
8.6: Back to Reaction Mechanisms
- Page ID
- 357482

\( \newcommand{\vecs}[1]{\overset { \scriptstyle \rightharpoonup} {\mathbf{#1}} } \)
\( \newcommand{\vecd}[1]{\overset{-\!-\!\rightharpoonup}{\vphantom{a}\smash {#1}}} \)
\( \newcommand{\id}{\mathrm{id}}\) \( \newcommand{\Span}{\mathrm{span}}\)
( \newcommand{\kernel}{\mathrm{null}\,}\) \( \newcommand{\range}{\mathrm{range}\,}\)
\( \newcommand{\RealPart}{\mathrm{Re}}\) \( \newcommand{\ImaginaryPart}{\mathrm{Im}}\)
\( \newcommand{\Argument}{\mathrm{Arg}}\) \( \newcommand{\norm}[1]{\| #1 \|}\)
\( \newcommand{\inner}[2]{\langle #1, #2 \rangle}\)
\( \newcommand{\Span}{\mathrm{span}}\)
\( \newcommand{\id}{\mathrm{id}}\)
\( \newcommand{\Span}{\mathrm{span}}\)
\( \newcommand{\kernel}{\mathrm{null}\,}\)
\( \newcommand{\range}{\mathrm{range}\,}\)
\( \newcommand{\RealPart}{\mathrm{Re}}\)
\( \newcommand{\ImaginaryPart}{\mathrm{Im}}\)
\( \newcommand{\Argument}{\mathrm{Arg}}\)
\( \newcommand{\norm}[1]{\| #1 \|}\)
\( \newcommand{\inner}[2]{\langle #1, #2 \rangle}\)
\( \newcommand{\Span}{\mathrm{span}}\) \( \newcommand{\AA}{\unicode[.8,0]{x212B}}\)
\( \newcommand{\vectorA}[1]{\vec{#1}} % arrow\)
\( \newcommand{\vectorAt}[1]{\vec{\text{#1}}} % arrow\)
\( \newcommand{\vectorB}[1]{\overset { \scriptstyle \rightharpoonup} {\mathbf{#1}} } \)
\( \newcommand{\vectorC}[1]{\textbf{#1}} \)
\( \newcommand{\vectorD}[1]{\overrightarrow{#1}} \)
\( \newcommand{\vectorDt}[1]{\overrightarrow{\text{#1}}} \)
\( \newcommand{\vectE}[1]{\overset{-\!-\!\rightharpoonup}{\vphantom{a}\smash{\mathbf {#1}}}} \)
\( \newcommand{\vecs}[1]{\overset { \scriptstyle \rightharpoonup} {\mathbf{#1}} } \)
\( \newcommand{\vecd}[1]{\overset{-\!-\!\rightharpoonup}{\vphantom{a}\smash {#1}}} \)

Recall that one of the most important reasons for studying reaction kinetics is to get information about the reaction pathway, or mechanism. Now that we have all the concepts we need to understand these ideas, let us go back and see how to put it all together. The rate equation, along with the equilibrium constant, is the key to unraveling what happens during a reaction.
We have seen that, at a given temperature, the reaction rate depends on the magnitude of the rate constant and the concentrations of one or more of the reactants. However, for the two seemingly similar substitution reactions we discussed earlier, the rate equations are different. What is going on here? The answer lies in the fact that most reactions do not occur in one step. In many cases, there is not a smooth transition from reactants to products with a single transition state and activation energy, as we have simplistically portrayed it. Rather, there are a series of steps, each with their own transition state and activation energy. Here, we will only consider one-step and two-step reactions, but in reality there could be many distinct steps from reactant to product. Each step represents a kind of sub-reaction, each with its own activation energy and equilibrium state. The kinetics of a reaction is generally determined by the slowest of these sub-reactions, whereby a kind of bottleneck or rate-limiting step is formed. The rate equation gives us information about what reactants are present in the rate-determining step of the reaction. The reaction can only go as fast as the slowest step (the step with the highest activation energy barrier). As an analogy, imagine you are traveling at \(70 \mathrm{~mph}\) on a five-lane highway. If the lanes suddenly narrow to allow only one lane of traffic, all the cars slow down. Although they are capable of traveling faster, no one can get past the slowest cars.
The reaction we discussed earlier between methyl bromide (\(\mathrm{CH}_{3}\mathrm{Br}\)) and hydroxide (\({}^{-}\mathrm{OH}\)): \[\mathrm{CH}_{3} \mathrm{Br}+{ }^{-} \mathrm{OH}+\mathrm{Na}^{+} \rightleftarrows \mathrm{CH}_{3} \mathrm{OH}+\mathrm{Br}^{-}+\mathrm{Na}^{+}\]
has been shown experimentally to have the rate equation: \(\text{ rate } = k \left[\mathrm{CH}_{3}\mathrm{Br}\right] \left[{}^{-}\mathrm{OH}\right]\)
What this tells us that the rate of this reaction depends on both reactants. This means that whatever the mechanism of the reaction, both reactants must be present in the transition state (the species at the highest energy on the energy profile) that determines the rate of reaction. From this information we might begin to think about what the pathway for the reaction might be. It turns out that the simplest possibility is actually the correct – which is that the reaction takes place in one step, as shown in the figure. that is the hydroxide (the nucleophile) is attracted to the carbon, and at the same time the carbon bromine bond is broken. that is the reaction take place in one step that involves both the hydroxide and the methyl bromide.

We can imagine what the structure of the transition state might look like (although we cannot detect it by any traditional methods because transition states only exist for one molecular vibration and are very difficult to detect). The nucleophile (\({}^{-}\mathrm{OH}\)) is attracted to the \(\delta +\) on the methyl carbon. At the same time, the bromide ion starts to leave, so that at the “top” of the transition state (the most unstable point, requiring the most energy to form), we have a carbon that is coordinated to five other atoms by partial or full bonds. Given that carbon normally makes four bonds, it is no wonder that this pentavalent species sits at the reaction’s highest energy point.
However, if we analyze what appears to be a very similar reaction: \[\left(\mathrm{CH}_{3}\right)_{3} \mathrm{CBr}+{}^{-}\mathrm{OH} \rightleftarrows \left(\mathrm{CH}_{3}\right)_{3} \mathrm{COH}+\mathrm{Br} .\]

We must come to the conclusion that it has a different mechanism. Why? Because the rate equation for this reaction is first order: \(\text{ rate } = k \left[\left(\mathrm{CH}_{3}\right)_{3} \mathrm{CBr}\right]\). This tells us that only \(\left(\mathrm{CH}_{3}\right)_{3} \mathrm{CBr}\) is involved in the step that determines the rate. In other words, the transition state with the largest activation energy involves only the t-butyl bromide molecule. There is no nucleophile (the hydroxide) present during the step that determines how fast the reaction goes.
While there are a number of possible mechanism that we could postulate for this reaction, the mechanism for this reaction involves two discrete steps, as shown in the figure.
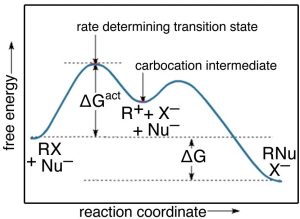
The first is the ionization of the t-butyl bromide, which involves breaking the \(\mathrm{C—Br}\) bond. This results in a positively-charged carbon (the bromine takes all the electrons and becomes bromide ion)—a very unstable and distinct species known as a carbocation. The resulting carbocation is an intermediate: it sits in an energy well between two less stable states. This distinguishes it from the transition state, which precariously sits at the highest local energy state (surrounded by lower energy states). Intermediates lie in energy “valleys”, while transition states are at the summit of an energy “hill”, as shown in the figure. The carbocation can react with the hydroxide, to form the t-butyl alcohol, or it can react with the bromide to reform the original product (or a variety of other side reactions can occur). The important point here is that we can deduce how the reaction will proceed from the rate equation for each reaction.
Questions to Answer
- Draw a reaction energy diagram for a two-step reaction in which the second (or first) step is rate determining.
- What is the rate equation for a reaction which occurs in the following steps:
- \(A + B \rightarrow C\) (fast)?
- \(A + C \rightarrow D\) (slow)?
- Explain why it is not possible to write a rate equation from the reaction equation.
In this chapter we have explored how the fate of reactions is determined by a variety of factors, including the concentrations of reactants and products, the temperature, and the Gibbs energy change. We have learned that we can make a reaction go backward, forward, faster, or slower by examining the nature of the reaction and the conditions under which it is performed. You can now extend these principles to imagine how we might control reactions to do what we want, rather than let nature (or entropy) take its course. In the next chapter, we will take this one step further to see what happens when reactions are removed from isolation and allowed to interact with each other.