
3.3: Lewis (Dot) Representation
- Page ID
- 369183
\( \newcommand{\vecs}[1]{\overset { \scriptstyle \rightharpoonup} {\mathbf{#1}} } \)
\( \newcommand{\vecd}[1]{\overset{-\!-\!\rightharpoonup}{\vphantom{a}\smash {#1}}} \)
\( \newcommand{\id}{\mathrm{id}}\) \( \newcommand{\Span}{\mathrm{span}}\)
( \newcommand{\kernel}{\mathrm{null}\,}\) \( \newcommand{\range}{\mathrm{range}\,}\)
\( \newcommand{\RealPart}{\mathrm{Re}}\) \( \newcommand{\ImaginaryPart}{\mathrm{Im}}\)
\( \newcommand{\Argument}{\mathrm{Arg}}\) \( \newcommand{\norm}[1]{\| #1 \|}\)
\( \newcommand{\inner}[2]{\langle #1, #2 \rangle}\)
\( \newcommand{\Span}{\mathrm{span}}\)
\( \newcommand{\id}{\mathrm{id}}\)
\( \newcommand{\Span}{\mathrm{span}}\)
\( \newcommand{\kernel}{\mathrm{null}\,}\)
\( \newcommand{\range}{\mathrm{range}\,}\)
\( \newcommand{\RealPart}{\mathrm{Re}}\)
\( \newcommand{\ImaginaryPart}{\mathrm{Im}}\)
\( \newcommand{\Argument}{\mathrm{Arg}}\)
\( \newcommand{\norm}[1]{\| #1 \|}\)
\( \newcommand{\inner}[2]{\langle #1, #2 \rangle}\)
\( \newcommand{\Span}{\mathrm{span}}\) \( \newcommand{\AA}{\unicode[.8,0]{x212B}}\)
\( \newcommand{\vectorA}[1]{\vec{#1}} % arrow\)
\( \newcommand{\vectorAt}[1]{\vec{\text{#1}}} % arrow\)
\( \newcommand{\vectorB}[1]{\overset { \scriptstyle \rightharpoonup} {\mathbf{#1}} } \)
\( \newcommand{\vectorC}[1]{\textbf{#1}} \)
\( \newcommand{\vectorD}[1]{\overrightarrow{#1}} \)
\( \newcommand{\vectorDt}[1]{\overrightarrow{\text{#1}}} \)
\( \newcommand{\vectE}[1]{\overset{-\!-\!\rightharpoonup}{\vphantom{a}\smash{\mathbf {#1}}}} \)
\( \newcommand{\vecs}[1]{\overset { \scriptstyle \rightharpoonup} {\mathbf{#1}} } \)
\( \newcommand{\vecd}[1]{\overset{-\!-\!\rightharpoonup}{\vphantom{a}\smash {#1}}} \)
\(\newcommand{\avec}{\mathbf a}\) \(\newcommand{\bvec}{\mathbf b}\) \(\newcommand{\cvec}{\mathbf c}\) \(\newcommand{\dvec}{\mathbf d}\) \(\newcommand{\dtil}{\widetilde{\mathbf d}}\) \(\newcommand{\evec}{\mathbf e}\) \(\newcommand{\fvec}{\mathbf f}\) \(\newcommand{\nvec}{\mathbf n}\) \(\newcommand{\pvec}{\mathbf p}\) \(\newcommand{\qvec}{\mathbf q}\) \(\newcommand{\svec}{\mathbf s}\) \(\newcommand{\tvec}{\mathbf t}\) \(\newcommand{\uvec}{\mathbf u}\) \(\newcommand{\vvec}{\mathbf v}\) \(\newcommand{\wvec}{\mathbf w}\) \(\newcommand{\xvec}{\mathbf x}\) \(\newcommand{\yvec}{\mathbf y}\) \(\newcommand{\zvec}{\mathbf z}\) \(\newcommand{\rvec}{\mathbf r}\) \(\newcommand{\mvec}{\mathbf m}\) \(\newcommand{\zerovec}{\mathbf 0}\) \(\newcommand{\onevec}{\mathbf 1}\) \(\newcommand{\real}{\mathbb R}\) \(\newcommand{\twovec}[2]{\left[\begin{array}{r}#1 \\ #2 \end{array}\right]}\) \(\newcommand{\ctwovec}[2]{\left[\begin{array}{c}#1 \\ #2 \end{array}\right]}\) \(\newcommand{\threevec}[3]{\left[\begin{array}{r}#1 \\ #2 \\ #3 \end{array}\right]}\) \(\newcommand{\cthreevec}[3]{\left[\begin{array}{c}#1 \\ #2 \\ #3 \end{array}\right]}\) \(\newcommand{\fourvec}[4]{\left[\begin{array}{r}#1 \\ #2 \\ #3 \\ #4 \end{array}\right]}\) \(\newcommand{\cfourvec}[4]{\left[\begin{array}{c}#1 \\ #2 \\ #3 \\ #4 \end{array}\right]}\) \(\newcommand{\fivevec}[5]{\left[\begin{array}{r}#1 \\ #2 \\ #3 \\ #4 \\ #5 \\ \end{array}\right]}\) \(\newcommand{\cfivevec}[5]{\left[\begin{array}{c}#1 \\ #2 \\ #3 \\ #4 \\ #5 \\ \end{array}\right]}\) \(\newcommand{\mattwo}[4]{\left[\begin{array}{rr}#1 \amp #2 \\ #3 \amp #4 \\ \end{array}\right]}\) \(\newcommand{\laspan}[1]{\text{Span}\{#1\}}\) \(\newcommand{\bcal}{\cal B}\) \(\newcommand{\ccal}{\cal C}\) \(\newcommand{\scal}{\cal S}\) \(\newcommand{\wcal}{\cal W}\) \(\newcommand{\ecal}{\cal E}\) \(\newcommand{\coords}[2]{\left\{#1\right\}_{#2}}\) \(\newcommand{\gray}[1]{\color{gray}{#1}}\) \(\newcommand{\lgray}[1]{\color{lightgray}{#1}}\) \(\newcommand{\rank}{\operatorname{rank}}\) \(\newcommand{\row}{\text{Row}}\) \(\newcommand{\col}{\text{Col}}\) \(\renewcommand{\row}{\text{Row}}\) \(\newcommand{\nul}{\text{Nul}}\) \(\newcommand{\var}{\text{Var}}\) \(\newcommand{\corr}{\text{corr}}\) \(\newcommand{\len}[1]{\left|#1\right|}\) \(\newcommand{\bbar}{\overline{\bvec}}\) \(\newcommand{\bhat}{\widehat{\bvec}}\) \(\newcommand{\bperp}{\bvec^\perp}\) \(\newcommand{\xhat}{\widehat{\xvec}}\) \(\newcommand{\vhat}{\widehat{\vvec}}\) \(\newcommand{\uhat}{\widehat{\uvec}}\) \(\newcommand{\what}{\widehat{\wvec}}\) \(\newcommand{\Sighat}{\widehat{\Sigma}}\) \(\newcommand{\lt}{<}\) \(\newcommand{\gt}{>}\) \(\newcommand{\amp}{&}\) \(\definecolor{fillinmathshade}{gray}{0.9}\)Chemical bonding is one of the most basic fundamentals of chemistry that explains other concepts such as molecules and reactions. Without it, scientists wouldn't be able to explain why atoms are attracted to each other or how products are formed after a chemical reaction. To understand the concept of bonding, one must first know the basics behind atomic structure.
Introduction
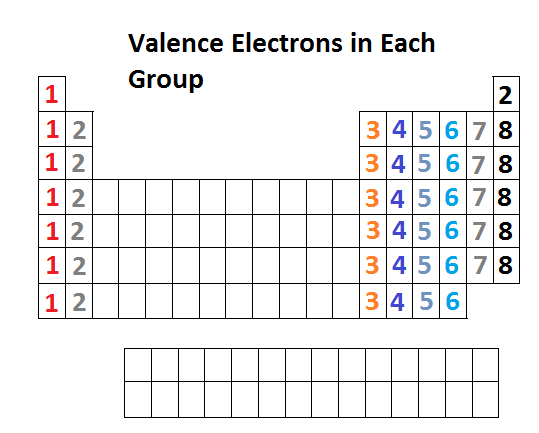
For atoms in groups A on the periodic table, we are going to match the number of valance electrons with the roman numeral of the groups A. For example, Hydrogen (H) belongs to Group IA, which means H has 1 valence electron, then, Oxygen (O) belongs to Group VIA, which means O has 6 valence electrons. This easy way to know the number of valence electrons works only for Group A.
Octet Rule
Lewis Diagrams
Lewis diagrams are graphical representations of elements and their valence electrons. Valance electrons are the electrons that form the outermost shell of an atom. In a Lewis diagram of an element, the symbol of the element is written in the center and the valence electrons are drawn around it as dots. The position of the valence electrons drawn is unimportant. However, the general convention is to start from 12o'clock position and go clockwise direction to 3 o'clock, 6 o'clock, 9 o'clock, and back to 12 o'clock positions respectively. Generally the Roman numeral of the group corresponds with the number of valance electrons of the element.
Below is the periodic table representation of the number of valance electrons. The alkali metals of Group IA have one valance electron, the alkaline-earth metals of Group IIA have 2 valance electrons, Group IIIA has 3 valance electrons, and so on. The nonindicated transition metals, lanthanoids, and actinoids are more difficult in terms of distinguishing the number of valance electrons they have; however, this section only introduces bonding, hence they will not be covered in this unit.
Ionic Bonding
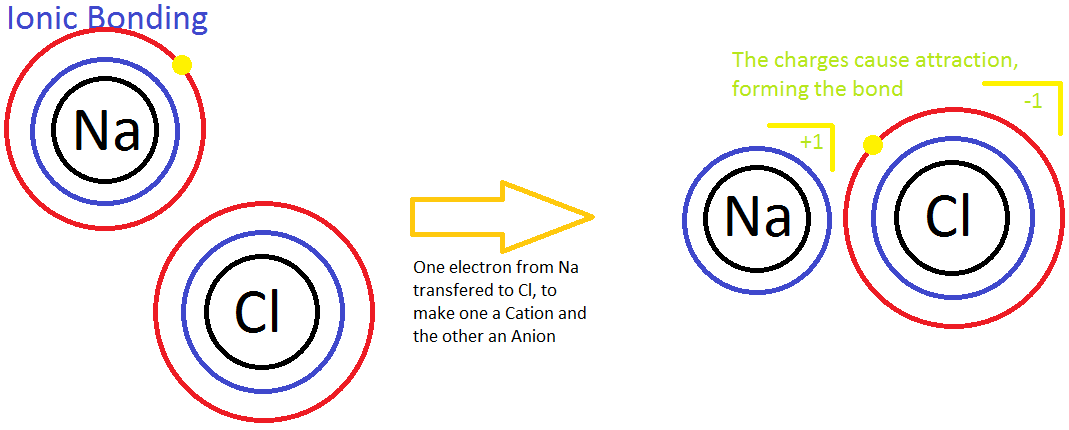
Ionic bonding is the process of not sharing electrons between two atoms. It occurs between a nonmetal and a metal. Ionic bonding is also known as the process in which electrons are "transferred" to one another because the two atoms have different levels of electron affinity. In the picture below, a sodium (Na) ion and a chlorine (Cl) ion are being combined through ionic bonding. Na+ has less electronegativity due to a large atomic radius and essentially does not want the electron it has. This will easily allow the more electronegative chlorine atom to gain the electron to complete its 3rd energy level. Throughout this process, the transfer of the electron releases energy to the atmosphere.

Another example of ionic bonding is the crystal lattice structure shown above. The ions are arranged in such a way that shows unifomity and stablity; a physical characteristic in crystals and solids. Moreover, in a concept called "the sea of electrons," it is seen that the molecular structure of metals is composed of stabilized positive ions (cations) and "free-flowing" electrons that weave in-between the cations. This attributes to the metal property of conductivity; the flowing electrons allow the electric current to pass through them. In addition, this explains why strong electrolytes are good conductors. Ionic bonds are easily broken by water because the polarity of the water molecules shield the anions from attracting the cations. Therefore, the ionic compounds dissociate easily in water, and the metallic properties of the compound allow conductivity of the solution.
Covalent Bonding
Covalent bonding is the process of sharing of electrons between two atoms. The bonds are typically between a nonmetal and a nonmetal. Since their electronegativities are all within the high range, the electrons are attracted and pulled by both atom's nuceli. In the case of two identical atoms that are bonded to each other (also known as a nonpolar bond, explained later below), they both emit the same force of pull on the electrons, thus there is equal attraction between the two atoms (i.e. oxygen gas, or O2, have an equal distribution of electron affinity. This makes covalent bonds harder to break.

There are three types of covalent bonds: single, double, and triple bonds. A single bond is composed of 2 bonded electrons. Naturally, a double bond has 4 electrons, and a triple bond has 6 bonded electrons. Because a triple bond will have more strength in electron affinity than a single bond, the attraction to the positively charged nucleus is increased, meaning that the distance from the nucleus to the electrons is less. Simply put, the more bonds or the greater the bond strength, the shorter the bond length will be. In other words:
Bond length: triple bond < double bond < single bond
Summary
The covalent bond is formed when two atoms are able to share electrons:

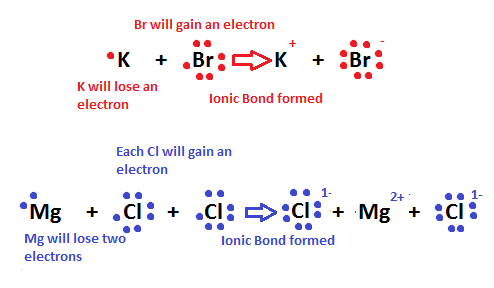
whereas the ionic bond is formed when the "sharing" is so unequal that an electron from atom A is completely lost to atom B, resulting in a pair of ions:

The two extremes of electron sharing represented by the covalent and ionic models appear to be generally consistent with the observed properties of molecular and ionic solids and liquids.
Contributors and Attributions
- Sol Puenzo (Cañada College)
Stephen Lower, Professor Emeritus (Simon Fraser U.) Chem1 Virtual Textbook