
1.8: RFID cards
- Page ID
- 212104

\( \newcommand{\vecs}[1]{\overset { \scriptstyle \rightharpoonup} {\mathbf{#1}} } \)
\( \newcommand{\vecd}[1]{\overset{-\!-\!\rightharpoonup}{\vphantom{a}\smash {#1}}} \)
\( \newcommand{\dsum}{\displaystyle\sum\limits} \)
\( \newcommand{\dint}{\displaystyle\int\limits} \)
\( \newcommand{\dlim}{\displaystyle\lim\limits} \)
\( \newcommand{\id}{\mathrm{id}}\) \( \newcommand{\Span}{\mathrm{span}}\)
( \newcommand{\kernel}{\mathrm{null}\,}\) \( \newcommand{\range}{\mathrm{range}\,}\)
\( \newcommand{\RealPart}{\mathrm{Re}}\) \( \newcommand{\ImaginaryPart}{\mathrm{Im}}\)
\( \newcommand{\Argument}{\mathrm{Arg}}\) \( \newcommand{\norm}[1]{\| #1 \|}\)
\( \newcommand{\inner}[2]{\langle #1, #2 \rangle}\)
\( \newcommand{\Span}{\mathrm{span}}\)
\( \newcommand{\id}{\mathrm{id}}\)
\( \newcommand{\Span}{\mathrm{span}}\)
\( \newcommand{\kernel}{\mathrm{null}\,}\)
\( \newcommand{\range}{\mathrm{range}\,}\)
\( \newcommand{\RealPart}{\mathrm{Re}}\)
\( \newcommand{\ImaginaryPart}{\mathrm{Im}}\)
\( \newcommand{\Argument}{\mathrm{Arg}}\)
\( \newcommand{\norm}[1]{\| #1 \|}\)
\( \newcommand{\inner}[2]{\langle #1, #2 \rangle}\)
\( \newcommand{\Span}{\mathrm{span}}\) \( \newcommand{\AA}{\unicode[.8,0]{x212B}}\)
\( \newcommand{\vectorA}[1]{\vec{#1}} % arrow\)
\( \newcommand{\vectorAt}[1]{\vec{\text{#1}}} % arrow\)
\( \newcommand{\vectorB}[1]{\overset { \scriptstyle \rightharpoonup} {\mathbf{#1}} } \)
\( \newcommand{\vectorC}[1]{\textbf{#1}} \)
\( \newcommand{\vectorD}[1]{\overrightarrow{#1}} \)
\( \newcommand{\vectorDt}[1]{\overrightarrow{\text{#1}}} \)
\( \newcommand{\vectE}[1]{\overset{-\!-\!\rightharpoonup}{\vphantom{a}\smash{\mathbf {#1}}}} \)
\( \newcommand{\vecs}[1]{\overset { \scriptstyle \rightharpoonup} {\mathbf{#1}} } \)
\(\newcommand{\longvect}{\overrightarrow}\)
\( \newcommand{\vecd}[1]{\overset{-\!-\!\rightharpoonup}{\vphantom{a}\smash {#1}}} \)
\(\newcommand{\avec}{\mathbf a}\) \(\newcommand{\bvec}{\mathbf b}\) \(\newcommand{\cvec}{\mathbf c}\) \(\newcommand{\dvec}{\mathbf d}\) \(\newcommand{\dtil}{\widetilde{\mathbf d}}\) \(\newcommand{\evec}{\mathbf e}\) \(\newcommand{\fvec}{\mathbf f}\) \(\newcommand{\nvec}{\mathbf n}\) \(\newcommand{\pvec}{\mathbf p}\) \(\newcommand{\qvec}{\mathbf q}\) \(\newcommand{\svec}{\mathbf s}\) \(\newcommand{\tvec}{\mathbf t}\) \(\newcommand{\uvec}{\mathbf u}\) \(\newcommand{\vvec}{\mathbf v}\) \(\newcommand{\wvec}{\mathbf w}\) \(\newcommand{\xvec}{\mathbf x}\) \(\newcommand{\yvec}{\mathbf y}\) \(\newcommand{\zvec}{\mathbf z}\) \(\newcommand{\rvec}{\mathbf r}\) \(\newcommand{\mvec}{\mathbf m}\) \(\newcommand{\zerovec}{\mathbf 0}\) \(\newcommand{\onevec}{\mathbf 1}\) \(\newcommand{\real}{\mathbb R}\) \(\newcommand{\twovec}[2]{\left[\begin{array}{r}#1 \\ #2 \end{array}\right]}\) \(\newcommand{\ctwovec}[2]{\left[\begin{array}{c}#1 \\ #2 \end{array}\right]}\) \(\newcommand{\threevec}[3]{\left[\begin{array}{r}#1 \\ #2 \\ #3 \end{array}\right]}\) \(\newcommand{\cthreevec}[3]{\left[\begin{array}{c}#1 \\ #2 \\ #3 \end{array}\right]}\) \(\newcommand{\fourvec}[4]{\left[\begin{array}{r}#1 \\ #2 \\ #3 \\ #4 \end{array}\right]}\) \(\newcommand{\cfourvec}[4]{\left[\begin{array}{c}#1 \\ #2 \\ #3 \\ #4 \end{array}\right]}\) \(\newcommand{\fivevec}[5]{\left[\begin{array}{r}#1 \\ #2 \\ #3 \\ #4 \\ #5 \\ \end{array}\right]}\) \(\newcommand{\cfivevec}[5]{\left[\begin{array}{c}#1 \\ #2 \\ #3 \\ #4 \\ #5 \\ \end{array}\right]}\) \(\newcommand{\mattwo}[4]{\left[\begin{array}{rr}#1 \amp #2 \\ #3 \amp #4 \\ \end{array}\right]}\) \(\newcommand{\laspan}[1]{\text{Span}\{#1\}}\) \(\newcommand{\bcal}{\cal B}\) \(\newcommand{\ccal}{\cal C}\) \(\newcommand{\scal}{\cal S}\) \(\newcommand{\wcal}{\cal W}\) \(\newcommand{\ecal}{\cal E}\) \(\newcommand{\coords}[2]{\left\{#1\right\}_{#2}}\) \(\newcommand{\gray}[1]{\color{gray}{#1}}\) \(\newcommand{\lgray}[1]{\color{lightgray}{#1}}\) \(\newcommand{\rank}{\operatorname{rank}}\) \(\newcommand{\row}{\text{Row}}\) \(\newcommand{\col}{\text{Col}}\) \(\renewcommand{\row}{\text{Row}}\) \(\newcommand{\nul}{\text{Nul}}\) \(\newcommand{\var}{\text{Var}}\) \(\newcommand{\corr}{\text{corr}}\) \(\newcommand{\len}[1]{\left|#1\right|}\) \(\newcommand{\bbar}{\overline{\bvec}}\) \(\newcommand{\bhat}{\widehat{\bvec}}\) \(\newcommand{\bperp}{\bvec^\perp}\) \(\newcommand{\xhat}{\widehat{\xvec}}\) \(\newcommand{\vhat}{\widehat{\vvec}}\) \(\newcommand{\uhat}{\widehat{\uvec}}\) \(\newcommand{\what}{\widehat{\wvec}}\) \(\newcommand{\Sighat}{\widehat{\Sigma}}\) \(\newcommand{\lt}{<}\) \(\newcommand{\gt}{>}\) \(\newcommand{\amp}{&}\) \(\definecolor{fillinmathshade}{gray}{0.9}\)hypothes.is tag:
Download Assignment:
Learning Objectives
Students will be able to:
Content:
- Explore radio-frequency identification (RFID)
- Read and write to RFID tags
- Control processes based on RFID
Process:
- Build an RFID reader circuit and install python modules
- Use python programming to read and write data to RFID cards
- Use If statements to control events with RFID cars
Prior Knowledge
- Python and IoT concepts from previous Activities
Further Reading
Task 1: View the following YouTube videos on RFID technology:
Entertaining:
The explanation of the technology:
Task 2: Build the RFID RC522 circuit
In this activity you will be using a circuit board based on the MFRD522 microcontroller. These units are available on Amazon for about $5 each depending on the vender. The microcontroller works by using a 13.56 MHz electromagnetic field to read and write data to an RFID tag. The circuit as shown in the following images, and connect seven of the 8 pins of the RFID reader to the following GPIO pins on the Raspberry Pi.
Starting from the left of the RFID board:
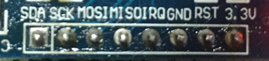
SDA connects to CE0 on your Adafruit cobbler (Board pin 24)
SCK connects to SCLK on your Adafruit cobbler (Board pin 23)
MOSI connects to MOSI on your Adafruit cobbler (Board pin 19)
MISO connects to MISO on your Adafruit cobbler (Board pin 21)
IRQ is not used, so skip this.
GND is connected to ground, which can be on your ground rail or any of the cobbler pins marked GND (Board Pin 6 or 39 for example)
RST connects to GPIO 25 on Adafruit cobbler (Board pin 22)
3.3V connects to your positive rail (or you can connect to Board pin 1)

Information: Serial Peripheral Interface/Interchange
To communicate with the circuit board we are going to be using the Serial Peripheral Interface (SPI) which allows transfer of data between the computer and the data collecting device. The computer is the “master” and the device is the “slave”. There are four separate connections to communicate with the device. These connections are:
- The serial clock (CLK) which synchronizes the signals between computer and device
- Master Input Slave Output (MISO) which is the data line from the device to computer
- Master Output Slave Input (MOSI) which is the data line from the computer to device
- Chip Enable (CE, or chip select CS, or slave select SS) which allows multiple devices to be connected, but we are connecting one. (You have CE0 and CE1 on your board)
For a video explanation, view this https://youtu.be/nMZJwspSkAc?t=5m41s You can watch the whole thing, but start here for SPI. There is an element14 ad at 7:14, but the narrative picks back up at 8:14 explaining with Arduino rather than Raspberry Pi. Then again at 15:13 he talks about Raspberry Pi. Skip around as needed.
Task 3: Prepare your Raspberry Pi to use SPI and get appropriate library for the circuit board
To be able to use SPI as a protocol on your raspberry pi, you need to make sure SPI is enabled in your Raspberry Pi configuration. Open the configuration by clicking on preferences and choose Raspberry Pi configuration:
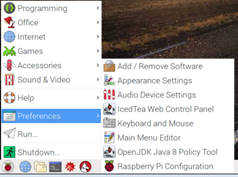
Go to the interfaces tab, and make sure that SPI is enabled. If it has not been enabled, enable it and you will have to reboot. If it has been enabled already, then you are already set.
 Figure \(\PageIndex{5}\): Enable SPI
To test that you have SPI enabled, type the following command in a terminal window to see if spi_bcm2835 is listed:
lsmod | grep spi
If it is listed, you are ready to proceed.
 Figure \(\PageIndex{6}\): Test to make sure SPI is enabled
If it is not listed: Follow steps 6, 7 and 8 on the following webpage: https://pimylifeup.com/raspberry-pi-rfid-rc522/
Before you get the RFID RC522 library, type the following commands in at your terminal to make sure you are running the latest versions of all software.
sudo apt-get update
sudo apt-get upgrade
Next, we will clone the Python SPI PY library so that we have the source code for running SPI. To do so, type the following two commands in a terminal window. The first command puts you in your home directory, and the second gets the library and puts it in a directory in your home directory called SPI-Py:
cd ~
git clone https://github.com/lthiery/SPI-Py.git
Next, we need to install the library. To do so, type the following two commands in a terminal window. The first command takes you to the appropriate directory, and the second installs the library so that we can use it with our Python3 interpreter. (Note that the Raspberry Pi has both Python2 and Python3 but we are using the newer Python3 language):
cd ~/SPI-Py
sudo python3 setup.py install
Now that we have the SPI library, we will clone the RFID RC522 Python code. To do so, type the following two commands in a terminal window:
cd ~
git clone https://github.com/pimylifeup/MFRC522-python.git
You should now have a directory called MFRC522-python that has the library for using the card reader. To confirm this, in a terminal window, type
ls
and you will have a list of all folders and files in your current directory. You should see MFRC522-python in that directory. You can also go into that directory by typing
cd MFRC522-python
and you can see what is in that directory by typing
ls
 Figure \(\PageIndex{7}\): Directory contents
Task 4: Read your first RFID card
For this task, enter and execute the following program with your Thonny IDE on your Raspberry Pi. Save this file with IoT_07_read.py as the filename (we will be using this file again soon!) For this program to work you must save it to the MFRC522-python indicated in the previous task as it references the SimpleMFRC522.py program.
| Python Program 1 |
|---|
import RPi.GPIO as GPIO
import SimpleMFRC522

reader = SimpleMFRC522.SimpleMFRC522()
read = True
try:
        while read:
            serial, text = reader.read()
            print(serial)
            print(text)
            read=False
finally:        GPIO.cleanup()
|
Critical Thinking Questions:
1. Does the serial number printed on the card match the one reported by the program?
2. What kind of information can be stored on your RFID card?
3. How does this python program use another python program when running?
4. What happens to the execution of the program if you change line 11 to the following value? read=True
Task 5: Write your first RFID card
For this task, enter and execute the following program with your Thonny IDE on your Raspberry Pi. Save this file with IoT_07_write.py as the filename. For this program to work you must save it to the MFRC522-python indicated in the previous task as it references the SimpleMFRC522.py and MFRC522 program.
| Python Program 2 |
|---|
import RPi.GPIO as GPIO
import SimpleMFRC522

reader = SimpleMFRC522.SimpleMFRC522()
try:
        text = input("Type new data you want written to the card: ")
        print("Now place your tag to write")
        reader.write(text)
        print("Check screen for messages, if no messages, write was successful")
finally:        GPIO.cleanup()
|
5. Using python program 1 in the previous task, check to see if your new data was written to the card.
6. Through trial and error, determine how many and what types of characters you can save to your card.
7. In the above program, when prompted for input, type the following line:
cyclohexane,C6H12, 84.162,colorless,flammable
Using your read program, make sure the card wrote the data. Does is matter if you have commas in your text? Can you think of a way this might be beneficial?
Task 6: Working with data stored on a card
For this task, enter and execute the following program with your Thonny IDE on your Raspberry Pi. Use the card and data you were asked to write in question Save this file with IoT_07_Task6.py as the filename. For this program to work you must save it to the MFRC522-python indicated in the previous task as it references the SimpleMFRC522.py and MFRC522 program.
| Python Program 3 |
|---|
import RPi.GPIO as GPIO
import SimpleMFRC522

reader = SimpleMFRC522.SimpleMFRC522()
read = True
try:
        while read:
            serial, text = reader.read()
            print(serial)
            print(text)
            cardData= text.split(",")
            print(cardData)
            read=False
finally:        GPIO.cleanup()
|
8. What line of code above allows you to take a variable with commas and convert it to list values?
9. How is the output of print(text) different from print(cardData)?
Task 7: Enter and execute the following program using the RFID card that has the cyclohexane data stored on it. Before running the program, predict the output you should get on screen.
| Python Program 4 |
|---|
import RPi.GPIO as GPIO
import SimpleMFRC522

reader = SimpleMFRC522.SimpleMFRC522()
read = True
try:
        while read:
            serial, text = reader.read()
            print(serial)
            print(text)
            cardData= text.split(",")
            print(cardData)

            read=False
finally:
        GPIO.cleanup()

for item in cardData:
    print(item)

if cardData[0] == 'cyclohexane':
    print("This substance is cyclohexane")
else:
    print("This substance is NOT cyclohexane")

if cardData[3] == 'colorless':
    print("this substance is colorless")
else:
    print("This substance is NOT colorless")

if cardData[4]== 'flammable':
    print("this substance is flammable")
else:    print("This substance is NOT flammable")
|
10. How does the program output compare to your predicted output? What is the problem with the data stored in cardData[4]?
11. Change line 31 in the code of python program 4 to read:
if cardData[4]== 'flammable ':
(Note: there should be four spaces after the e in flammable)
What does this do to the output?
Task 8: Enter and execute the following program using the RFID card that has the cyclohexane data stored on it.
| Python Program 5 |
|---|
import RPi.GPIO as GPIO
import SimpleMFRC522

reader = SimpleMFRC522.SimpleMFRC522()
read = True
try:
        while read:
            serial, text = reader.read()
            print(serial)
            print(text)
            cardData = text.split(",")

            read = False
finally:
        GPIO.cleanup()

print(cardData)
newData = []

for item in cardData:
    newData.extend(item.split())

print(newData)

if newData[4] == 'flammable    ':
    print("newData[4] is flammable with four spaces")
elif newData[4] == 'flammable':
    print("newData[4] is flammable with no spaces")
else:    print("newData[4] is something else")
|
12. Next to each line above, write what the program does.
13. How does this program solve the problem you had before with the spaces after flammable?
Information: Issues with this “library”
The files we need to include are not installed as a library, but as two python programs that must be in the same directory as we are working in. For this card reader to work we are always going to need to have access to SimpleMFRC522.py and MFRC522.py programs. This library is not included in the system path, so every program that we write that addresses this library will need to be able to access it. There are three ways of doing this:
- Super Easy way- write every new python program that requires SimpleMFRC522.py in the MFRC522-python directory you just created.
- Somewhat Easy way- Place a copy of SimpleMFRC522.py into any directory that you are using for writing your python programs. For example, you might have a folder called python_programs that you set up before and copy it into there. The easiest way is to copy them is to use the file manager.
- Hard way, but gives you most flexibility. Add the following code to any program you write regardless of where you store it as long as you always have SimpleMFRC522.py in its original directory:
import sys
sys.path.insert(0, '/home/pi/MFRC522-python/')
import SimpleMFRC522
import RPi.GPIO as GPIO
reader = SimpleMFRC522.SimpleMFRC522()