
1.3: The Internet of Things
- Page ID
- 207050

\( \newcommand{\vecs}[1]{\overset { \scriptstyle \rightharpoonup} {\mathbf{#1}} } \)
\( \newcommand{\vecd}[1]{\overset{-\!-\!\rightharpoonup}{\vphantom{a}\smash {#1}}} \)
\( \newcommand{\dsum}{\displaystyle\sum\limits} \)
\( \newcommand{\dint}{\displaystyle\int\limits} \)
\( \newcommand{\dlim}{\displaystyle\lim\limits} \)
\( \newcommand{\id}{\mathrm{id}}\) \( \newcommand{\Span}{\mathrm{span}}\)
( \newcommand{\kernel}{\mathrm{null}\,}\) \( \newcommand{\range}{\mathrm{range}\,}\)
\( \newcommand{\RealPart}{\mathrm{Re}}\) \( \newcommand{\ImaginaryPart}{\mathrm{Im}}\)
\( \newcommand{\Argument}{\mathrm{Arg}}\) \( \newcommand{\norm}[1]{\| #1 \|}\)
\( \newcommand{\inner}[2]{\langle #1, #2 \rangle}\)
\( \newcommand{\Span}{\mathrm{span}}\)
\( \newcommand{\id}{\mathrm{id}}\)
\( \newcommand{\Span}{\mathrm{span}}\)
\( \newcommand{\kernel}{\mathrm{null}\,}\)
\( \newcommand{\range}{\mathrm{range}\,}\)
\( \newcommand{\RealPart}{\mathrm{Re}}\)
\( \newcommand{\ImaginaryPart}{\mathrm{Im}}\)
\( \newcommand{\Argument}{\mathrm{Arg}}\)
\( \newcommand{\norm}[1]{\| #1 \|}\)
\( \newcommand{\inner}[2]{\langle #1, #2 \rangle}\)
\( \newcommand{\Span}{\mathrm{span}}\) \( \newcommand{\AA}{\unicode[.8,0]{x212B}}\)
\( \newcommand{\vectorA}[1]{\vec{#1}} % arrow\)
\( \newcommand{\vectorAt}[1]{\vec{\text{#1}}} % arrow\)
\( \newcommand{\vectorB}[1]{\overset { \scriptstyle \rightharpoonup} {\mathbf{#1}} } \)
\( \newcommand{\vectorC}[1]{\textbf{#1}} \)
\( \newcommand{\vectorD}[1]{\overrightarrow{#1}} \)
\( \newcommand{\vectorDt}[1]{\overrightarrow{\text{#1}}} \)
\( \newcommand{\vectE}[1]{\overset{-\!-\!\rightharpoonup}{\vphantom{a}\smash{\mathbf {#1}}}} \)
\( \newcommand{\vecs}[1]{\overset { \scriptstyle \rightharpoonup} {\mathbf{#1}} } \)
\(\newcommand{\longvect}{\overrightarrow}\)
\( \newcommand{\vecd}[1]{\overset{-\!-\!\rightharpoonup}{\vphantom{a}\smash {#1}}} \)
\(\newcommand{\avec}{\mathbf a}\) \(\newcommand{\bvec}{\mathbf b}\) \(\newcommand{\cvec}{\mathbf c}\) \(\newcommand{\dvec}{\mathbf d}\) \(\newcommand{\dtil}{\widetilde{\mathbf d}}\) \(\newcommand{\evec}{\mathbf e}\) \(\newcommand{\fvec}{\mathbf f}\) \(\newcommand{\nvec}{\mathbf n}\) \(\newcommand{\pvec}{\mathbf p}\) \(\newcommand{\qvec}{\mathbf q}\) \(\newcommand{\svec}{\mathbf s}\) \(\newcommand{\tvec}{\mathbf t}\) \(\newcommand{\uvec}{\mathbf u}\) \(\newcommand{\vvec}{\mathbf v}\) \(\newcommand{\wvec}{\mathbf w}\) \(\newcommand{\xvec}{\mathbf x}\) \(\newcommand{\yvec}{\mathbf y}\) \(\newcommand{\zvec}{\mathbf z}\) \(\newcommand{\rvec}{\mathbf r}\) \(\newcommand{\mvec}{\mathbf m}\) \(\newcommand{\zerovec}{\mathbf 0}\) \(\newcommand{\onevec}{\mathbf 1}\) \(\newcommand{\real}{\mathbb R}\) \(\newcommand{\twovec}[2]{\left[\begin{array}{r}#1 \\ #2 \end{array}\right]}\) \(\newcommand{\ctwovec}[2]{\left[\begin{array}{c}#1 \\ #2 \end{array}\right]}\) \(\newcommand{\threevec}[3]{\left[\begin{array}{r}#1 \\ #2 \\ #3 \end{array}\right]}\) \(\newcommand{\cthreevec}[3]{\left[\begin{array}{c}#1 \\ #2 \\ #3 \end{array}\right]}\) \(\newcommand{\fourvec}[4]{\left[\begin{array}{r}#1 \\ #2 \\ #3 \\ #4 \end{array}\right]}\) \(\newcommand{\cfourvec}[4]{\left[\begin{array}{c}#1 \\ #2 \\ #3 \\ #4 \end{array}\right]}\) \(\newcommand{\fivevec}[5]{\left[\begin{array}{r}#1 \\ #2 \\ #3 \\ #4 \\ #5 \\ \end{array}\right]}\) \(\newcommand{\cfivevec}[5]{\left[\begin{array}{c}#1 \\ #2 \\ #3 \\ #4 \\ #5 \\ \end{array}\right]}\) \(\newcommand{\mattwo}[4]{\left[\begin{array}{rr}#1 \amp #2 \\ #3 \amp #4 \\ \end{array}\right]}\) \(\newcommand{\laspan}[1]{\text{Span}\{#1\}}\) \(\newcommand{\bcal}{\cal B}\) \(\newcommand{\ccal}{\cal C}\) \(\newcommand{\scal}{\cal S}\) \(\newcommand{\wcal}{\cal W}\) \(\newcommand{\ecal}{\cal E}\) \(\newcommand{\coords}[2]{\left\{#1\right\}_{#2}}\) \(\newcommand{\gray}[1]{\color{gray}{#1}}\) \(\newcommand{\lgray}[1]{\color{lightgray}{#1}}\) \(\newcommand{\rank}{\operatorname{rank}}\) \(\newcommand{\row}{\text{Row}}\) \(\newcommand{\col}{\text{Col}}\) \(\renewcommand{\row}{\text{Row}}\) \(\newcommand{\nul}{\text{Nul}}\) \(\newcommand{\var}{\text{Var}}\) \(\newcommand{\corr}{\text{corr}}\) \(\newcommand{\len}[1]{\left|#1\right|}\) \(\newcommand{\bbar}{\overline{\bvec}}\) \(\newcommand{\bhat}{\widehat{\bvec}}\) \(\newcommand{\bperp}{\bvec^\perp}\) \(\newcommand{\xhat}{\widehat{\xvec}}\) \(\newcommand{\vhat}{\widehat{\vvec}}\) \(\newcommand{\uhat}{\widehat{\uvec}}\) \(\newcommand{\what}{\widehat{\wvec}}\) \(\newcommand{\Sighat}{\widehat{\Sigma}}\) \(\newcommand{\lt}{<}\) \(\newcommand{\gt}{>}\) \(\newcommand{\amp}{&}\) \(\definecolor{fillinmathshade}{gray}{0.9}\)hypothes.is tag: s20iostiot3ualr
Download Assignment: S2020iot03
Learning Objectives
Students will be able to:
Content:
- Email from their Raspberry Pi computers
- Text to a phone number from their Raspberry Pi computers
- Obtain the computer’s IP address
- Take pictures using the Raspberry Pi Camera
Process:
- Set up email client and a fresh google mail account
- Email and text data from class
- Set up camera and take pictures
Prior Knowledge
- Python and IoT concepts from previous activities
Further Reading
Task 1: Setting a Pi to email from Google Account
Suppose you want your RasPi to email you some data collected from a program/sensor. The program could be running on the RasPi in one location, and you could get that data in another location. One of the easiest ways to do this is with an email account. When the data is collected, you can have the data emailed to you.
- Obtain a new gmail account. Be sure to use a completely new username you have never used before! This password will be compromised!!!!
- Under settings of the gmail account, go to the settings under "sign in and security" on the left hand side of the screen there is a place for "connected apps and sites". In the main window after clicking connected apps and sites, toggle to switch the settings to "Allow less secure apps" to on. The default is off.
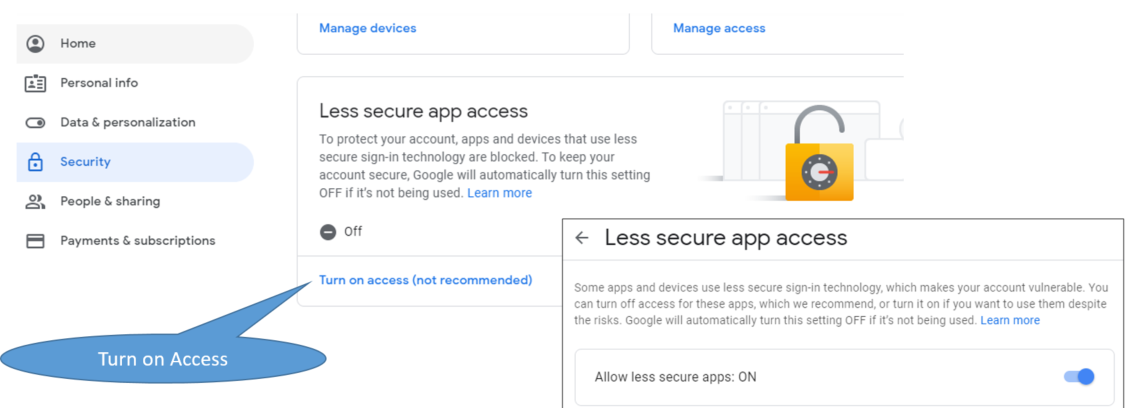 Screen shot from 2/18/2020 of the Security option within Google email accounts
Email from Command Line
To email from the command line you need to add two packages, MSMTP and MUTT. The instructions for this are given is Appendix 3 section 3.4.
Email in Python
If you downloaded Raspbian Buster desktop with reccomended software in IOCT module 2 and have updated your system since February 2020, you should have installed all the packages required to run the following programs.
Email without attachment
The following code will send an email without an attachment. You need to modify the following code and use the account information from the gmail account you set up for this course.
| Python Program 1 |
|---|
import smtplib from email.mime.text import MIMEText from email.mime.multipart import MIMEMultipart from email.mime.base import MIMEBase from email import encoders email_user = "[Insert: YouriostAccount@gmail.com]" email_password = "[Insert: YouriostAccountPassword]" email_send = "[Insert: email you want to send to]" subject = "Test email from pi" msg = MIMEMultipart() msg["From"] = email_user msg["To"] = email_send msg["Subject"] = subject body = "Hi there, sending this email from Python!" msg.attach(MIMEText(body,"plain")) text = msg.as_string() server = smtplib.SMTP("smtp.gmail.com",587) server.starttls() server.login(email_user,email_password) server.sendmail(email_user,email_send,text) server.quit() |
Email with Attachment in Python
This code will send email with an attachment. The attachment file needs to be in the folder the program is saved to and you need to
| Ptyhon Program 2 |
|---|
|
import smtplib mail_content = '''TYPE YOUR encoders.encode_base64(payload) #encode the attachment #Create SMTP session for sending the mail |
Emailing IP address on boot-up
To access your Pi over VNC you need to know its IP address and these can change from location to location. In fact some schools (like UALR) have dynamic IP address and so it can change if you turn the Pi off and on. This activity will consist of two parts. First you will analyze code that identifies your Pi's IP address, and then you will set up a Cron job that sends an email with the IP to your Google account.
Note
The Internet Protocol Address (IP Address) is a unique string of numbers separated by periods that identifies each computer using the internet protocol to communicate over a network.
Setting up Python program
| Python Program 3: Get IP Address |
|
import socket def get_ip_address(ifname): |
Now that you have a program that gets the IP (python 3) you can embed it into the program that sends emails (python 1), which we did for python 4.
| Python Program 4: email IP address |
|---|
import smtplib
from email.mime.text import MIMEText
from email.mime.multipart import MIMEMultipart
from email.mime.base import MIMEBase
from email import encoders
#for send IP
import socket
import fcntl
import struct

email_user = "YOURIOSTMAIL@gmail.com"
email_password = "YOURIOSTPASSWORD"
email_send = "EMAIL_2B_NOTIFIED"


#create function to get ip address
def get_ip_address(ifname):
    s = socket.socket(socket.AF_INET, socket.SOCK_DGRAM)
    # uncomment the following line if using python2
    #return socket.inet_ntoa(fcntl.ioctl(s.fileno(),0x8915,struct.pack('256s',ifname[:15]))[20:24])
    # uncomment the following line if using python3
    return socket.inet_ntoa(fcntl.ioctl(s.fileno(),0x8915,struct.pack('256s',bytes(ifname[:15],'utf-8')))[20:24])

#assign IP address to variable address
address = get_ip_address('wlan0')

subject=str(address)

msg = MIMEMultipart()
msg["From"] = email_user
msg["To"] = email_send
msg["Subject"] = subject

body="The new IP address is " + str(address)

msg.attach(MIMEText(body,"plain"))
text = msg.as_string()
server = smtplib.SMTP("smtp.gmail.com",587)
server.starttls()
server.login(email_user,email_password)

server.sendmail(email_user,email_send,text)
server.quit()
|
Before proceeding, save this program in your /home/pi/python_programs directory with the name send_my_ipaddress.py (you may need to create this folder)
Setting up Cron job
Information
The software utility cron is a time-based job scheduler in Unix-like computer operating systems. People who set up and maintain software environments use cron to schedule jobs (commands or shell scripts) to run periodically at fixed times, dates, or intervals. It typically automates system maintenance or administration—though its general-purpose nature makes it useful for things like downloading files from the Internet and downloading email at regular intervals. (from Wikipedia)
We can set up a cron job to run our ip address emailer every time we boot our raspberry pi. That way if we forget to attach the monitor, or want to connect remotely, we have its IP address to connect. To do this at your prompt type the following:
pi@hostname:~ $ sudo crontab -e
The first time you do this, you will be prompted to select your favorite editor. We will select 1 for the nano editor. At the bottom of the document add the following line
@reboot sleep 60 && python3 /home/pi/python_programs/send_my_ipaddress.py
Now reboot your Pi and see if you get an email with the IP address. If so, you are done with this part of the assignment.
ESD: Electrostatic Discharge
Before going into setting up the camera of making any circuits it is prudent to discuss ESD, or Electro Static Discharge. This is a real problem with small microcircuits where static build up and discharge when you touch a device and cause damage to the circuits. Here is an article on electrostatic discharge in manufaturing and the following YouTube by the Hoffmann Group describes electrostatic Discharge.
Video \(\PageIndex{1}\): Video by Hoffmann Group on electro static discharge (https://youtu.be/bWXNOemu2j4)
Setting up Camera
You will now set up the Ribbon camera as outlined in Figure \(\PageIndex{2}\), but first, you should watch the following two videos. The camera is very static sensitive, so you want to be careful, and may want to follow the precautions in the second video.
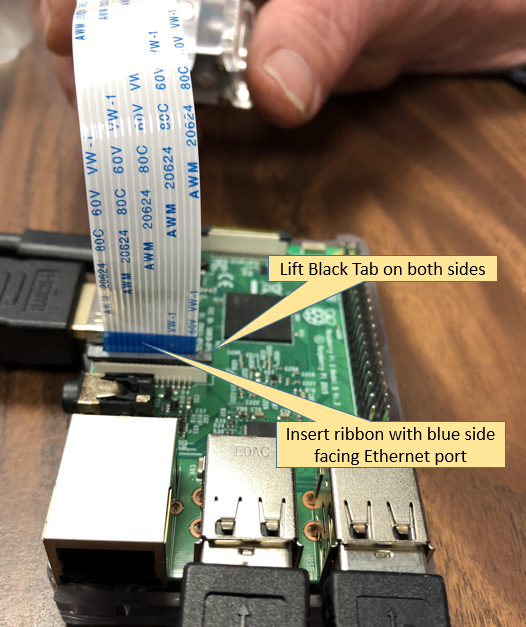 Figure \(\PageIndex{2}\): You lift up the black tabs around the camera port and then insert the ribbon with the blue side facing the ethernet port.
The following video was developed by
Video \(\PageIndex{2}\): Youtube uploaded by #RaspberryPi (https://youtu.be/VzYGDq0D1mw)
Video \(\PageIndex{3}\): Youtube video on installing a camera on a Raspberry Pi uploaded by Dr. Bucholtz (https://youtu.be/a4KF5f3Ghjk).
We are going to look at three ways to run the camera
- Command Line
- Python code
- Python code calling command line through a subprocess.
Now that you have the raspberry Pi camera set up we need to take a picture. Log into your Pi and open the command line.
Command Line Access
The basic command for taking a picture is: raspistill –o your_image_name.jpg and will show you a preview on the screen for 5 seconds before taking a picture. See this link for raspistill documentation.
Open a new terminal window on your raspberry pi and type the following command:
raspistill -o /home/pi/Desktop/pictures/my_first_picture.jpg
To view your pictures, you can double click on your image on the desktop to bring up the picture viewer.
To take a video use the raspivid command. The following code will make a 10 second video
raspivid -o video.h264 -t 10000
What does each of the following commands do?
raspistill -o /home/pi/Pictures/my_first_picture.jpg
raspistill -hf -o /home/pi/Pictures/my_second_picture.jpg
raspistill -vf -o /home/pi/Pictures/my_third_picture.jpg
raspistill -rot 90 -o /home/pi/Pictures/my_fourth_picture.jpg
raspistill -t 1 -o /home/pi/Pictures/my_fifth_picture.jpg
raspistill -ifx negative -o /home/pi/Pictures/my_sixth_picture.jpg
raspistill -ifx sketch –hf -o /home/pi/Pictures/my_seventh_picture.jpg
note pipe less gives you all the commands
REMEBER Q gets you out
raspistill | less
#or just try
raspistill
Python Access
Pen Thonny and type the following code in. Note the path to the file where you want to keep the picture may need to be modified.
from picamera import PiCamera
from time import sleep
camera = PiCamera()
camera.start_preview(alpha=192)
sleep(1)
camera.capture("/home/pi/Desktop/pictures/pic.jpg")
camera.stop_preview()
Subprocess Access
Now run the following code in thonnny
import subprocess
subprocess.call('raspistill -o /home/pi/Desktop/pictures/my_first_picture.jpg',shell=True)
print("done")
Compare the above code with the code for command line access. What do you think the subprocess module does?
Note
You can send a text message to your phone via email. SMS (Short Message Service) text messages can be sent through email gateways of your phone service provider. The email address for your text messages are dependent on your provider as well. You can also send a text to your email address just by putting the email address in instead of a phone number. To send a text from your raspberry pi to your phone, use the following addresses with your phone number.
AT&T: number@txt.att.net
T-Mobile: number@tmomail.net
Verizon: number@vtext.com (text-only), number@vzwpix (text + photo)
Sprint: number@messaging.sprintpcs.com or number@pm.sprint.com
Virgin Mobile: number@vmobl.com
Tracfone: number@mmst5.tracfone.com
Metro PCS: number@mymetropcs.com
Boost Mobile: number@myboostmobile.com
Cricket: number@mms.cricketwireless.net
Ptel: number@ptel.com
Republic Wireless: number@text.republicwireless.com
Google Fi (Project Fi): number@msg.fi.google.com
Suncom: number@tms.suncom.com
Ting: number@message.ting.com
U.S. Cellular: number@email.uscc.net
Consumer Cellular: number@cingularme.com
C-Spire: number@cspire1.com
Page Plus: number@vtext.com