Course Information
- Page ID
- 216950
\( \newcommand{\vecs}[1]{\overset { \scriptstyle \rightharpoonup} {\mathbf{#1}} } \)
\( \newcommand{\vecd}[1]{\overset{-\!-\!\rightharpoonup}{\vphantom{a}\smash {#1}}} \)
\( \newcommand{\id}{\mathrm{id}}\) \( \newcommand{\Span}{\mathrm{span}}\)
( \newcommand{\kernel}{\mathrm{null}\,}\) \( \newcommand{\range}{\mathrm{range}\,}\)
\( \newcommand{\RealPart}{\mathrm{Re}}\) \( \newcommand{\ImaginaryPart}{\mathrm{Im}}\)
\( \newcommand{\Argument}{\mathrm{Arg}}\) \( \newcommand{\norm}[1]{\| #1 \|}\)
\( \newcommand{\inner}[2]{\langle #1, #2 \rangle}\)
\( \newcommand{\Span}{\mathrm{span}}\)
\( \newcommand{\id}{\mathrm{id}}\)
\( \newcommand{\Span}{\mathrm{span}}\)
\( \newcommand{\kernel}{\mathrm{null}\,}\)
\( \newcommand{\range}{\mathrm{range}\,}\)
\( \newcommand{\RealPart}{\mathrm{Re}}\)
\( \newcommand{\ImaginaryPart}{\mathrm{Im}}\)
\( \newcommand{\Argument}{\mathrm{Arg}}\)
\( \newcommand{\norm}[1]{\| #1 \|}\)
\( \newcommand{\inner}[2]{\langle #1, #2 \rangle}\)
\( \newcommand{\Span}{\mathrm{span}}\) \( \newcommand{\AA}{\unicode[.8,0]{x212B}}\)
\( \newcommand{\vectorA}[1]{\vec{#1}} % arrow\)
\( \newcommand{\vectorAt}[1]{\vec{\text{#1}}} % arrow\)
\( \newcommand{\vectorB}[1]{\overset { \scriptstyle \rightharpoonup} {\mathbf{#1}} } \)
\( \newcommand{\vectorC}[1]{\textbf{#1}} \)
\( \newcommand{\vectorD}[1]{\overrightarrow{#1}} \)
\( \newcommand{\vectorDt}[1]{\overrightarrow{\text{#1}}} \)
\( \newcommand{\vectE}[1]{\overset{-\!-\!\rightharpoonup}{\vphantom{a}\smash{\mathbf {#1}}}} \)
\( \newcommand{\vecs}[1]{\overset { \scriptstyle \rightharpoonup} {\mathbf{#1}} } \)
\( \newcommand{\vecd}[1]{\overset{-\!-\!\rightharpoonup}{\vphantom{a}\smash {#1}}} \)
\(\newcommand{\avec}{\mathbf a}\) \(\newcommand{\bvec}{\mathbf b}\) \(\newcommand{\cvec}{\mathbf c}\) \(\newcommand{\dvec}{\mathbf d}\) \(\newcommand{\dtil}{\widetilde{\mathbf d}}\) \(\newcommand{\evec}{\mathbf e}\) \(\newcommand{\fvec}{\mathbf f}\) \(\newcommand{\nvec}{\mathbf n}\) \(\newcommand{\pvec}{\mathbf p}\) \(\newcommand{\qvec}{\mathbf q}\) \(\newcommand{\svec}{\mathbf s}\) \(\newcommand{\tvec}{\mathbf t}\) \(\newcommand{\uvec}{\mathbf u}\) \(\newcommand{\vvec}{\mathbf v}\) \(\newcommand{\wvec}{\mathbf w}\) \(\newcommand{\xvec}{\mathbf x}\) \(\newcommand{\yvec}{\mathbf y}\) \(\newcommand{\zvec}{\mathbf z}\) \(\newcommand{\rvec}{\mathbf r}\) \(\newcommand{\mvec}{\mathbf m}\) \(\newcommand{\zerovec}{\mathbf 0}\) \(\newcommand{\onevec}{\mathbf 1}\) \(\newcommand{\real}{\mathbb R}\) \(\newcommand{\twovec}[2]{\left[\begin{array}{r}#1 \\ #2 \end{array}\right]}\) \(\newcommand{\ctwovec}[2]{\left[\begin{array}{c}#1 \\ #2 \end{array}\right]}\) \(\newcommand{\threevec}[3]{\left[\begin{array}{r}#1 \\ #2 \\ #3 \end{array}\right]}\) \(\newcommand{\cthreevec}[3]{\left[\begin{array}{c}#1 \\ #2 \\ #3 \end{array}\right]}\) \(\newcommand{\fourvec}[4]{\left[\begin{array}{r}#1 \\ #2 \\ #3 \\ #4 \end{array}\right]}\) \(\newcommand{\cfourvec}[4]{\left[\begin{array}{c}#1 \\ #2 \\ #3 \\ #4 \end{array}\right]}\) \(\newcommand{\fivevec}[5]{\left[\begin{array}{r}#1 \\ #2 \\ #3 \\ #4 \\ #5 \\ \end{array}\right]}\) \(\newcommand{\cfivevec}[5]{\left[\begin{array}{c}#1 \\ #2 \\ #3 \\ #4 \\ #5 \\ \end{array}\right]}\) \(\newcommand{\mattwo}[4]{\left[\begin{array}{rr}#1 \amp #2 \\ #3 \amp #4 \\ \end{array}\right]}\) \(\newcommand{\laspan}[1]{\text{Span}\{#1\}}\) \(\newcommand{\bcal}{\cal B}\) \(\newcommand{\ccal}{\cal C}\) \(\newcommand{\scal}{\cal S}\) \(\newcommand{\wcal}{\cal W}\) \(\newcommand{\ecal}{\cal E}\) \(\newcommand{\coords}[2]{\left\{#1\right\}_{#2}}\) \(\newcommand{\gray}[1]{\color{gray}{#1}}\) \(\newcommand{\lgray}[1]{\color{lightgray}{#1}}\) \(\newcommand{\rank}{\operatorname{rank}}\) \(\newcommand{\row}{\text{Row}}\) \(\newcommand{\col}{\text{Col}}\) \(\renewcommand{\row}{\text{Row}}\) \(\newcommand{\nul}{\text{Nul}}\) \(\newcommand{\var}{\text{Var}}\) \(\newcommand{\corr}{\text{corr}}\) \(\newcommand{\len}[1]{\left|#1\right|}\) \(\newcommand{\bbar}{\overline{\bvec}}\) \(\newcommand{\bhat}{\widehat{\bvec}}\) \(\newcommand{\bperp}{\bvec^\perp}\) \(\newcommand{\xhat}{\widehat{\xvec}}\) \(\newcommand{\vhat}{\widehat{\vvec}}\) \(\newcommand{\uhat}{\widehat{\uvec}}\) \(\newcommand{\what}{\widehat{\wvec}}\) \(\newcommand{\Sighat}{\widehat{\Sigma}}\) \(\newcommand{\lt}{<}\) \(\newcommand{\gt}{>}\) \(\newcommand{\amp}{&}\) \(\definecolor{fillinmathshade}{gray}{0.9}\)Due to COVID19 this course is being run online and using a variety of web tools. This section provides instructions on many of the tools used in this class. For example, if you properly set up email notifications you will get an email with the course Zoom link 10 minutes before class. If you properly set up Zoom you can run two monitors, one that you are working on, and the other that shows the instructors desktop.
Email Notifications
This class will use Zoom and you need to be logged in by 8:40 AM. We will use the same Zoom link for lecture and lab and it will be emailed to you. I suggest you set up an email notification through your Google Calendar and the following video shows you how to do that for the duration of the class (with the email containing the link being sent 10 minutes before class).
Hypothes.is Web Annotations
This class will use the Hypothes.is web annotation service that is integrated into LibreText. You need to go to https://web.hypothes.is/ and create an account. Please start your username with your last name so you can easily be identified for grading purposes. You should follow it with an underscore and then anything you want, so my username could be belford_123. You will then need to join the class group, which is a private group. You will be sent an email invitation or contact your instructor, and you should only make annotations in the group.
The following YouTube gives a quick demonstration on the use of the Hypothes.is Web Annotation service.
Making Annotations
To make an annotation you simply highlight the text you want to annotate, choose "Annotate" and write in the overlay. Note, the first time you open up a page it will post to "Public" and you need to change that to your class group. Once you have started posting to the class group that will be the default option, but initially the default is public.
 Figure \(\PageIndex{1}\): To annotate you simply highlight text and write in the overlay. (Copyright; Belford, cc.0)
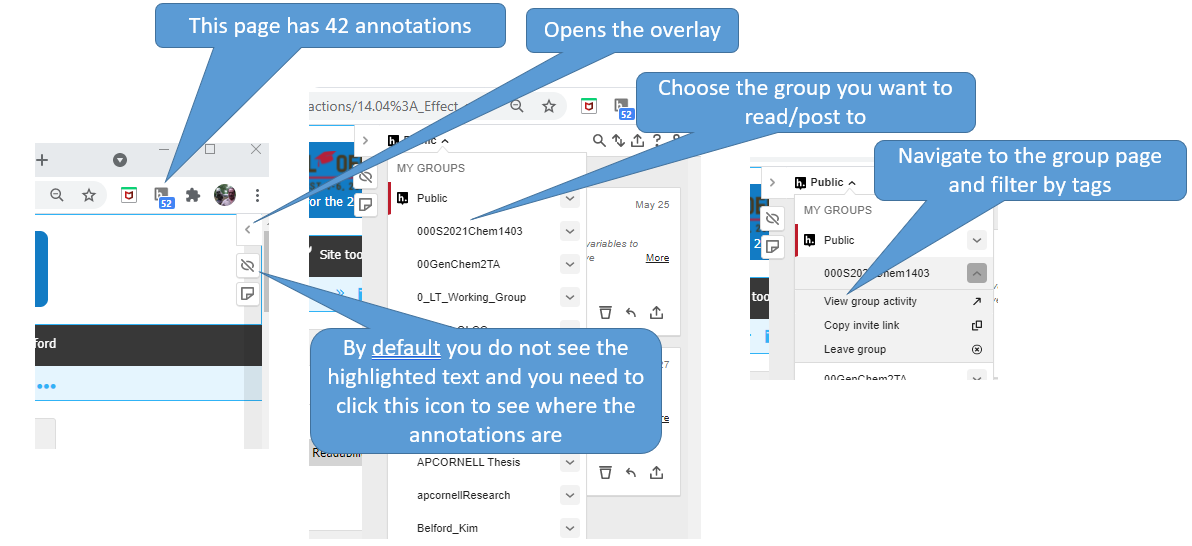
If you tag your annotation you can easily find it by going to your homepage in hypothes.is and then filtering by tags. So you may want to make tags like "exam 1", or "nomenclature". If you then filter with your hypothes.is user name and exam 1, you see those items you tagged. If you just do exam 1, you filter for everything the class tagged exam 1. You can then click the contextual link by the annotation, and hypothes.is will open that page, navigate to the highlighted text and display the annotation. (Note: In LibreText the highlights are hidden by default, and you need to click the "eye" with the slash over it (figure \(\PageIndex{2}\)
Using the Hypothes.is Overlay to read discussions
By default the hypothes.is overlay is closed and you do not see the annotations.

Figure \(\PageIndex{2}\) shows how to pick a group and view group activity.
 Figure \(\PageIndex{3}\): Annotation and highlights text being displayed. (Copyright; Belford CC0)
Using tags
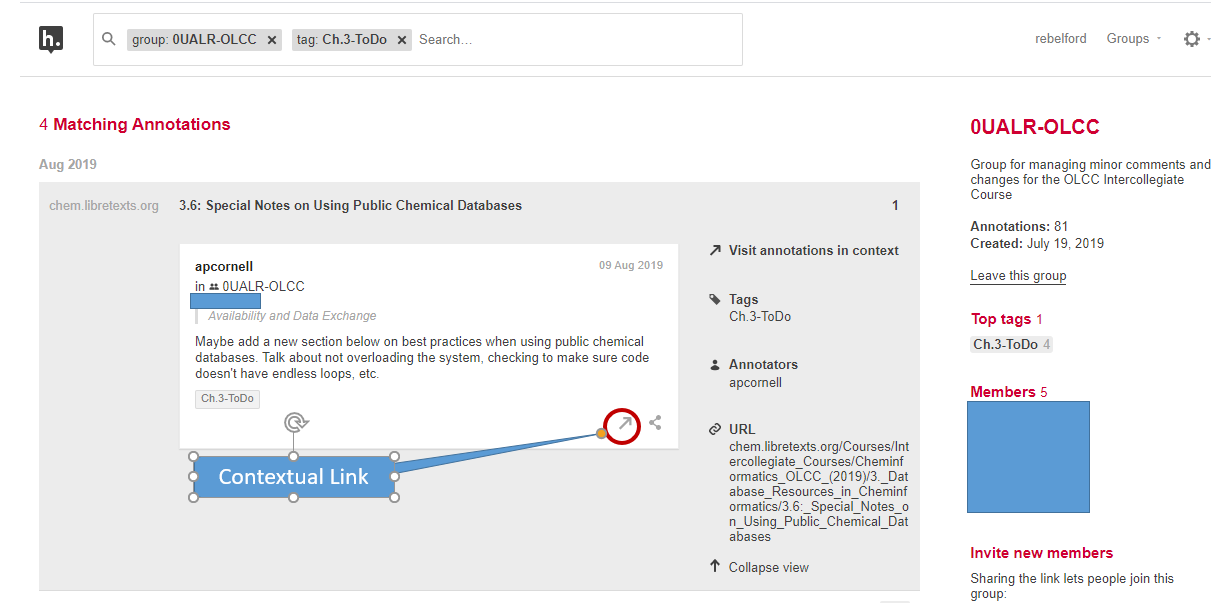
Tags are a very powerful way of organizing your notes and Hypothes.is has different types of tags. Your class group is a tag, and when you click on your hypothes.is group activity (figure \(\PageIndex{2}\)) you only see items posted to your class (note the first tag in the search filter of figure \(\PageIndex{4}\) is a group tag. If you then click your name you see those you have posted to that group. If you remove the group you see all the annotations you have posted anywhere. If you generate a tag based on a topic or exam, you can then easily find that information. Figure \(\PageIndex{4}\) shows a filter using two tags that resulting in four items in a student's "To Do list" for chapter 3 of a cheminformatics class
 Figure \(\PageIndex{4}\): Hypothes.is search filtered by the group tag 0UALR-OLCC (which was a class group) and a student's tag "Ch.3-ToDo". (Copyright; Belford CC0)
If the student clicks the contextual link hypothes.is will open the webpage that was highlighted, scroll down to the highlighted section and show the annotation in the overlay. This allows students to organize their notes on LibreText and quickly find content. If you get the chrome plugin you can even annotate material outside of LibreText and connect it to your material and notes within LibreText, as long as the material does not require a login to access. It should also be noted that you can not highlight hidden text within LibreText (like the answers to exercises), and if you have a question on the answer to an exercise, you should highlight the question, not the answer.
Accessing Google Classroom
If you open your Google Mail you will see 9 dots by your name which opens the Google Suite. If you scroll to the bottom you will find Google Classroom, and if you open the Drive you will also find a folder called Classroom where you can find your assignments.

Contributors and Attributions
Robert E. Belford (University of Arkansas Little Rock; Department of Chemistry). The breadth, depth and veracity of this work is the responsibility of Robert E. Belford, rebelford@ualr.edu. You should contact him if you have any concerns. This material has both original contributions, and content built upon prior contributions of the LibreTexts Community and other resources, including but not limited to:

