1.7: Streaming Temperature and Humidity Data
- Page ID
- 373667
\( \newcommand{\vecs}[1]{\overset { \scriptstyle \rightharpoonup} {\mathbf{#1}} } \)
\( \newcommand{\vecd}[1]{\overset{-\!-\!\rightharpoonup}{\vphantom{a}\smash {#1}}} \)
\( \newcommand{\id}{\mathrm{id}}\) \( \newcommand{\Span}{\mathrm{span}}\)
( \newcommand{\kernel}{\mathrm{null}\,}\) \( \newcommand{\range}{\mathrm{range}\,}\)
\( \newcommand{\RealPart}{\mathrm{Re}}\) \( \newcommand{\ImaginaryPart}{\mathrm{Im}}\)
\( \newcommand{\Argument}{\mathrm{Arg}}\) \( \newcommand{\norm}[1]{\| #1 \|}\)
\( \newcommand{\inner}[2]{\langle #1, #2 \rangle}\)
\( \newcommand{\Span}{\mathrm{span}}\)
\( \newcommand{\id}{\mathrm{id}}\)
\( \newcommand{\Span}{\mathrm{span}}\)
\( \newcommand{\kernel}{\mathrm{null}\,}\)
\( \newcommand{\range}{\mathrm{range}\,}\)
\( \newcommand{\RealPart}{\mathrm{Re}}\)
\( \newcommand{\ImaginaryPart}{\mathrm{Im}}\)
\( \newcommand{\Argument}{\mathrm{Arg}}\)
\( \newcommand{\norm}[1]{\| #1 \|}\)
\( \newcommand{\inner}[2]{\langle #1, #2 \rangle}\)
\( \newcommand{\Span}{\mathrm{span}}\) \( \newcommand{\AA}{\unicode[.8,0]{x212B}}\)
\( \newcommand{\vectorA}[1]{\vec{#1}} % arrow\)
\( \newcommand{\vectorAt}[1]{\vec{\text{#1}}} % arrow\)
\( \newcommand{\vectorB}[1]{\overset { \scriptstyle \rightharpoonup} {\mathbf{#1}} } \)
\( \newcommand{\vectorC}[1]{\textbf{#1}} \)
\( \newcommand{\vectorD}[1]{\overrightarrow{#1}} \)
\( \newcommand{\vectorDt}[1]{\overrightarrow{\text{#1}}} \)
\( \newcommand{\vectE}[1]{\overset{-\!-\!\rightharpoonup}{\vphantom{a}\smash{\mathbf {#1}}}} \)
\( \newcommand{\vecs}[1]{\overset { \scriptstyle \rightharpoonup} {\mathbf{#1}} } \)
\( \newcommand{\vecd}[1]{\overset{-\!-\!\rightharpoonup}{\vphantom{a}\smash {#1}}} \)
\(\newcommand{\avec}{\mathbf a}\) \(\newcommand{\bvec}{\mathbf b}\) \(\newcommand{\cvec}{\mathbf c}\) \(\newcommand{\dvec}{\mathbf d}\) \(\newcommand{\dtil}{\widetilde{\mathbf d}}\) \(\newcommand{\evec}{\mathbf e}\) \(\newcommand{\fvec}{\mathbf f}\) \(\newcommand{\nvec}{\mathbf n}\) \(\newcommand{\pvec}{\mathbf p}\) \(\newcommand{\qvec}{\mathbf q}\) \(\newcommand{\svec}{\mathbf s}\) \(\newcommand{\tvec}{\mathbf t}\) \(\newcommand{\uvec}{\mathbf u}\) \(\newcommand{\vvec}{\mathbf v}\) \(\newcommand{\wvec}{\mathbf w}\) \(\newcommand{\xvec}{\mathbf x}\) \(\newcommand{\yvec}{\mathbf y}\) \(\newcommand{\zvec}{\mathbf z}\) \(\newcommand{\rvec}{\mathbf r}\) \(\newcommand{\mvec}{\mathbf m}\) \(\newcommand{\zerovec}{\mathbf 0}\) \(\newcommand{\onevec}{\mathbf 1}\) \(\newcommand{\real}{\mathbb R}\) \(\newcommand{\twovec}[2]{\left[\begin{array}{r}#1 \\ #2 \end{array}\right]}\) \(\newcommand{\ctwovec}[2]{\left[\begin{array}{c}#1 \\ #2 \end{array}\right]}\) \(\newcommand{\threevec}[3]{\left[\begin{array}{r}#1 \\ #2 \\ #3 \end{array}\right]}\) \(\newcommand{\cthreevec}[3]{\left[\begin{array}{c}#1 \\ #2 \\ #3 \end{array}\right]}\) \(\newcommand{\fourvec}[4]{\left[\begin{array}{r}#1 \\ #2 \\ #3 \\ #4 \end{array}\right]}\) \(\newcommand{\cfourvec}[4]{\left[\begin{array}{c}#1 \\ #2 \\ #3 \\ #4 \end{array}\right]}\) \(\newcommand{\fivevec}[5]{\left[\begin{array}{r}#1 \\ #2 \\ #3 \\ #4 \\ #5 \\ \end{array}\right]}\) \(\newcommand{\cfivevec}[5]{\left[\begin{array}{c}#1 \\ #2 \\ #3 \\ #4 \\ #5 \\ \end{array}\right]}\) \(\newcommand{\mattwo}[4]{\left[\begin{array}{rr}#1 \amp #2 \\ #3 \amp #4 \\ \end{array}\right]}\) \(\newcommand{\laspan}[1]{\text{Span}\{#1\}}\) \(\newcommand{\bcal}{\cal B}\) \(\newcommand{\ccal}{\cal C}\) \(\newcommand{\scal}{\cal S}\) \(\newcommand{\wcal}{\cal W}\) \(\newcommand{\ecal}{\cal E}\) \(\newcommand{\coords}[2]{\left\{#1\right\}_{#2}}\) \(\newcommand{\gray}[1]{\color{gray}{#1}}\) \(\newcommand{\lgray}[1]{\color{lightgray}{#1}}\) \(\newcommand{\rank}{\operatorname{rank}}\) \(\newcommand{\row}{\text{Row}}\) \(\newcommand{\col}{\text{Col}}\) \(\renewcommand{\row}{\text{Row}}\) \(\newcommand{\nul}{\text{Nul}}\) \(\newcommand{\var}{\text{Var}}\) \(\newcommand{\corr}{\text{corr}}\) \(\newcommand{\len}[1]{\left|#1\right|}\) \(\newcommand{\bbar}{\overline{\bvec}}\) \(\newcommand{\bhat}{\widehat{\bvec}}\) \(\newcommand{\bperp}{\bvec^\perp}\) \(\newcommand{\xhat}{\widehat{\xvec}}\) \(\newcommand{\vhat}{\widehat{\vvec}}\) \(\newcommand{\uhat}{\widehat{\uvec}}\) \(\newcommand{\what}{\widehat{\wvec}}\) \(\newcommand{\Sighat}{\widehat{\Sigma}}\) \(\newcommand{\lt}{<}\) \(\newcommand{\gt}{>}\) \(\newcommand{\amp}{&}\) \(\definecolor{fillinmathshade}{gray}{0.9}\)In this lesson, we will connect the DHT22 temperature and humidity sensor and stream readings to a Google Sheet. DHT22 is one of the most common IOT temperature and humidity sensors, it can measure temperature between -40°C and 80°C (±1°C) and humidity from 0% to 100% (±1%).
To start:
- You can use the same Google Sheet that you've created last time (1.5: Introduction to APIs-Google Sheets)
- Add a new tab to your Google Sheet
- Name columns "DateTime", "Temperature, C" and "Humidity, %"
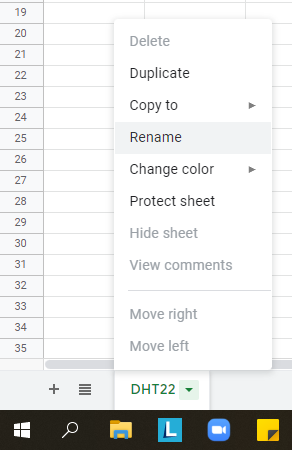
- Rename the worksheet (the tab at the bottom) to "DHT22" by right-clicking on it and selecting "Rename". This way you can always find your data quickly.
Fritzing Diagram
Any time you need to connect a sensor to your Raspberry Pi, you should start with searching the web for the pinout of that sensor. If you search for "DHT22 pinout" you will find many images similar to the one below.
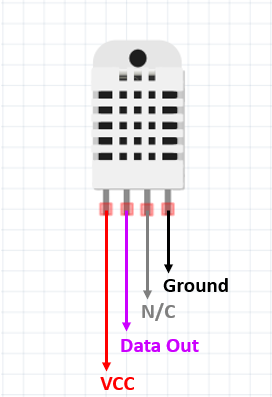
As you can see, DHT22 has 4 pins: VCC, Data Out, N/C and Ground. N/C stands for “Not connected” and is not used for wiring. You can connect the DHT22 sensor directly to your Raspberri Pi's GPIO pins using a male-to-female jumper wires, or you can use a T-cobbler and a breadboard. We will be using a breadboard for this lesson.
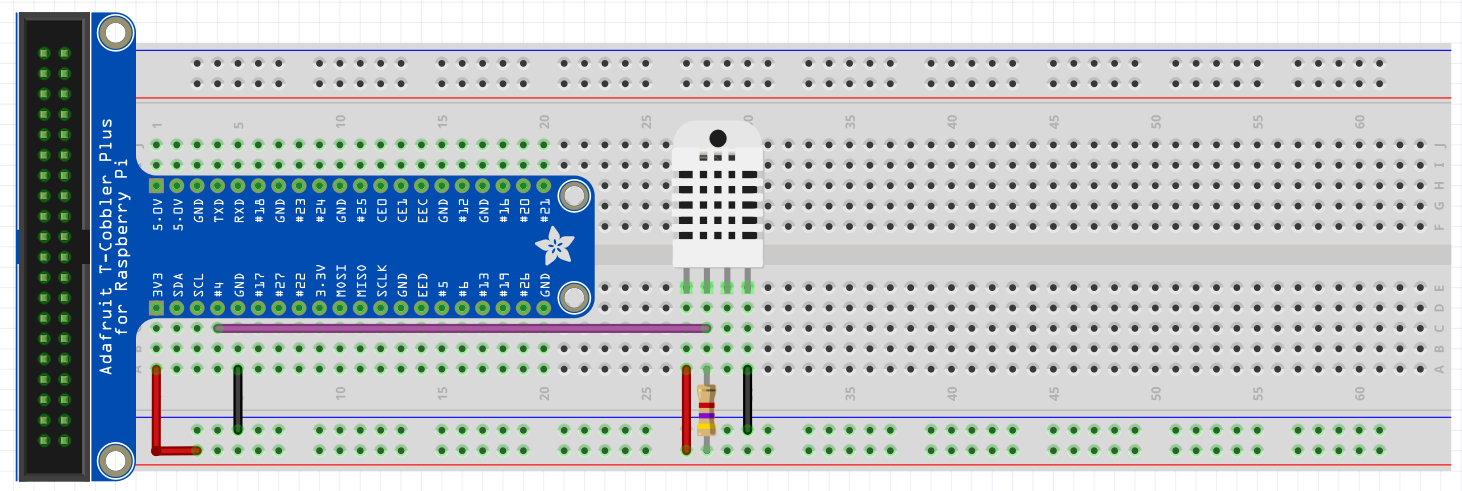
- Pin#1 is connected to hot rail
- Pin#2 is connected to GPIO4 and a "pull-up" resistor
- Pin#4 is connected to ground rail
Remember, that we are not using pin#3. If your T-cobbler doesn't have built-in connections to hot and ground rails, you will need to run wires from the cobbler's 3.3 V to hot (red) rail and GND to ground (blue) rail. We will also add a 4.7 to 10 kΩ resistor between the data out pin and hot. Remember the GPIO pin has two values, on (3.3 V) or off, and this pulls it to high as the default position. Note, GPIO pins 1 through 8 of the Broadcom BCM2711B0 are pulled up by default (see page 77, the alternative GPIO assignments table of the datasheet), but we will run a pull-up resistor to ensure this. Here is the Fritzing connection diagram:
Python Code
Let's test the sensor. We will need to install a few things first. Open the terminal and execute the following commands:
pip3 install adafruit-circuitpython-dht
sudo apt-get install libgpiod2
We install the gspread module during one of the previous lessons, but if you are starting with a new Raspberry Pi you will need to install it again with the following command:
pip3 install gspread
Now run the following program in Thonny:
#!/usr/bin/python3

#Import the modules
import time
import board
import adafruit_dht

#Declare the sensor and the GPIO pin it is connected to
dhtDevice = adafruit_dht.DHT22(board.D4, use_pulseio=False)

while True:
    try:
        # Print the values to the serial port
        tempC = dhtDevice.temperature
        humidity = dhtDevice.humidity
        print("Temp: {:.1f} C    Humidity: {}% ".format(tempC, humidity))
        time.sleep(2.0)  #pause for 2 seconds
    except RuntimeError:
        pass
Examine the code. What do you think is the purpose of the “try – except” block?
- Answer
-
DHT22 can fail unexpectedly and return a Runtime Error, that looks like this:
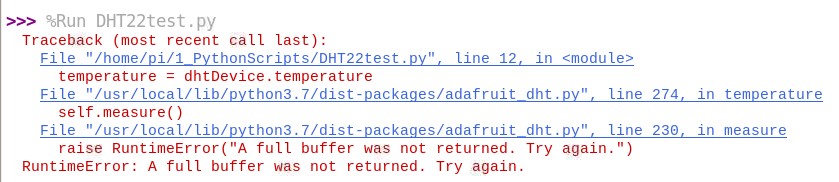
This would stop your code, and you would have to restart it manually. To prevent this from happening, we add the “try-except” block that basically tells our program to try to run this code and if the specified error occurs to pass (or ignore) it. This way the loop continues.
Be careful using the "try-except" block. Errors are usually signaling that something is wrong with your code or wiring, and you can miss that message if you are ignoring the errors you shouldn't be ignoring. Runtime Error is a known issue with the DHT22 sensors, so it is safe to use for this lesson.
You can learn more about Runtime Errors and how they are different from Syntax Errors here.
If you want, you can add a print statement to alert you that an error had occurred, so you can see how often it happens.
    except RuntimeError:
        print ("Runtime Error. Continue...")
        pass
Stream DHT22 Data to Google Sheets
#!/usr/bin/python3

import datetime
import time
import board
import adafruit_dht
import gspread
from google.auth.transport.requests import AuthorizedSession
from google.oauth2 import service_account
import requests

dhtDevice = adafruit_dht.DHT22(board.D4, use_pulseio=False)

#Access Google API
googleAPI = '/home/pi/1_PythonScripts/mydata-key.json' #NOTE: replace this with the path to your JSON key
scope = ['https://www.googleapis.com/auth/drive']
credentials = service_account.Credentials.from_service_account_file(googleAPI)
scopedCreds = credentials.with_scopes(scope)
gc = gspread.Client(auth=scopedCreds)
gc.session = AuthorizedSession(scopedCreds)
sheet = gc.open("DHT22_Data")
worksheet = sheet.worksheet("DHT22")

def appendSheet(tempC, humidity):
    dateTime = datetime.datetime.now().strftime('%Y-%m-%d %H:%M:%S')
    values =[dateTime, tempC, humidity]
    worksheet.insert_row(values, 2, value_input_option='RAW')
    print("Google Sheet Updated")

def getData():
    try:
        tempC = dhtDevice.temperature
        humidity = dhtDevice.humidity
        print("Temp: {:.1f} C    Humidity: {:.1f}% ".format(tempC, humidity))
        appendSheet(tempC, humidity)
    except RuntimeError:
        print ("Runtime Error. Continue...")
        pass

while True:
    getData()
    time.sleep(5.0)
Notice that in this code, we used the full path to the JSON key file. This is useful if you want to keep your JSON keys separate from the code files or schedule your script in cron.
Check your Google Sheet. You should see the DHT22 readings.
Homework Assignment
- Edit the code to stream the temperature in degrees Fahrenheit instead of Celsius. You will need to add a new variable (tempF) and convert from degrees Celsius to degrees Fahrenheit. Make sure that you change the heading in your Google Sheet from "Temperature, C" to "Temperature, F". Run your script and make sure it works and your Google Sheet is updated with the temperature in Fahrenheit.
- Add a red LED to your circuit. You can always go back to 1.4: Introduction to Electronics - LED Circuit if you forgot how to connect the LED or what code to use.
- Create an IF statement that will turn the LED on when the temperature is below x degrees Fahrenheit and turn it off if the temperature is equal or above x degrees Fahrenheit. Set x to about 1oF above the temperature read from step 1. For example, if in step 1 your temperature was 70.6, make x = 71.6.
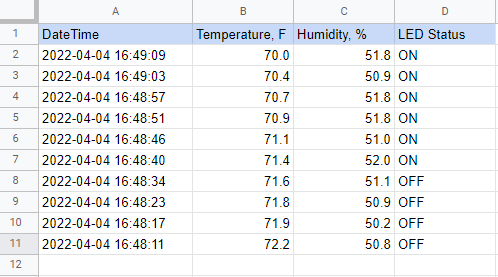
- Add a new variable "ledStatus" that can be either "ON" or "OFF". Add a new column to your Google Sheet, call it "LED Status". Make your program stream all 4 variables (dateTime, tempF, humidity, ledStatus) to your Google Sheet.
- You can wait for the temperature to change naturally, or you can place a hot or a cold object next to the sensor. Use common sense and don't put anything that can damage your board! Your Google Sheet should look something like this (for x=71.6):
- Set up a Google Dashboard as the front page of your sheet (see Appendix A1.6: Google Dashboard).