
1.5: Introduction to APIs-Google Sheets
- Page ID
- 372206
\( \newcommand{\vecs}[1]{\overset { \scriptstyle \rightharpoonup} {\mathbf{#1}} } \)
\( \newcommand{\vecd}[1]{\overset{-\!-\!\rightharpoonup}{\vphantom{a}\smash {#1}}} \)
\( \newcommand{\id}{\mathrm{id}}\) \( \newcommand{\Span}{\mathrm{span}}\)
( \newcommand{\kernel}{\mathrm{null}\,}\) \( \newcommand{\range}{\mathrm{range}\,}\)
\( \newcommand{\RealPart}{\mathrm{Re}}\) \( \newcommand{\ImaginaryPart}{\mathrm{Im}}\)
\( \newcommand{\Argument}{\mathrm{Arg}}\) \( \newcommand{\norm}[1]{\| #1 \|}\)
\( \newcommand{\inner}[2]{\langle #1, #2 \rangle}\)
\( \newcommand{\Span}{\mathrm{span}}\)
\( \newcommand{\id}{\mathrm{id}}\)
\( \newcommand{\Span}{\mathrm{span}}\)
\( \newcommand{\kernel}{\mathrm{null}\,}\)
\( \newcommand{\range}{\mathrm{range}\,}\)
\( \newcommand{\RealPart}{\mathrm{Re}}\)
\( \newcommand{\ImaginaryPart}{\mathrm{Im}}\)
\( \newcommand{\Argument}{\mathrm{Arg}}\)
\( \newcommand{\norm}[1]{\| #1 \|}\)
\( \newcommand{\inner}[2]{\langle #1, #2 \rangle}\)
\( \newcommand{\Span}{\mathrm{span}}\) \( \newcommand{\AA}{\unicode[.8,0]{x212B}}\)
\( \newcommand{\vectorA}[1]{\vec{#1}} % arrow\)
\( \newcommand{\vectorAt}[1]{\vec{\text{#1}}} % arrow\)
\( \newcommand{\vectorB}[1]{\overset { \scriptstyle \rightharpoonup} {\mathbf{#1}} } \)
\( \newcommand{\vectorC}[1]{\textbf{#1}} \)
\( \newcommand{\vectorD}[1]{\overrightarrow{#1}} \)
\( \newcommand{\vectorDt}[1]{\overrightarrow{\text{#1}}} \)
\( \newcommand{\vectE}[1]{\overset{-\!-\!\rightharpoonup}{\vphantom{a}\smash{\mathbf {#1}}}} \)
\( \newcommand{\vecs}[1]{\overset { \scriptstyle \rightharpoonup} {\mathbf{#1}} } \)
\( \newcommand{\vecd}[1]{\overset{-\!-\!\rightharpoonup}{\vphantom{a}\smash {#1}}} \)
\(\newcommand{\avec}{\mathbf a}\) \(\newcommand{\bvec}{\mathbf b}\) \(\newcommand{\cvec}{\mathbf c}\) \(\newcommand{\dvec}{\mathbf d}\) \(\newcommand{\dtil}{\widetilde{\mathbf d}}\) \(\newcommand{\evec}{\mathbf e}\) \(\newcommand{\fvec}{\mathbf f}\) \(\newcommand{\nvec}{\mathbf n}\) \(\newcommand{\pvec}{\mathbf p}\) \(\newcommand{\qvec}{\mathbf q}\) \(\newcommand{\svec}{\mathbf s}\) \(\newcommand{\tvec}{\mathbf t}\) \(\newcommand{\uvec}{\mathbf u}\) \(\newcommand{\vvec}{\mathbf v}\) \(\newcommand{\wvec}{\mathbf w}\) \(\newcommand{\xvec}{\mathbf x}\) \(\newcommand{\yvec}{\mathbf y}\) \(\newcommand{\zvec}{\mathbf z}\) \(\newcommand{\rvec}{\mathbf r}\) \(\newcommand{\mvec}{\mathbf m}\) \(\newcommand{\zerovec}{\mathbf 0}\) \(\newcommand{\onevec}{\mathbf 1}\) \(\newcommand{\real}{\mathbb R}\) \(\newcommand{\twovec}[2]{\left[\begin{array}{r}#1 \\ #2 \end{array}\right]}\) \(\newcommand{\ctwovec}[2]{\left[\begin{array}{c}#1 \\ #2 \end{array}\right]}\) \(\newcommand{\threevec}[3]{\left[\begin{array}{r}#1 \\ #2 \\ #3 \end{array}\right]}\) \(\newcommand{\cthreevec}[3]{\left[\begin{array}{c}#1 \\ #2 \\ #3 \end{array}\right]}\) \(\newcommand{\fourvec}[4]{\left[\begin{array}{r}#1 \\ #2 \\ #3 \\ #4 \end{array}\right]}\) \(\newcommand{\cfourvec}[4]{\left[\begin{array}{c}#1 \\ #2 \\ #3 \\ #4 \end{array}\right]}\) \(\newcommand{\fivevec}[5]{\left[\begin{array}{r}#1 \\ #2 \\ #3 \\ #4 \\ #5 \\ \end{array}\right]}\) \(\newcommand{\cfivevec}[5]{\left[\begin{array}{c}#1 \\ #2 \\ #3 \\ #4 \\ #5 \\ \end{array}\right]}\) \(\newcommand{\mattwo}[4]{\left[\begin{array}{rr}#1 \amp #2 \\ #3 \amp #4 \\ \end{array}\right]}\) \(\newcommand{\laspan}[1]{\text{Span}\{#1\}}\) \(\newcommand{\bcal}{\cal B}\) \(\newcommand{\ccal}{\cal C}\) \(\newcommand{\scal}{\cal S}\) \(\newcommand{\wcal}{\cal W}\) \(\newcommand{\ecal}{\cal E}\) \(\newcommand{\coords}[2]{\left\{#1\right\}_{#2}}\) \(\newcommand{\gray}[1]{\color{gray}{#1}}\) \(\newcommand{\lgray}[1]{\color{lightgray}{#1}}\) \(\newcommand{\rank}{\operatorname{rank}}\) \(\newcommand{\row}{\text{Row}}\) \(\newcommand{\col}{\text{Col}}\) \(\renewcommand{\row}{\text{Row}}\) \(\newcommand{\nul}{\text{Nul}}\) \(\newcommand{\var}{\text{Var}}\) \(\newcommand{\corr}{\text{corr}}\) \(\newcommand{\len}[1]{\left|#1\right|}\) \(\newcommand{\bbar}{\overline{\bvec}}\) \(\newcommand{\bhat}{\widehat{\bvec}}\) \(\newcommand{\bperp}{\bvec^\perp}\) \(\newcommand{\xhat}{\widehat{\xvec}}\) \(\newcommand{\vhat}{\widehat{\vvec}}\) \(\newcommand{\uhat}{\widehat{\uvec}}\) \(\newcommand{\what}{\widehat{\wvec}}\) \(\newcommand{\Sighat}{\widehat{\Sigma}}\) \(\newcommand{\lt}{<}\) \(\newcommand{\gt}{>}\) \(\newcommand{\amp}{&}\) \(\definecolor{fillinmathshade}{gray}{0.9}\)
UALR students should use their personal Google account for this activity.
When you collect sensor data using Raspberry Pi, you can store it in a local file or upload it to Google Sheets using Google Sheets API and Google Drive API. Uploading your information to the cloud gives you the ability to effortlessly share real time data with other and have access to it from anywhere. We are going to set up a new Google Sheet that we will use to upload real sensor data in the next lesson.
Create New Google Sheet
- Make sure you are logged in to your personal Google account. Navigate to https://docs.google.com/spreadsheets
- Click on "Blank"
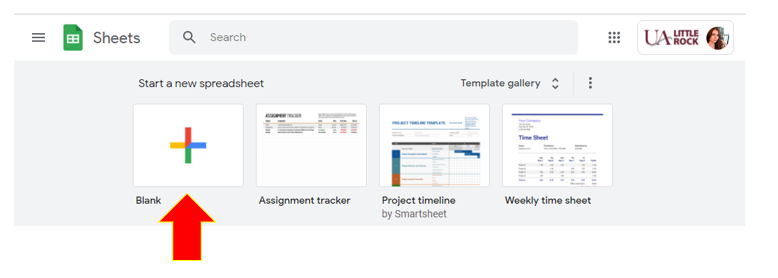
Figure \(\PageIndex{1}\): Start a new spreadsheet. (Copyright; E. Lisitsyna CC0.0) - Change the name of your new Google Sheet from "Untitled Spreadsheet" to "RasPi Data"
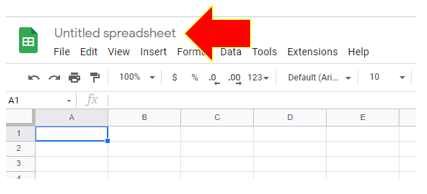
Figure \(\PageIndex{2}\): Change the name of your spreadsheet. (Copyright; E. Lisitsyna CC0.0) - Create column headers by typing "DateTime" in cell A1 and "Data" in cell B1
Enable Google APIs
Create New Project
- Open a new tab and go to the Google API console http://console.developers.google.com
- If this is your first time accessing Google Cloud Platform, you will be greeted with a welcome message. Select your country and check the checkbox, then click Agree and Continue.

Figure \(\PageIndex{3}\): Agree to Terms of Service. (Copyright; E. Lisitsyna CC0.0) - This window might look different if you don't have any projects in your Google Cloud Platform. We will be creating a new project for this class. Click on the triange next to the project name (it might also say "Select a Project" if you are new to this platform)
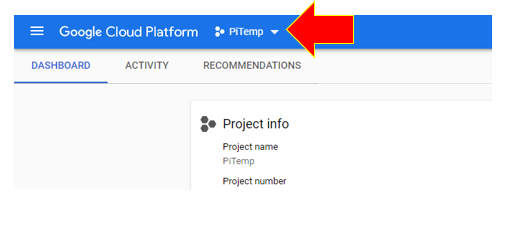
Figure \(\PageIndex{4}\): Select the project. (Copyright; E. Lisitsyna CC0.0) - In the overlay, click "New Project"
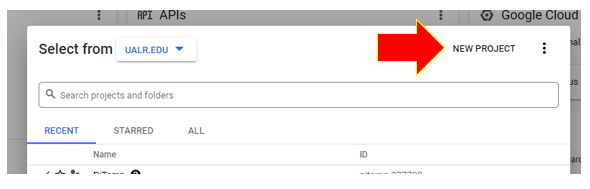
Figure \(\PageIndex{5}\): Create a new project. (Copyright; E. Lisitsyna CC0.0) - Type "mydata" in the Project Name field. Click "Create"
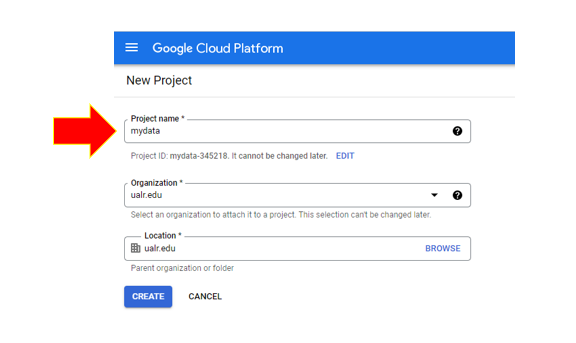
Figure \(\PageIndex{6}\): Name your new project. (Copyright; E. Lisitsyna CC0.0) - Wait for a few seconds. You will be notified when it's done. Click Select Project. This will bring you to your project dashboard
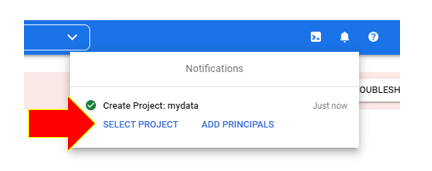
Figure \(\PageIndex{7}\): Navigate to the created project. (Copyright; E. Lisitsyna CC0.0)
Enable APIs
- Open the navigational menu (three lines next to the "Google Cloud Platform"), then select "APIs & Services"
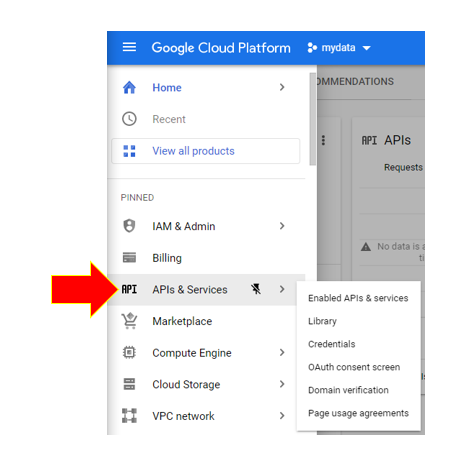
Figure \(\PageIndex{8}\): Go to APIs and Services. (Copyright; E. Lisitsyna CC0.0) - Click on "Enable APIs and Services"
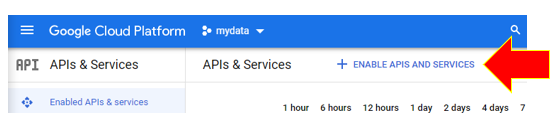
Figure \(\PageIndex{9}\): Click on the plus sign. (Copyright; E. Lisitsyna CC0.0) - In the search bar, type "Sheets" and hit Enter. This will show you the Google Sheets API that we need. Click on it
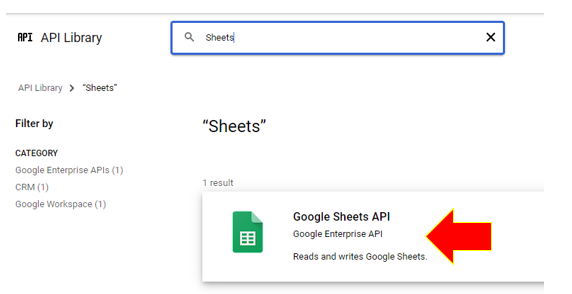
Figure \(\PageIndex{10}\): Search for Google Sheets API. (Copyright; E. Lisitsyna CC0.0) - On the next page click "Enable"
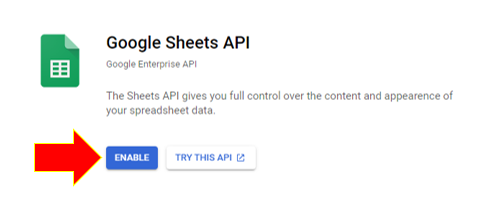
Figure \(\PageIndex{11}\): Enable API. (Copyright; E. Lisitsyna CC0.0) - Now we need to create credentials in order to be able to talk to Google Sheets. Click on "Create Credentials"
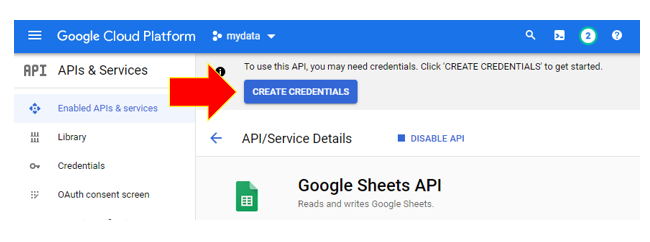
Figure \(\PageIndex{12}\): Click Create Credentials. (Copyright; E. Lisitsyna CC0.0) - Make sure your select the options indicated in the image below. Then click "Next" to go to the next step. DO NOT click on "Done" as we are not done yet
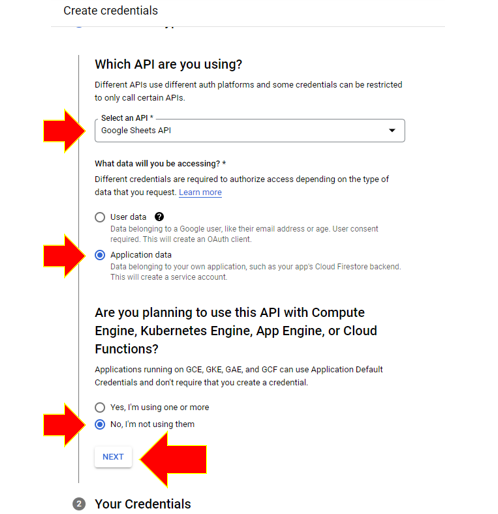
Figure \(\PageIndex{13}\): Create Credentials: Step 1. (Copyright; E. Lisitsyna CC0.0) - Next, type "MyRasPi" into the Service account name. You will see the email address populated below. Copy it by clicking on the copy icon. Use Sticky Notes app or any text document to paste this email. We will need it later. Click "Create and Continue" when you are done.
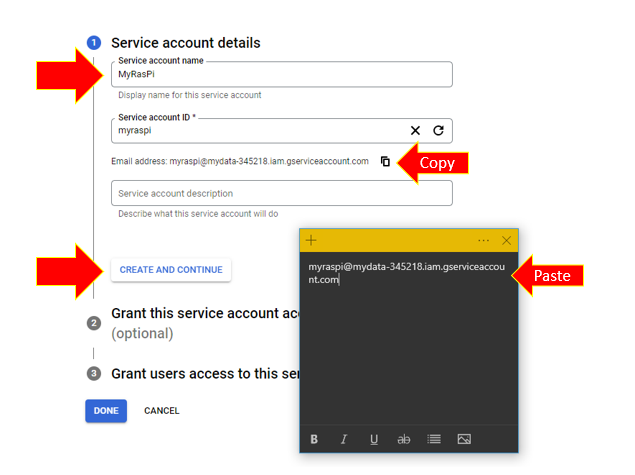
Figure \(\PageIndex{14}\): Create Credentials: Step 1. (Copyright; E. Lisitsyna CC0.0) - In the next step, select "Owner" in the role field. This will give your service account MyRasPi full permissions. Click "Continue" to move onto the next step
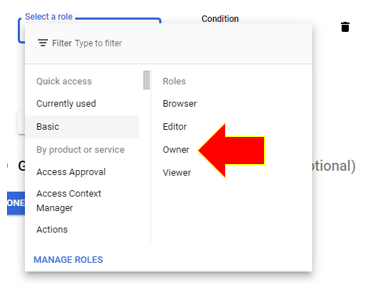
Figure \(\PageIndex{15}\): Create Credentials: Step 2. (Copyright; E. Lisitsyna CC0.0) - Don't change anything in step 3. Simply click "Done"
- Raspberry Pi script will be using a JSON key to communicate with the Google Sheets. To create a JSON file navigate to Credentials. You should see your newly created service account. Click on the edit icon (pencil)
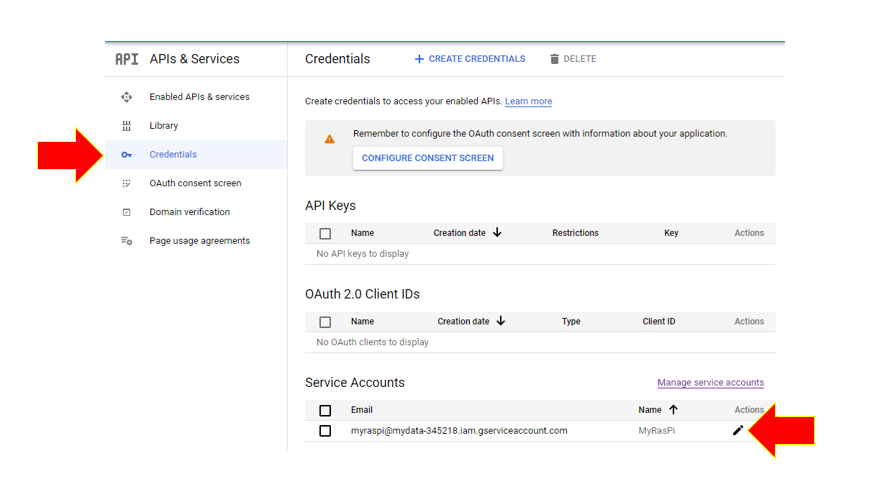
Figure \(\PageIndex{16}\): Edit service account. (Copyright; E. Lisitsyna CC0.0) - Go to the Keys tab, then click "Add Key" --> "Create new key"
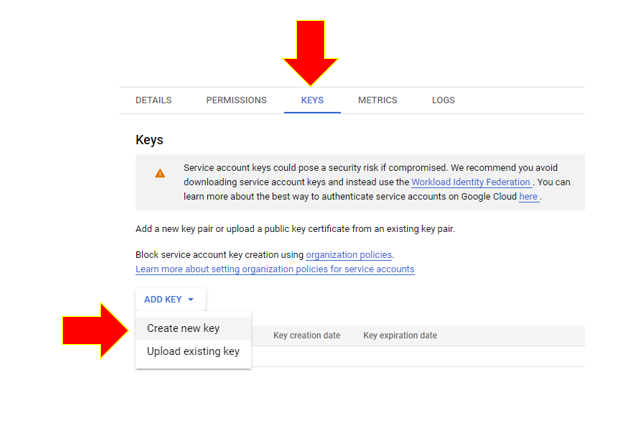
Figure \(\PageIndex{17}\): Add new key. (Copyright; E. Lisitsyna CC0.0) - Make sure that JSON is selected and click "Create". The key will be downloaded automatically
- Last thing that we need to do is to enable Google Drive API. To do that, repeat steps 1-4 of this section. In step 3 search for "Google Drive". Select Google Drive API by Google Enterprise API, You don't need to create credentials for this API, since we already did that for Google Sheets API

Figure \(\PageIndex{18}\): Enable Google Drive API. (Copyright; E. Lisitsyna CC0.0)
Stream Data from Raspberry Pi to Google Sheets
Share the Google Sheets with your Service Account
- Return to the Google Sheet you've created. Click on "Share"
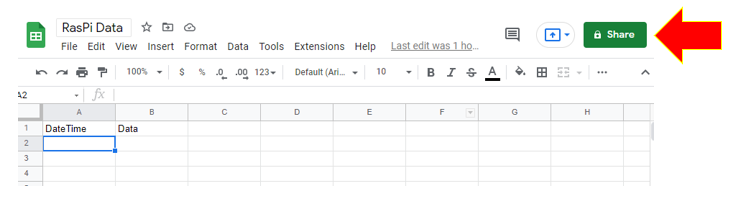
Figure \(\PageIndex{19}\): Share your Google Sheet with your service account. (Copyright; E. Lisitsyna CC0.0)
- You will need the service account email address from earlier. When you share your Google Sheet with the service account, make sure it is added as an editor
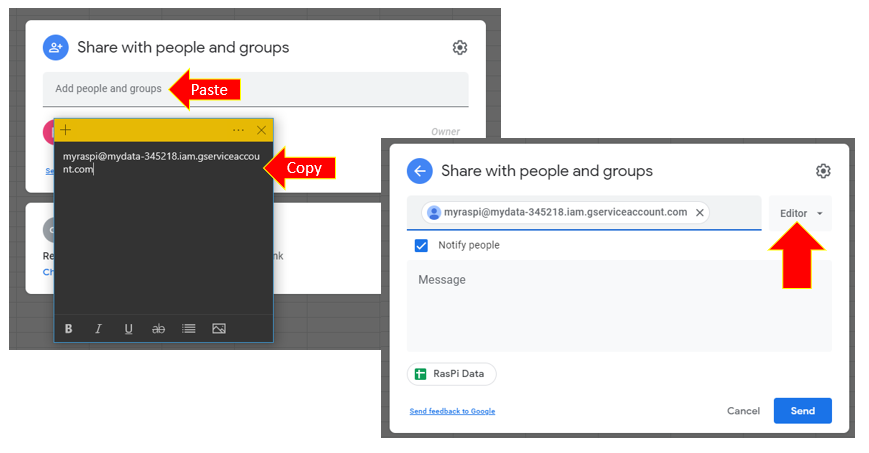
Figure \(\PageIndex{20}\): The service account requires editor permissions. (Copyright; E. Lisitsyna CC0.0)
Copy JSON Key to Raspberry Pi
The Python script will be referencing the JSON key that we downloaded from the Google Cloud Platform. This means that you need to copy the file from your device to the Raspberry Pi. We can use VNC Viewer for this.
- Open VNC Viewer and connect to your Raspberry Pi. Move your cursor to the top boarder of the VNC window, you will see the control panel slide down. Select the Icon with two arrows
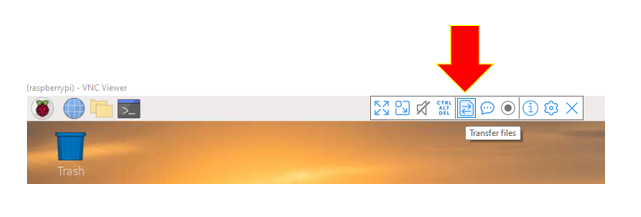
Figure \(\PageIndex{21}\): Transfer files via VNC. (Copyright; E. Lisitsyna CC0.0) - Click "Send Files" and select the JSON file from the Downloads folder on your device (unless you saved it to a different folder). Click Open
- The file will appear on your Raspberry Pi desktop. Close the file transfer window.
- Move your JSON file to the folder with Python scripts and rename it to mydata-key.json
Static Data Upload
- Open terminal and install gspread module:
pip3 install gspread
- Open Thonny, copy and paste the following script. Make sure to save your Python script to the same location where you moved your JSON file to
#!/usr/bin/python3 import datetime, time import gspread from google.auth.transport.requests import AuthorizedSession from google.oauth2 import service_account #Access Google API googleAPI = 'mydata-key.json' scope = ['https://www.googleapis.com/auth/drive'] credentials = service_account.Credentials.from_service_account_file(googleAPI) scopedCreds = credentials.with_scopes(scope) gc = gspread.Client(auth=scopedCreds) gc.session = AuthorizedSession(scopedCreds) sheet = gc.open("RasPi Data") worksheet = sheet.worksheet("Sheet1") #Upload data to Google Sheets time = datetime.datetime.now().strftime('%Y-%m-%d %H:%M:%S') data = 0 values =[time, data] worksheet.insert_row(values, 2, value_input_option='RAW') print("Google Sheet Updated") - Check your Google Sheet. You should see date and time in the first column and "0" in the second column.
Using PubChem API to Upload Data Through Google Sheet API
When we introduced concatenation in section 2.3.3.1 we showed how you could combine strings to create a uri (universal resource identifier) that allows you to extract data from thorough a chemical compound database API like that in PubChem. In this activity you will make a new tab on your Google Sheet and then merge the script from two scripts to create a program that will only upload data to your Google Sheet when you ask it to.
- Create a new tab in your Google Sheet labeled Sheet 2
- Edit the column headers in Google Sheet 2. Put "Compound Name" in cell B1, "Mass, g" in C1, "Moles" in D1 and leave "DateTime" in cell A1
- Copy and paste the following script to your Thonny IDE, but don't run it yet:
#!/usr/bin/python3 import datetime from time import sleep import gspread from google.auth.transport.requests import AuthorizedSession from google.oauth2 import service_account import requests #Access Google API googleAPI = 'mydata-key.json' scope = ['https://www.googleapis.com/auth/drive'] credentials = service_account.Credentials.from_service_account_file(googleAPI) scopedCreds = credentials.with_scopes(scope) gc = gspread.Client(auth=scopedCreds) gc.session = AuthorizedSession(scopedCreds) sheet = gc.open("RasPi Data") #Change this to match your spreadsheet's name worksheet = sheet.worksheet("Sheet2") #Send request to Pubchem def getMoles(): uri = ("https://pubchem.ncbi.nlm.nih.gov/rest/pug/compound/name/" +str(compound_name) +"/property/MolecularWeight/txt") res = requests.get(uri) molar_mass=float(res.text.rstrip()) moles = mass/molar_mass return moles #Main loop while True: compound_name = input("Input compound's name: ") mass = float(input("input mass of sample in units of g: ")) moles = getMoles() time = datetime.datetime.now().strftime('%Y-%m-%d %H:%M:%S') values =[time, compound_name, mass, moles] worksheet.insert_row(values, 2, value_input_option='RAW') print("Google Sheet Updated") sleep(1) - Before running the program above figure out what each line of code is supposed to do when the program run.
- Run the script and see the output in your Google Sheet
Contributors
Elena Lisitsyna created this module using prior material developed with assistance from Dr. Sunhwan Kim and Bob Belford.