
1.2: Pi Camera and email
- Page ID
- 367709
\( \newcommand{\vecs}[1]{\overset { \scriptstyle \rightharpoonup} {\mathbf{#1}} } \)
\( \newcommand{\vecd}[1]{\overset{-\!-\!\rightharpoonup}{\vphantom{a}\smash {#1}}} \)
\( \newcommand{\id}{\mathrm{id}}\) \( \newcommand{\Span}{\mathrm{span}}\)
( \newcommand{\kernel}{\mathrm{null}\,}\) \( \newcommand{\range}{\mathrm{range}\,}\)
\( \newcommand{\RealPart}{\mathrm{Re}}\) \( \newcommand{\ImaginaryPart}{\mathrm{Im}}\)
\( \newcommand{\Argument}{\mathrm{Arg}}\) \( \newcommand{\norm}[1]{\| #1 \|}\)
\( \newcommand{\inner}[2]{\langle #1, #2 \rangle}\)
\( \newcommand{\Span}{\mathrm{span}}\)
\( \newcommand{\id}{\mathrm{id}}\)
\( \newcommand{\Span}{\mathrm{span}}\)
\( \newcommand{\kernel}{\mathrm{null}\,}\)
\( \newcommand{\range}{\mathrm{range}\,}\)
\( \newcommand{\RealPart}{\mathrm{Re}}\)
\( \newcommand{\ImaginaryPart}{\mathrm{Im}}\)
\( \newcommand{\Argument}{\mathrm{Arg}}\)
\( \newcommand{\norm}[1]{\| #1 \|}\)
\( \newcommand{\inner}[2]{\langle #1, #2 \rangle}\)
\( \newcommand{\Span}{\mathrm{span}}\) \( \newcommand{\AA}{\unicode[.8,0]{x212B}}\)
\( \newcommand{\vectorA}[1]{\vec{#1}} % arrow\)
\( \newcommand{\vectorAt}[1]{\vec{\text{#1}}} % arrow\)
\( \newcommand{\vectorB}[1]{\overset { \scriptstyle \rightharpoonup} {\mathbf{#1}} } \)
\( \newcommand{\vectorC}[1]{\textbf{#1}} \)
\( \newcommand{\vectorD}[1]{\overrightarrow{#1}} \)
\( \newcommand{\vectorDt}[1]{\overrightarrow{\text{#1}}} \)
\( \newcommand{\vectE}[1]{\overset{-\!-\!\rightharpoonup}{\vphantom{a}\smash{\mathbf {#1}}}} \)
\( \newcommand{\vecs}[1]{\overset { \scriptstyle \rightharpoonup} {\mathbf{#1}} } \)
\( \newcommand{\vecd}[1]{\overset{-\!-\!\rightharpoonup}{\vphantom{a}\smash {#1}}} \)
\(\newcommand{\avec}{\mathbf a}\) \(\newcommand{\bvec}{\mathbf b}\) \(\newcommand{\cvec}{\mathbf c}\) \(\newcommand{\dvec}{\mathbf d}\) \(\newcommand{\dtil}{\widetilde{\mathbf d}}\) \(\newcommand{\evec}{\mathbf e}\) \(\newcommand{\fvec}{\mathbf f}\) \(\newcommand{\nvec}{\mathbf n}\) \(\newcommand{\pvec}{\mathbf p}\) \(\newcommand{\qvec}{\mathbf q}\) \(\newcommand{\svec}{\mathbf s}\) \(\newcommand{\tvec}{\mathbf t}\) \(\newcommand{\uvec}{\mathbf u}\) \(\newcommand{\vvec}{\mathbf v}\) \(\newcommand{\wvec}{\mathbf w}\) \(\newcommand{\xvec}{\mathbf x}\) \(\newcommand{\yvec}{\mathbf y}\) \(\newcommand{\zvec}{\mathbf z}\) \(\newcommand{\rvec}{\mathbf r}\) \(\newcommand{\mvec}{\mathbf m}\) \(\newcommand{\zerovec}{\mathbf 0}\) \(\newcommand{\onevec}{\mathbf 1}\) \(\newcommand{\real}{\mathbb R}\) \(\newcommand{\twovec}[2]{\left[\begin{array}{r}#1 \\ #2 \end{array}\right]}\) \(\newcommand{\ctwovec}[2]{\left[\begin{array}{c}#1 \\ #2 \end{array}\right]}\) \(\newcommand{\threevec}[3]{\left[\begin{array}{r}#1 \\ #2 \\ #3 \end{array}\right]}\) \(\newcommand{\cthreevec}[3]{\left[\begin{array}{c}#1 \\ #2 \\ #3 \end{array}\right]}\) \(\newcommand{\fourvec}[4]{\left[\begin{array}{r}#1 \\ #2 \\ #3 \\ #4 \end{array}\right]}\) \(\newcommand{\cfourvec}[4]{\left[\begin{array}{c}#1 \\ #2 \\ #3 \\ #4 \end{array}\right]}\) \(\newcommand{\fivevec}[5]{\left[\begin{array}{r}#1 \\ #2 \\ #3 \\ #4 \\ #5 \\ \end{array}\right]}\) \(\newcommand{\cfivevec}[5]{\left[\begin{array}{c}#1 \\ #2 \\ #3 \\ #4 \\ #5 \\ \end{array}\right]}\) \(\newcommand{\mattwo}[4]{\left[\begin{array}{rr}#1 \amp #2 \\ #3 \amp #4 \\ \end{array}\right]}\) \(\newcommand{\laspan}[1]{\text{Span}\{#1\}}\) \(\newcommand{\bcal}{\cal B}\) \(\newcommand{\ccal}{\cal C}\) \(\newcommand{\scal}{\cal S}\) \(\newcommand{\wcal}{\cal W}\) \(\newcommand{\ecal}{\cal E}\) \(\newcommand{\coords}[2]{\left\{#1\right\}_{#2}}\) \(\newcommand{\gray}[1]{\color{gray}{#1}}\) \(\newcommand{\lgray}[1]{\color{lightgray}{#1}}\) \(\newcommand{\rank}{\operatorname{rank}}\) \(\newcommand{\row}{\text{Row}}\) \(\newcommand{\col}{\text{Col}}\) \(\renewcommand{\row}{\text{Row}}\) \(\newcommand{\nul}{\text{Nul}}\) \(\newcommand{\var}{\text{Var}}\) \(\newcommand{\corr}{\text{corr}}\) \(\newcommand{\len}[1]{\left|#1\right|}\) \(\newcommand{\bbar}{\overline{\bvec}}\) \(\newcommand{\bhat}{\widehat{\bvec}}\) \(\newcommand{\bperp}{\bvec^\perp}\) \(\newcommand{\xhat}{\widehat{\xvec}}\) \(\newcommand{\vhat}{\widehat{\vvec}}\) \(\newcommand{\uhat}{\widehat{\uvec}}\) \(\newcommand{\what}{\widehat{\wvec}}\) \(\newcommand{\Sighat}{\widehat{\Sigma}}\) \(\newcommand{\lt}{<}\) \(\newcommand{\gt}{>}\) \(\newcommand{\amp}{&}\) \(\definecolor{fillinmathshade}{gray}{0.9}\)
Task 1: Setting up a Google email account
There are a lot of reasons you would want a Pi to be able to send an email, and that will be our first task for communication over the internet. This requires the program to be able to login to your email account, which means you must hard code your password and username. So we are going to have everyone set up a "fake gmail account" for this class, and then forward email from that account to your normal account.
- Create a new gmail account. Note, UALR uses gmail, and if you use an incognito browser you can run more than one email account at a time. Be sure to use a completely new username and password that you have never used before! These will be compromised!!!!
- Go to your Google Account (icon next to Google Apps), navigate to "Manage your Google Account" / "Security"' scroll down to "Less secure app access" and toggle to on (the default value is off).
 Figure \(\PageIndex{1}\): Screenshots (Feb 2022) of how to turn on "Less secure app access" for a Google account. (Belford; CC0.0)
It is advisable to forward from your new Google Account to the one you normally use. So go to your new email account (through the Google Apps), click settings (on your email, not your Google Account), choose "see all settings" /"Forwarding and POP/IMAP" and type in the email you would like posts to be forwarded to.
 Figure \(\PageIndex{2}\): Set up your gmail to forward posts to your normal email account. (Belford, CC 0.0)
Task 2: Organizing your Pi
In Windows you typically use a file manager to access files and the Raspberry Pi desktop gives you the same options (fig. \(\PageIndex{3}\)). Just as in Windows, you can right-click and choose new folder (or file). Note how the file names start with an underscore instead of a number, as there may be some programs fthat may treat your file as a variable and you should not start a variable name as a number. You will also be navigating your directory through shell terminal as indicated in the overlay of (fig. \(\PageIndex{3}\)). Note how the folders are in blue and the file in white. Also note how both the file manager and the terminal are displaying the exact same information.
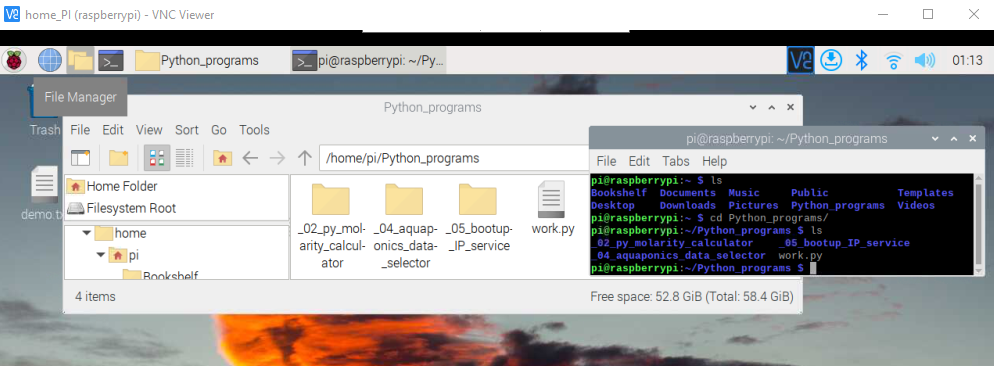 Figure \(\PageIndex{3}\): Two ways of navigating content in your Pi, File Manager and the shell terminal. (belford 0.0)
It is very important you keep your work organized and spend the time to properly structure the hierarchy of your directory.
Caution
Rename or comment out original script any time you save a file in Thonny as it will overwrite the original one when you run it. Throughout this semester you will be taking a working script, and then modifying it to add a new feature, which may involve removing an old feature. When you then run the program to see if the new feature works, you destroy the old feature. In fact you may develop several ways of doing the same thing, and you should rename each version, or you will lose it. The suffix _vn is good for different versions, for example, molarity_calculator_v1.py, molarity_calculator_v2.py,... . Or if the version has a feature add that as a suffix, molarity_calculator_new_molecule.py.
A final note in naming files is that some python files will be programs that have functions which have arguments, and sometimes those functions will auto generate data files that use those arguments as parameters, and it can be very useful to include the parameters in the file name. For example, say you are collecting pH every 10 minutes with one probe, and temperature every 10 minutes with another, and appending that data to a file. So one file inputs pH and time, the other temp and time, and so you may name them aquaponics_pH_10min.py, that creates a file aqua_ph_10min.txt, etc, or aquaponics_Temp_time_3hr.py or aquaponics_all_data_20min.py.... But if a program generates data, it can be prudent to put the parameters of the data in both the program name, and in the data file(s) it generates.
Task 3:Sending email without attachment
After you have set up your account on Google you are ready to send an email with your Raspberry Pi.
import smtplib
from email.mime.text import MIMEText
from email.mime.multipart import MIMEMultipart
from email.mime.base import MIMEBase
from email import encoders

email_user = "type here your_iost_account@gmail.com"
email_password ="type here your_iost_account@ gmail Password"
email_send = "type here the email_address you want to send an email to"

subject = "type here the subject line of your email"

msg = MIMEMultipart()
msg["From"] = email_user
msg["To"] = email_send
msg["Subject"] = subject

body = "Type here the message you wish to send"
msg.attach(MIMEText(body,"plain"))

text = msg.as_string()
server = smtplib.SMTP("smtp.gmail.com",587)
server.starttls()
server.login(email_user,email_password)
server.sendmail(email_user,email_send,text)
server.quit()
After analyzing the above code you see there are 5 variables that you need to fill. Your first assignment will be to alter the above code so you are asked the values of these variables in the shell.
Task 2: Sending email with attachment
import smtplib
from email.mime.multipart import MIMEMultipart
from email.mime.text import MIMEText
from email.mime.base import MIMEBase
from email import encoders
mail_content = '''TYPE YOUR
MESSAGE
HERE'''
#The mail addresses and password
sender_address = 'YOUR_IOST_CLASS_ACCOUNT@gmail.com'
sender_pass = 'YOUR_IOST_PASSWORD'
receiver_address = "EMAIL_YOU_WANT_TO_MAIL_TO"
#Setup the MIME
message = MIMEMultipart()
message['From'] = sender_address
message['To'] = receiver_address
message['Subject'] = 'A test mail sent by Python. It has an attachment.'
#The subject line
#The body and the attachments for the mail
attach_file_name = 'work.py'
message.attach(MIMEText(mail_content, 'plain'))
attach_file = open(attach_file_name, 'rb') # Open the file as binary mode
payload = MIMEBase('application', 'octate-stream')
#payload.set_payload((attach_file).read())
payload.set_payload((attach_file).read())
encoders.encode_base64(payload) #encode the attachment
#add payload header with filename
#payload.add_header('Content-Decomposition', 'attachment', filename=attach_file_name)
payload.add_header('Content-Disposition', 'attachment', filename=attach_file_name)
#message.attach(attach_file_name,maintype='image')
message.attach(payload)
#Create SMTP session for sending the mail
session = smtplib.SMTP('smtp.gmail.com', 587) #use gmail with port
session.starttls() #enable security
session.login(sender_address,sender_pass) #login with mail_id and password
text = message.as_string()
session.sendmail(sender_address, receiver_address, text)
#to send more than one email
#session.sendmail(sender_address, receiver_address.split(","), text)
session.quit()
print('Mail Sent')
The above script sends an email with an attachment. The attachment must be in the same folder as the python program.
Task 3: Sending email with IP address on boot-up
To access your Pi over VNC you need to know its IP address and these can change from location to location. In fact some schools (like UALR) have dynamic IP address and so it can change if you turn the Pi off and on. This activity will consist of two parts. First you will analyze code that identifies your Pi's IP address, and then you will set up a Cron job that sends an email with the IP to your Google account.
Note
The Internet Protocol Address (IP Address) is a unique string of numbers separated by periods that identifies each computer using the internet protocol to communicate over a network.
Finding IP Address
In this script we are creating a user defined function called get_ip_address() by using the "def" command.import socket
import fcntl
import struct
def get_ip_address(ifname):
    s = socket.socket(socket.AF_INET, socket.SOCK_DGRAM)
    # uncomment the following line if using python2
    #return socket.inet_ntoa(fcntl.ioctl(s.fileno(),0x8915,struct.pack('256s',ifname[:15]))[20:24])
    # uncomment the following line if using python3
    return socket.inet_ntoa(fcntl.ioctl(s.fileno(),0x8915,struct.pack('256s',bytes(ifname[:15],'utf-8')))[20:24])
address = get_ip_address('wlan0')
#change wlan0 to eth0 if you want the wired IP address
print(address)
Note, we are passing wlan0 as the argument. If you are using ethernet you would pass eth0 as the argument
emailing IP address
The following script will grab your IP address and email it to you. You need to create a program
import smtplib
from email.mime.text import MIMEText
from email.mime.multipart import MIMEMultipart
from email.mime.base import MIMEBase
from email import encoders
#for send IP
import socket
import fcntl
import struct

email_user = "my_sacrifical@gmail.com"
email_password = "my_sf_password"
email_send = "EMAIL_2B_NOTIFIED"


#create function to get ip address
def get_ip_address(ifname):
    s = socket.socket(socket.AF_INET, socket.SOCK_DGRAM)
    return socket.inet_ntoa(fcntl.ioctl(s.fileno(),0x8915,struct.pack('256s',bytes(ifname[:15],'utf-8')))[20:24])

#assign IP address to variable address
address = get_ip_address('wlan0')

subject=str(address)

msg = MIMEMultipart()
msg["From"] = email_user
msg["To"] = email_send
msg["Subject"] = subject

body="The new IP address is " + str(address)

msg.attach(MIMEText(body,"plain"))
text = msg.as_string()
server = smtplib.SMTP("smtp.gmail.com",587)
server.starttls()
server.login(email_user,email_password)

server.sendmail(email_user,email_send,text)
server.quit()
Note, if the above script does not work there may be some cut and paste issues with the get_ip_address(_) function and you may need to manually type it in.
Setting up Cron job
Information
The software utility cron is a time-based job scheduler in Unix-like computer operating systems. People who set up and maintain software environments use cron to schedule jobs (commands or shell scripts) to run periodically at fixed times, dates, or intervals. It typically automates system maintenance or administration—though its general-purpose nature makes it useful for things like downloading files from the Internet and downloading email at regular intervals. (from Wikipedia)
We can set up a cron job to run our ip address emailer every time we boot our raspberry pi. That way if we forget to attach the monitor, or want to connect remotely, we have its IP address to connect. To do this at your prompt type the following:
pi@hostname:~ $ sudo crontab -e
The first time you do this, you will be prompted to select your favorite editor. We will select 1 for the nano editor. At the bottom of the document add the following line
@reboot sleep 60 && python3 /home/pi/python_programs/send_my_ipaddress.py
Now reboot your Pi and see if you get an email with the IP address. If so, you are done with this part of the assignment.
Setting up Camera
You will now set up the Ribbon camera as outlined in Figure \(\PageIndex{4}\), but first, you should watch the following two videos. The camera is very static sensitive, so you want to be careful. It comes in a protective ESD bag, and you should store it in a ESD bag when not in use. It is advisable that you touch a grounded metal surface before working with the camera. You will attach the camera to the pi through the MIPI SCI (Camera Serial Interface) with the 15 pin ribbon, such that the blue side faces towards the USB 2.0 ports (Pi 4), or the ethernet (Pi 3). The connector has a plastic clip that needs to be raised slightly, you then slip in the ribbon and then lower the clip back into place. I personally like to use tweezers and suggest you get a set of precision tweezers like these, as you will find them very useful when you are building circuits.
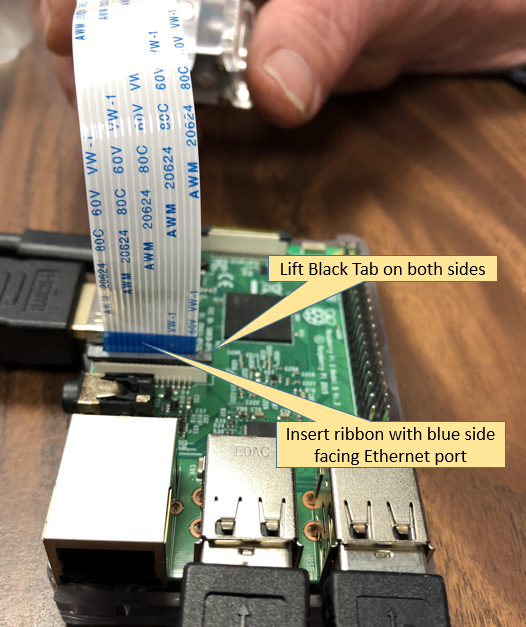 Figure \(\PageIndex{4}\): You lift up the black tabs around the camera port and then insert the ribbon with the blue side facing the ethernet port. Note, this picture is of a Pi 3, and in the Pi 4 the USB 2.0 ports are located where the ethernet port on the Pi 3 is
With the Raspberry Bullseye operating system the old raspicam program was deprecated and the new libcamera is installed. Many programs still use the old system and you can switch between them with the raspi-config command.
Switching camera interfaces
To switch camera interfaces between raspicam and libcamera you go to the Pi Configuration Tool (raspi-config)
sudo raspi-config
Use the down arrow to navigate to option 3 (left image of fig. \(\PageIndex{5}\))
 Figure \(\PageIndex{5}\): Raspberry Pi Configuration tool (2022, Belford CC0.0)
The first option is to support the legacy camera support (raspicam), and the default should be for it not to be supported (right two images fig. \(\PageIndex{5}\)). If you wish to use Raspicam you need to choose yes. If you wish to use Libcamera, just leave it at No. I suggest you work with Libcamera, but if you have some third party software the issue may be that it is set up for raspicam commands, and so you may need to switch the interface.
If you choose to use Raspicam you can go to the 2020 class section 1.3.7.
Right now we are going to interact with the camera through the command line. Later on we will do this through python scripts.
Command Line Acces to Camera
The following material relates to the Bullseye operating system and uses libcamera. If you are using Buster or wish to use the Raspicam legacy interface, go to section 1.3.7 of the 2020 class. The following video and this article from Core Electronics , How to use of Raspberry Pi Cameras with Bulleseye OS Update are a good place to start.
Video
libcamera commands
For a complete overview of the librecamer options go to Raspberry Pi camera documentation.
Preview
libcamera-hello - gives a 5 second view of what the camera sees
libcamera-hello
the following switch keeps the view on until you terminate the command (<ctrl>c) or close the window.
libcamera-hello -t 0
Still Picture
There currently is an issue if you have disconnected a monitor and are using VNC in that it will not save the file and gives a segmentation error (it works if the monitor is plugged in and off (or on), but not if it is unplugged.
libcamera-jpeg -o /home/pi/Pictures/nefw.jpg
will crash
The workaround is to disable the preview with -n before the -o
libcamera-jpeg -n -o /home/pi/Pictures/nefw.jpg
libcamera-jpeg -o filename.jpg Will save the camera in the folder your command line is operating in. the -o switch indicates output file
libcamera-jpeg -o FirstPhoto.jpg
If you wish to place it in another folder you can add the path from your home directory
libcamera-jpeg -o /home/pi/Pictures/FirstPhoto.jpg
to flip the image along the vertical axis
libcamera-jpeg -o /home/pi/Pictures/FirstPhoto.jpg --vflip
to delay picture 5 seconds (5,000 miliseconds)
libcamera-jpeg -o /home/pi/Pictures/FirstPhoto.jpg -t 5000
libcamera-still allows you to save in different formats through the equivalency switch (-e)
libcamera-still -e png -o /home/pi/Pictures/FirstPNGphoto.png
time lapse images - the following takes an image every second for 4 seconds (I am not sure why the first one is not saved). It then labels each picture in date-time format (MMDDhhmmss). Note, in the following script we have not indicated the directory.
libcamera-still -t 5000 --timelapse 1000 --datetime
Video
Here you are making a 5 second video and storing it in the Videos directory. the .h264 makes an mp4 video.
libcamera-vid -t 5000 -o /home/pi/Videos/firstmovie.h264
Python Access Camera
The following pertains to the new libcamera on Bullseye. If you are using the legacy system you should check out section 1.3.7.2 of the Fall 2020 course. To run any of the above commands you simply do a system call from python with the following function
os.system('Insert Command Code Here')
import os
os.system('libcamera-hello -t 0')