
1.3: Pi OS
- Page ID
- 369576
\( \newcommand{\vecs}[1]{\overset { \scriptstyle \rightharpoonup} {\mathbf{#1}} } \)
\( \newcommand{\vecd}[1]{\overset{-\!-\!\rightharpoonup}{\vphantom{a}\smash {#1}}} \)
\( \newcommand{\id}{\mathrm{id}}\) \( \newcommand{\Span}{\mathrm{span}}\)
( \newcommand{\kernel}{\mathrm{null}\,}\) \( \newcommand{\range}{\mathrm{range}\,}\)
\( \newcommand{\RealPart}{\mathrm{Re}}\) \( \newcommand{\ImaginaryPart}{\mathrm{Im}}\)
\( \newcommand{\Argument}{\mathrm{Arg}}\) \( \newcommand{\norm}[1]{\| #1 \|}\)
\( \newcommand{\inner}[2]{\langle #1, #2 \rangle}\)
\( \newcommand{\Span}{\mathrm{span}}\)
\( \newcommand{\id}{\mathrm{id}}\)
\( \newcommand{\Span}{\mathrm{span}}\)
\( \newcommand{\kernel}{\mathrm{null}\,}\)
\( \newcommand{\range}{\mathrm{range}\,}\)
\( \newcommand{\RealPart}{\mathrm{Re}}\)
\( \newcommand{\ImaginaryPart}{\mathrm{Im}}\)
\( \newcommand{\Argument}{\mathrm{Arg}}\)
\( \newcommand{\norm}[1]{\| #1 \|}\)
\( \newcommand{\inner}[2]{\langle #1, #2 \rangle}\)
\( \newcommand{\Span}{\mathrm{span}}\) \( \newcommand{\AA}{\unicode[.8,0]{x212B}}\)
\( \newcommand{\vectorA}[1]{\vec{#1}} % arrow\)
\( \newcommand{\vectorAt}[1]{\vec{\text{#1}}} % arrow\)
\( \newcommand{\vectorB}[1]{\overset { \scriptstyle \rightharpoonup} {\mathbf{#1}} } \)
\( \newcommand{\vectorC}[1]{\textbf{#1}} \)
\( \newcommand{\vectorD}[1]{\overrightarrow{#1}} \)
\( \newcommand{\vectorDt}[1]{\overrightarrow{\text{#1}}} \)
\( \newcommand{\vectE}[1]{\overset{-\!-\!\rightharpoonup}{\vphantom{a}\smash{\mathbf {#1}}}} \)
\( \newcommand{\vecs}[1]{\overset { \scriptstyle \rightharpoonup} {\mathbf{#1}} } \)
\( \newcommand{\vecd}[1]{\overset{-\!-\!\rightharpoonup}{\vphantom{a}\smash {#1}}} \)
\(\newcommand{\avec}{\mathbf a}\) \(\newcommand{\bvec}{\mathbf b}\) \(\newcommand{\cvec}{\mathbf c}\) \(\newcommand{\dvec}{\mathbf d}\) \(\newcommand{\dtil}{\widetilde{\mathbf d}}\) \(\newcommand{\evec}{\mathbf e}\) \(\newcommand{\fvec}{\mathbf f}\) \(\newcommand{\nvec}{\mathbf n}\) \(\newcommand{\pvec}{\mathbf p}\) \(\newcommand{\qvec}{\mathbf q}\) \(\newcommand{\svec}{\mathbf s}\) \(\newcommand{\tvec}{\mathbf t}\) \(\newcommand{\uvec}{\mathbf u}\) \(\newcommand{\vvec}{\mathbf v}\) \(\newcommand{\wvec}{\mathbf w}\) \(\newcommand{\xvec}{\mathbf x}\) \(\newcommand{\yvec}{\mathbf y}\) \(\newcommand{\zvec}{\mathbf z}\) \(\newcommand{\rvec}{\mathbf r}\) \(\newcommand{\mvec}{\mathbf m}\) \(\newcommand{\zerovec}{\mathbf 0}\) \(\newcommand{\onevec}{\mathbf 1}\) \(\newcommand{\real}{\mathbb R}\) \(\newcommand{\twovec}[2]{\left[\begin{array}{r}#1 \\ #2 \end{array}\right]}\) \(\newcommand{\ctwovec}[2]{\left[\begin{array}{c}#1 \\ #2 \end{array}\right]}\) \(\newcommand{\threevec}[3]{\left[\begin{array}{r}#1 \\ #2 \\ #3 \end{array}\right]}\) \(\newcommand{\cthreevec}[3]{\left[\begin{array}{c}#1 \\ #2 \\ #3 \end{array}\right]}\) \(\newcommand{\fourvec}[4]{\left[\begin{array}{r}#1 \\ #2 \\ #3 \\ #4 \end{array}\right]}\) \(\newcommand{\cfourvec}[4]{\left[\begin{array}{c}#1 \\ #2 \\ #3 \\ #4 \end{array}\right]}\) \(\newcommand{\fivevec}[5]{\left[\begin{array}{r}#1 \\ #2 \\ #3 \\ #4 \\ #5 \\ \end{array}\right]}\) \(\newcommand{\cfivevec}[5]{\left[\begin{array}{c}#1 \\ #2 \\ #3 \\ #4 \\ #5 \\ \end{array}\right]}\) \(\newcommand{\mattwo}[4]{\left[\begin{array}{rr}#1 \amp #2 \\ #3 \amp #4 \\ \end{array}\right]}\) \(\newcommand{\laspan}[1]{\text{Span}\{#1\}}\) \(\newcommand{\bcal}{\cal B}\) \(\newcommand{\ccal}{\cal C}\) \(\newcommand{\scal}{\cal S}\) \(\newcommand{\wcal}{\cal W}\) \(\newcommand{\ecal}{\cal E}\) \(\newcommand{\coords}[2]{\left\{#1\right\}_{#2}}\) \(\newcommand{\gray}[1]{\color{gray}{#1}}\) \(\newcommand{\lgray}[1]{\color{lightgray}{#1}}\) \(\newcommand{\rank}{\operatorname{rank}}\) \(\newcommand{\row}{\text{Row}}\) \(\newcommand{\col}{\text{Col}}\) \(\renewcommand{\row}{\text{Row}}\) \(\newcommand{\nul}{\text{Nul}}\) \(\newcommand{\var}{\text{Var}}\) \(\newcommand{\corr}{\text{corr}}\) \(\newcommand{\len}[1]{\left|#1\right|}\) \(\newcommand{\bbar}{\overline{\bvec}}\) \(\newcommand{\bhat}{\widehat{\bvec}}\) \(\newcommand{\bperp}{\bvec^\perp}\) \(\newcommand{\xhat}{\widehat{\xvec}}\) \(\newcommand{\vhat}{\widehat{\vvec}}\) \(\newcommand{\uhat}{\widehat{\uvec}}\) \(\newcommand{\what}{\widehat{\wvec}}\) \(\newcommand{\Sighat}{\widehat{\Sigma}}\) \(\newcommand{\lt}{<}\) \(\newcommand{\gt}{>}\) \(\newcommand{\amp}{&}\) \(\definecolor{fillinmathshade}{gray}{0.9}\)Your Raspberry Pi typically uses the Debian Linux operating system and this section will introduce you to some common Linux commands that you will find useful. Linux is an open source operating system that is similar to Unix, but through the GNU project (GNU's Not Unix) has a General Public License (GNU GPL). Yes, GNU is a recursive acronym and stand for "GNU Not Linux". The most recent versions of Debian Linux are Buster (released in July 2019) Bullseye (released in August 2021) and if you installed your operating system after November 21, 2020 using the instructions outlined in section 1.1 you have installed Bullseye.
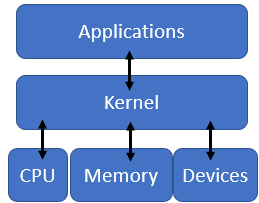
Linux is the "kernel" of your computer's operating system, and interpreted language that you access through the shell (command prompt) and gives you access to control the hardware on your computer. Figure When a series of Linux commands are bundled into a script it is often called a BASH script, which stands for Borne Again Shell. We will use BASH scripts both within the Raspberry Pi terminal and through system calls from Python.
Linux File System
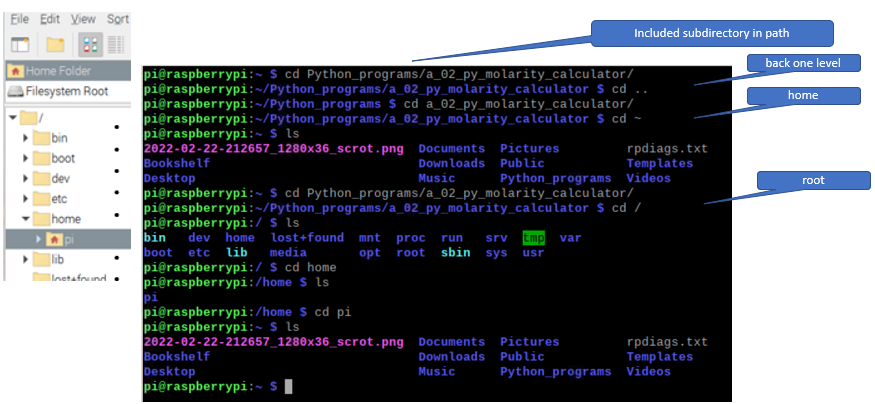
Linux uses a tree structure for the file system, and the contents are placed in folders, which are also called directories. You can navigate this system with the "File Manager" of the Raspberry Pi Desktop (figure \(\PageIndex{2}\) or through commands like ls (list) and cd (change directory) of a shell terminal (figure \(\PageIndex{3}\)). You can activate the File Manager by clicking on the two folder icon of the keyboard, and here we are showing the contents of user pi (which is highlighted in the tree structure on the left)
 Figure \(\PageIndex{2}\): Raspberry Pi desktop File Manager view of the Filesystem Root Directory showing contents of user Pi. Note in this directory there are 10 other directories and two files. (Belford; CC 0.0)
Figure \(\PageIndex{2}\) shows the Linux root file structure and unless you know what you are doing you should only add/alter files in your user directory. Here we are showing the default user directory of pi, and in this directory we have created a program for your python programs. Not in naming files and directories you should have no blank spaces and we used an underscore in the name Python_programs. We also started the name of the directory with a capital letter, which is a personal preference that will be explained later when we get into key-board shortcuts.
Pi Terminal
The terminal icon on the toolbar opens the command shell (figure \(\PageIndex{3}\))
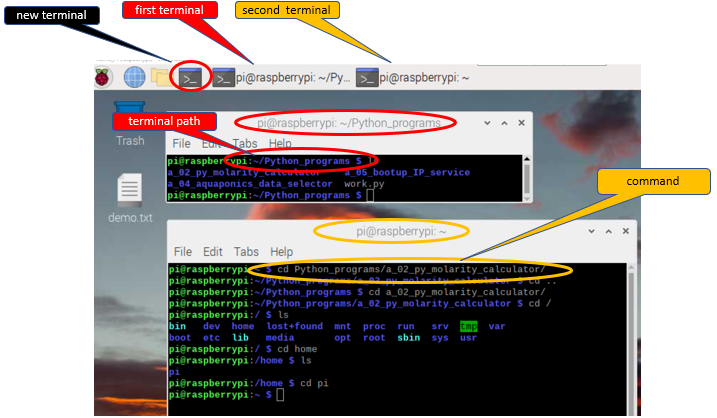
Note you can run more than one terminal shell at a time. The title in the terminal indicates the path.
Keyboard Shortcuts
The following is a list of Keyboard shortcuts you can use in the shell terminal.
- <ctrl><alt>t - Opens the shell terminal
- <ctrl>c - Kills current running command
- <shift><ctrl>C - Copy
- <shift><ctrl>V - Paste
- <ctrl> u - wipe out from curser to beginning of line
- <ctrul> a - jump to front of line
- <ctrl> c - jump to end of line
- <ctrl> l - clear screen
- <shift><ctrl>+ - increase shell terminal size
- <shift><ctrl>- - decrease shell terminal size
- <tab> -auto complete
Note that <ctrl> c kills a program while <ctrl> C copies highlighted text.
Keyboarding Tips
<tab> - auto complete is very useful as it lets you see what directories and commands are available, while also avoiding the issue of spelling mistakes. In the following example ( top shell of figure \(\PageIndex{4}\)) you are in the pi directory of figure \(\PageIndex{2}\) and hit the following commands.
P <tab> - nothing happens as there is more than one folder that starts with P
<tab> - hitting a second tab prints the the name of the three folders that start with P, and return the P
y <tab> - it now auto completes Python_programs as there is only one item that starts with Py
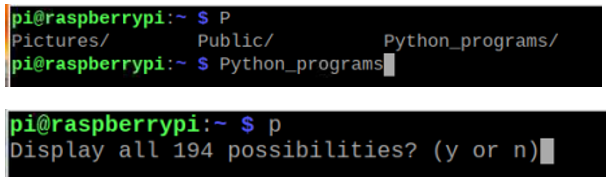 Figure \(\PageIndex{4}\): Copy and Paste Caption here. (Copyright; author via source)
Note in the bottom shell of figure \(\PageIndex{4}\) a small "p" was typed, followed by two tabs, and resulted in 194 possibilities. This is because most functions start with a lower case letter and is why I am suggesting you start your folders with a capital letter, as you can then quickly navigate to them without having to type as many letters to come up with a unique name for auto complete to work.
Note, if you try <tab> on a file it needs to be executable for auto complete to work, or you need to be in the nano editor.
 Up arrow moves to previous command in the past
 Down arrow moves to previous command in the future
<History> Gives Indexed list of past commands that were saved if you properly exited.
!<Index Number> brings the command in history to the command prompt
Navigation Commands
cd
-Change Directory
cd .. - back one level
cd ~ - home directory
cd / - root directory
 cd commands
clear
-clear the shell
cp
-copy directory or file (change path)
 cp filename_with_current_path new_path
cp - r /current directory/ /new directory/ -allows you to move subdirectories
cp -r /home/pi/mydocuments/ /home/pi/experiment_folder
ls
- list directory contents
ls *.py - Shows python files
ls ../ -Shows other files of current directory
ls -a Shows hidden files
ls -l -shows permissions
 ls -l
ls -lls -R -Recursively show list
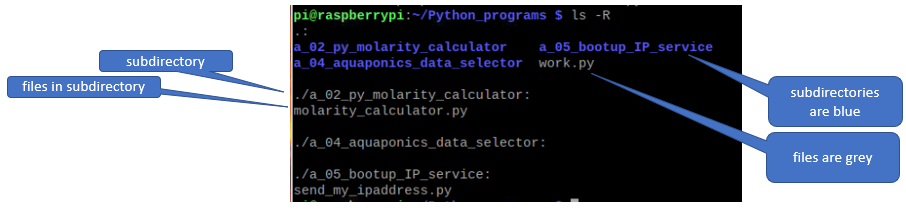 ls -R
ls -R
mkdir [name]
-make a directory, where [name] is the name of the directory
pwd
- Print Working Directory (shows where you are)
rmdir [name]
-remove empty directory
rm -rf [name]
-forced and recursive removal of a director [name]
tree
-Provides directory structure
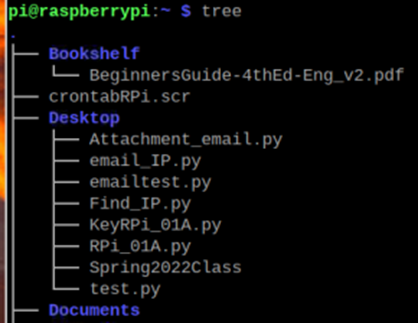 tree
tree
System Management
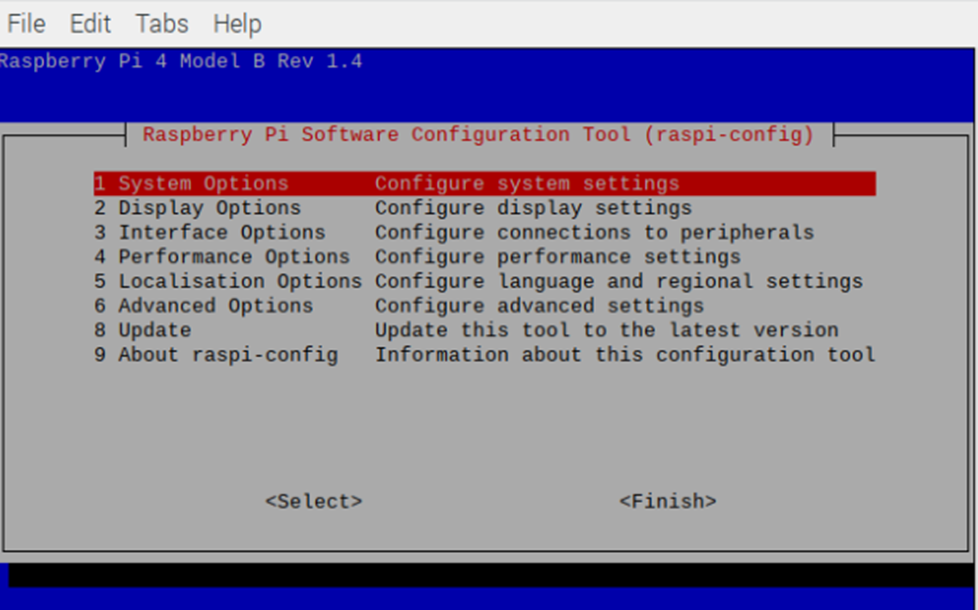
Pi Configuration Tool
sudo raspi-config opens the keyboard-based navigation tool.
- up/down arrow allows navigation across items
- right/left arrow allows you to select and finish choices
 Pi Configuration Tool (2022)
Operating system
cat /etc/os-release
- need to be in root directory
- gives info on CPU
 Identify operating system
cat /proc/version - information on version of Linux
 Information on version of Linux
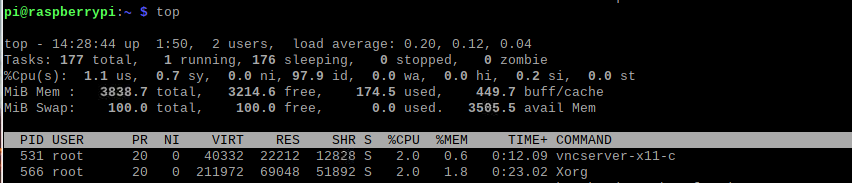
top
top
 Identify operating system
line 1: time, how long system has been up, number of users and load average over last minute, 5 minute and 15 minutes.
line 2: number of tasks and their states (running, sleeping, stopped), and the number of zombies*
line 3: CPU info
line 4: info on memory
The remaining table gives process ID for running processes and information about those processes.
*Zombies are like orphaned pieces of old programs that have not been completely removed from memory
Hardware Information
cat /proc/cpuinfo - information on CPU
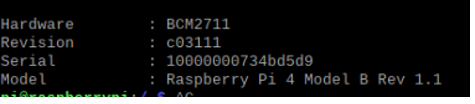 CPU information
memory functions
cat /proc/meminfo -information on memory
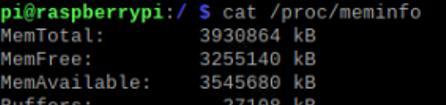 Memory information
free -h -available system memory
 Available memory
CPU Tempera
SD card functions
cat /proc/partitions - information of SD card
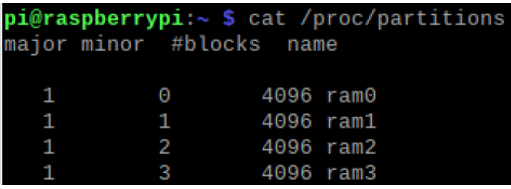 SD card information
df -h - free disk space (-h human readable)
 SD card information
vcgencmd get_men arm && vcgenchmd get_mem gpu - SoC memory split between cpu and gpuation of SD card
 System on Chip memory split between CPU and GPU
CPU Temperature
vcgencmd measure temp - information of SD card
 Temperature of CPU
External Ports
lsusb - devices attached to USB ports
 Devices attached to USB ports
CPU Temperature
shutdown
sudo shutdown -h now -shuts down now (h for halt)
reboot
sudo reboot -restarts pi from command line. You will not need to resubmit password
User Management
User Permissions
there are three types of users (owner, group and other) and three types of permissions (read, write and execute)
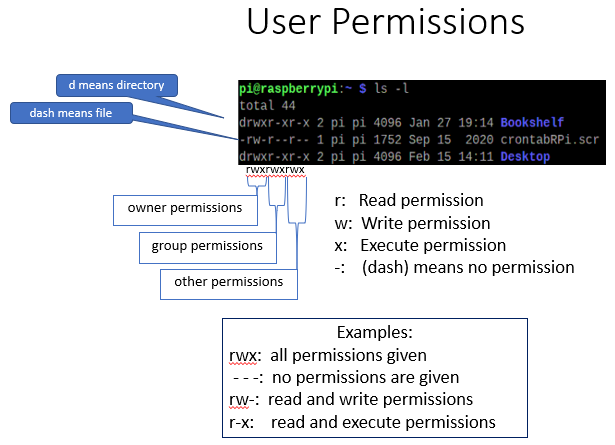
chmod
-allows you to assign permissions to a file or directory
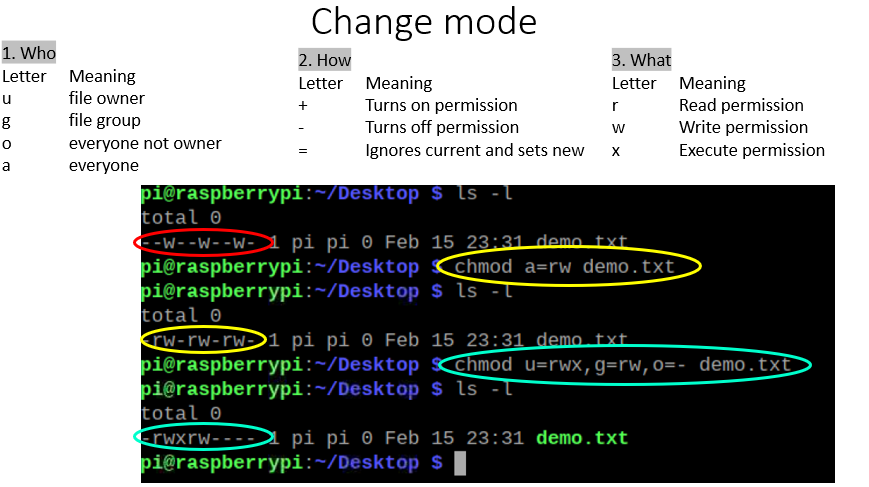 Various chmod actions
In the above image ls -l showed that everyone had write permissions for the file demo.txt. He command chmod a=rw demo.txt gave everone read and write permissions for the demo.txt document. This was then changed with the command chmod u=rwx, g=rw, o=- demo.txt, which gave the user all permissions, the group read and write and others no permissions.