
1.1: Starting your Pi
- Page ID
- 358426
\( \newcommand{\vecs}[1]{\overset { \scriptstyle \rightharpoonup} {\mathbf{#1}} } \)
\( \newcommand{\vecd}[1]{\overset{-\!-\!\rightharpoonup}{\vphantom{a}\smash {#1}}} \)
\( \newcommand{\id}{\mathrm{id}}\) \( \newcommand{\Span}{\mathrm{span}}\)
( \newcommand{\kernel}{\mathrm{null}\,}\) \( \newcommand{\range}{\mathrm{range}\,}\)
\( \newcommand{\RealPart}{\mathrm{Re}}\) \( \newcommand{\ImaginaryPart}{\mathrm{Im}}\)
\( \newcommand{\Argument}{\mathrm{Arg}}\) \( \newcommand{\norm}[1]{\| #1 \|}\)
\( \newcommand{\inner}[2]{\langle #1, #2 \rangle}\)
\( \newcommand{\Span}{\mathrm{span}}\)
\( \newcommand{\id}{\mathrm{id}}\)
\( \newcommand{\Span}{\mathrm{span}}\)
\( \newcommand{\kernel}{\mathrm{null}\,}\)
\( \newcommand{\range}{\mathrm{range}\,}\)
\( \newcommand{\RealPart}{\mathrm{Re}}\)
\( \newcommand{\ImaginaryPart}{\mathrm{Im}}\)
\( \newcommand{\Argument}{\mathrm{Arg}}\)
\( \newcommand{\norm}[1]{\| #1 \|}\)
\( \newcommand{\inner}[2]{\langle #1, #2 \rangle}\)
\( \newcommand{\Span}{\mathrm{span}}\) \( \newcommand{\AA}{\unicode[.8,0]{x212B}}\)
\( \newcommand{\vectorA}[1]{\vec{#1}} % arrow\)
\( \newcommand{\vectorAt}[1]{\vec{\text{#1}}} % arrow\)
\( \newcommand{\vectorB}[1]{\overset { \scriptstyle \rightharpoonup} {\mathbf{#1}} } \)
\( \newcommand{\vectorC}[1]{\textbf{#1}} \)
\( \newcommand{\vectorD}[1]{\overrightarrow{#1}} \)
\( \newcommand{\vectorDt}[1]{\overrightarrow{\text{#1}}} \)
\( \newcommand{\vectE}[1]{\overset{-\!-\!\rightharpoonup}{\vphantom{a}\smash{\mathbf {#1}}}} \)
\( \newcommand{\vecs}[1]{\overset { \scriptstyle \rightharpoonup} {\mathbf{#1}} } \)
\( \newcommand{\vecd}[1]{\overset{-\!-\!\rightharpoonup}{\vphantom{a}\smash {#1}}} \)
\(\newcommand{\avec}{\mathbf a}\) \(\newcommand{\bvec}{\mathbf b}\) \(\newcommand{\cvec}{\mathbf c}\) \(\newcommand{\dvec}{\mathbf d}\) \(\newcommand{\dtil}{\widetilde{\mathbf d}}\) \(\newcommand{\evec}{\mathbf e}\) \(\newcommand{\fvec}{\mathbf f}\) \(\newcommand{\nvec}{\mathbf n}\) \(\newcommand{\pvec}{\mathbf p}\) \(\newcommand{\qvec}{\mathbf q}\) \(\newcommand{\svec}{\mathbf s}\) \(\newcommand{\tvec}{\mathbf t}\) \(\newcommand{\uvec}{\mathbf u}\) \(\newcommand{\vvec}{\mathbf v}\) \(\newcommand{\wvec}{\mathbf w}\) \(\newcommand{\xvec}{\mathbf x}\) \(\newcommand{\yvec}{\mathbf y}\) \(\newcommand{\zvec}{\mathbf z}\) \(\newcommand{\rvec}{\mathbf r}\) \(\newcommand{\mvec}{\mathbf m}\) \(\newcommand{\zerovec}{\mathbf 0}\) \(\newcommand{\onevec}{\mathbf 1}\) \(\newcommand{\real}{\mathbb R}\) \(\newcommand{\twovec}[2]{\left[\begin{array}{r}#1 \\ #2 \end{array}\right]}\) \(\newcommand{\ctwovec}[2]{\left[\begin{array}{c}#1 \\ #2 \end{array}\right]}\) \(\newcommand{\threevec}[3]{\left[\begin{array}{r}#1 \\ #2 \\ #3 \end{array}\right]}\) \(\newcommand{\cthreevec}[3]{\left[\begin{array}{c}#1 \\ #2 \\ #3 \end{array}\right]}\) \(\newcommand{\fourvec}[4]{\left[\begin{array}{r}#1 \\ #2 \\ #3 \\ #4 \end{array}\right]}\) \(\newcommand{\cfourvec}[4]{\left[\begin{array}{c}#1 \\ #2 \\ #3 \\ #4 \end{array}\right]}\) \(\newcommand{\fivevec}[5]{\left[\begin{array}{r}#1 \\ #2 \\ #3 \\ #4 \\ #5 \\ \end{array}\right]}\) \(\newcommand{\cfivevec}[5]{\left[\begin{array}{c}#1 \\ #2 \\ #3 \\ #4 \\ #5 \\ \end{array}\right]}\) \(\newcommand{\mattwo}[4]{\left[\begin{array}{rr}#1 \amp #2 \\ #3 \amp #4 \\ \end{array}\right]}\) \(\newcommand{\laspan}[1]{\text{Span}\{#1\}}\) \(\newcommand{\bcal}{\cal B}\) \(\newcommand{\ccal}{\cal C}\) \(\newcommand{\scal}{\cal S}\) \(\newcommand{\wcal}{\cal W}\) \(\newcommand{\ecal}{\cal E}\) \(\newcommand{\coords}[2]{\left\{#1\right\}_{#2}}\) \(\newcommand{\gray}[1]{\color{gray}{#1}}\) \(\newcommand{\lgray}[1]{\color{lightgray}{#1}}\) \(\newcommand{\rank}{\operatorname{rank}}\) \(\newcommand{\row}{\text{Row}}\) \(\newcommand{\col}{\text{Col}}\) \(\renewcommand{\row}{\text{Row}}\) \(\newcommand{\nul}{\text{Nul}}\) \(\newcommand{\var}{\text{Var}}\) \(\newcommand{\corr}{\text{corr}}\) \(\newcommand{\len}[1]{\left|#1\right|}\) \(\newcommand{\bbar}{\overline{\bvec}}\) \(\newcommand{\bhat}{\widehat{\bvec}}\) \(\newcommand{\bperp}{\bvec^\perp}\) \(\newcommand{\xhat}{\widehat{\xvec}}\) \(\newcommand{\vhat}{\widehat{\vvec}}\) \(\newcommand{\uhat}{\widehat{\uvec}}\) \(\newcommand{\what}{\widehat{\wvec}}\) \(\newcommand{\Sighat}{\widehat{\Sigma}}\) \(\newcommand{\lt}{<}\) \(\newcommand{\gt}{>}\) \(\newcommand{\amp}{&}\) \(\definecolor{fillinmathshade}{gray}{0.9}\)Raspberry Pis are single board computers (SCB) developed by the Raspberry Pi Foundation. The entire computer is on one Printed Circuit Board (PCB), these are very small and cheap, and these are ideal for IOT.
Installing RPi OS
Preparing your microSD Card
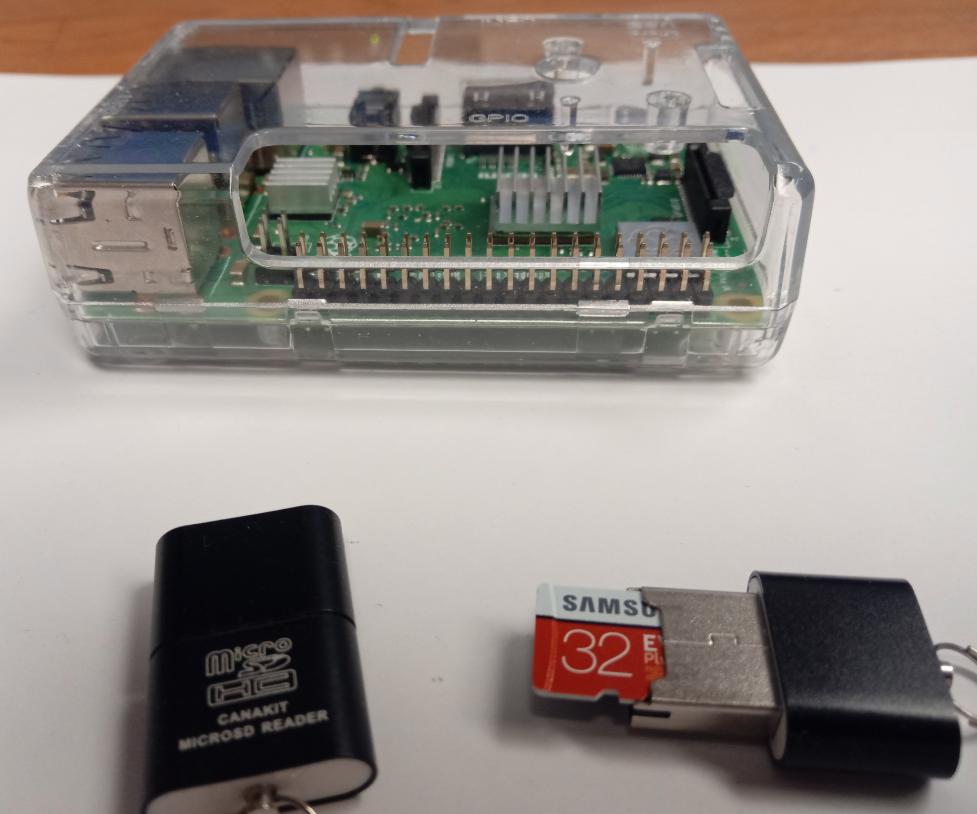
In Appendix A1.1 you installed all the software on your computer that you need for this task. Place a microSD card into a USB adapter sleeve and then place the USB into a USB port on the computer you set up in IOST module 1. Be sure you have no other external storage devices hooked up to your computer.
Format microSD Card
This step will show you how to use the SD Card Formatter to format the microSD card. This will clear all data on the card, and be sure you format the microSD card and not your hard drive!
1. From Start Menu, choose SD Card Formatter (you can click through the windows icon and scroll through the Apps to SD Association, or type in the search menu "sd" and the sd card formatter will autoappear
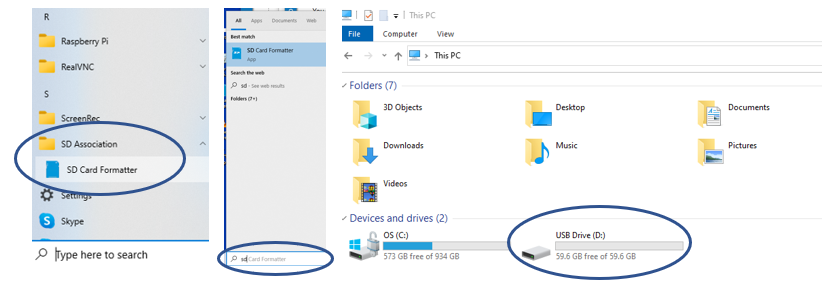 Figure \(\PageIndex{3}\): Two ways to activate SD Card Formatter from Windows Start Menu. Scrolling through the Apps (left image) or using Start menu Search option (middle image). Be sure you are formatting your USB drive with the micro SD card (right image) and not your hard drive!
2. Now that you have the SD Card Formatter open you can go and format your microSD card. Now be sure NOT TO FORMAT the C drive. Figure \(\PageIndex{4}\) shows screenshots of this process.
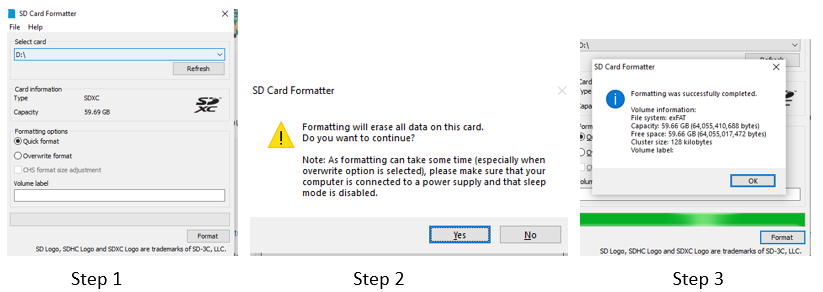 Figure \(\PageIndex{4}\): Screenshots of formatting the microSD card with SD Card Formatter. (1) Check to be sure which drive your microSD card is in and use quick format and make sure you are formatting the drive identified in step 1 (you do not want to format your computer's hard drive!). (2) The warning statement that formatting a drive will erase all data in the drive. (3) The formatting complete message, you are now ready to place an image of Raspbian on your micro SD card
Steps:
- Select Drive SD card is in and choose Quick format option
- Choose yes if you are in correct drive
- Choose OK when complete
Install RPi OS
There are multiple ways to install the RPi OS. The easiest is to use the Raspberry Pi Imager at https://www.raspberrypi.com/software/. At the time of this writing the operating system is Debian 11 (Bullseye), which was released Oct. 30, 2021. As this is a new release there may be some issues with projects that use HATs (Hardware Attached on Top) and you may wish to use the Buster operating system. You can download both from this link, and then make an image on your personal computer that can be transferred to a micro-SD card. If you choose this later route, you will want to follow the instructions from the 2020 IOST class.
Step 1: Insert formatted micro SD card into USB reader and insert into a USB drive of your personal computer.
Step 2: Download Raspberry Pi Imager (figure \(\PageIndex{5}\).
Step 3: Click on the downloaded exe file (imager_1.7.1.exe in figure \(\PageIndex{6}\)
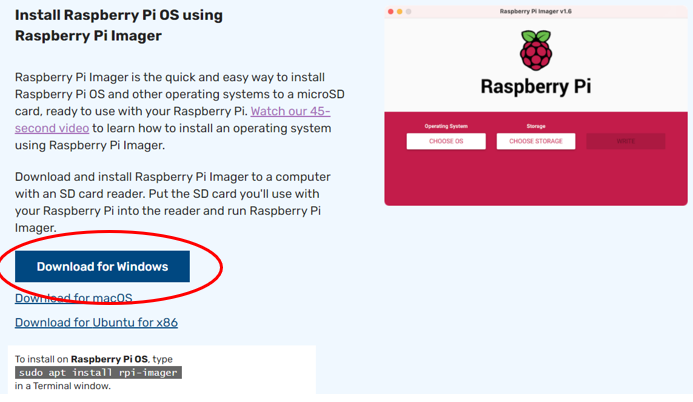 Figure \(\PageIndex{5}\): Download RPi OS Imager, here we are downloading onto a Windows PC. (Copyright; Belford CC 0.0)
After you download the imager you can install it
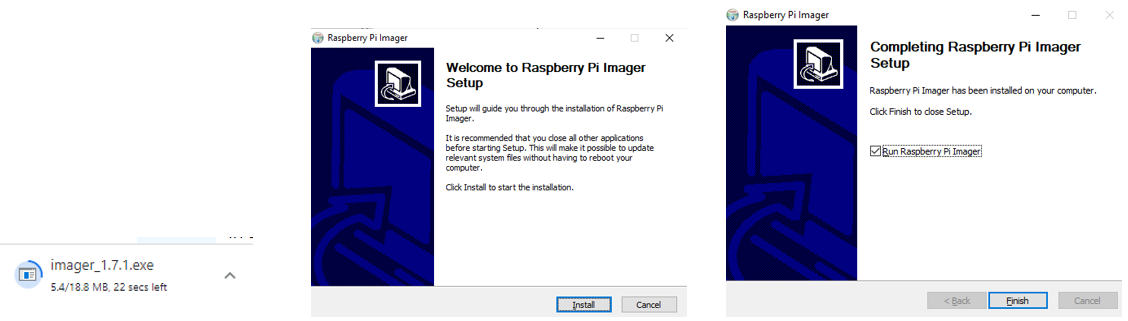 Figure \(\PageIndex{6}\): Installing Pi Imager. (Belford CC0.0)
The Raspberry Pi Imager is now one of your apps and you can choose the operating system and storage device you wish to generate the image on
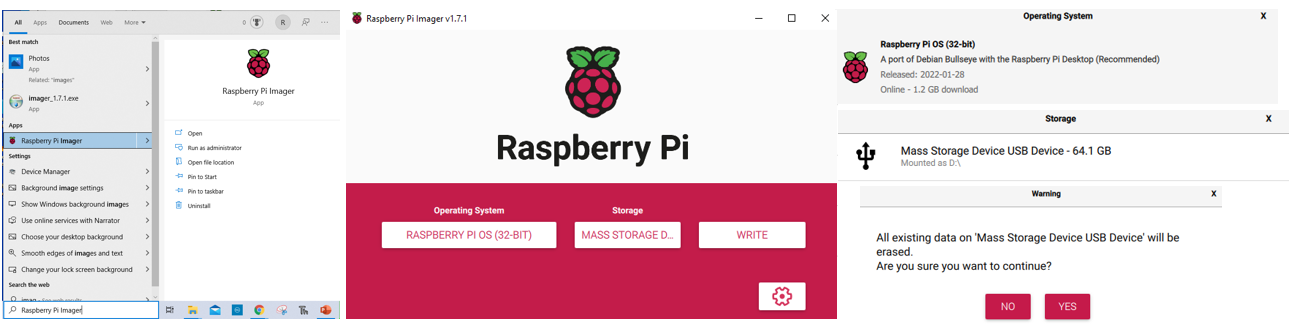 Figure \(\PageIndex{7}\): Installing RPi OS on a a micro SD card with imager (Belford CC 0.0)
The RPi operating system will now be installed
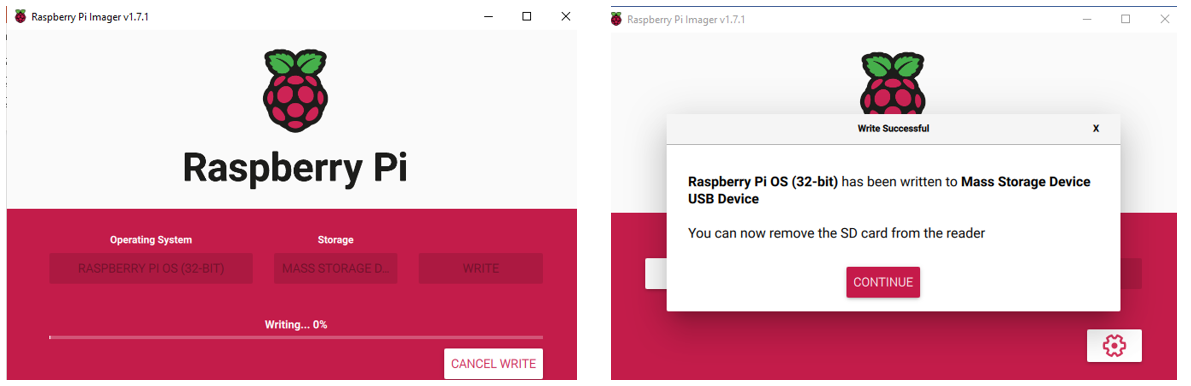 Figure \(\PageIndex{8}\): You are now ready to start your Pi. (Belford CC 0.0)
You now have the image of a Disc operating system that you will need to transfer to the micro SD card.
Starting Your Pi for the First Time
The first time we start the Pi will be in Desktop Mode, where we will set up the preferences and get the system MAC address so that we can remotely access the Pi through VNC. Before we connect the monitor, keyboard and mouse we need to install the microSD card. Figure \(\PageIndex{7}\) shows the correct and incorrect way to install the SD card.
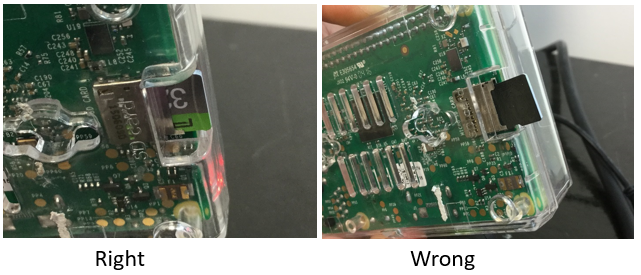
Figure \(\PageIndex{8}\) shows a Pi in desktop mode. Note, the last thing you should connect is the power supply.
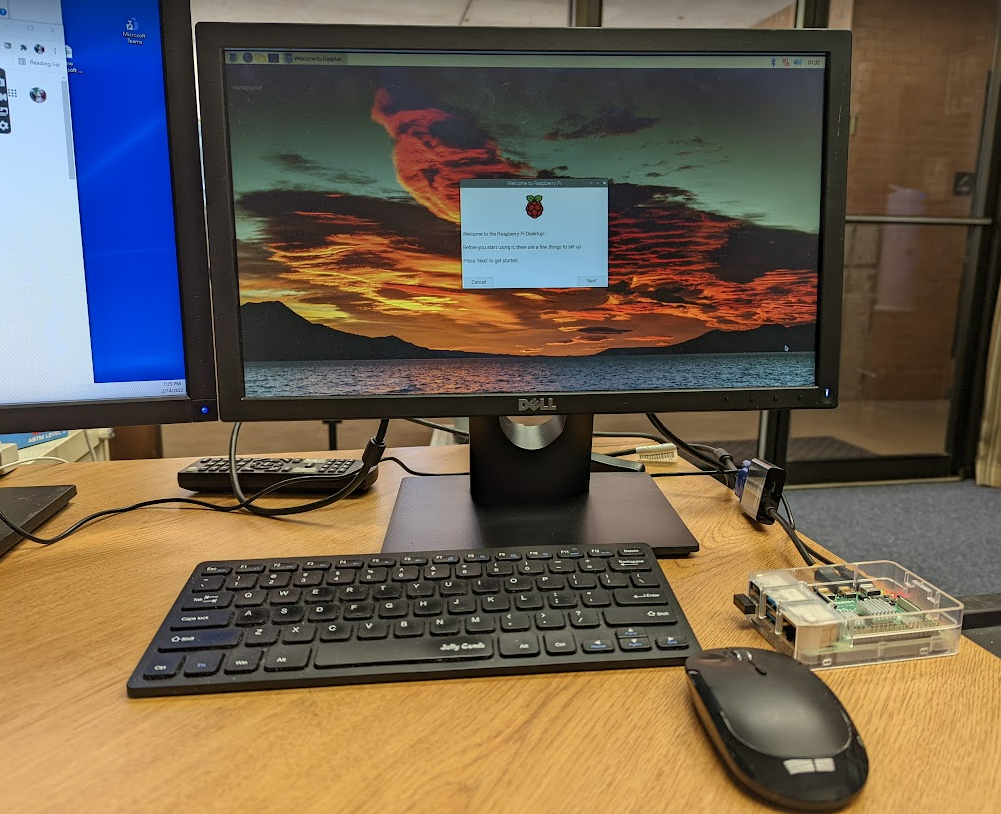 Figure \(\PageIndex{8}\): Raspberry Pi in Desktop Mode, note the wireless mouse and keyboard dongle in the USB 2.0 port
Turn the Pi on and you will be taken through a startup menu. Follow the instructions.
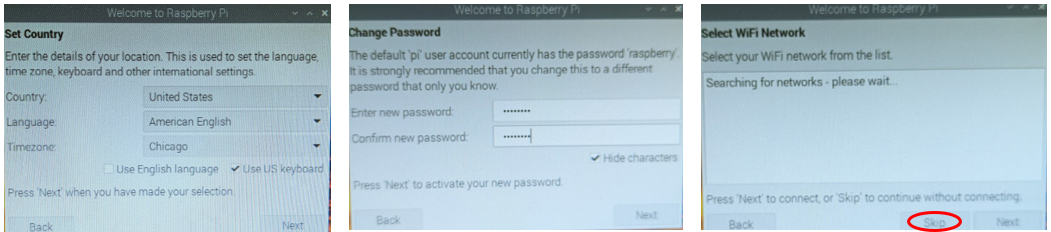 Figure\(\PageIndex{9}\): If you live in Little Rock Arkansas choose US, American English and Chicago as your time zone. Also click "Use US Keyboard". Then enter a new password as everyone has the same default password (raspberry). If you are on campus you need to skip Select WiFi Network as you need to register your RPi's MAC address with IT services before you can hook up. If you are at home you can now connect to the WiFi Network.
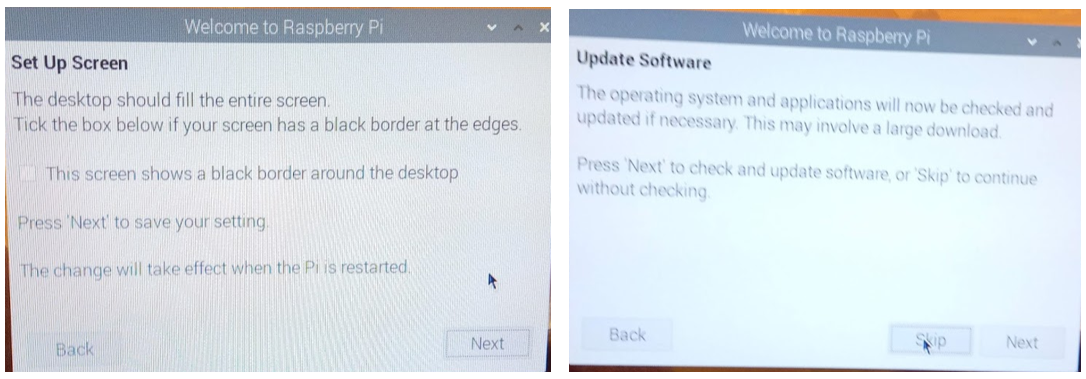
Proceed through the setup menu, when you get to update software you should skip it if you are in the class as we do not have time, but do it if you are logged in and doing this from your home. In the next section we will learn how to update the software from the command line, and you can do that from home.
Now that the Pi has been setup you can go to preferences and double check your configuration.
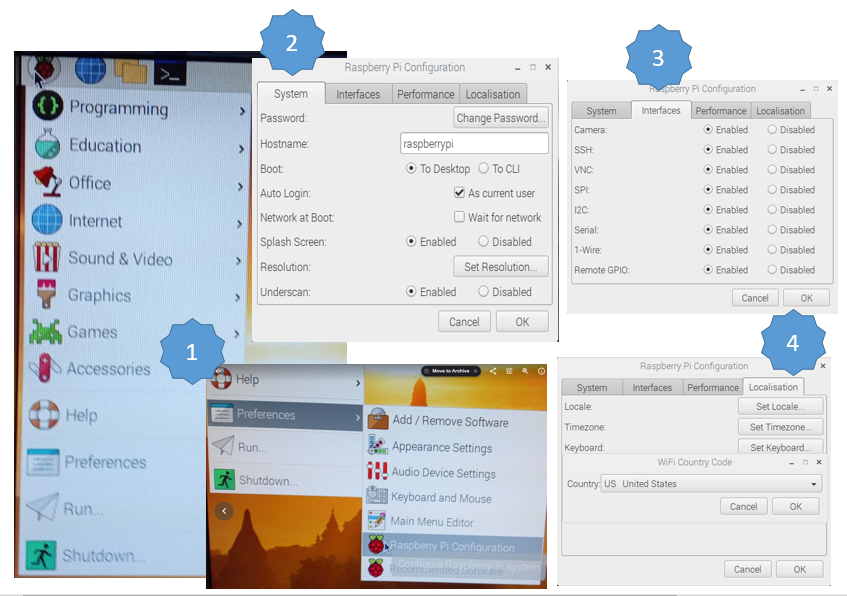
1. Set Country: Choose United States, American English, Chicago (if you are in Little Rock), and click "Use US Keyboard".
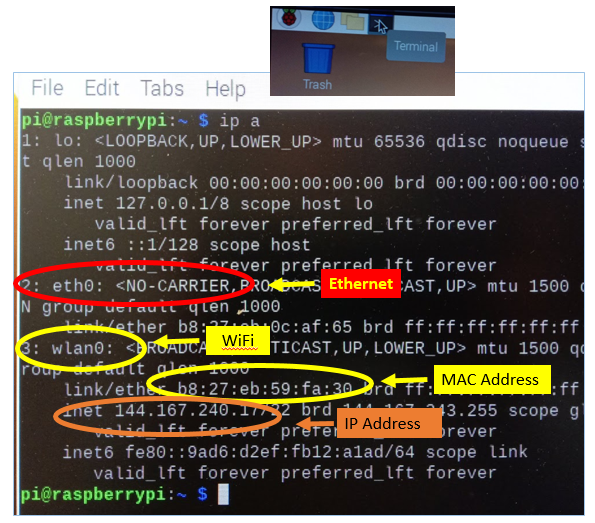 Figure \(\PageIndex{12}\):
Taking Care of your Pi
Now that you have your Pi up and running we need to discuss two important aspects of keeping it up and running. The first is electrostatic discharge and the second is updating the the software.
Electrostatic Discharge (ESD)
Your Raspberry Pi is not only a single board computer that contains many tiny integrated circuit (ic) chips that are susceptible to Electrostatic Discharge (ESD), but so are many of the sensors and devices you will be working on the breadboard with. ESD is a real problem with these small microcircuits where static electricity can build up and discharge when you touch a device, and cause damage to the circuits. Here is an article that can give you a bearing of the problem, Combating ESD: the silent assassin in electronics manufacturing. The following YouTube by the Hoffmann Group describes electrostatic discharge should be watched before proceeding, and especial note should be taken to the difference between direct and latent faults that can be induced through improper handling.
Video \(\PageIndex{1}\): 3:29 min video by Hoffmann Group on electro static discharge (https://youtu.be/bWXNOemu2j4)
ESDS devices (Electrostatic Discharge Sensitive Devices) and are shipped in special antistatic protective packaging. You need to take proper precautions with respect to ESD. Failure to do so can not only result in problems that are almost impossible to troubleshoot, like a latent fault that causes a short circuit that only occurs in rare situations, and intermittently causes your program to crash, but lead to direct faults that can result in the complete destruction of your Raspberry Pi or other devices (like your camera).
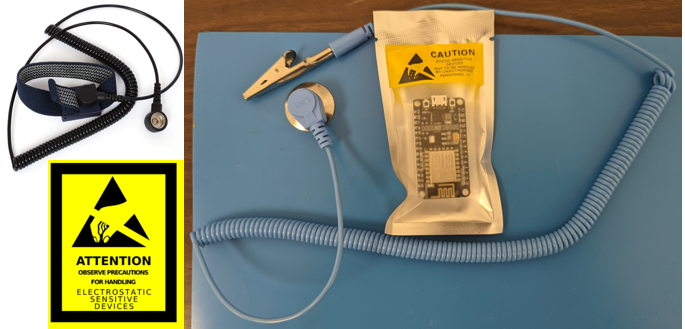
If you start to solder printed circuit boards you should consider investing in an antistatic map with an arm band, but no matter what, you should take prudent action to avoid ESD damage to your devices.
Updating with APT
APT is Debian's Advanced Packaging Tool and keeps a list of your software in /etc/apt/sources.list. The first thing you want to do is update and upgrade your Pi with the following commands. Open the terminal window and type
sudo apt update
Now install the packages
sudo apt full-upgrade
Note, full-upgrade picks up any dependencies that upgrade may miss.
Headless Mode
Now that you have your Pi up and running you want to remotely access it (in Headless mode) through VNC viewer, which you installed on your laptop or desktop (Appendix A1.1.4). If you are at UALR you need register your Pi through the IOT network this through the IOT WiFi network (not UALR WiFi or guest WiFi). Because students will need to follow this instructions multiple time we have placed the actuall instructions in the Appendices, and you should follow them in this order.
- Connect your Pi to the WiFi network and get your IP address. If you are at UALR you need to register your Pi's MAC address with the IOT network as outlined in Appendix A1.3: Registering your Pi with UALR IOT.
- Obtain the IP address of your Pi (fig. 1.1.12 above)
- Be sure VNC is activated on your Pi, (step 3 of fig 1.11) above
- Set up a profile on your Desktop VNC that connects to the IP address of your Pi (Appendix A1.4: Setting up VNC Headless Access).
- Log in with your username and password.
At this point you should be able to access your Pi.
Section 5.3 has instructions for running your Pi in headless mode through VNC and section 5.4 on adjusting the screen resolution.