3.3: Adding Images and Figures and Video
- Page ID
- 148795
\( \newcommand{\vecs}[1]{\overset { \scriptstyle \rightharpoonup} {\mathbf{#1}} } \)
\( \newcommand{\vecd}[1]{\overset{-\!-\!\rightharpoonup}{\vphantom{a}\smash {#1}}} \)
\( \newcommand{\id}{\mathrm{id}}\) \( \newcommand{\Span}{\mathrm{span}}\)
( \newcommand{\kernel}{\mathrm{null}\,}\) \( \newcommand{\range}{\mathrm{range}\,}\)
\( \newcommand{\RealPart}{\mathrm{Re}}\) \( \newcommand{\ImaginaryPart}{\mathrm{Im}}\)
\( \newcommand{\Argument}{\mathrm{Arg}}\) \( \newcommand{\norm}[1]{\| #1 \|}\)
\( \newcommand{\inner}[2]{\langle #1, #2 \rangle}\)
\( \newcommand{\Span}{\mathrm{span}}\)
\( \newcommand{\id}{\mathrm{id}}\)
\( \newcommand{\Span}{\mathrm{span}}\)
\( \newcommand{\kernel}{\mathrm{null}\,}\)
\( \newcommand{\range}{\mathrm{range}\,}\)
\( \newcommand{\RealPart}{\mathrm{Re}}\)
\( \newcommand{\ImaginaryPart}{\mathrm{Im}}\)
\( \newcommand{\Argument}{\mathrm{Arg}}\)
\( \newcommand{\norm}[1]{\| #1 \|}\)
\( \newcommand{\inner}[2]{\langle #1, #2 \rangle}\)
\( \newcommand{\Span}{\mathrm{span}}\) \( \newcommand{\AA}{\unicode[.8,0]{x212B}}\)
\( \newcommand{\vectorA}[1]{\vec{#1}} % arrow\)
\( \newcommand{\vectorAt}[1]{\vec{\text{#1}}} % arrow\)
\( \newcommand{\vectorB}[1]{\overset { \scriptstyle \rightharpoonup} {\mathbf{#1}} } \)
\( \newcommand{\vectorC}[1]{\textbf{#1}} \)
\( \newcommand{\vectorD}[1]{\overrightarrow{#1}} \)
\( \newcommand{\vectorDt}[1]{\overrightarrow{\text{#1}}} \)
\( \newcommand{\vectE}[1]{\overset{-\!-\!\rightharpoonup}{\vphantom{a}\smash{\mathbf {#1}}}} \)
\( \newcommand{\vecs}[1]{\overset { \scriptstyle \rightharpoonup} {\mathbf{#1}} } \)
\( \newcommand{\vecd}[1]{\overset{-\!-\!\rightharpoonup}{\vphantom{a}\smash {#1}}} \)
\(\newcommand{\avec}{\mathbf a}\) \(\newcommand{\bvec}{\mathbf b}\) \(\newcommand{\cvec}{\mathbf c}\) \(\newcommand{\dvec}{\mathbf d}\) \(\newcommand{\dtil}{\widetilde{\mathbf d}}\) \(\newcommand{\evec}{\mathbf e}\) \(\newcommand{\fvec}{\mathbf f}\) \(\newcommand{\nvec}{\mathbf n}\) \(\newcommand{\pvec}{\mathbf p}\) \(\newcommand{\qvec}{\mathbf q}\) \(\newcommand{\svec}{\mathbf s}\) \(\newcommand{\tvec}{\mathbf t}\) \(\newcommand{\uvec}{\mathbf u}\) \(\newcommand{\vvec}{\mathbf v}\) \(\newcommand{\wvec}{\mathbf w}\) \(\newcommand{\xvec}{\mathbf x}\) \(\newcommand{\yvec}{\mathbf y}\) \(\newcommand{\zvec}{\mathbf z}\) \(\newcommand{\rvec}{\mathbf r}\) \(\newcommand{\mvec}{\mathbf m}\) \(\newcommand{\zerovec}{\mathbf 0}\) \(\newcommand{\onevec}{\mathbf 1}\) \(\newcommand{\real}{\mathbb R}\) \(\newcommand{\twovec}[2]{\left[\begin{array}{r}#1 \\ #2 \end{array}\right]}\) \(\newcommand{\ctwovec}[2]{\left[\begin{array}{c}#1 \\ #2 \end{array}\right]}\) \(\newcommand{\threevec}[3]{\left[\begin{array}{r}#1 \\ #2 \\ #3 \end{array}\right]}\) \(\newcommand{\cthreevec}[3]{\left[\begin{array}{c}#1 \\ #2 \\ #3 \end{array}\right]}\) \(\newcommand{\fourvec}[4]{\left[\begin{array}{r}#1 \\ #2 \\ #3 \\ #4 \end{array}\right]}\) \(\newcommand{\cfourvec}[4]{\left[\begin{array}{c}#1 \\ #2 \\ #3 \\ #4 \end{array}\right]}\) \(\newcommand{\fivevec}[5]{\left[\begin{array}{r}#1 \\ #2 \\ #3 \\ #4 \\ #5 \\ \end{array}\right]}\) \(\newcommand{\cfivevec}[5]{\left[\begin{array}{c}#1 \\ #2 \\ #3 \\ #4 \\ #5 \\ \end{array}\right]}\) \(\newcommand{\mattwo}[4]{\left[\begin{array}{rr}#1 \amp #2 \\ #3 \amp #4 \\ \end{array}\right]}\) \(\newcommand{\laspan}[1]{\text{Span}\{#1\}}\) \(\newcommand{\bcal}{\cal B}\) \(\newcommand{\ccal}{\cal C}\) \(\newcommand{\scal}{\cal S}\) \(\newcommand{\wcal}{\cal W}\) \(\newcommand{\ecal}{\cal E}\) \(\newcommand{\coords}[2]{\left\{#1\right\}_{#2}}\) \(\newcommand{\gray}[1]{\color{gray}{#1}}\) \(\newcommand{\lgray}[1]{\color{lightgray}{#1}}\) \(\newcommand{\rank}{\operatorname{rank}}\) \(\newcommand{\row}{\text{Row}}\) \(\newcommand{\col}{\text{Col}}\) \(\renewcommand{\row}{\text{Row}}\) \(\newcommand{\nul}{\text{Nul}}\) \(\newcommand{\var}{\text{Var}}\) \(\newcommand{\corr}{\text{corr}}\) \(\newcommand{\len}[1]{\left|#1\right|}\) \(\newcommand{\bbar}{\overline{\bvec}}\) \(\newcommand{\bhat}{\widehat{\bvec}}\) \(\newcommand{\bperp}{\bvec^\perp}\) \(\newcommand{\xhat}{\widehat{\xvec}}\) \(\newcommand{\vhat}{\widehat{\vvec}}\) \(\newcommand{\uhat}{\widehat{\uvec}}\) \(\newcommand{\what}{\widehat{\wvec}}\) \(\newcommand{\Sighat}{\widehat{\Sigma}}\) \(\newcommand{\lt}{<}\) \(\newcommand{\gt}{>}\) \(\newcommand{\amp}{&}\) \(\definecolor{fillinmathshade}{gray}{0.9}\)Images can be added to LibreTexts via two primary mechanisms:
Adding Figures the Hard Way - Manual Upload
Three steps to add non-copyrighted (e.g. public domain, Creative Commons, original photos or figures) images or pictures:
- "Save" the figures into jpg, png, gif or some other graphics file depending on the program you are using to make the image.
- Then "attach" the file using the lower right hand button on the page or under the "more" button.
- Then "edit" the page with the edit button and "link" the file to your page with "insert/edit image" button.
Adding Figures the Easy Way - Drag and Drop
- "Save" or "export" the figures into jpg, png, gif or some other graphics file depending on the program you are using to make the image (JPG and PNG are preferred).
- Drag and drop the image from your desktop to your page (while editing).

Additional factors to pay attention to regarding figures
- NO BMP figures are allowed to be imported. Avoid TIFF. Use PNG, JPG, GIF figures instead.
- Please CROP your figures to remove superfluous white space that makes reading your module awkward. The Microsoft Office Picture Editor or Paint will crop images and is free on MS operating systems.
- All figures constructed for this project must have the original image files used uploaded to the LibreTexts, preferable in the module itself. DO NOT HOTLINK images. Hotlinks in general are prone to vaporization.
The Medium Way - Copy and Paste Screenshots
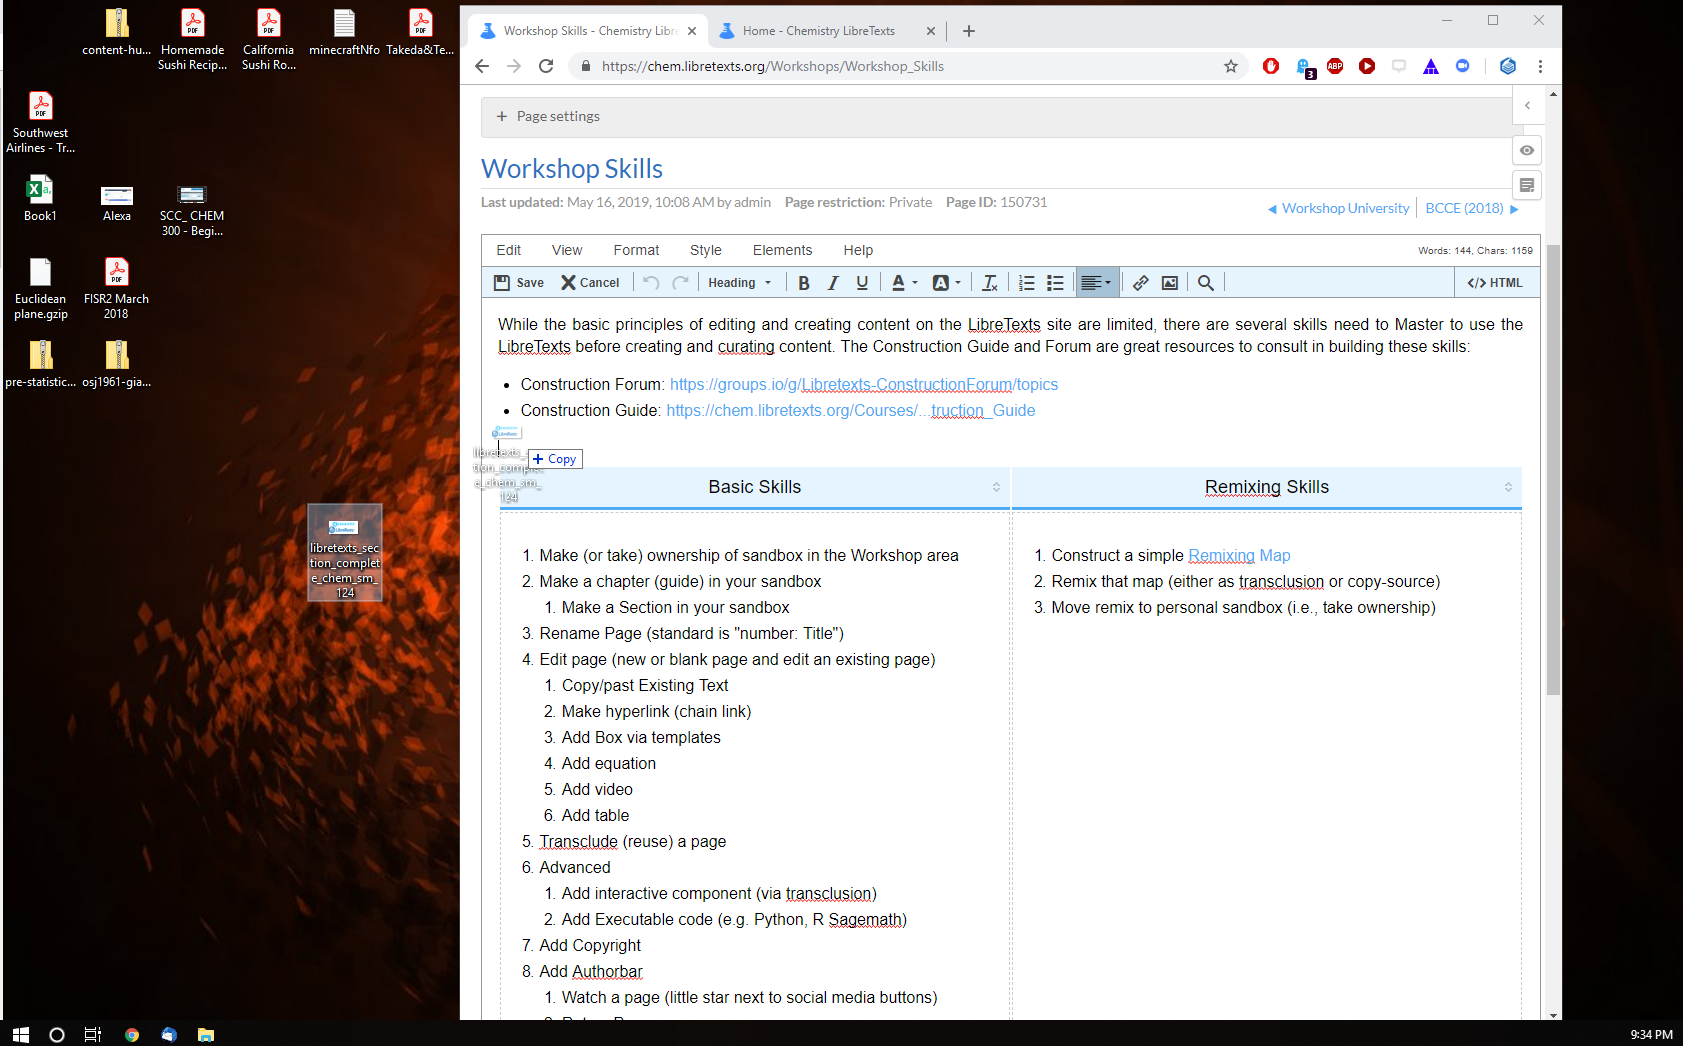
Often when integrating content from dead libraries like PDF or scanned images, the Print Screen option can be used. On PC, there is a "Print Screen" button on the upper right corner of the keyboard that will take a screen shot of the screen and store it in the computer clipboard. This can then be "pasted" directly via the control-v combination directly into the LibreTexts Editor. The problem with this is that the image that is being copied and pasted via this mechanism will typically have superfluous content around it and will need to be cropped before editing. There are two ways to address this:
- Paste the screen shot into a image editor (e.g., Paint in Windows or Powerpoint) and then crop it in that respective software, save into a file and drag-and-drop into the page as discussed above.
- Alternatively, a screen shot snipping tool can be used to selectively copy the image on the page from the rest of the screen (sort of like pre-cropping) and then you can paste directly into the editor (https://support.microsoft.com/en-us/help/13776/windows-use-snipping-tool-to-capture-screenshots).
There are other snipping tools available via a simple Internet Search. Apple computers have a similar snipping tool. You can use Shift-Cmd-4 to save a screen snip of an image on the screen. This image file can then be edited as needed and then imported into a LibreTexts page, following the protocol described above.
Formatting Figures
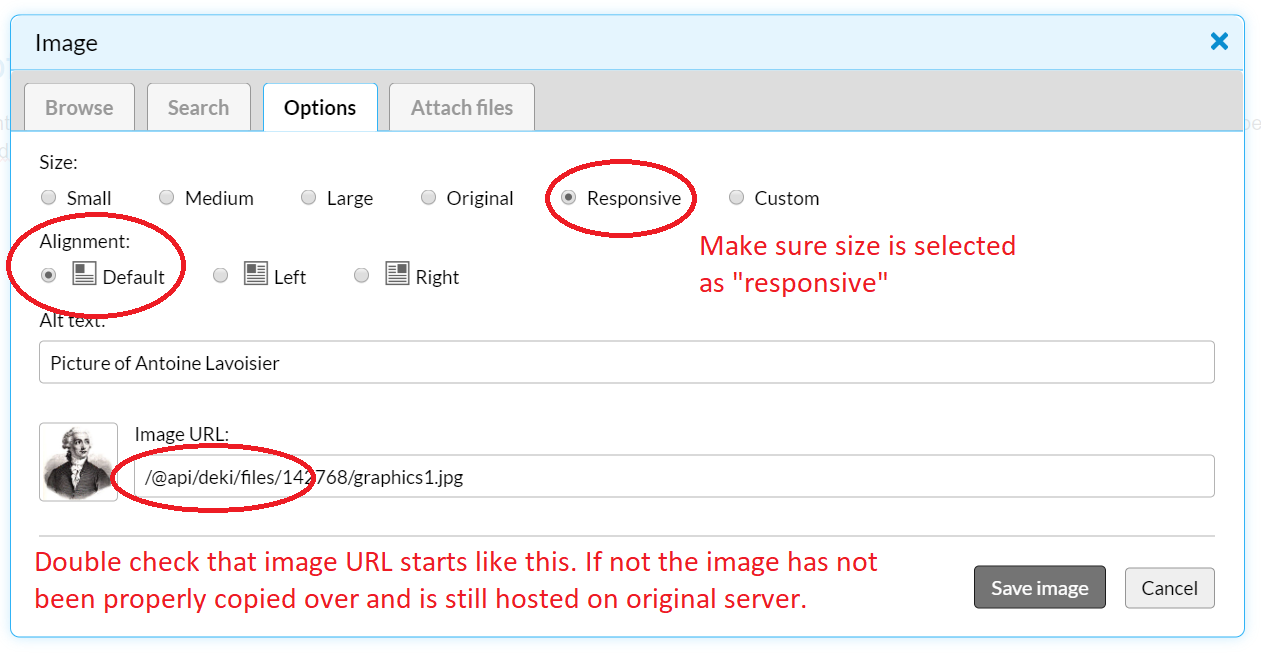
Double-click on an image (in edit mode) to open its settings and make sure these settings are set correctly:

To center justify figure, click on the right side of the image (not the figure) and you can use the center justification for text off the normal editing toolbar.

Adding Captions
To add a caption add a line under the figure formatted as
Figure \(\PageIndex{i}\): Copy and Paste Caption here. (Copyright; author via source)
where \( i \) is the number of the figure on the page. This automatically formats the caption into the caption style you see on the figures on this page. Unfortunately, if you add another figure that requires renumbering the figures after it this still has to be done manually. You can use (\PageIndex{n}\) to sequentially number tables, videos, examples, etc. All figures should be open source, if possible provide a link to the original source.
Figure captions Format
The figure label should be formatted as shown for the figure above:
- Center justified
- "Figure" in bold followed by numbering with a page index command and a colon like this: Figure
\(\PageIndex{1}\): - Manually enter the figure number in the \PageIndex command, "1" for the first figure of the page, "2" for the second, etc.
Advanced (alt-texts)
Each Figure and Table has a simple option to add alt-texts. Just double click on the image to get the figure setting (Figure 1.3.1) and you can add alt-test into the entry. See section on Alt-texts for more details.

