7.19: Interaction Free Measurement - Seeing in the Dark
- Page ID
- 141609
\( \newcommand{\vecs}[1]{\overset { \scriptstyle \rightharpoonup} {\mathbf{#1}} } \)
\( \newcommand{\vecd}[1]{\overset{-\!-\!\rightharpoonup}{\vphantom{a}\smash {#1}}} \)
\( \newcommand{\id}{\mathrm{id}}\) \( \newcommand{\Span}{\mathrm{span}}\)
( \newcommand{\kernel}{\mathrm{null}\,}\) \( \newcommand{\range}{\mathrm{range}\,}\)
\( \newcommand{\RealPart}{\mathrm{Re}}\) \( \newcommand{\ImaginaryPart}{\mathrm{Im}}\)
\( \newcommand{\Argument}{\mathrm{Arg}}\) \( \newcommand{\norm}[1]{\| #1 \|}\)
\( \newcommand{\inner}[2]{\langle #1, #2 \rangle}\)
\( \newcommand{\Span}{\mathrm{span}}\)
\( \newcommand{\id}{\mathrm{id}}\)
\( \newcommand{\Span}{\mathrm{span}}\)
\( \newcommand{\kernel}{\mathrm{null}\,}\)
\( \newcommand{\range}{\mathrm{range}\,}\)
\( \newcommand{\RealPart}{\mathrm{Re}}\)
\( \newcommand{\ImaginaryPart}{\mathrm{Im}}\)
\( \newcommand{\Argument}{\mathrm{Arg}}\)
\( \newcommand{\norm}[1]{\| #1 \|}\)
\( \newcommand{\inner}[2]{\langle #1, #2 \rangle}\)
\( \newcommand{\Span}{\mathrm{span}}\) \( \newcommand{\AA}{\unicode[.8,0]{x212B}}\)
\( \newcommand{\vectorA}[1]{\vec{#1}} % arrow\)
\( \newcommand{\vectorAt}[1]{\vec{\text{#1}}} % arrow\)
\( \newcommand{\vectorB}[1]{\overset { \scriptstyle \rightharpoonup} {\mathbf{#1}} } \)
\( \newcommand{\vectorC}[1]{\textbf{#1}} \)
\( \newcommand{\vectorD}[1]{\overrightarrow{#1}} \)
\( \newcommand{\vectorDt}[1]{\overrightarrow{\text{#1}}} \)
\( \newcommand{\vectE}[1]{\overset{-\!-\!\rightharpoonup}{\vphantom{a}\smash{\mathbf {#1}}}} \)
\( \newcommand{\vecs}[1]{\overset { \scriptstyle \rightharpoonup} {\mathbf{#1}} } \)
\( \newcommand{\vecd}[1]{\overset{-\!-\!\rightharpoonup}{\vphantom{a}\smash {#1}}} \)
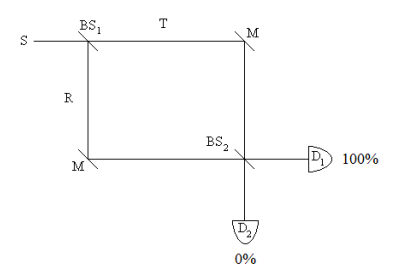
\(\newcommand{\avec}{\mathbf a}\) \(\newcommand{\bvec}{\mathbf b}\) \(\newcommand{\cvec}{\mathbf c}\) \(\newcommand{\dvec}{\mathbf d}\) \(\newcommand{\dtil}{\widetilde{\mathbf d}}\) \(\newcommand{\evec}{\mathbf e}\) \(\newcommand{\fvec}{\mathbf f}\) \(\newcommand{\nvec}{\mathbf n}\) \(\newcommand{\pvec}{\mathbf p}\) \(\newcommand{\qvec}{\mathbf q}\) \(\newcommand{\svec}{\mathbf s}\) \(\newcommand{\tvec}{\mathbf t}\) \(\newcommand{\uvec}{\mathbf u}\) \(\newcommand{\vvec}{\mathbf v}\) \(\newcommand{\wvec}{\mathbf w}\) \(\newcommand{\xvec}{\mathbf x}\) \(\newcommand{\yvec}{\mathbf y}\) \(\newcommand{\zvec}{\mathbf z}\) \(\newcommand{\rvec}{\mathbf r}\) \(\newcommand{\mvec}{\mathbf m}\) \(\newcommand{\zerovec}{\mathbf 0}\) \(\newcommand{\onevec}{\mathbf 1}\) \(\newcommand{\real}{\mathbb R}\) \(\newcommand{\twovec}[2]{\left[\begin{array}{r}#1 \\ #2 \end{array}\right]}\) \(\newcommand{\ctwovec}[2]{\left[\begin{array}{c}#1 \\ #2 \end{array}\right]}\) \(\newcommand{\threevec}[3]{\left[\begin{array}{r}#1 \\ #2 \\ #3 \end{array}\right]}\) \(\newcommand{\cthreevec}[3]{\left[\begin{array}{c}#1 \\ #2 \\ #3 \end{array}\right]}\) \(\newcommand{\fourvec}[4]{\left[\begin{array}{r}#1 \\ #2 \\ #3 \\ #4 \end{array}\right]}\) \(\newcommand{\cfourvec}[4]{\left[\begin{array}{c}#1 \\ #2 \\ #3 \\ #4 \end{array}\right]}\) \(\newcommand{\fivevec}[5]{\left[\begin{array}{r}#1 \\ #2 \\ #3 \\ #4 \\ #5 \\ \end{array}\right]}\) \(\newcommand{\cfivevec}[5]{\left[\begin{array}{c}#1 \\ #2 \\ #3 \\ #4 \\ #5 \\ \end{array}\right]}\) \(\newcommand{\mattwo}[4]{\left[\begin{array}{rr}#1 \amp #2 \\ #3 \amp #4 \\ \end{array}\right]}\) \(\newcommand{\laspan}[1]{\text{Span}\{#1\}}\) \(\newcommand{\bcal}{\cal B}\) \(\newcommand{\ccal}{\cal C}\) \(\newcommand{\scal}{\cal S}\) \(\newcommand{\wcal}{\cal W}\) \(\newcommand{\ecal}{\cal E}\) \(\newcommand{\coords}[2]{\left\{#1\right\}_{#2}}\) \(\newcommand{\gray}[1]{\color{gray}{#1}}\) \(\newcommand{\lgray}[1]{\color{lightgray}{#1}}\) \(\newcommand{\rank}{\operatorname{rank}}\) \(\newcommand{\row}{\text{Row}}\) \(\newcommand{\col}{\text{Col}}\) \(\renewcommand{\row}{\text{Row}}\) \(\newcommand{\nul}{\text{Nul}}\) \(\newcommand{\var}{\text{Var}}\) \(\newcommand{\corr}{\text{corr}}\) \(\newcommand{\len}[1]{\left|#1\right|}\) \(\newcommand{\bbar}{\overline{\bvec}}\) \(\newcommand{\bhat}{\widehat{\bvec}}\) \(\newcommand{\bperp}{\bvec^\perp}\) \(\newcommand{\xhat}{\widehat{\xvec}}\) \(\newcommand{\vhat}{\widehat{\vvec}}\) \(\newcommand{\uhat}{\widehat{\uvec}}\) \(\newcommand{\what}{\widehat{\wvec}}\) \(\newcommand{\Sighat}{\widehat{\Sigma}}\) \(\newcommand{\lt}{<}\) \(\newcommand{\gt}{>}\) \(\newcommand{\amp}{&}\) \(\definecolor{fillinmathshade}{gray}{0.9}\)The illustration of the concept of interaction-free measurement requires the use of an interferometer. A simple illustration employs a Mach-Zehnder interferometer (MZI) like the one shown here.

This equal-arm MZI consists of two 50-50 beam splitters (BS1, BS2), two mirrors (M) and two detectors (D1, D2). A source emits a photon which interacts with BS1 producing the following superposition. (By convention a 90 degree (i) phase shift is assigned to reflection.
\[ S = \frac{1}{ \sqrt{2}} (T + iR) \label{1} \]
The transmitted and reflected branches are united at BS2 by the mirrors, where they evolve into the following superpositions in the basis of the detectors.
\[ T = \frac{1}{ \sqrt{2}} (i D_1 + D_2) \label{2} \]
\[ R = \frac{1}{ \sqrt{2}} (D_1 + i D_2) \label{3} \]
Substitution of Equations \ref{2} and \ref{3} into Equation \ref{1} reveals that the output photon is always registered at \(D_1\). There are two paths to each detector and constructive interference occurs at D1 and destructive interference at \(D_2\).
\[\begin{align} S &= \frac{1}{ \sqrt{2}} (T + iR) \bigg|_{substitute,~ R = \frac{1}{ \sqrt{2}} (D_1 + i D_2)}^{substitute~ T = \frac{1}{ \sqrt{2}} (i D_1 + D_2)} \rightarrow \\[4pt] & = D_{1} i \end{align} \nonumber \]
Probability at D1: \( (|i|)^2 = 1\)
The MZI provides a rudimentary method of determining whether an obstruction is present in its upper arm without actually interacting with it. As we shall see, it is not an efficient method, but it does clearly illustrate the principle involved which then can be used in a more elaborate and sophisticated interferometer to yield better results.

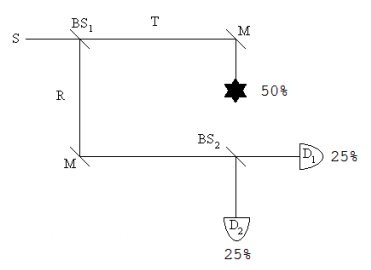
In the presence of the obstruction, Equation \ref{2} becomes \(T = \gamma_{Absorbed}\). This leads to the following result at the detectors.
\[\begin{align} S &= \frac{1}{ \sqrt{2}} (T + iR) \bigg|_{substitute,~ R = \frac{1}{ \sqrt{2}} (D_1 + i D_2)}^{substitute~ T = \gamma_{Absorbed}} \rightarrow \\[4pt] & = \frac{ \sqrt{2} \gamma_{Absorbed}}{2} - \frac{D_2}{2} + \frac{D_1 i}{2} \end{align} \nonumber \]
Quantum mechanics predicts that for a large number of experiments 50% of the photons will be absorbed by the obstruction, 25% will be detected at D1 and 25% will be detect at D2. This later result is the signature of interaction-free measurement. Even if the photon is not absorbed, the mere presence of the obstruction causes the probability of detection at D2 to go from zero to 25%. The photon's arrival at D2 signals the presence of an obstruction in the upper arm of the MZI, and the obstruction is detected without an interaction.
Of course, 25% is not great efficiency, so this is "a proof of principle" example. However, with a little ingenuity the probability of interaction-free detection can be increased dramatically. To see how this can be accomplished read "Quantum Seeing in the Dark" by Kwiat, Weinfurter and Zeilinger in the November 1996 issue of Scientific American.
However, it is possible to improve performance significantly by using a system of nested MZIs which is only slightly more complicated than the simple MZI used earlier. To simplify analysis Feynman's "sum over histories" approach to quantum mechanics will be used. The probability amplitudes for transmission and reflection at the beam splitters are required.
\[ T = \frac{1}{ \sqrt{2}} \nonumber \]
\[ R = \frac{i}{ \sqrt{2}} \nonumber \]
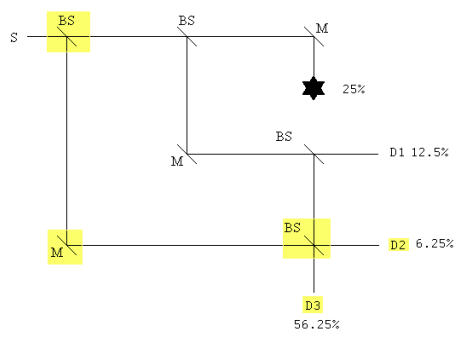
Placing an additional BS before the original MZI and another BS before D2 and renaming it D3, plus an additional mirror and new detector D2, yields a nested interferometer configuration that significantly increases the probability of interaction-free detection of the obstruction.

To interact with the obstruction a photon must be transmitted at the first and second beam splitters. In this case there is only one history and the probability of the interaction occurring is the square of its absolute magnitude.
\[ (| T T |)^2 \rightarrow \frac{1}{4} = 25% \nonumber \]
The probabilities of detectors 1, 2 and 3 firing are calculated using the same methodology.
The probability D1 registers a photon:
\[ (| TRT|)^2 \rightarrow \frac{1}{8} = 12.5% \nonumber \]
The probability D2 registers a photon:
\[ (|TRRR + RT|)^2 \rightarrow \frac{1}{16} = 6.25% \nonumber \]
The probability D3 registers a photon:
\[ (| TRRT + RR|)^2 = \frac{9}{16} = 56.25% \nonumber \]
With the modified interferometer detecting the presence of the obstruction without interacting with it increases from 25% to 56.25%.

