
11.5: Characteristics of the SN1 Reaction
- Page ID
- 31509
\( \newcommand{\vecs}[1]{\overset { \scriptstyle \rightharpoonup} {\mathbf{#1}} } \)
\( \newcommand{\vecd}[1]{\overset{-\!-\!\rightharpoonup}{\vphantom{a}\smash {#1}}} \)
\( \newcommand{\id}{\mathrm{id}}\) \( \newcommand{\Span}{\mathrm{span}}\)
( \newcommand{\kernel}{\mathrm{null}\,}\) \( \newcommand{\range}{\mathrm{range}\,}\)
\( \newcommand{\RealPart}{\mathrm{Re}}\) \( \newcommand{\ImaginaryPart}{\mathrm{Im}}\)
\( \newcommand{\Argument}{\mathrm{Arg}}\) \( \newcommand{\norm}[1]{\| #1 \|}\)
\( \newcommand{\inner}[2]{\langle #1, #2 \rangle}\)
\( \newcommand{\Span}{\mathrm{span}}\)
\( \newcommand{\id}{\mathrm{id}}\)
\( \newcommand{\Span}{\mathrm{span}}\)
\( \newcommand{\kernel}{\mathrm{null}\,}\)
\( \newcommand{\range}{\mathrm{range}\,}\)
\( \newcommand{\RealPart}{\mathrm{Re}}\)
\( \newcommand{\ImaginaryPart}{\mathrm{Im}}\)
\( \newcommand{\Argument}{\mathrm{Arg}}\)
\( \newcommand{\norm}[1]{\| #1 \|}\)
\( \newcommand{\inner}[2]{\langle #1, #2 \rangle}\)
\( \newcommand{\Span}{\mathrm{span}}\) \( \newcommand{\AA}{\unicode[.8,0]{x212B}}\)
\( \newcommand{\vectorA}[1]{\vec{#1}} % arrow\)
\( \newcommand{\vectorAt}[1]{\vec{\text{#1}}} % arrow\)
\( \newcommand{\vectorB}[1]{\overset { \scriptstyle \rightharpoonup} {\mathbf{#1}} } \)
\( \newcommand{\vectorC}[1]{\textbf{#1}} \)
\( \newcommand{\vectorD}[1]{\overrightarrow{#1}} \)
\( \newcommand{\vectorDt}[1]{\overrightarrow{\text{#1}}} \)
\( \newcommand{\vectE}[1]{\overset{-\!-\!\rightharpoonup}{\vphantom{a}\smash{\mathbf {#1}}}} \)
\( \newcommand{\vecs}[1]{\overset { \scriptstyle \rightharpoonup} {\mathbf{#1}} } \)
\( \newcommand{\vecd}[1]{\overset{-\!-\!\rightharpoonup}{\vphantom{a}\smash {#1}}} \)
\(\newcommand{\avec}{\mathbf a}\) \(\newcommand{\bvec}{\mathbf b}\) \(\newcommand{\cvec}{\mathbf c}\) \(\newcommand{\dvec}{\mathbf d}\) \(\newcommand{\dtil}{\widetilde{\mathbf d}}\) \(\newcommand{\evec}{\mathbf e}\) \(\newcommand{\fvec}{\mathbf f}\) \(\newcommand{\nvec}{\mathbf n}\) \(\newcommand{\pvec}{\mathbf p}\) \(\newcommand{\qvec}{\mathbf q}\) \(\newcommand{\svec}{\mathbf s}\) \(\newcommand{\tvec}{\mathbf t}\) \(\newcommand{\uvec}{\mathbf u}\) \(\newcommand{\vvec}{\mathbf v}\) \(\newcommand{\wvec}{\mathbf w}\) \(\newcommand{\xvec}{\mathbf x}\) \(\newcommand{\yvec}{\mathbf y}\) \(\newcommand{\zvec}{\mathbf z}\) \(\newcommand{\rvec}{\mathbf r}\) \(\newcommand{\mvec}{\mathbf m}\) \(\newcommand{\zerovec}{\mathbf 0}\) \(\newcommand{\onevec}{\mathbf 1}\) \(\newcommand{\real}{\mathbb R}\) \(\newcommand{\twovec}[2]{\left[\begin{array}{r}#1 \\ #2 \end{array}\right]}\) \(\newcommand{\ctwovec}[2]{\left[\begin{array}{c}#1 \\ #2 \end{array}\right]}\) \(\newcommand{\threevec}[3]{\left[\begin{array}{r}#1 \\ #2 \\ #3 \end{array}\right]}\) \(\newcommand{\cthreevec}[3]{\left[\begin{array}{c}#1 \\ #2 \\ #3 \end{array}\right]}\) \(\newcommand{\fourvec}[4]{\left[\begin{array}{r}#1 \\ #2 \\ #3 \\ #4 \end{array}\right]}\) \(\newcommand{\cfourvec}[4]{\left[\begin{array}{c}#1 \\ #2 \\ #3 \\ #4 \end{array}\right]}\) \(\newcommand{\fivevec}[5]{\left[\begin{array}{r}#1 \\ #2 \\ #3 \\ #4 \\ #5 \\ \end{array}\right]}\) \(\newcommand{\cfivevec}[5]{\left[\begin{array}{c}#1 \\ #2 \\ #3 \\ #4 \\ #5 \\ \end{array}\right]}\) \(\newcommand{\mattwo}[4]{\left[\begin{array}{rr}#1 \amp #2 \\ #3 \amp #4 \\ \end{array}\right]}\) \(\newcommand{\laspan}[1]{\text{Span}\{#1\}}\) \(\newcommand{\bcal}{\cal B}\) \(\newcommand{\ccal}{\cal C}\) \(\newcommand{\scal}{\cal S}\) \(\newcommand{\wcal}{\cal W}\) \(\newcommand{\ecal}{\cal E}\) \(\newcommand{\coords}[2]{\left\{#1\right\}_{#2}}\) \(\newcommand{\gray}[1]{\color{gray}{#1}}\) \(\newcommand{\lgray}[1]{\color{lightgray}{#1}}\) \(\newcommand{\rank}{\operatorname{rank}}\) \(\newcommand{\row}{\text{Row}}\) \(\newcommand{\col}{\text{Col}}\) \(\renewcommand{\row}{\text{Row}}\) \(\newcommand{\nul}{\text{Nul}}\) \(\newcommand{\var}{\text{Var}}\) \(\newcommand{\corr}{\text{corr}}\) \(\newcommand{\len}[1]{\left|#1\right|}\) \(\newcommand{\bbar}{\overline{\bvec}}\) \(\newcommand{\bhat}{\widehat{\bvec}}\) \(\newcommand{\bperp}{\bvec^\perp}\) \(\newcommand{\xhat}{\widehat{\xvec}}\) \(\newcommand{\vhat}{\widehat{\vvec}}\) \(\newcommand{\uhat}{\widehat{\uvec}}\) \(\newcommand{\what}{\widehat{\wvec}}\) \(\newcommand{\Sighat}{\widehat{\Sigma}}\) \(\newcommand{\lt}{<}\) \(\newcommand{\gt}{>}\) \(\newcommand{\amp}{&}\) \(\definecolor{fillinmathshade}{gray}{0.9}\)After completing this section, you should be able to
- discuss how the structure of the substrate affects the rate of a reaction occurring by the SN1 mechanism.
- arrange a given list of carbocations (including benzyl and allyl) in order of increasing or decreasing stability.
- explain the high stability of the allyl and benzyl carbocations.
- arrange a given series of compounds in order of increasing or decreasing reactivity in SN1 reactions, and discuss this order in terms of the Hammond postulate.
- discuss how the nature of the leaving group affects the rate of an SN1 reaction, and in particular, explain why SN1 reactions involving alcohols are carried out under acidic conditions.
- explain why the nature of the nucleophile does not affect the rate of an SN1 reaction.
- discuss the role played by the solvent in an SN1 reaction, and hence determine whether a given solvent will promote reaction by this mechanism.
- compare the roles played by the solvent in SN1 and in SN2 reactions.
- determine which of two SN1 reactions will occur faster, by taking into account factors such as the structure of the substrate and the polarity of the solvent.
- determine whether a given reaction is most likely to occur by an SN1 or SN2 mechanism, based on factors such as the structure of the substrate, the solvent used, etc.
Make certain that you can define, and use in context, the key terms below.
- benzylic
- dielectric constant
- polarity
The Substrate in SN1Reactions
As discussed in the previous section SN1 reactions follow first order kinetics due to a multi-step mechanism in which the rate-determining step consists of the ionization of the alkyl halide to form a carbocation.

The transition state for the rate determining step shows the transition of an alkyl halide to a carbocation. Because the rate determining step is endothermic, the Hammond postulate says that the transition state more closely resembles the carbocation intermediate. Factors which stabilize this intermediate will lower the energy of activation for the rate determining step and cause the rate of reaction to increase. In general, a more stable carbocation intermediate formed during the reaction allows for a faster the SN1 reaction rate.
_for_SN1.svg?revision=1&size=bestfit&width=125&height=84)
Transition State 1
(TS1‡)
In Section 7-9, the stability of alky carbocations was shown to be 3o > 2o > 1o > methyl. Two special cases of resonance-stabilized carbocations, allyl and benzyl, must be considered and added to the list. The delocalization of the positive charge over an extended p orbital system allows for allyl and benzyl carbocations to be exceptionally stable. The resonance hybrid of an allyic cation is made up of two resonance forms while the resonance hybrid of the benzylic carbocation is made up of five.

Resonance Structures for a Benzyl Carbocation

Resonance Structures for an Allylic Carbocation
|
%252C_then_tertiary.svg?revision=1&size=bestfit&width=742&height=167)
Effects of Leaving Group
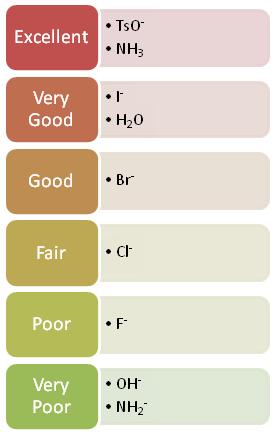
Since leaving group removal is involved in the rate-determining step of the SN1 mechanism, reaction rates increase with a good leaving group. A good leaving group can stabilize the electron pair it obtains after the breaking of the C-Leaving Group bond faster. Once the bond breaks, the carbocation is formed and the faster the carbocation is formed, the faster the nucleophile can come in and the faster the reaction will be completed.
Because weak bases tend to strongly hold onto their electrons, they are lower energy molecules and they tend to make good leaving groups. Strong bases, on the other hand, donate electrons readily because they are high energy, reactive molecules. Therefore, they are not typically good leaving groups. As you go from left to right on the periodic table, electron donating ability decreases and thus ability to be a good leaving group increases. Halides are an example of a good leaving group whose leaving-group ability increases as you go down the halogen column of the periodic table.

The two reactions below only vary by the different leaving groups in each reaction. The reaction with a more stable leaving group is significantly faster than the other. This is because the better leaving group leaves faster and thus the reaction can proceed faster.

Under acidic conditions, the -OH group of an alcohol can be converted into a neutral water leaving group through protonation. As discussed in Section 10-5, this occurs during the conversion of a tertiary alcohol to an alkyl halide through reaction with HCl or HBr. Because the -OH group itself is a poor nucleophile, the mechanism starts with protonation to form a hydronium ion. Neutral water is then lost as a leaving group to create the carbocation intermediate which then reacts with the halide ion nucleophile to provide the alkyl halide product. This reaction works best when a tertiary alcohol is used because it produces a stable carbocation intermediate.

The Nucleophile
Since nucleophiles only participate in the fast second step, their relative molar concentrations rather than their nucleophilicities should be the primary product-determining factor. If a nucleophilic solvent such as water is used, its high concentration will assure that alcohols are the major product. While recombination of the halide anion with the carbocation intermediate can occur, it simply reforms the starting compound. Also this is less likely since there are less molecules of the leaving group in solution than there are of the solvent. Note that SN1 reactions in which the nucleophile is also the solvent are commonly called solvolysis reactions. The SN1 reaction of allyl bromide in methanol is an example of what we would call methanolysis, while if water is the solvent the reaction would be called hydrolysis:

The strength of the nucleophile does not affect the reaction rate of SN1 because, as described previously, the nucleophile is not involved in the rate-determining step. However, if you have more than one nucleophile competing to bond to the carbocation, the strengths and concentrations of those nucleophiles affects the distribution of products that you will get. For example, if you have (CH3)3CCl reacting in water and formic acid where the water and formic acid are competing nucleophiles, you will get two different products: (CH3)3COH and (CH3)3COCOH. The relative yields of these products depend on the concentrations and relative reactivities of the nucleophiles.

Solvent Effects on the SN1 Reaction
Since the hydrogen atom in a polar protic solvent is highly positively charged, it can interact with the anionic nucleophile which would negatively affect an SN2 reaction which depends on nucleophilic attack during the rate-determining step of the reaction. However, this does not affect an SN1 reaction because the nucleophile is not a part of the rate-determining step. Polar protic solvents actually speed up the rate of the unimolecular substitution reaction because the large dipole moment of the solvent helps to stabilize the carbocation-like transition state. Since the carbocation is unstable, anything that can stabilize this even a little will speed up the reaction.

The polarity and the ability of the solvent to stabilize the intermediate carbocation is very important as shown by the relative rate data for a solvolysis (see table below). The dielectric constant of a solvent roughly provides a measure of the solvent's polarity. A dielectric constant below 15 is usually considered non-polar. Basically, the dielectric constant can be thought of as the solvent's ability to reduce the internal charge of the solvent. So for our purposes, the higher the dielectric constant the more polar the substance and in the case of SN1 reactions, the faster the rate.
| Solvent | Dielectric Constant | Relative Rate |
|---|---|---|
| CH3CO2H | 6 | 1 |
| CH3OH | 33 | 4 |
| H2O | 78 | 150,000 |
(note that even though acetic acid is a highly polar molecule, it tends to make a dimer with itself greatly reducing its dielectric constant)
Predicting SN1 vs. SN2 mechanisms
When considering whether a nucleophilic substitution is likely to occur via an SN1 or SN2 mechanism, we really need to consider three factors:
1) The electrophile: when the leaving group is attached to a methyl group or a primary carbon, an SN2 mechanism is favored (here the electrophile is unhindered by surrounded groups, and any carbocation intermediate would be high-energy and thus unlikely). When the leaving group is attached to a tertiary, allylic, or benzylic carbon, a carbocation intermediate will be relatively stable and thus an SN1 mechanism is favored.
2) The nucleophile: powerful nucleophiles, especially those with negative charges, favor the SN2 mechanism. Weaker nucleophiles such as water or alcohols favor the SN1 mechanism.
3) The solvent: Polar aprotic solvents favor the SN2 mechanism by enhancing the reactivity of the nucleophile. Polar protic solvents favor the SN1 mechanism by stabilizing the carbocation intermediate. SN1 reactions are frequently solvolysis reactions.
For example, the reaction below has a tertiary alkyl bromide as the electrophile, a weak nucleophile, and a polar protic solvent (we’ll assume that methanol is the solvent). Thus we’d confidently predict an SN1 reaction mechanism. Because substitution occurs at a chiral carbon, we can also predict that the reaction will proceed with racemization.
-1-bromo-1%252C3-dimethylcyclohexane_reacts_with_methanol_by_SN1_mechanism_to_give_(1R%252C3R)-1-methoxy-1%252C3-dimethylcyclohexane%252C_(1S%252C3R)-1-methoxy-1%252C3-dimethylcyclohexane%252C_and_HBr.svg?revision=1&size=bestfit&width=626&height=72)
In the reaction below, on the other hand, the electrophile is a secondary alkyl bromide – with these, both SN1 and SN2 mechanisms are possible, depending on the nucleophile and the solvent. In this example, the nucleophile (a thiolate anion) is strong, and a polar aprotic solvent is used – so the SN2 mechanism is heavily favored. The reaction is expected to proceed with inversion of configuration.
-1-bromo-3-methylcyclohexane_reacts_with_methanethiolate_in_acetone_via_SN2_mechanism_to_give_methyl((1S%252C3R)-3-methylcyclohexyl)sulfane_and_bromide.svg?revision=2&size=bestfit&width=592&height=73)
1. Put the following leaving groups highlighted in blue in order of decreasing leaving group ability
%252C_ROH%252C_RBr%252C_and_ROCH3.svg?revision=1&size=bestfit&width=342&height=59)
2. Which solvent would an SN1 reaction occur faster in? H2O or CH3CN
3. What kind of conditions disfavor SN1 reactions?
4. What are the products of the following reaction and does it proceed via SN1 or SN2?
_if_(R)-2-bromobutane_reacts_with_methanol.svg?revision=1&size=bestfit&width=308&height=57)
5. How could you change the reactants in the problem 4 to favor the other substitution reaction?
6. Indicate the expected product and list why it occurs through SN1 instead of SN2?

7. Rank the following by increasing reactivity in an SN1 reaction.
_1-bromopropane%252C_b)_(E)-1-bromobut-2-ene%252C_c)_3-bromopent-1-ene%252C_d)_3-bromopentane.svg?revision=2&size=bestfit&width=312&height=126)
8. 3-bromo-1-pentene and 1-bromo-2-pentene undergo SN1 reaction at almost the same rate, but one is a secondary halide while the other is a primary halide. Explain why this is.
9. Label the following reactions as most likely occuring by an SN1 or SN2 mechanism. Suggest why.
_1-(cyclohex-1-en-1-yl)propan-1-ol_reacts_with_HBr_in_ethanol_to_give_1-(1-bromopropyl)cyclohex-1-ene%253B_b)_(E)-1-bromo-2-methylbut-2-ene_reacts_with_sodium_methanethiolate_in_acetonitrile_to_give_(E)-methyl(2-methylbut-2-en-1-yl)sulfane.svg?revision=2&size=bestfit&width=373&height=176)
10. Give the solvolysis product expected when the compound is heated in methanol.
_3-iodo-3-methylhexane%252C_b)_(2-bromo-2-methylpropyl)cyclopentane%252C_c)_(4-bromobutyl)benzene%252C_d)_5-chloro-2%252C2-dimethylhexane.svg?revision=1&size=bestfit&width=214&height=331)
11. Predict whether each compound below would be more likely to undergo a SN2 or SN1 reaction.
_bromocyclopentane%252C_b)_1-chloro-3-methylhexane%252C_c)_1-fluoro-1-methylcyclohexane%252C_d)_(2-chloropentan-2-yl)cyclopropane.svg?revision=1&size=bestfit&width=209&height=288)
12. Show how each compound may be synthesized using nucleophilic substitution reactions.
_2-cyclohexylacetonitrile%252C_b)_3-methylpentan-3-ol%252C_c)_but-2-yn-1-ylcyclohexane%252C_d)_propoxycyclohexane%252C_e)_(S)-hexan-2-ol%252C_f)_(S)-1-cyclohexylpropan-1-ol%252C_g)_(E)-2%252C3-dimethylhex-3-en-2-ol.svg?revision=1&size=bestfit&width=197&height=611)
- Answers
1.

-
2. An SN1 reaction would occur faster in H2O because it's polar protic and would stabilize the carbocation and CH3CN is polar aprotic.
3. Polar aprotic solvents, a weak leaving group and primary substrates disfavor SN1 reactions.
4.
-2-bromobutane_reacts_with_methanol_to_give_a_racemic_mixture_of_(R)-2-methoxybutane_and_(S)-2-methoxybutane.svg?revision=1&size=bestfit&width=493&height=85)
Reaction proceeds via SN1 because a secondary carbocation was formed, the solvent is polar protic and Br- is a good leaving group.
5. You could change the solvent to something polar aprotic like CH3CN or DMSO, and you could use a stronger nucleophile such as NaOCH3. Note that this would give only the inverted product, and not a racemic mixture.
6.

This reaction occurs via SN1 because Cl- is a good leaving group, the intermediate carbocation is a stable benzylic cation, and the solvent is polar protic. This is an example of a solvolysis reaction because the nucleophile is also the solvent.
7. Consider the stability of the intermediate, the carbocation.
A < D < B < C (most reactive)
8. They have the same intermediates when you look at the resonance forms.
-1-bromopent-2-ene_lose_bromide.svg?revision=1&size=bestfit&width=351&height=316)
9.
A – SN1 *poor leaving group, protic solvent, secondary cation intermediate
B – SN2 *good leaving group, polar solvent, primary position.
10.
_3-methoxy-3-methylhexane%252C_b)_(2-methoxy-2-methylpropyl)cyclopentane%252C_c)_no_reaction%252C_d)_5-methoxy-2%252C2-dimethylhexane.svg?revision=1&size=bestfit&width=192&height=313)
11.a) Can undergo SN1 or SN2, depending on reaction conditions
b) SN2
c) SN1
d) SN1
12.