
Electron Configuration of Transition Metals
- Page ID
- 623
\( \newcommand{\vecs}[1]{\overset { \scriptstyle \rightharpoonup} {\mathbf{#1}} } \)
\( \newcommand{\vecd}[1]{\overset{-\!-\!\rightharpoonup}{\vphantom{a}\smash {#1}}} \)
\( \newcommand{\dsum}{\displaystyle\sum\limits} \)
\( \newcommand{\dint}{\displaystyle\int\limits} \)
\( \newcommand{\dlim}{\displaystyle\lim\limits} \)
\( \newcommand{\id}{\mathrm{id}}\) \( \newcommand{\Span}{\mathrm{span}}\)
( \newcommand{\kernel}{\mathrm{null}\,}\) \( \newcommand{\range}{\mathrm{range}\,}\)
\( \newcommand{\RealPart}{\mathrm{Re}}\) \( \newcommand{\ImaginaryPart}{\mathrm{Im}}\)
\( \newcommand{\Argument}{\mathrm{Arg}}\) \( \newcommand{\norm}[1]{\| #1 \|}\)
\( \newcommand{\inner}[2]{\langle #1, #2 \rangle}\)
\( \newcommand{\Span}{\mathrm{span}}\)
\( \newcommand{\id}{\mathrm{id}}\)
\( \newcommand{\Span}{\mathrm{span}}\)
\( \newcommand{\kernel}{\mathrm{null}\,}\)
\( \newcommand{\range}{\mathrm{range}\,}\)
\( \newcommand{\RealPart}{\mathrm{Re}}\)
\( \newcommand{\ImaginaryPart}{\mathrm{Im}}\)
\( \newcommand{\Argument}{\mathrm{Arg}}\)
\( \newcommand{\norm}[1]{\| #1 \|}\)
\( \newcommand{\inner}[2]{\langle #1, #2 \rangle}\)
\( \newcommand{\Span}{\mathrm{span}}\) \( \newcommand{\AA}{\unicode[.8,0]{x212B}}\)
\( \newcommand{\vectorA}[1]{\vec{#1}} % arrow\)
\( \newcommand{\vectorAt}[1]{\vec{\text{#1}}} % arrow\)
\( \newcommand{\vectorB}[1]{\overset { \scriptstyle \rightharpoonup} {\mathbf{#1}} } \)
\( \newcommand{\vectorC}[1]{\textbf{#1}} \)
\( \newcommand{\vectorD}[1]{\overrightarrow{#1}} \)
\( \newcommand{\vectorDt}[1]{\overrightarrow{\text{#1}}} \)
\( \newcommand{\vectE}[1]{\overset{-\!-\!\rightharpoonup}{\vphantom{a}\smash{\mathbf {#1}}}} \)
\( \newcommand{\vecs}[1]{\overset { \scriptstyle \rightharpoonup} {\mathbf{#1}} } \)
\(\newcommand{\longvect}{\overrightarrow}\)
\( \newcommand{\vecd}[1]{\overset{-\!-\!\rightharpoonup}{\vphantom{a}\smash {#1}}} \)
\(\newcommand{\avec}{\mathbf a}\) \(\newcommand{\bvec}{\mathbf b}\) \(\newcommand{\cvec}{\mathbf c}\) \(\newcommand{\dvec}{\mathbf d}\) \(\newcommand{\dtil}{\widetilde{\mathbf d}}\) \(\newcommand{\evec}{\mathbf e}\) \(\newcommand{\fvec}{\mathbf f}\) \(\newcommand{\nvec}{\mathbf n}\) \(\newcommand{\pvec}{\mathbf p}\) \(\newcommand{\qvec}{\mathbf q}\) \(\newcommand{\svec}{\mathbf s}\) \(\newcommand{\tvec}{\mathbf t}\) \(\newcommand{\uvec}{\mathbf u}\) \(\newcommand{\vvec}{\mathbf v}\) \(\newcommand{\wvec}{\mathbf w}\) \(\newcommand{\xvec}{\mathbf x}\) \(\newcommand{\yvec}{\mathbf y}\) \(\newcommand{\zvec}{\mathbf z}\) \(\newcommand{\rvec}{\mathbf r}\) \(\newcommand{\mvec}{\mathbf m}\) \(\newcommand{\zerovec}{\mathbf 0}\) \(\newcommand{\onevec}{\mathbf 1}\) \(\newcommand{\real}{\mathbb R}\) \(\newcommand{\twovec}[2]{\left[\begin{array}{r}#1 \\ #2 \end{array}\right]}\) \(\newcommand{\ctwovec}[2]{\left[\begin{array}{c}#1 \\ #2 \end{array}\right]}\) \(\newcommand{\threevec}[3]{\left[\begin{array}{r}#1 \\ #2 \\ #3 \end{array}\right]}\) \(\newcommand{\cthreevec}[3]{\left[\begin{array}{c}#1 \\ #2 \\ #3 \end{array}\right]}\) \(\newcommand{\fourvec}[4]{\left[\begin{array}{r}#1 \\ #2 \\ #3 \\ #4 \end{array}\right]}\) \(\newcommand{\cfourvec}[4]{\left[\begin{array}{c}#1 \\ #2 \\ #3 \\ #4 \end{array}\right]}\) \(\newcommand{\fivevec}[5]{\left[\begin{array}{r}#1 \\ #2 \\ #3 \\ #4 \\ #5 \\ \end{array}\right]}\) \(\newcommand{\cfivevec}[5]{\left[\begin{array}{c}#1 \\ #2 \\ #3 \\ #4 \\ #5 \\ \end{array}\right]}\) \(\newcommand{\mattwo}[4]{\left[\begin{array}{rr}#1 \amp #2 \\ #3 \amp #4 \\ \end{array}\right]}\) \(\newcommand{\laspan}[1]{\text{Span}\{#1\}}\) \(\newcommand{\bcal}{\cal B}\) \(\newcommand{\ccal}{\cal C}\) \(\newcommand{\scal}{\cal S}\) \(\newcommand{\wcal}{\cal W}\) \(\newcommand{\ecal}{\cal E}\) \(\newcommand{\coords}[2]{\left\{#1\right\}_{#2}}\) \(\newcommand{\gray}[1]{\color{gray}{#1}}\) \(\newcommand{\lgray}[1]{\color{lightgray}{#1}}\) \(\newcommand{\rank}{\operatorname{rank}}\) \(\newcommand{\row}{\text{Row}}\) \(\newcommand{\col}{\text{Col}}\) \(\renewcommand{\row}{\text{Row}}\) \(\newcommand{\nul}{\text{Nul}}\) \(\newcommand{\var}{\text{Var}}\) \(\newcommand{\corr}{\text{corr}}\) \(\newcommand{\len}[1]{\left|#1\right|}\) \(\newcommand{\bbar}{\overline{\bvec}}\) \(\newcommand{\bhat}{\widehat{\bvec}}\) \(\newcommand{\bperp}{\bvec^\perp}\) \(\newcommand{\xhat}{\widehat{\xvec}}\) \(\newcommand{\vhat}{\widehat{\vvec}}\) \(\newcommand{\uhat}{\widehat{\uvec}}\) \(\newcommand{\what}{\widehat{\wvec}}\) \(\newcommand{\Sighat}{\widehat{\Sigma}}\) \(\newcommand{\lt}{<}\) \(\newcommand{\gt}{>}\) \(\newcommand{\amp}{&}\) \(\definecolor{fillinmathshade}{gray}{0.9}\)Electron configuration describes the distribution of electrons among different orbitals (including shells and subshells) within atoms and molecules.
Introduction
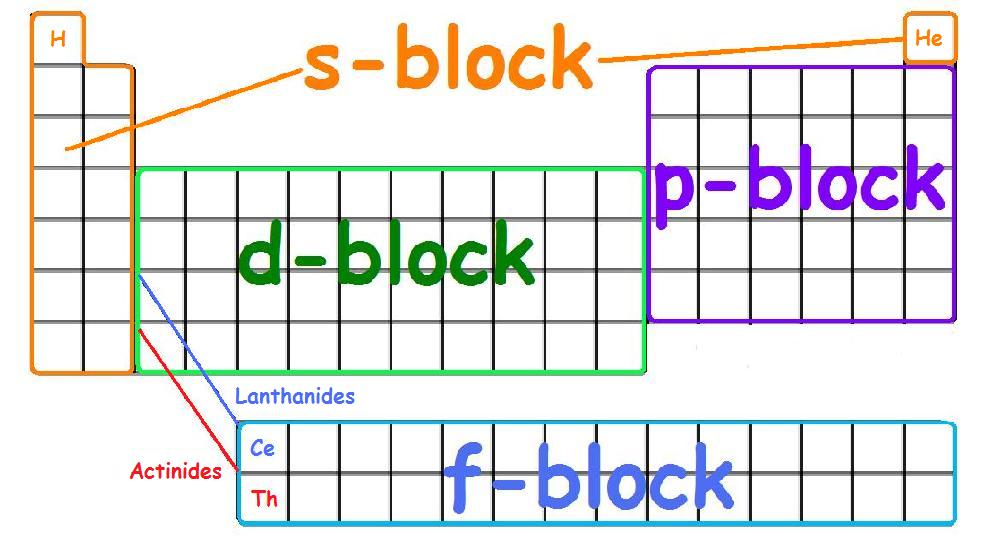
There are four principle orbitals (s, p, d, and f) which are filled according to the energy level and valence electrons of the element. All four orbitals can hold different number of electrons. The s-orbital can hold 2 electrons, and the other three orbitals can hold up to 6, 10, and 14 electrons, respectively. The s-orbital primarily denotes group 1 or group 2 elements, the p-orbital denotes group 13, 14, 15, 16, 17, or 18 elements, and the f-orbital denotes the Lanthanides and Actinides group. The main focus of this module however will be on the electron configuration of transition metals, which are found in the d-orbitals (d-block).
The electron configuration of transition metals is special in the sense that they can be found in numerous oxidation states. Although the elements can display many different oxidation states, they usually exhibit a common oxidation state depending on what makes that element most stable. For this module, we will work only with the first row of transition metals; however the other rows of transition metals generally follow the same patterns as the first row.
The s, p, d, and f-orbitals are identified on the periodic table below:
First Row Transition Metals
In the first row of the transition metals, the ten elements that can be found are: Scandium (Sc), Titanium (Ti), Vanadium (V), Chromium (Cr), Manganese (Mn), Iron (Fe), Cobalt (Co), Nickel (Ni), Copper (Cu), and Zinc (Zn).
Below is a table of the oxidation states that the transition metals can or cannot form. As stated in the boxes, the “No” indicates that the elements are not found with that oxidation state. The “Rare” signifies the oxidation states that the elements are rarely found in. Lastly, the “Common” identifies the oxidation states that the elements readily found in.
Oxidation States vs. First Row Transition Metals
| First Row Transition Metals | Oxidation States | |||||||
| Element Symbol | Atomic Number | +1 | +2 | +3 | +4 | +5 | +6 | +7 |
| Sc | 21 | No | Rare | Common | No | No | No | No |
| Ti | 22 | No | Rare | Rare | Common | No | No | No |
| V | 23 | Rare | Common (lilac) |
Common (green) |
Common (blue) | Common (yellow) | No | No |
| Cr | 24 | Rare | Common | Common (Most stable) | Rare | Rare | Common | No |
| Mn | 25 | Rare | Common (Most stable) (pink/red) |
Common (purple/red) |
Common | Rare (blue) | Common (green) | Common (purple) |
| Fe | 26 | Rare | Common (ferrous) |
Common (ferric) |
Rare | Rare | Rare | No |
| Co | 27 | Rare | Common | Common | Rare | Rare | Rare | No |
| Ni | 28 | Rare | Common | Rare | Rare | No | No | No |
| Cu | 29 | Rare | Common (blue/green) |
No | No | No | No | No |
| Zn | 30 | No | Common | No | No | No | No | No |
Filling Transition Metal Orbitals
The electron configuration for the first row transition metals consists of 4s and 3d subshells with an argon (noble gas) core. This only applies to the first row transition metals, adjustments will be necessary when writing the electron configuration for the other rows of transition metals. The noble gas before the first row of transition metals would be the core written with brackets around the element symbol (i.e. [Ar] would be used for the first row transition metals), and the electron configuration would follow a [Ar] nsxndx format. In the case of first row transition metals, the electron configuration would simply be [Ar] 4sx3dx. The energy level, "n", can be determined based on the periodic table, simply by looking at the row number in which the element is in. However, there is an exception for the d-block and f-block, in which the energy level, "n" for the d block is "n-1" ("n" minus 1) and for the f block is "n-2" (See following periodic table for clarification). In this case, the "x" in nsx and ndx is the number of electrons in a specific orbital (i.e. s-orbitals can hold up to a maximum of 2 electrons, p-orbitals can hold up to 6 electrons, d-orbitals can hold up to 10 electrons, and f-orbitals can hold up to 14 electrons). To determine what "x" is, simply count the number of boxes that you come across before reaching the element you are attempting to determine the electron configuration for.
Example of Determining Energy Levels (n)
For example, if we want to determine the electron configuration for Cobalt (Co) at ground state, we would first look at the row number, which is 4 according to the periodic table below; meaning n = 4 for the s-orbital. In addition, since we know that the energy level for the d orbital is "n-1", therefore n = 3 for the d-orbital in this case. Thus, the electron configuration for Cobalt at ground state would simply be Co: [Ar] 4s23d7. The reason why it is 3d7 can be explained using the periodic table. As stated, you could simply count the boxes on the periodic table, and since Cobalt is the 7th element of the first row transition metals, we get Co: [Ar] 4s23d7.
.jpg?revision=1&size=bestfit&width=656&height=425)
Order of Filling the Subshells
The following image shows the order for filling the subshells:

Transition Metals with an Oxidation State
In the ground state, the electron configuration of the transition metals follows the format, ns2ndx. As for the electron configuration for transition metals that are charged (i.e. Cu+), the electrons from the s orbital will be moved to the d-orbital to form either ns0ndx or ns1ndx.
It is helpful to first write down the electron configuration of an element at its ground state before attempting to determine the electron configuration of an element with an oxidation state. See examples below.
| Example 1: Vanadium |
|---|
|
Vanadium at Ground State (Neutral): V: 5 d-electrons = [Ar] 4s23d3 Vanadium with an Oxidation State of +4: V4+: [Ar] 4s03d1 Or you can also write it as V4+: [Ar] 3d1 |
| Example 2: Nickel |
|---|
|
Above is a video showing how to write the electron configuration for Nickel (Ni) and Zirconium (Zr) from the d-block. Nickel at Ground State: Ni: 8 d-electrons = [Ar] 4s23d8 Nickel with an Oxidation State of +2: Ni2+: [Ar] 4s03d8 Or simply Ni2+: [Ar] 3d8 In this example, the electron configuration for Ni2+ still kept its 3d8, but lost the 4s2 (became 4s0) because the s-orbital has the highest energy level of n = 4 in this case. Therefore, the s-orbital will lose its electrons first, before the d-orbital, and so Ni2+ can be written as [Ar] 4s03d8 OR [Ar] 3d8. |
Electron Configuration of a Second Row Transition Metal (Rhodium)
Rhodium at Ground State:
Rh: 7 d-electrons = [Kr] 5s24d7
Rhodium with an Oxidation State of +3:
Rh3+: [Kr] 5s04d6
Or simply Rh3+: [Kr] 4d6
| Example 3: Osmium |
|---|
|
Note: Osmium is stable with oxidation states of +2, +3, +4, as well as +8. Osmium at Ground State: Os: 6 d-electrons = [Xe] 6s24f145d6 Osmium with an Oxidation State of +2: Os: [Xe] 4f145d6 Osmium with an Oxidation State of +3: Os: [Xe] 4f145d5 For fourth row transition metals, the electron configuration is very similar to the electron configuration of the third row transition metals. However, for a fourth row transition metal, you would follow the format of [Rn] 7sx5fx6dx rather than the third row transition metal formating of [Xe] 6sx4fx5dx. |
References
- Petrucci, Ralph. Harwood, William. Herring, Geoffrey. Madura, Jeffery. General Chemistry: Principles and Modern Applications, 9th Edition. Pearson Education, Inc. New Jersey, 2007.
- Hein, et al. Introduction to General, Organic, and Biochemistry. 9th ed. Hoboken, NJ 2009.
Problems
- What is the maximum number of electrons each orbital (s, p, d, f) can hold, respectively?
- Write the electron configuration for Sc3+.
- Write the electron configuration for Ti2+.
- Which first row transition metal is the only element that forms an oxidation state of +7?
- For additional practice, try to write the electron configuration of all the first row transition metals with their common oxidation states:
To see an example of an element from the second row or third row transition metals, see "Electron Configuration of a Second Row Transition Metal (Rhodium)" and "Electron Configuration of a Third Row Transition Metal (Osmium)".)
A) V2+ B) V3+ C) V5+ D) Cr2+ E) Cr3+ F) Cr6+ G) Mn2+ H) Mn3+
I) Mn4+ J) Mn6+ K) Mn7+ L) Fe2+ M) Fe3+ N) Co2+ O) Co3+ P) Cu2+ Q) Zn2+
Solutions
See File Attachment for Solutions. (You will probably need Adobe Reader to open the PDF file.)
Contributors
- Liza Chu (UCD)