25.6: Stripping Methods
- Page ID
- 335303
\( \newcommand{\vecs}[1]{\overset { \scriptstyle \rightharpoonup} {\mathbf{#1}} } \)
\( \newcommand{\vecd}[1]{\overset{-\!-\!\rightharpoonup}{\vphantom{a}\smash {#1}}} \)
\( \newcommand{\dsum}{\displaystyle\sum\limits} \)
\( \newcommand{\dint}{\displaystyle\int\limits} \)
\( \newcommand{\dlim}{\displaystyle\lim\limits} \)
\( \newcommand{\id}{\mathrm{id}}\) \( \newcommand{\Span}{\mathrm{span}}\)
( \newcommand{\kernel}{\mathrm{null}\,}\) \( \newcommand{\range}{\mathrm{range}\,}\)
\( \newcommand{\RealPart}{\mathrm{Re}}\) \( \newcommand{\ImaginaryPart}{\mathrm{Im}}\)
\( \newcommand{\Argument}{\mathrm{Arg}}\) \( \newcommand{\norm}[1]{\| #1 \|}\)
\( \newcommand{\inner}[2]{\langle #1, #2 \rangle}\)
\( \newcommand{\Span}{\mathrm{span}}\)
\( \newcommand{\id}{\mathrm{id}}\)
\( \newcommand{\Span}{\mathrm{span}}\)
\( \newcommand{\kernel}{\mathrm{null}\,}\)
\( \newcommand{\range}{\mathrm{range}\,}\)
\( \newcommand{\RealPart}{\mathrm{Re}}\)
\( \newcommand{\ImaginaryPart}{\mathrm{Im}}\)
\( \newcommand{\Argument}{\mathrm{Arg}}\)
\( \newcommand{\norm}[1]{\| #1 \|}\)
\( \newcommand{\inner}[2]{\langle #1, #2 \rangle}\)
\( \newcommand{\Span}{\mathrm{span}}\) \( \newcommand{\AA}{\unicode[.8,0]{x212B}}\)
\( \newcommand{\vectorA}[1]{\vec{#1}} % arrow\)
\( \newcommand{\vectorAt}[1]{\vec{\text{#1}}} % arrow\)
\( \newcommand{\vectorB}[1]{\overset { \scriptstyle \rightharpoonup} {\mathbf{#1}} } \)
\( \newcommand{\vectorC}[1]{\textbf{#1}} \)
\( \newcommand{\vectorD}[1]{\overrightarrow{#1}} \)
\( \newcommand{\vectorDt}[1]{\overrightarrow{\text{#1}}} \)
\( \newcommand{\vectE}[1]{\overset{-\!-\!\rightharpoonup}{\vphantom{a}\smash{\mathbf {#1}}}} \)
\( \newcommand{\vecs}[1]{\overset { \scriptstyle \rightharpoonup} {\mathbf{#1}} } \)
\(\newcommand{\longvect}{\overrightarrow}\)
\( \newcommand{\vecd}[1]{\overset{-\!-\!\rightharpoonup}{\vphantom{a}\smash {#1}}} \)
\(\newcommand{\avec}{\mathbf a}\) \(\newcommand{\bvec}{\mathbf b}\) \(\newcommand{\cvec}{\mathbf c}\) \(\newcommand{\dvec}{\mathbf d}\) \(\newcommand{\dtil}{\widetilde{\mathbf d}}\) \(\newcommand{\evec}{\mathbf e}\) \(\newcommand{\fvec}{\mathbf f}\) \(\newcommand{\nvec}{\mathbf n}\) \(\newcommand{\pvec}{\mathbf p}\) \(\newcommand{\qvec}{\mathbf q}\) \(\newcommand{\svec}{\mathbf s}\) \(\newcommand{\tvec}{\mathbf t}\) \(\newcommand{\uvec}{\mathbf u}\) \(\newcommand{\vvec}{\mathbf v}\) \(\newcommand{\wvec}{\mathbf w}\) \(\newcommand{\xvec}{\mathbf x}\) \(\newcommand{\yvec}{\mathbf y}\) \(\newcommand{\zvec}{\mathbf z}\) \(\newcommand{\rvec}{\mathbf r}\) \(\newcommand{\mvec}{\mathbf m}\) \(\newcommand{\zerovec}{\mathbf 0}\) \(\newcommand{\onevec}{\mathbf 1}\) \(\newcommand{\real}{\mathbb R}\) \(\newcommand{\twovec}[2]{\left[\begin{array}{r}#1 \\ #2 \end{array}\right]}\) \(\newcommand{\ctwovec}[2]{\left[\begin{array}{c}#1 \\ #2 \end{array}\right]}\) \(\newcommand{\threevec}[3]{\left[\begin{array}{r}#1 \\ #2 \\ #3 \end{array}\right]}\) \(\newcommand{\cthreevec}[3]{\left[\begin{array}{c}#1 \\ #2 \\ #3 \end{array}\right]}\) \(\newcommand{\fourvec}[4]{\left[\begin{array}{r}#1 \\ #2 \\ #3 \\ #4 \end{array}\right]}\) \(\newcommand{\cfourvec}[4]{\left[\begin{array}{c}#1 \\ #2 \\ #3 \\ #4 \end{array}\right]}\) \(\newcommand{\fivevec}[5]{\left[\begin{array}{r}#1 \\ #2 \\ #3 \\ #4 \\ #5 \\ \end{array}\right]}\) \(\newcommand{\cfivevec}[5]{\left[\begin{array}{c}#1 \\ #2 \\ #3 \\ #4 \\ #5 \\ \end{array}\right]}\) \(\newcommand{\mattwo}[4]{\left[\begin{array}{rr}#1 \amp #2 \\ #3 \amp #4 \\ \end{array}\right]}\) \(\newcommand{\laspan}[1]{\text{Span}\{#1\}}\) \(\newcommand{\bcal}{\cal B}\) \(\newcommand{\ccal}{\cal C}\) \(\newcommand{\scal}{\cal S}\) \(\newcommand{\wcal}{\cal W}\) \(\newcommand{\ecal}{\cal E}\) \(\newcommand{\coords}[2]{\left\{#1\right\}_{#2}}\) \(\newcommand{\gray}[1]{\color{gray}{#1}}\) \(\newcommand{\lgray}[1]{\color{lightgray}{#1}}\) \(\newcommand{\rank}{\operatorname{rank}}\) \(\newcommand{\row}{\text{Row}}\) \(\newcommand{\col}{\text{Col}}\) \(\renewcommand{\row}{\text{Row}}\) \(\newcommand{\nul}{\text{Nul}}\) \(\newcommand{\var}{\text{Var}}\) \(\newcommand{\corr}{\text{corr}}\) \(\newcommand{\len}[1]{\left|#1\right|}\) \(\newcommand{\bbar}{\overline{\bvec}}\) \(\newcommand{\bhat}{\widehat{\bvec}}\) \(\newcommand{\bperp}{\bvec^\perp}\) \(\newcommand{\xhat}{\widehat{\xvec}}\) \(\newcommand{\vhat}{\widehat{\vvec}}\) \(\newcommand{\uhat}{\widehat{\uvec}}\) \(\newcommand{\what}{\widehat{\wvec}}\) \(\newcommand{\Sighat}{\widehat{\Sigma}}\) \(\newcommand{\lt}{<}\) \(\newcommand{\gt}{>}\) \(\newcommand{\amp}{&}\) \(\definecolor{fillinmathshade}{gray}{0.9}\)Another important voltammetric technique is stripping voltammetry, which consists of three related techniques: anodic stripping voltammetry, cathodic stripping voltammetry, and adsorptive stripping voltammetry. Because anodic stripping voltammetry is the more widely used of these techniques, we will consider it in greatest detail.
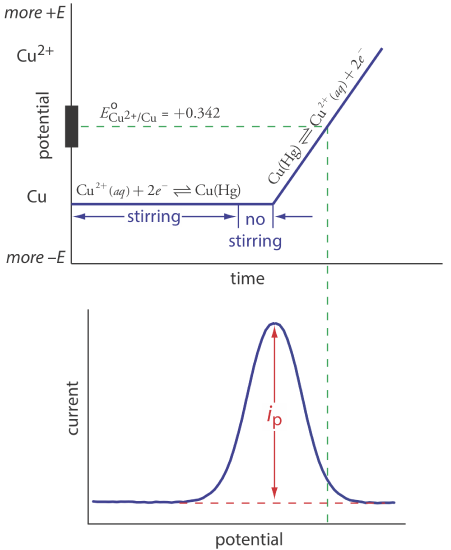
Anodic stripping voltammetry consists of two steps (Figure \(\PageIndex{1}\)). The first step is a controlled potential electrolysis in which we hold the working electrode—usually a hanging mercury drop or a mercury film electrode—at a cathodic potential sufficient to deposit the metal ion on the electrode. For example, when analyzing Cu2+ the deposition reaction is
\[\mathrm{Cu}^{2+}+2 e^{-} \rightleftharpoons \mathrm{Cu}(\mathrm{Hg}) \label{sv1} \]
where Cu(Hg) indicates that the copper is amalgamated with the mercury. This step serves as a means of concentrating the analyte by transferring it from the larger volume of the solution to the smaller volume of the electrode. During most of the electrolysis we stir the solution to increase the rate of deposition. Near the end of the deposition time we stop the stirring—eliminating convection as a mode of mass transport—and allow the solution to become quiescent. Typical deposition times of 1–30 min are common, with analytes at lower concentrations requiring longer times.

In the second step, we scan the potential anodically—that is, toward a more positive potential. When the working electrode’s potential is sufficiently positive, the analyte is stripped from the electrode, returning to solution in its oxidized form.
\[\mathrm{Cu}(\mathrm{Hg})\rightleftharpoons \text{ Cu}^{2+}+2 e^{-} \label{sv2} \]
Monitoring the current during the stripping step gives a peak-shaped voltammogram, as shown in Figure \(\PageIndex{1}\). The peak current is proportional to the analyte’s concentration in the solution. Because we are concentrating the analyte in the electrode, detection limits are much smaller than other electrochemical techniques. An improvement of three orders of magnitude—the equivalent of parts per billion instead of parts per million—is routine.
Applications
Anodic stripping voltammetry is very sensitive to experimental conditions, which we must carefully control to obtain results that are accurate and precise. Key variables include the area of the mercury film or the size of the hanging Hg drop, the deposition time, the rest time, the rate of stirring, and the scan rate during the stripping step. Anodic stripping voltammetry is particularly useful for metals that form amalgams with mercury, several examples of which are listed in Table \(\PageIndex{1}\).
The experimental design for cathodic stripping voltammetry is similar to anodic stripping voltammetry with two exceptions. First, the deposition step involves the oxidation of the Hg electrode to \(\text{Hg}_2^{2+}\), which then reacts with the analyte to form an insoluble film at the surface of the electrode. For example, when Cl– is the analyte the deposition step is
\[2 \mathrm{Hg}(l)+2 \mathrm{Cl}^{-}(a q) \rightleftharpoons \text{ Hg}_{2} \mathrm{Cl}_{2}(s)+2 e^{-} \label{sv3} \]
Second, stripping is accomplished by scanning cathodically toward a more negative potential, reducing \(\text{Hg}_2^{2+}\) back to Hg and returning the analyte to solution.
\[\mathrm{Hg}_{2} \mathrm{Cl}_{2}(s)+2 e^{-}\rightleftharpoons 2 \mathrm{Hg}( l)+2 \mathrm{Cl}^{-}(a q) \label{sv4} \]
Table \(\PageIndex{1}\) lists several analytes analyzed successfully by cathodic stripping voltammetry.
In adsorptive stripping voltammetry, the deposition step occurs without electrolysis. Instead, the analyte adsorbs to the electrode’s surface. During deposition we maintain the electrode at a potential that enhances adsorption. For example, we can adsorb a neutral molecule on a Hg drop if we apply a potential of –0.4 V versus the SCE, a potential where the surface charge of mercury is approximately zero. When deposition is complete, we scan the potential in an anodic or a cathodic direction, depending on whether we are oxidizing or reducing the analyte. Examples of compounds that have been analyzed by absorptive stripping voltammetry also are listed in Table \(\PageIndex{1}\).


