2.4: Basic Equipment
- Page ID
- 127137

\( \newcommand{\vecs}[1]{\overset { \scriptstyle \rightharpoonup} {\mathbf{#1}} } \)
\( \newcommand{\vecd}[1]{\overset{-\!-\!\rightharpoonup}{\vphantom{a}\smash {#1}}} \)
\( \newcommand{\id}{\mathrm{id}}\) \( \newcommand{\Span}{\mathrm{span}}\)
( \newcommand{\kernel}{\mathrm{null}\,}\) \( \newcommand{\range}{\mathrm{range}\,}\)
\( \newcommand{\RealPart}{\mathrm{Re}}\) \( \newcommand{\ImaginaryPart}{\mathrm{Im}}\)
\( \newcommand{\Argument}{\mathrm{Arg}}\) \( \newcommand{\norm}[1]{\| #1 \|}\)
\( \newcommand{\inner}[2]{\langle #1, #2 \rangle}\)
\( \newcommand{\Span}{\mathrm{span}}\)
\( \newcommand{\id}{\mathrm{id}}\)
\( \newcommand{\Span}{\mathrm{span}}\)
\( \newcommand{\kernel}{\mathrm{null}\,}\)
\( \newcommand{\range}{\mathrm{range}\,}\)
\( \newcommand{\RealPart}{\mathrm{Re}}\)
\( \newcommand{\ImaginaryPart}{\mathrm{Im}}\)
\( \newcommand{\Argument}{\mathrm{Arg}}\)
\( \newcommand{\norm}[1]{\| #1 \|}\)
\( \newcommand{\inner}[2]{\langle #1, #2 \rangle}\)
\( \newcommand{\Span}{\mathrm{span}}\) \( \newcommand{\AA}{\unicode[.8,0]{x212B}}\)
\( \newcommand{\vectorA}[1]{\vec{#1}} % arrow\)
\( \newcommand{\vectorAt}[1]{\vec{\text{#1}}} % arrow\)
\( \newcommand{\vectorB}[1]{\overset { \scriptstyle \rightharpoonup} {\mathbf{#1}} } \)
\( \newcommand{\vectorC}[1]{\textbf{#1}} \)
\( \newcommand{\vectorD}[1]{\overrightarrow{#1}} \)
\( \newcommand{\vectorDt}[1]{\overrightarrow{\text{#1}}} \)
\( \newcommand{\vectE}[1]{\overset{-\!-\!\rightharpoonup}{\vphantom{a}\smash{\mathbf {#1}}}} \)
\( \newcommand{\vecs}[1]{\overset { \scriptstyle \rightharpoonup} {\mathbf{#1}} } \)
\( \newcommand{\vecd}[1]{\overset{-\!-\!\rightharpoonup}{\vphantom{a}\smash {#1}}} \)
\(\newcommand{\avec}{\mathbf a}\) \(\newcommand{\bvec}{\mathbf b}\) \(\newcommand{\cvec}{\mathbf c}\) \(\newcommand{\dvec}{\mathbf d}\) \(\newcommand{\dtil}{\widetilde{\mathbf d}}\) \(\newcommand{\evec}{\mathbf e}\) \(\newcommand{\fvec}{\mathbf f}\) \(\newcommand{\nvec}{\mathbf n}\) \(\newcommand{\pvec}{\mathbf p}\) \(\newcommand{\qvec}{\mathbf q}\) \(\newcommand{\svec}{\mathbf s}\) \(\newcommand{\tvec}{\mathbf t}\) \(\newcommand{\uvec}{\mathbf u}\) \(\newcommand{\vvec}{\mathbf v}\) \(\newcommand{\wvec}{\mathbf w}\) \(\newcommand{\xvec}{\mathbf x}\) \(\newcommand{\yvec}{\mathbf y}\) \(\newcommand{\zvec}{\mathbf z}\) \(\newcommand{\rvec}{\mathbf r}\) \(\newcommand{\mvec}{\mathbf m}\) \(\newcommand{\zerovec}{\mathbf 0}\) \(\newcommand{\onevec}{\mathbf 1}\) \(\newcommand{\real}{\mathbb R}\) \(\newcommand{\twovec}[2]{\left[\begin{array}{r}#1 \\ #2 \end{array}\right]}\) \(\newcommand{\ctwovec}[2]{\left[\begin{array}{c}#1 \\ #2 \end{array}\right]}\) \(\newcommand{\threevec}[3]{\left[\begin{array}{r}#1 \\ #2 \\ #3 \end{array}\right]}\) \(\newcommand{\cthreevec}[3]{\left[\begin{array}{c}#1 \\ #2 \\ #3 \end{array}\right]}\) \(\newcommand{\fourvec}[4]{\left[\begin{array}{r}#1 \\ #2 \\ #3 \\ #4 \end{array}\right]}\) \(\newcommand{\cfourvec}[4]{\left[\begin{array}{c}#1 \\ #2 \\ #3 \\ #4 \end{array}\right]}\) \(\newcommand{\fivevec}[5]{\left[\begin{array}{r}#1 \\ #2 \\ #3 \\ #4 \\ #5 \\ \end{array}\right]}\) \(\newcommand{\cfivevec}[5]{\left[\begin{array}{c}#1 \\ #2 \\ #3 \\ #4 \\ #5 \\ \end{array}\right]}\) \(\newcommand{\mattwo}[4]{\left[\begin{array}{rr}#1 \amp #2 \\ #3 \amp #4 \\ \end{array}\right]}\) \(\newcommand{\laspan}[1]{\text{Span}\{#1\}}\) \(\newcommand{\bcal}{\cal B}\) \(\newcommand{\ccal}{\cal C}\) \(\newcommand{\scal}{\cal S}\) \(\newcommand{\wcal}{\cal W}\) \(\newcommand{\ecal}{\cal E}\) \(\newcommand{\coords}[2]{\left\{#1\right\}_{#2}}\) \(\newcommand{\gray}[1]{\color{gray}{#1}}\) \(\newcommand{\lgray}[1]{\color{lightgray}{#1}}\) \(\newcommand{\rank}{\operatorname{rank}}\) \(\newcommand{\row}{\text{Row}}\) \(\newcommand{\col}{\text{Col}}\) \(\renewcommand{\row}{\text{Row}}\) \(\newcommand{\nul}{\text{Nul}}\) \(\newcommand{\var}{\text{Var}}\) \(\newcommand{\corr}{\text{corr}}\) \(\newcommand{\len}[1]{\left|#1\right|}\) \(\newcommand{\bbar}{\overline{\bvec}}\) \(\newcommand{\bhat}{\widehat{\bvec}}\) \(\newcommand{\bperp}{\bvec^\perp}\) \(\newcommand{\xhat}{\widehat{\xvec}}\) \(\newcommand{\vhat}{\widehat{\vvec}}\) \(\newcommand{\uhat}{\widehat{\uvec}}\) \(\newcommand{\what}{\widehat{\wvec}}\) \(\newcommand{\Sighat}{\widehat{\Sigma}}\) \(\newcommand{\lt}{<}\) \(\newcommand{\gt}{>}\) \(\newcommand{\amp}{&}\) \(\definecolor{fillinmathshade}{gray}{0.9}\)The array of equipment available for making analytical measurements and working with analytical samples is impressive, ranging from the simple and inexpensive, to the complex and expensive. With three exceptions—the measurement of mass, the measurement of volume, and the drying of materials—we will postpone the discussion of equipment to later chapters where its application to specific analytical methods is relevant.
Equipment for Measuring Mass
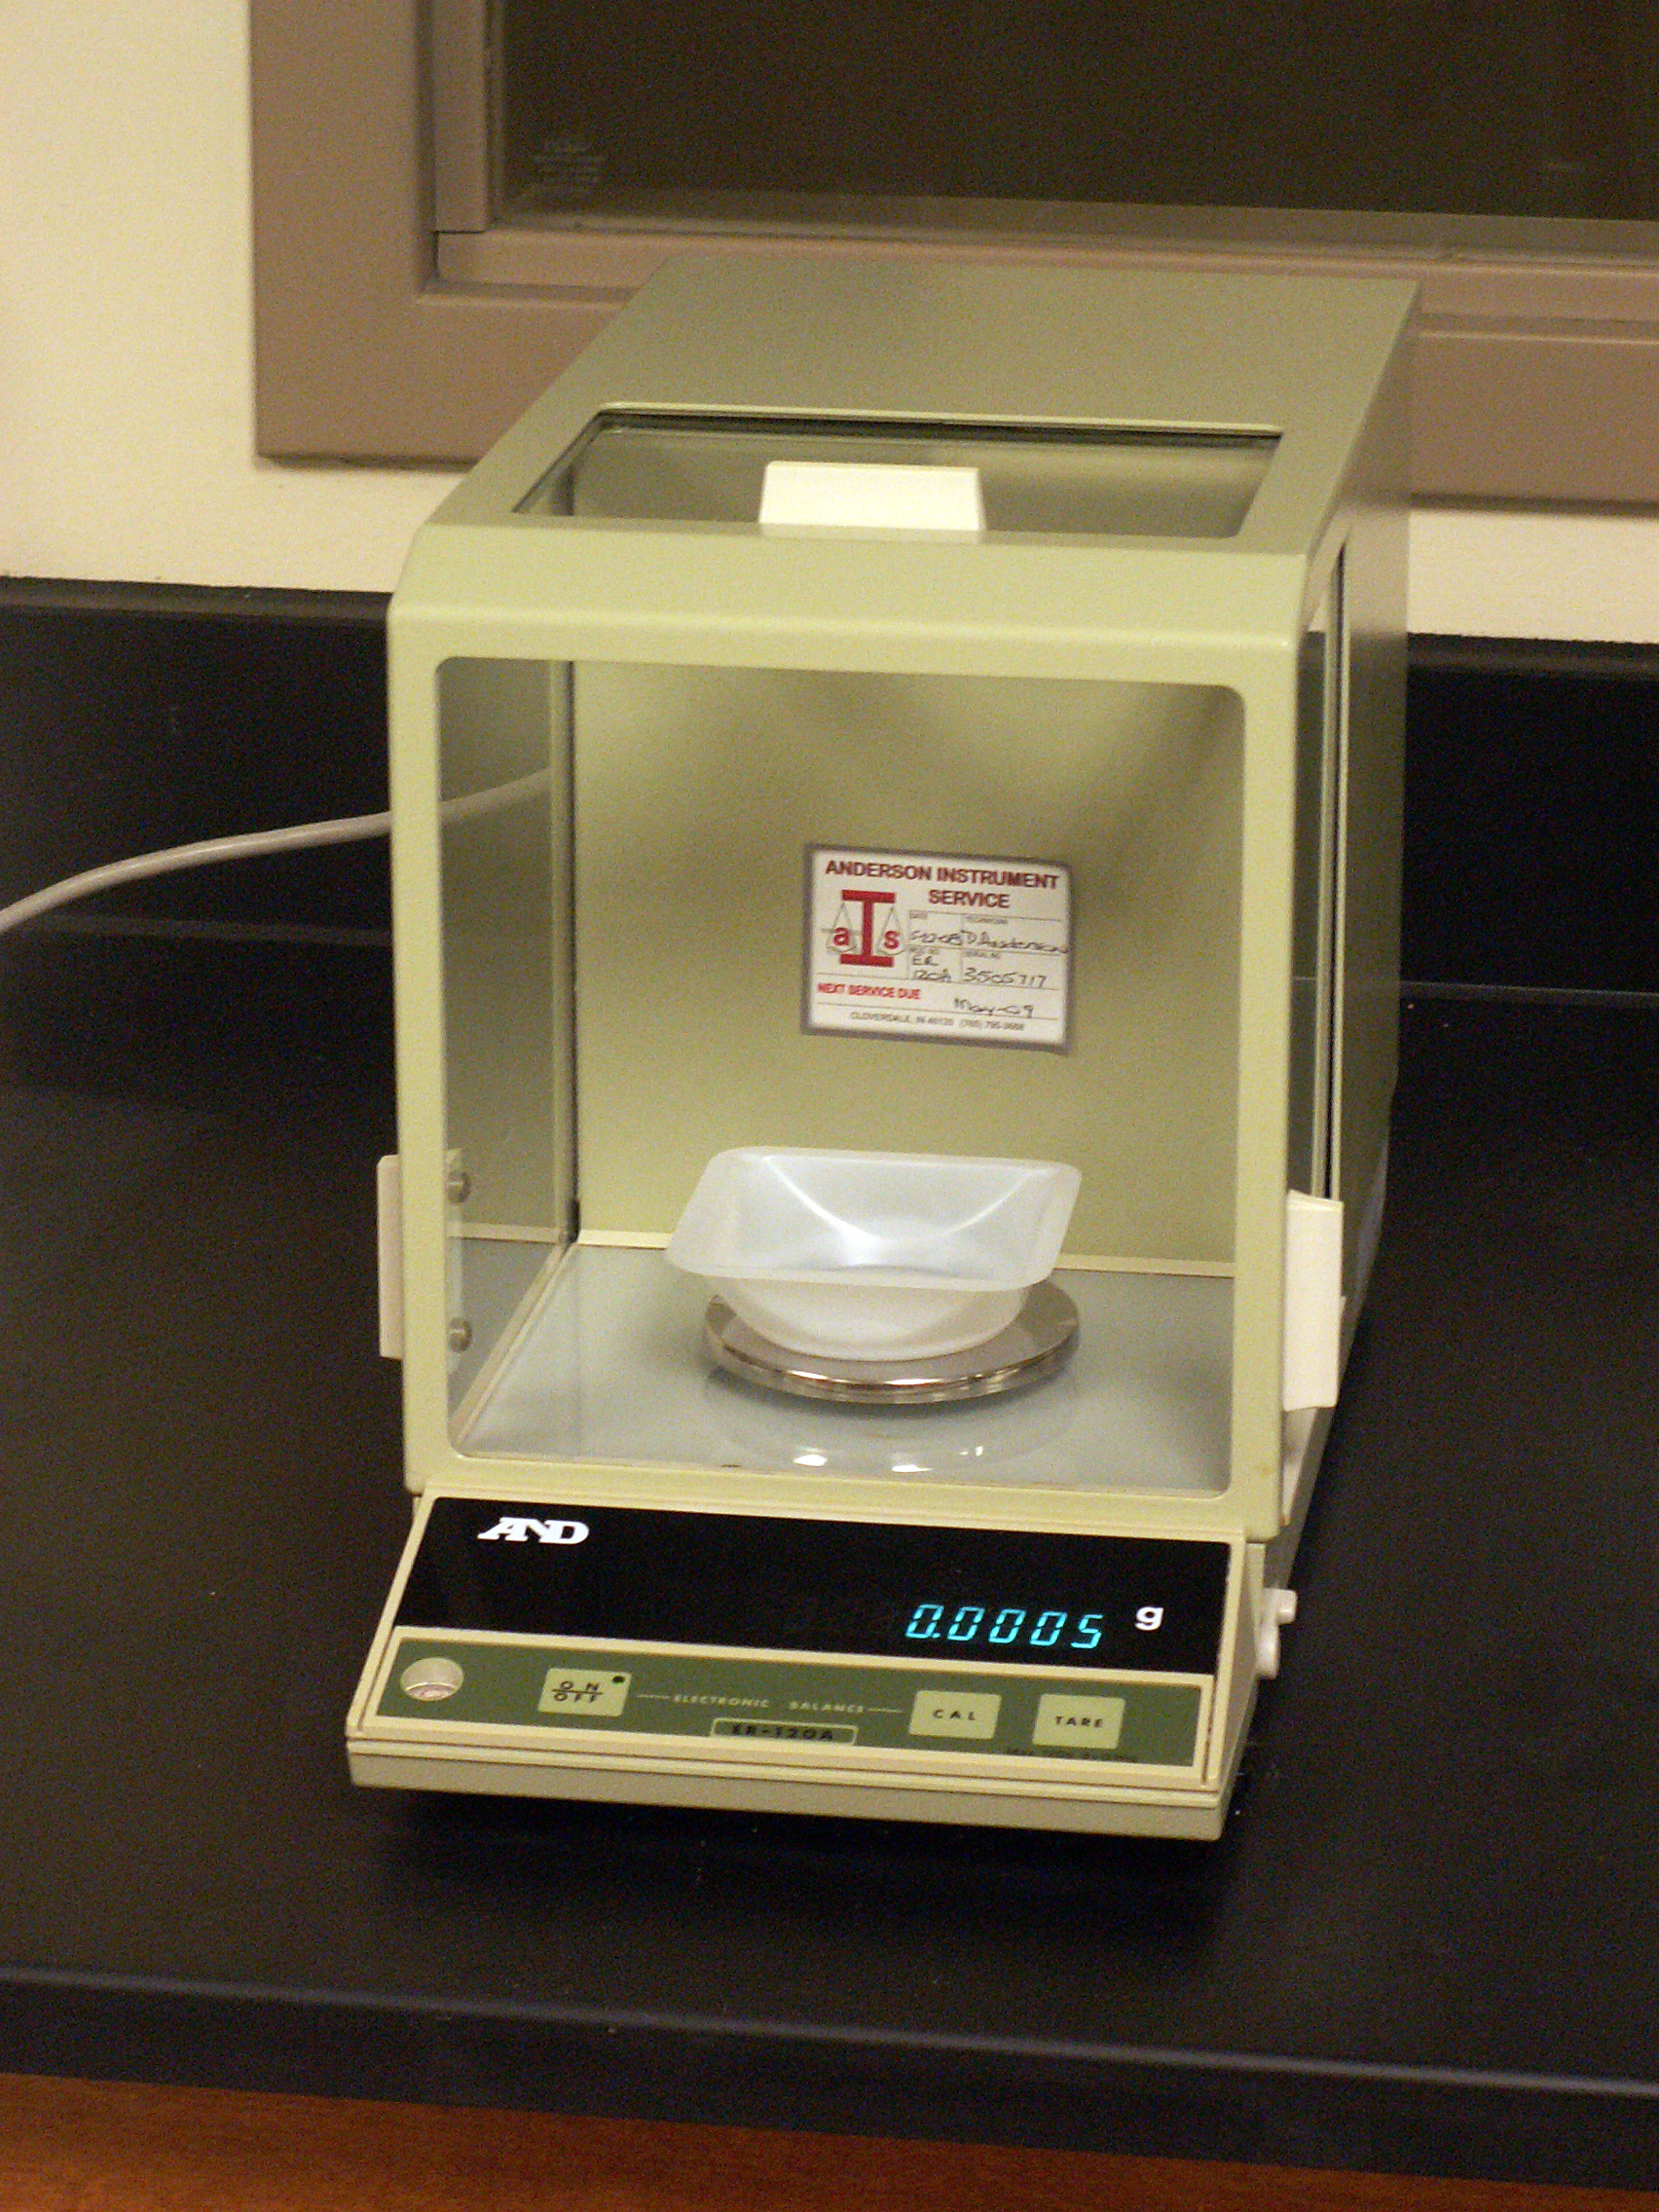
An object’s mass is measured using a digital electronic analytical balance (Figure 2.4.1 ). An electromagnet levitates the sample pan above a permanent cylindrical magnet. When we place an object on the sample pan, it displaces the sample pan downward by a force equal to the product of the sample’s mass and its acceleration due to gravity. The balance detects this downward movement and generates a counterbalancing force by increasing the current to the electromagnet. The current needed to return the balance to its original position is proportional to the object’s mass. A typical electronic balance has a capacity of 100–200 g, and can measure mass to the nearest ±0.01 mg to ±1 mg.
Although we tend to use interchangeably, the terms “weight” and “mass,” there is an important distinction between them. Mass is the absolute amount of matter in an object, measured in grams. Weight, W, is a measure of the gravitational force, g, acting on that mass, m:
\[W = m \times g \nonumber\]
An object has a fixed mass but its weight depends upon the acceleration due to gravity, which varies subtly from location-to-location.
A balance measures an object’s weight, not its mass. Because weight and mass are proportional to each other, we can calibrate a balance using a standard weight whose mass is traceable to the standard prototype for the kilogram. A properly calibrated balance gives an accurate value for an object’s mass; see Appendix 9 for more details on calibrating a balance.
If the sample is not moisture sensitive, a clean and dry container is placed on the balance. The container’s mass is called the tare and most balances allow you to set the container’s tare to a mass of zero. The sample is transferred to the container, the new mass is measured and the sample’s mass determined by subtracting the tare. A sample that absorbs moisture from the air is treated differently. The sample is placed in a covered weighing bottle and their combined mass is determined. A portion of the sample is removed and the weighing bottle and the remaining sample are reweighed. The difference between the two masses gives the sample’s mass.
Several important precautions help to minimize errors when we determine an object’s mass. To minimize the effect of vibrations, the balance is placed on a stable surface and in a level position. Because the sensitivity of an analytical balance is sufficient to measure the mass of a fingerprint, materials often are handled using tongs or laboratory tissues. Volatile liquid samples must be weighed in a covered container to avoid the loss of sample by evaporation. To minimize fluctuations in mass due to air currents, the balance pan often is housed within a wind shield, as seen in Figure 2.4.1 . A sample that is cooler or warmer than the surrounding air will create a convective air currents that affects the measurement of its mass. For this reason, bring your samples to room temperature before determining their mass. Finally, samples dried in an oven are stored in a desiccator to prevent them from reabsorbing moisture from the atmosphere.
Equipment for Measuring Volume
Analytical chemists use a variety of glassware to measure volume, including graduated cylinders, volumetric pipets, and volumetric flasks. The choice of what type of glassware to use depends on how accurately and how precisely we need to know the sample’s volume and whether we are interested in containing or delivering the sample.
A graduated cylinder is the simplest device for delivering a known volume of a liquid reagent (Figure 2.4.2 ). The graduated scale allows you to deliver any volume up to the cylinder’s maximum. Typical accuracy is ±1% of the maximum volume. A 100-mL graduated cylinder, for example, is accurate to ±1 mL.

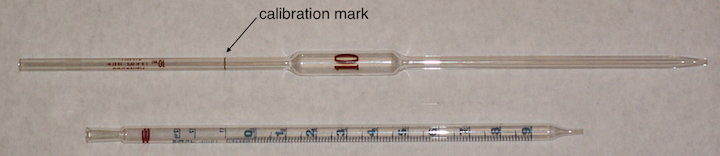
A volumetric pipet provides a more accurate method for delivering a known volume of solution. Several different styles of pipets are available, two of which are shown in Figure 2.4.3 . Transfer pipets provide the most accurate means for delivering a known volume of solution. A transfer pipet delivering less than 100 mL generally is accurate to the hundredth of a mL. Larger transfer pipets are accurate to a tenth of a mL. For example, the 10-mL transfer pipet in Figure 2.4.3 will deliver 10.00 mL with an accuracy of ±0.02 mL.
Scientists at the Brookhaven National Laboratory used a germanium nanowire to make a pipet that delivers a 35 zeptoliter (10–21 L) drop of a liquid gold-germanium alloy. You can read about this work in the April 21, 2007 issue of Science News.
To fill a transfer pipet, use a rubber suction bulb to pull the solution up past the calibration mark (Never use your mouth to suck a solution into a pipet!). After replacing the bulb with your finger, adjust the solution’s level to the calibration mark and dry the outside of the pipet with a laboratory tissue. Allow the pipet’s contents to drain into the receiving container with the pipet’s tip touching the inner wall of the container. A small portion of the liquid remains in the pipet’s tip and is not be blown out. With some measuring pipets any solution remaining in the tip must be blown out.
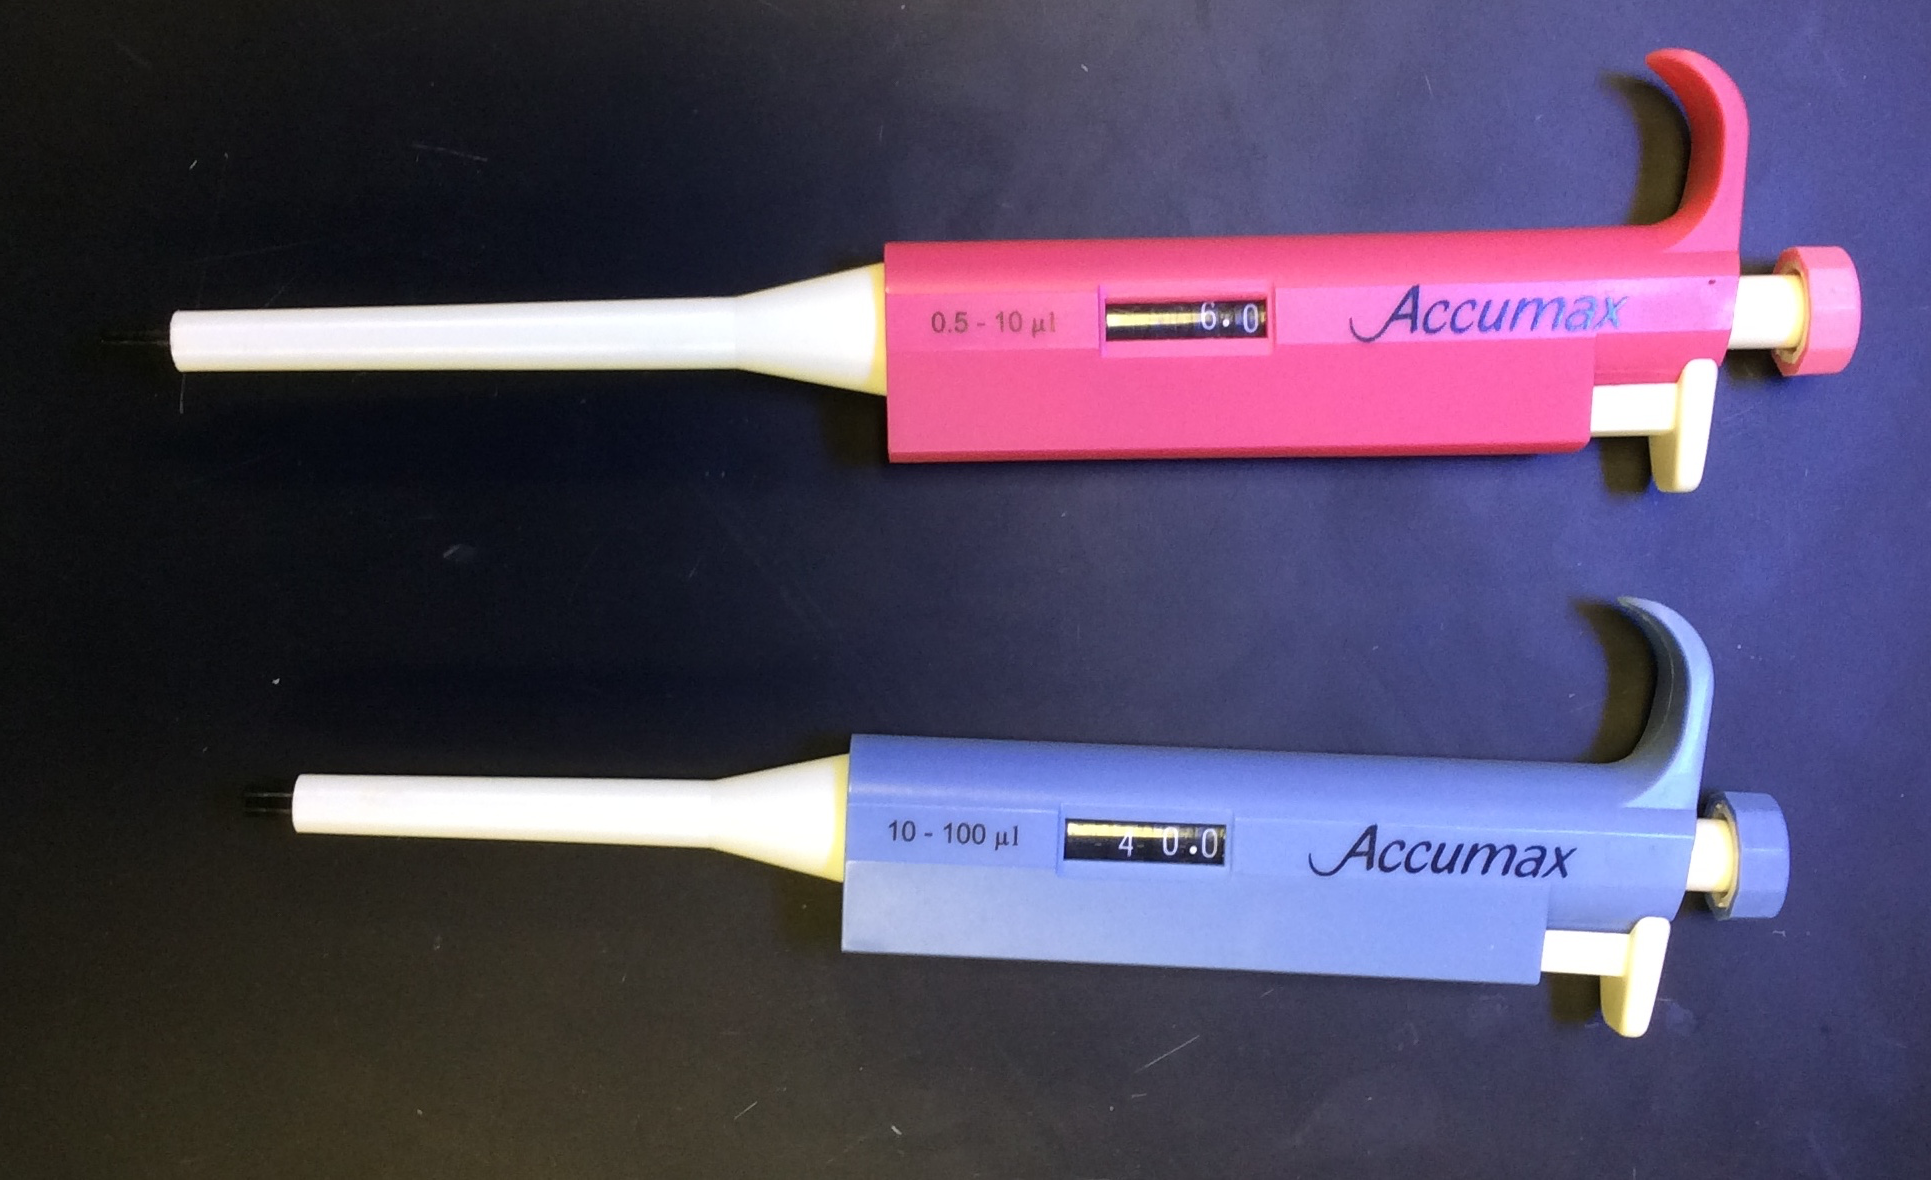
Delivering microliter volumes of liquids is not possible using transfer or measuring pipets. Digital micropipets (Figure 2.4.4 ), which come in a variety of volume ranges, provide for the routine measurement of microliter volumes.
Graduated cylinders and pipets deliver a known volume of solution. A volumetric flask, on the other hand, contains a specific volume of solution (Figure 2.4.5 ). When filled to its calibration mark, a volumetric flask that contains less than 100 mL generally is accurate to the hundredth of a mL, whereas larger volumetric flasks are accurate to the tenth of a mL. For example, a 10-mL volumetric flask contains 10.00 mL ± 0.02 mL and a 250-mL volumetric flask contains 250.0 mL ± 0.12 mL.
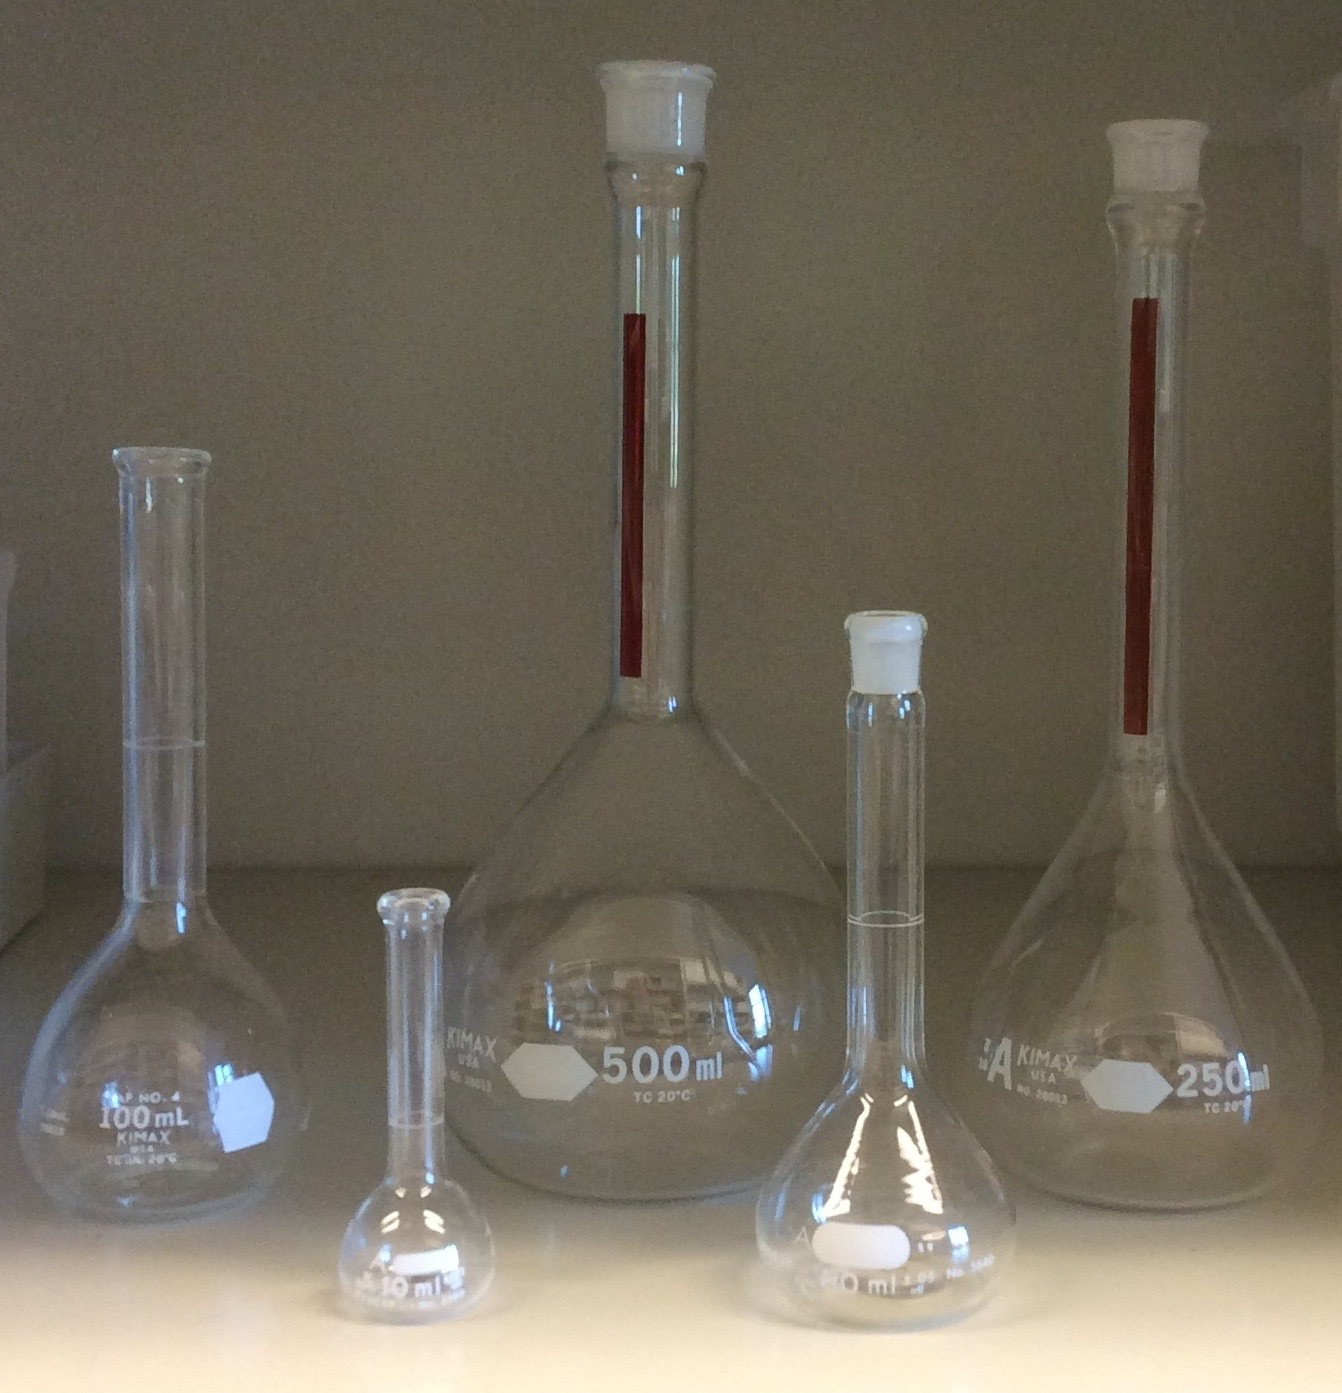
Because a volumetric flask contains a solution, it is used to prepare a solution with an accurately known concentration. Transfer the reagent to the volumetric flask and add enough solvent to bring the reagent into solution. Continuing adding solvent in several portions, mixing thoroughly after each addition, and then adjust the volume to the flask’s calibration mark using a dropper. Finally, complete the mixing process by inverting and shaking the flask at least 10 times.
If you look closely at a volumetric pipet or a volumetric flask you will see markings similar to those shown in Figure 2.4.6 . The text of the markings, which reads
10 mL T. D. at 20 oC ± 0.02 mL
indicates that the pipet is calibrated to deliver (T. D.) 10 mL of solution with an uncertainty of ±0.02 mL at a temperature of 20 oC. The temperature is important because glass expands and contracts with changes in temperatures; thus, the pipet’s accuracy is less than ±0.02 mL at a higher or a lower temperature. For a more accurate result, you can calibrate your volumetric glassware at the temperature you are working by weighing the amount of water contained or delivered and calculating the volume using its temperature dependent density.
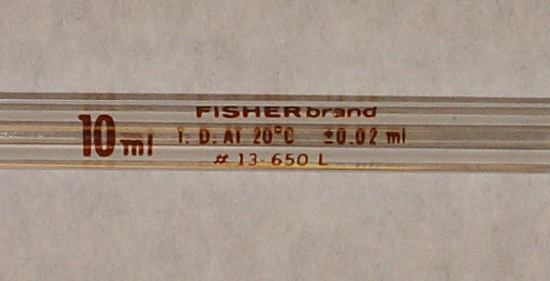
A volumetric flask has similar markings, but uses the abbreviation T. C. for “to contain” in place of T. D.
You should take three additional precautions when you work with pipets and volumetric flasks. First, the volume delivered by a pipet or contained by a volumetric flask assumes that the glassware is clean. Dirt and grease on the inner surface prevent liquids from draining evenly, leaving droplets of liquid on the container’s walls. For a pipet this means the delivered volume is less than the calibrated volume, while drops of liquid above the calibration mark mean that a volumetric flask contains more than its calibrated volume. Commercially available cleaning solutions are available for cleaning pipets and volumetric flasks.
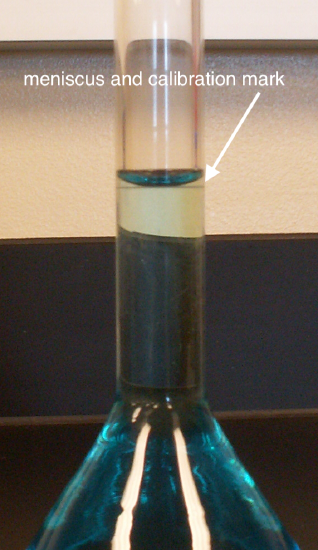
Second, when filling a pipet or volumetric flask the liquid’s level must be set exactly at the calibration mark. The liquid’s top surface is curved into a meniscus, the bottom of which should align with the glassware’s calibration mark (Figure 2.4.7 ). When adjusting the meniscus, keep your eye in line with the calibration mark to avoid parallax errors. If your eye level is above the calibration mark you will overfill the pipet or the volumetric flask and you will underfill them if your eye level is below the calibration mark.
Finally, before using a pipet or volumetric flask rinse it with several small portions of the solution whose volume you are measuring. This ensures the removal of any residual liquid remaining in the pipet or volumetric flask.
Equipment for Drying Samples
Many materials need to be dried prior to their analysis to remove residual moisture. Depending on the material, heating to a temperature between 110 oC and 140 oC usually is sufficient. Other materials need much higher temperatures to initiate thermal decomposition.
Conventional drying ovens provide maximum temperatures of 160 oC to 325 oC, depending on the model. Some ovens include the ability to circulate heated air, which allows for a more efficient removal of moisture and shorter drying times. Other ovens provide a tight seal for the door, which allows the oven to be evacuated. In some situations a microwave oven can replace a conventional laboratory oven. Higher temperatures, up to as much as 1700 oC, require a muffle furnace (Figure 2.4.8 ).

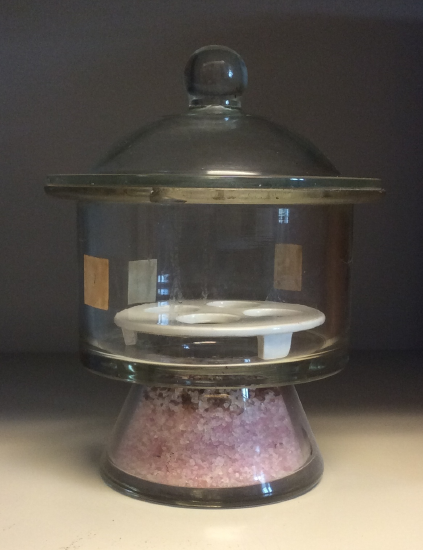
After drying or decomposing a sample, it is cooled to room temperature in a desiccator to prevent the readsorption of moisture. A desiccator (Figure 2.4.9 ) is a closed container that isolates the sample from the atmosphere. A drying agent, called a desiccant, is placed in the bottom of the container. Typical desiccants include calcium chloride and silica gel. A perforated plate sits above the desiccant, providing a shelf for storing samples. Some desiccators include a stopcock that allows them to be evacuated.