
18c: Complex II and III
- Page ID
- 150558

\( \newcommand{\vecs}[1]{\overset { \scriptstyle \rightharpoonup} {\mathbf{#1}} } \)
\( \newcommand{\vecd}[1]{\overset{-\!-\!\rightharpoonup}{\vphantom{a}\smash {#1}}} \)
\( \newcommand{\dsum}{\displaystyle\sum\limits} \)
\( \newcommand{\dint}{\displaystyle\int\limits} \)
\( \newcommand{\dlim}{\displaystyle\lim\limits} \)
\( \newcommand{\id}{\mathrm{id}}\) \( \newcommand{\Span}{\mathrm{span}}\)
( \newcommand{\kernel}{\mathrm{null}\,}\) \( \newcommand{\range}{\mathrm{range}\,}\)
\( \newcommand{\RealPart}{\mathrm{Re}}\) \( \newcommand{\ImaginaryPart}{\mathrm{Im}}\)
\( \newcommand{\Argument}{\mathrm{Arg}}\) \( \newcommand{\norm}[1]{\| #1 \|}\)
\( \newcommand{\inner}[2]{\langle #1, #2 \rangle}\)
\( \newcommand{\Span}{\mathrm{span}}\)
\( \newcommand{\id}{\mathrm{id}}\)
\( \newcommand{\Span}{\mathrm{span}}\)
\( \newcommand{\kernel}{\mathrm{null}\,}\)
\( \newcommand{\range}{\mathrm{range}\,}\)
\( \newcommand{\RealPart}{\mathrm{Re}}\)
\( \newcommand{\ImaginaryPart}{\mathrm{Im}}\)
\( \newcommand{\Argument}{\mathrm{Arg}}\)
\( \newcommand{\norm}[1]{\| #1 \|}\)
\( \newcommand{\inner}[2]{\langle #1, #2 \rangle}\)
\( \newcommand{\Span}{\mathrm{span}}\) \( \newcommand{\AA}{\unicode[.8,0]{x212B}}\)
\( \newcommand{\vectorA}[1]{\vec{#1}} % arrow\)
\( \newcommand{\vectorAt}[1]{\vec{\text{#1}}} % arrow\)
\( \newcommand{\vectorB}[1]{\overset { \scriptstyle \rightharpoonup} {\mathbf{#1}} } \)
\( \newcommand{\vectorC}[1]{\textbf{#1}} \)
\( \newcommand{\vectorD}[1]{\overrightarrow{#1}} \)
\( \newcommand{\vectorDt}[1]{\overrightarrow{\text{#1}}} \)
\( \newcommand{\vectE}[1]{\overset{-\!-\!\rightharpoonup}{\vphantom{a}\smash{\mathbf {#1}}}} \)
\( \newcommand{\vecs}[1]{\overset { \scriptstyle \rightharpoonup} {\mathbf{#1}} } \)
\(\newcommand{\longvect}{\overrightarrow}\)
\( \newcommand{\vecd}[1]{\overset{-\!-\!\rightharpoonup}{\vphantom{a}\smash {#1}}} \)
\(\newcommand{\avec}{\mathbf a}\) \(\newcommand{\bvec}{\mathbf b}\) \(\newcommand{\cvec}{\mathbf c}\) \(\newcommand{\dvec}{\mathbf d}\) \(\newcommand{\dtil}{\widetilde{\mathbf d}}\) \(\newcommand{\evec}{\mathbf e}\) \(\newcommand{\fvec}{\mathbf f}\) \(\newcommand{\nvec}{\mathbf n}\) \(\newcommand{\pvec}{\mathbf p}\) \(\newcommand{\qvec}{\mathbf q}\) \(\newcommand{\svec}{\mathbf s}\) \(\newcommand{\tvec}{\mathbf t}\) \(\newcommand{\uvec}{\mathbf u}\) \(\newcommand{\vvec}{\mathbf v}\) \(\newcommand{\wvec}{\mathbf w}\) \(\newcommand{\xvec}{\mathbf x}\) \(\newcommand{\yvec}{\mathbf y}\) \(\newcommand{\zvec}{\mathbf z}\) \(\newcommand{\rvec}{\mathbf r}\) \(\newcommand{\mvec}{\mathbf m}\) \(\newcommand{\zerovec}{\mathbf 0}\) \(\newcommand{\onevec}{\mathbf 1}\) \(\newcommand{\real}{\mathbb R}\) \(\newcommand{\twovec}[2]{\left[\begin{array}{r}#1 \\ #2 \end{array}\right]}\) \(\newcommand{\ctwovec}[2]{\left[\begin{array}{c}#1 \\ #2 \end{array}\right]}\) \(\newcommand{\threevec}[3]{\left[\begin{array}{r}#1 \\ #2 \\ #3 \end{array}\right]}\) \(\newcommand{\cthreevec}[3]{\left[\begin{array}{c}#1 \\ #2 \\ #3 \end{array}\right]}\) \(\newcommand{\fourvec}[4]{\left[\begin{array}{r}#1 \\ #2 \\ #3 \\ #4 \end{array}\right]}\) \(\newcommand{\cfourvec}[4]{\left[\begin{array}{c}#1 \\ #2 \\ #3 \\ #4 \end{array}\right]}\) \(\newcommand{\fivevec}[5]{\left[\begin{array}{r}#1 \\ #2 \\ #3 \\ #4 \\ #5 \\ \end{array}\right]}\) \(\newcommand{\cfivevec}[5]{\left[\begin{array}{c}#1 \\ #2 \\ #3 \\ #4 \\ #5 \\ \end{array}\right]}\) \(\newcommand{\mattwo}[4]{\left[\begin{array}{rr}#1 \amp #2 \\ #3 \amp #4 \\ \end{array}\right]}\) \(\newcommand{\laspan}[1]{\text{Span}\{#1\}}\) \(\newcommand{\bcal}{\cal B}\) \(\newcommand{\ccal}{\cal C}\) \(\newcommand{\scal}{\cal S}\) \(\newcommand{\wcal}{\cal W}\) \(\newcommand{\ecal}{\cal E}\) \(\newcommand{\coords}[2]{\left\{#1\right\}_{#2}}\) \(\newcommand{\gray}[1]{\color{gray}{#1}}\) \(\newcommand{\lgray}[1]{\color{lightgray}{#1}}\) \(\newcommand{\rank}{\operatorname{rank}}\) \(\newcommand{\row}{\text{Row}}\) \(\newcommand{\col}{\text{Col}}\) \(\renewcommand{\row}{\text{Row}}\) \(\newcommand{\nul}{\text{Nul}}\) \(\newcommand{\var}{\text{Var}}\) \(\newcommand{\corr}{\text{corr}}\) \(\newcommand{\len}[1]{\left|#1\right|}\) \(\newcommand{\bbar}{\overline{\bvec}}\) \(\newcommand{\bhat}{\widehat{\bvec}}\) \(\newcommand{\bperp}{\bvec^\perp}\) \(\newcommand{\xhat}{\widehat{\xvec}}\) \(\newcommand{\vhat}{\widehat{\vvec}}\) \(\newcommand{\uhat}{\widehat{\uvec}}\) \(\newcommand{\what}{\widehat{\wvec}}\) \(\newcommand{\Sighat}{\widehat{\Sigma}}\) \(\newcommand{\lt}{<}\) \(\newcommand{\gt}{>}\) \(\newcommand{\amp}{&}\) \(\definecolor{fillinmathshade}{gray}{0.9}\)Name: ______________________________
Section: _____________________________
Student ID#:__________________________
Complex I to Complex IV
Ubiquinol: the electron carrier from Complex I
Some of the electron carriers are bound tightly to prevent random oxidation.
- List some of these that you have seen.
There are some mobile electron carriers – NADH2, FADH2, UQH2, cytochrome c. These are needed to move electrons from one complex to the next.
- How can they move around without reducing random molecules in the cell?
Ubiquinone is an organic molecule (not a protein) dissolved in the hydrophobic region of the inner membrane of the mitochondrion. It can move freely within the hydrophobic region of the membrane, by diffusion.
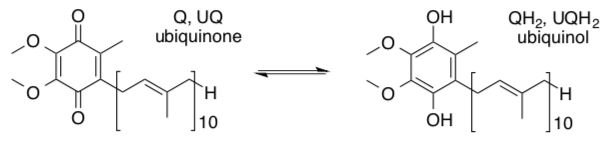
- Based on its structure, why can it move through the membrane easily? Draw a cartoon.
UQH2 now swims through the membrane to Complex III. HOLD that thought while we look at Complex II.
Complex II: Overview
Complex II (aka succinate dehydrogenase from the TCA cycle) oxidizes succinate(-O2CCH2CH2CO2-) to fumarate (trans--O2CCH=CHCO2-).
- Is the E° for this oxidation favorable?
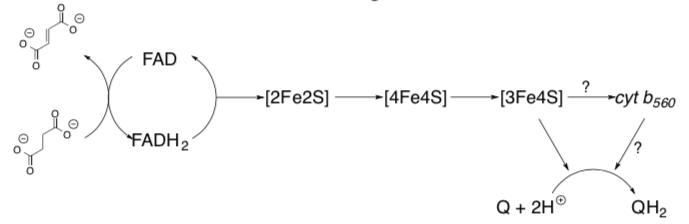
Complex II also has a cascade of electron transfers. When succinate is converted to fumarate, the electrons are passed through a new cascade to eventually reduce UQ (just like Complex I!)
succinate -> fumarate + 2 H+ + 2 e-
UQ + 2H+ + 2e- -> UQH2
- Write the net reaction for the work of Complex II.
- Calculate the ΔG° for the net reaction of Complex II. Show your work.
ΔG° =
- Do you think this small ΔG° is sufficient to power an antiporter channel?
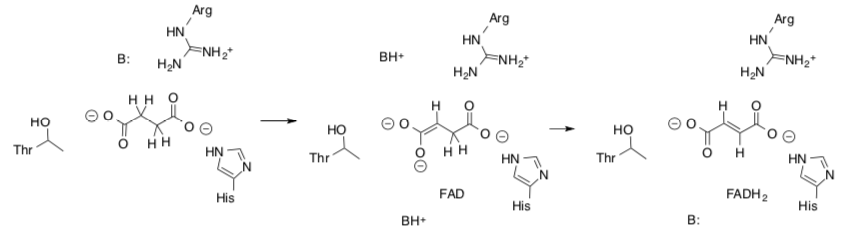
Complex II: Oxidation of Succinate from TCA
The first reaction of Complex II is an oxidation of succinate to fumarate.
- Draw the mechanism for this reaction.
- Show how the amino acid residues stabilize the substrate.
At this point the electrons are transferred through a series of FeS Clusters to the UQ.
This is a picture of Complex II with a focus on the prosthetic groups.

by W. Stephen McNeil at UBC Okanaganhttps://people.ok.ubc.ca/wsmcneil/bio/electronchain.htm
- Trace the e- path through the flat prosthetic groups and round FeS clusters.
- Is this outer sphere or inner sphere electron transfer?
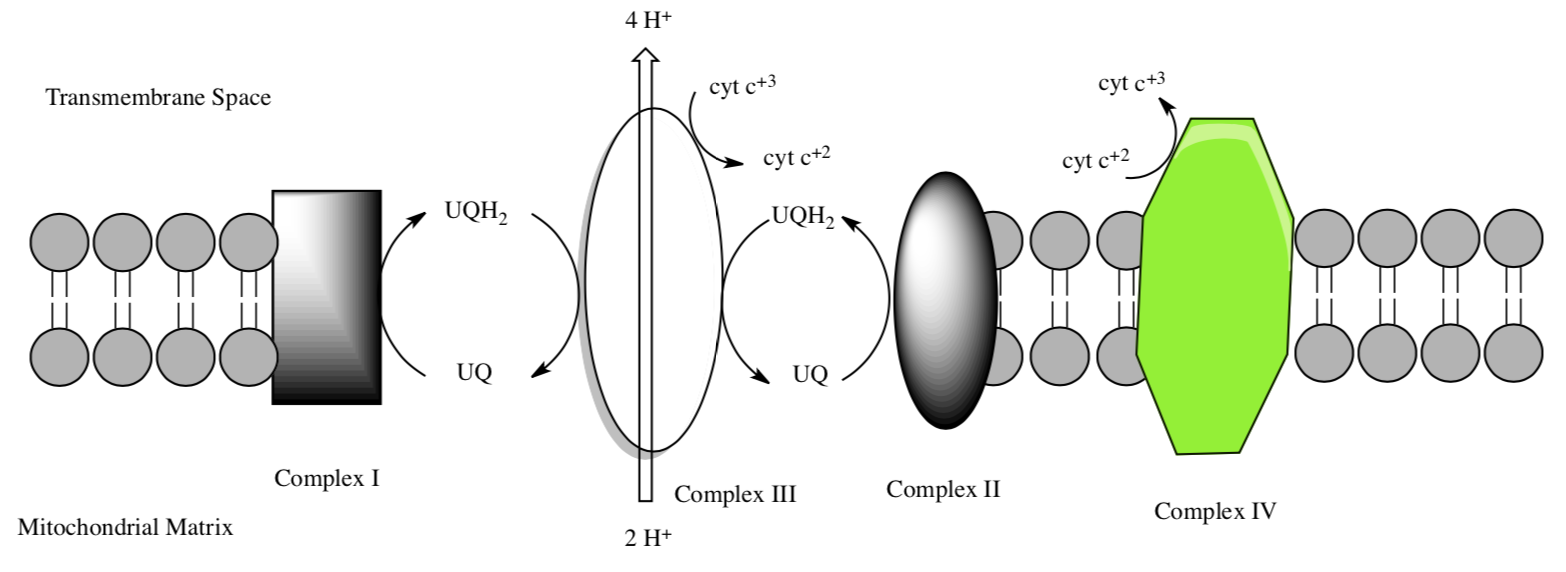
UQH2 now swims through the membrane to Complex III. Remember that UQH2 is coming to Complex III from both Complex I and Complex II.
Complex III: Overview
Complex III (sometimes called cytochrome bc1 complex) has two main substrates: cytochrome c and UQH2. The structure of this complex was determined by Johann Deisenhofer (Nobel Prize for a photosynthetic reaction center – we will see this soon).
This role of complex III is to transfer the electrons from UQH2 to cytochrome c.
- Complete the equation for the redox reactions of complex III.
___UQH2 + 1UQ + 2H+ + ___cytc3+ -> ___UQH2 + ___UQ + 4H+ + ___cytc+2
- Calculate the ΔG° for the net reaction of Complex III. Show your work.
ΔG° =
- Where is the UQH2 coming from?
- There are two H+ coming from the mitochondrial matrix but 4 H+ are transported into the inter-membrane space. How is that possible (check your balanced equation)?
This process also helps complete the catalytic cycle of Complex I and II.
- Briefly explain the role of Complex III in the catalytic cycles of Complex I and Complex II.
Complex III: electron cascade
There are two pathways for electrons to pass through Complex III from ubiquinol at Qo. One is via two heme iron centres, cytochromes b562 (or bL, with lower potential) and b566 (or bH, with higher potential), and then to ubiquinone at Qi. The other is via a Rieske iron-sulfur cluster to cytochrome c1, and then to cytochrome c.
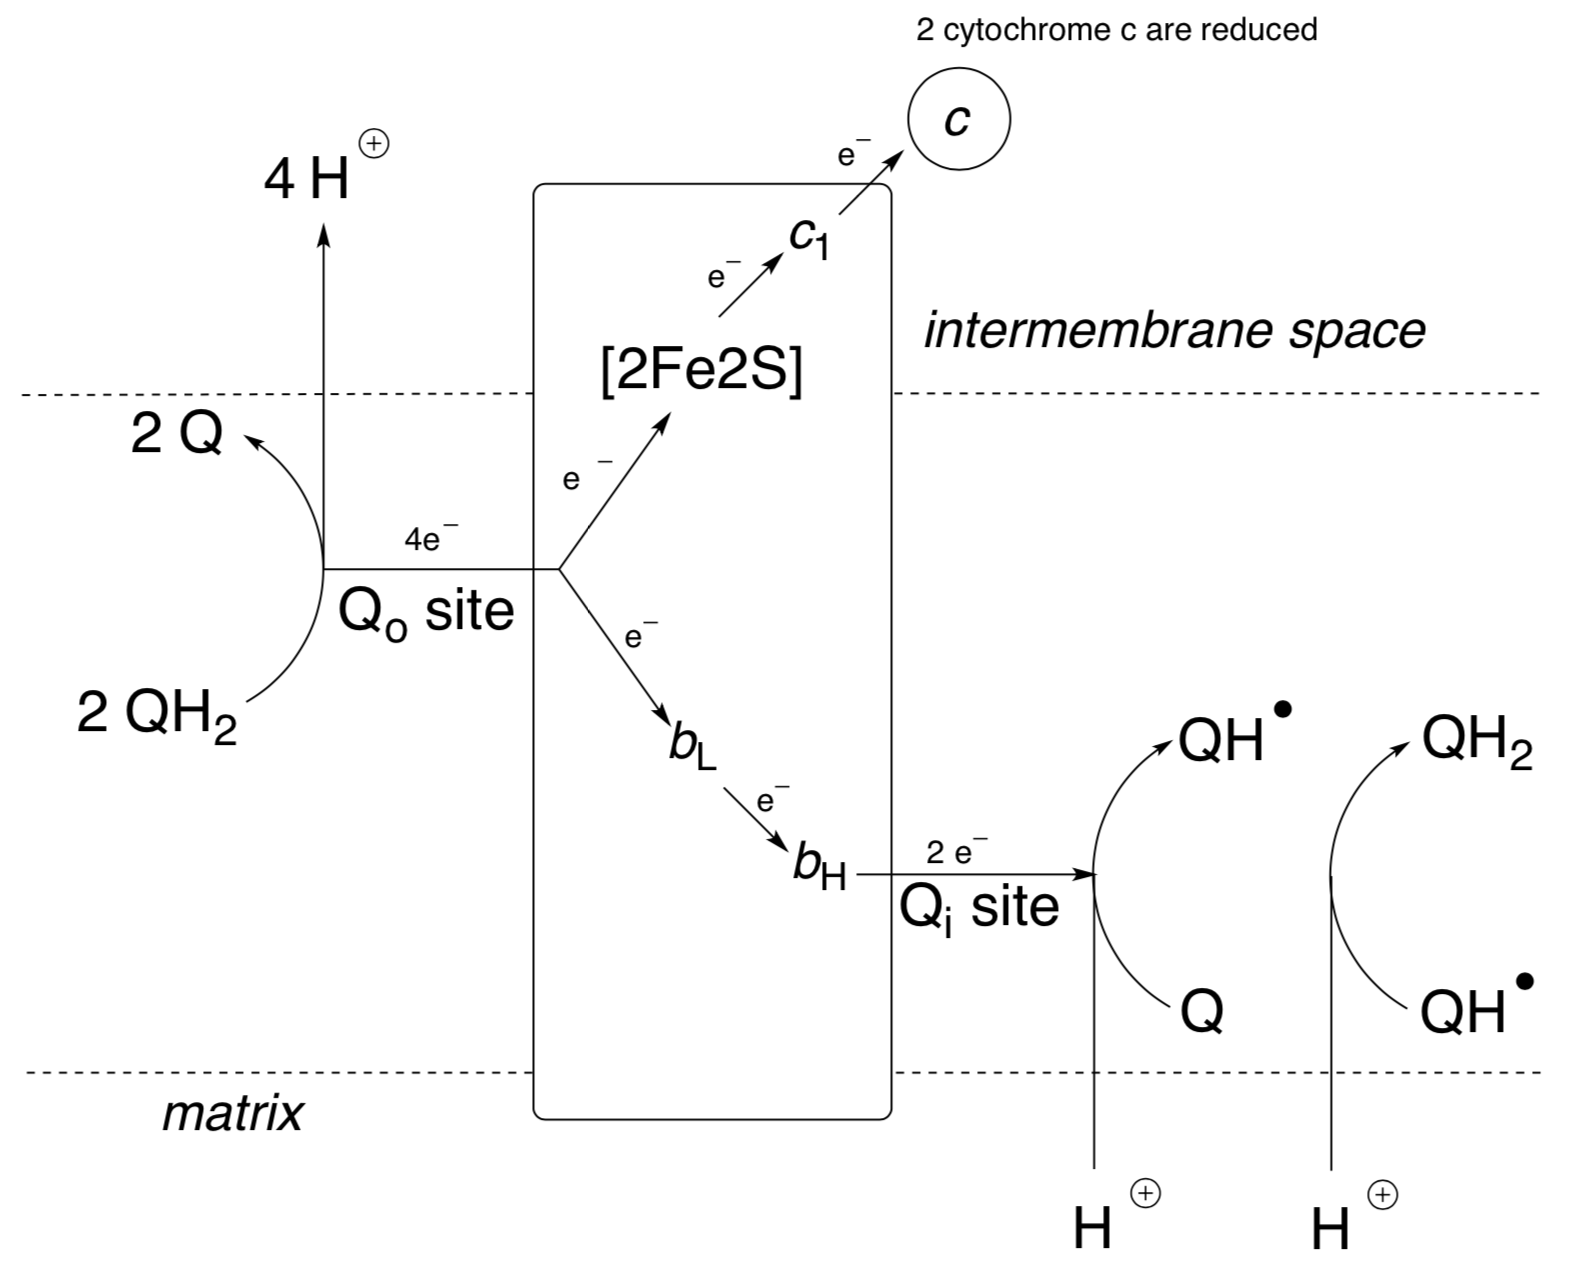
- How many UQ molecules are involved in the whole electron transport chain?
- Why does this path need to do both oxidation and reduction of ubiquinone?
- How many net H+ get released into the intramembrane space? Are they actually transported all the way across (i.e. Are the protons coming in, the same atoms that are going out?)
UQH2 and UQ diffusion
Because of the small size and lipid nature of ubiquinone, it has generally been considered to function as a mobile electron carrier. This concept is substantiated by a number of kinetic studies.
But recently, other groups have postulated that Complex I and III form a supercomplex and UQH2 is simply passed between them.
Lenza & Genova, Am J Physiol Cell Physiol, 2007 vol. 292 no. 4 C1221-C1239.
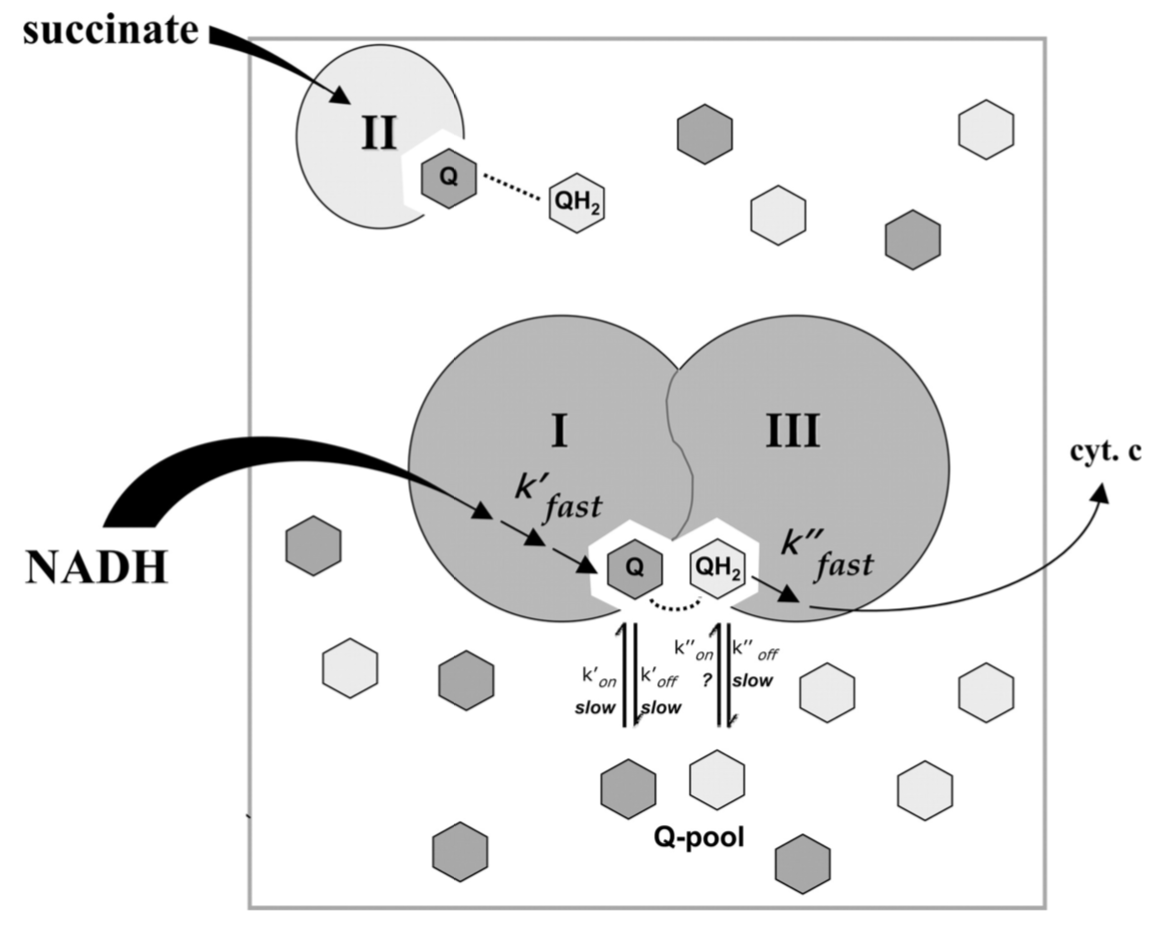
Kinetic evidence for intermediate channeling in the I–III supercomplex suggests that the dissociation rate constants (koff) of ubiquinone (Q) and ubiquinol (QH2) are considerably slower than the rates of electron transfer (k′ and k′′).
- Why is this disparity in rates important for this system?
Some researchers are suggesting that all the complexes of electron transport are clustered in one super assembly.
- What would be the advantages (to the organism) in this model?
- Draw a cartoon of this super assembly (aerial view might be easier).
UQH2 and UQ diffusion: kinetic studies
The evidence for UQ acting as a mobile carrier comes from inhibition studies. If complex I and complex III are closely associated, and UQ is simply shuttled from one to the other, increased inhibitor should produce a linear response (bottom picture).
Schematic models showing ubiquinone as a mediator of the electron transport in the respiratory chain.
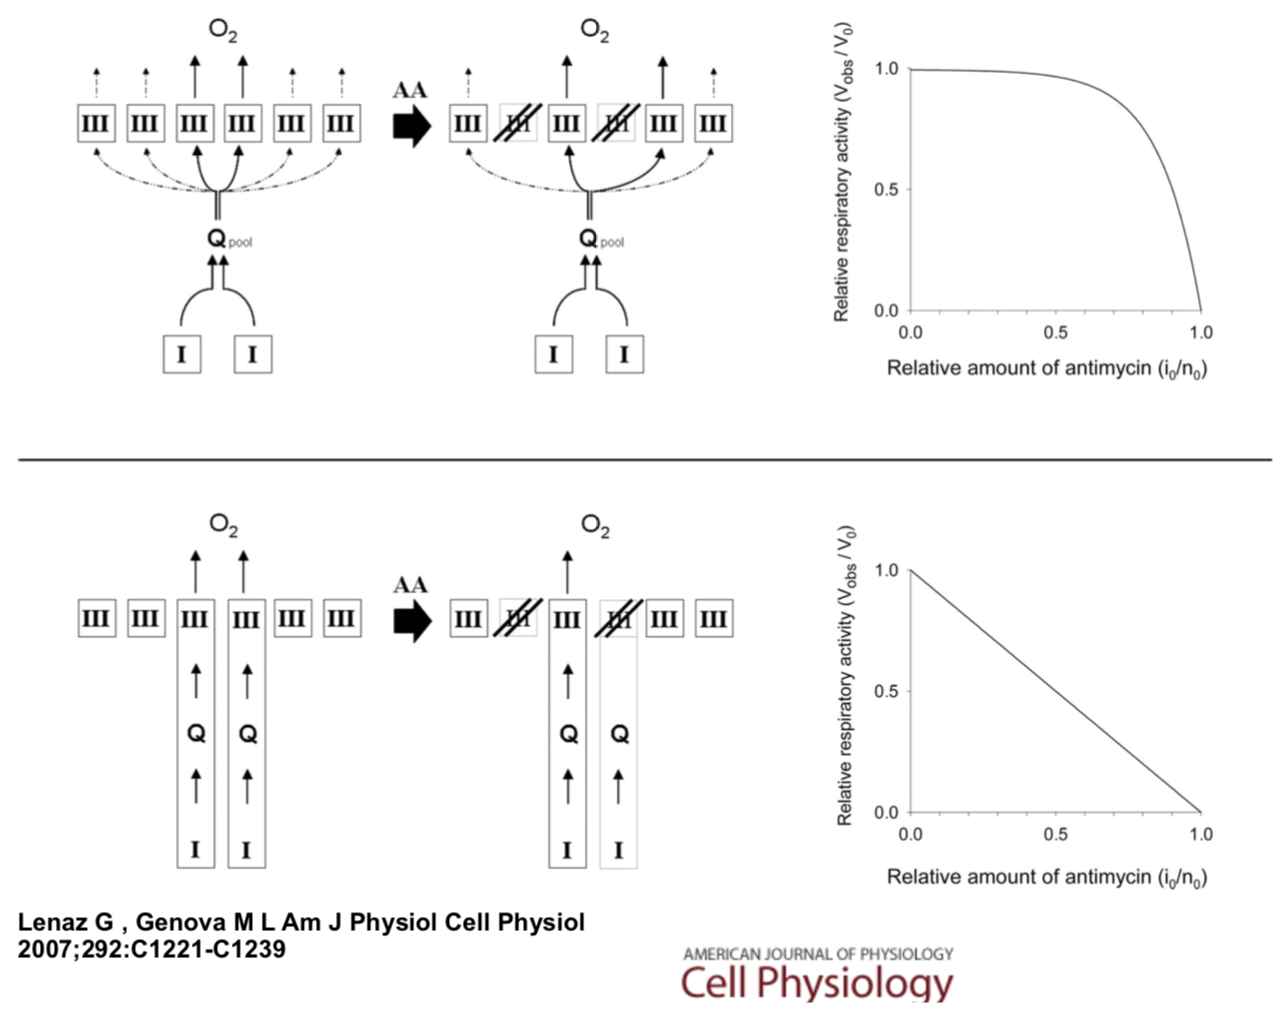
- Explain why a ubiquinone shuttle would respond linearly to inhibitor concentration.
On the other hand, if ubiquinone is freely diffusing, forming an available pool of ubiquinone, inhibition would produce a nonlinear response.
- Explain why a ubiquinone pool would respond in a nonlinear way to increasing inhibitor concentration.
A number of studies suggest there is a nonlinear response to inhibitor.
- What does this evidence suggest about how ubiquinone reaches complex III?
In addition, at high levels of ubiquinone, saturation kinetics are observed.
- Does this evidence suggest the ubiquinone shuttle or the ubiquinone pool is at work?
Complex III: electron cascade
This is a structure of the entire cytochrome bc1 complex (a dimer); all four metal clusters can be found in each subunit.
- Locate each prosthetic group.
- Stigmatellin (a bc1 inhibitor) occupies the Q binding site
- First electron pathway:
- 2 cytochrome b Fe centers
- Second electron transfer path:
- Rieske FeS cluster
- cytochrome c1 centre
- Mobile electron carrier:
- cytochrome c
- Trace the electron flow through the paths.
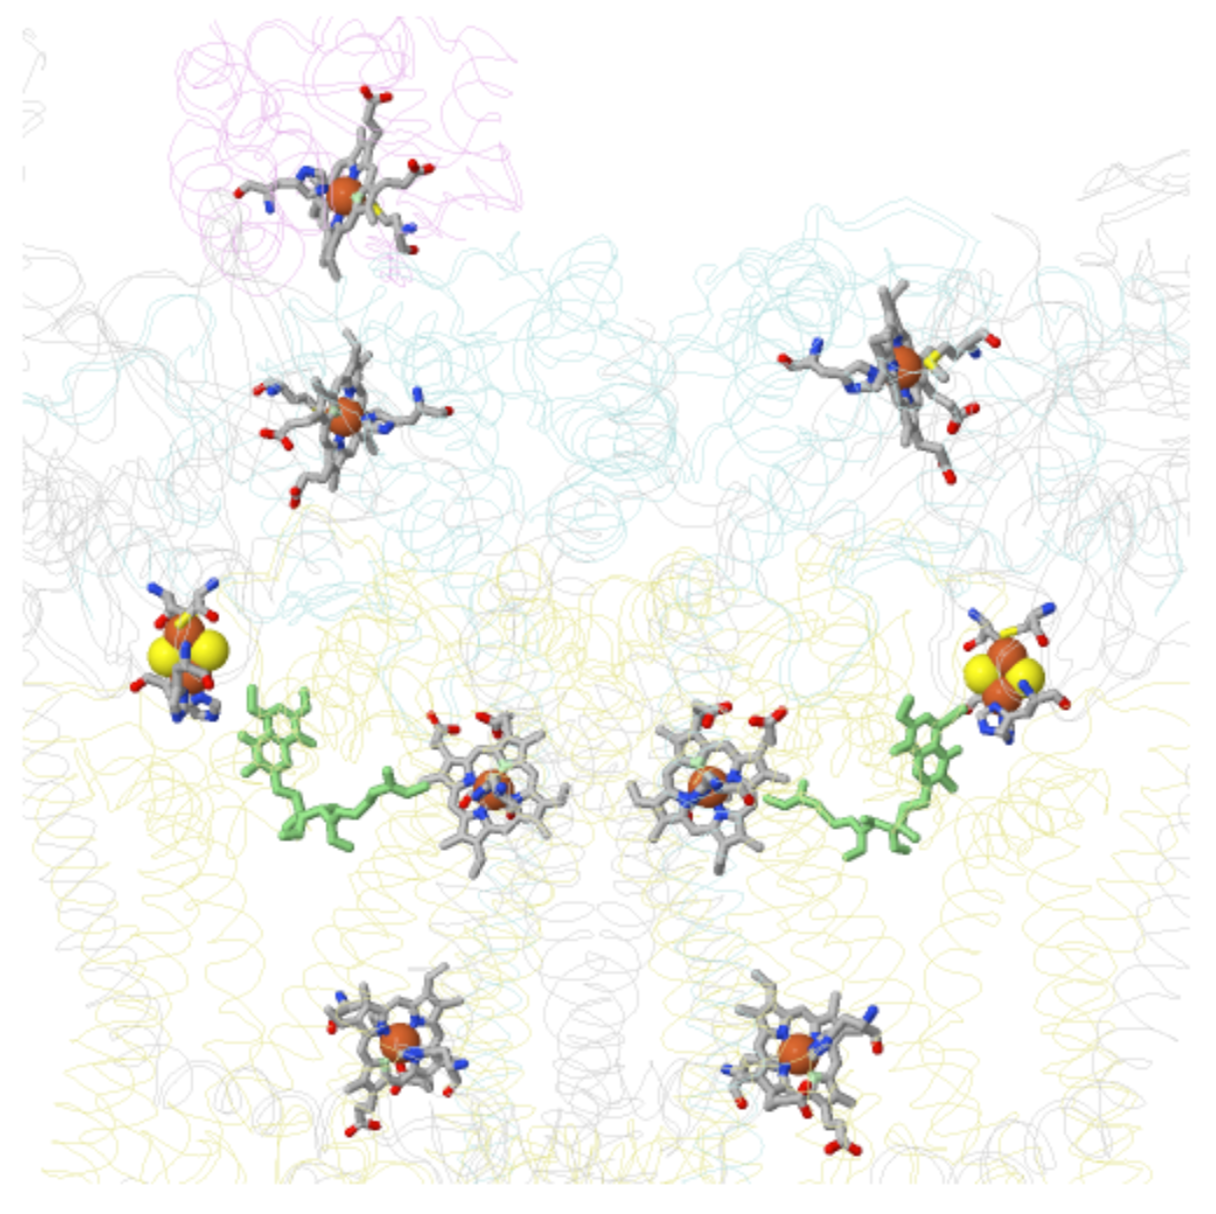
by W. Stephen McNeil at UBC Okanagan
https://people.ok.ubc.ca/wsmcneil/bio...ctronchain.htm
Complex III: Case Study on the Electron Transfers in Rieske Centers
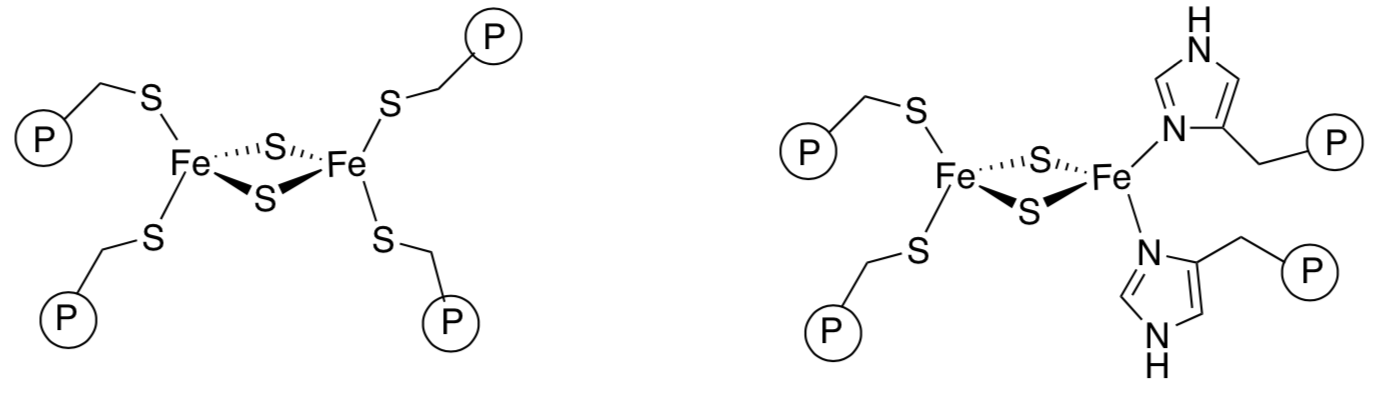
The 2Fe2S cluster in complex III belongs to a class known as Reiske centres.
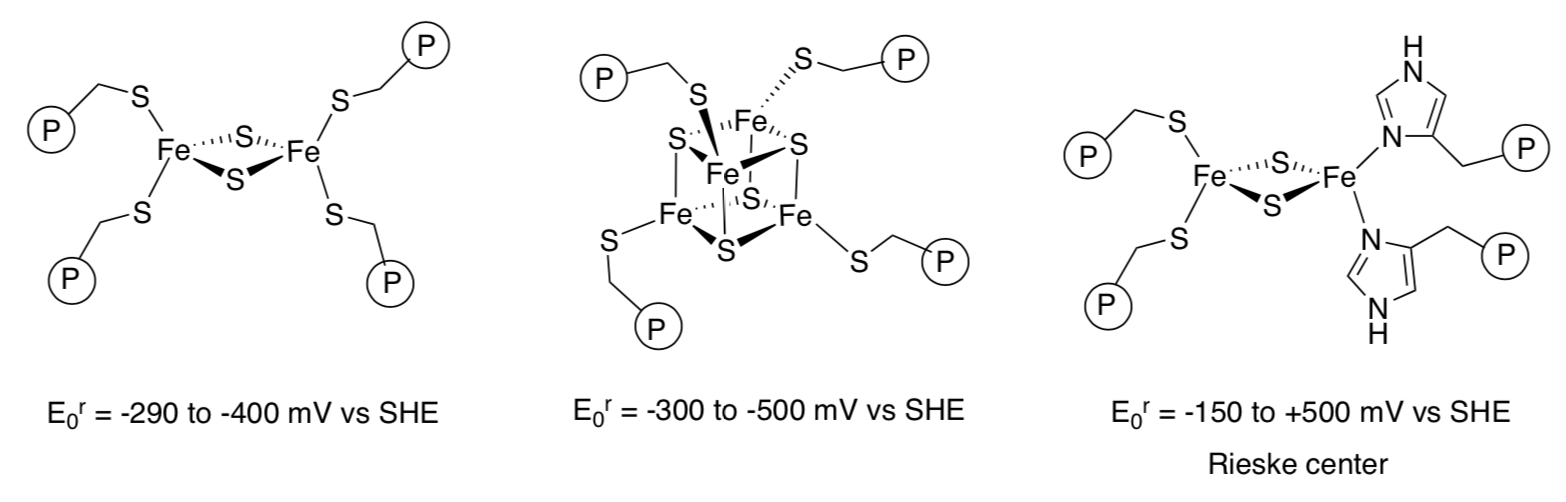
Reduction of these clusters involves conversion of an Fe(III) to Fe(II).
- Compare and contrast the Rieske centre with the other common FeS
clusters:
- In terms of structure
- In terms of properties
Case Study: Charge in High Potential Rieske Centres
Scientists have proposed several possible reasons for the difference in reduction potentials between regular FeS clusters and Rieske clusters. This section will examine a variety of factors to determine the best reasons for the differences. HSAB and spectrochemical series couldn’t explain the difference.
So scientists analyzed charge considerations in comparing Rieske centres to more cautious ones.
- If the iron atoms are both Fe(III), what is the overall charge on the cluster in each case?
- On that basis, which cluster would more easily accept an electron?
Keep in mind that these are complicated systems and other factors could play a role as well. Nevertheless, we will take a closer look at charge as a factor.
Case Study: pH Studies on Rieske Proteins
By coating an electrode with a thin film of proteins and measuring potentials in solutions with different pH, Judy Hirst at the Medical Council Research Human Nutrition Unit in the UK was able to look at how protonation state affected reduction (Biochem. 2003, 42, 12400-12408).
- pH 1 means plenty of proton donors / neutral / plenty of proton acceptors in solution (circle one).
- pH 7 means plenty of proton donors / neutral / plenty of proton acceptors in solution (circle one).
- pH 14 means plenty of proton donors / neutral / plenty of proton acceptors in solution (circle one).
- Draw histidine at pH 7 and pH 14.
- How would coordination to iron affect the ease of deprotonation of histidine?
Some typical data looked like this:
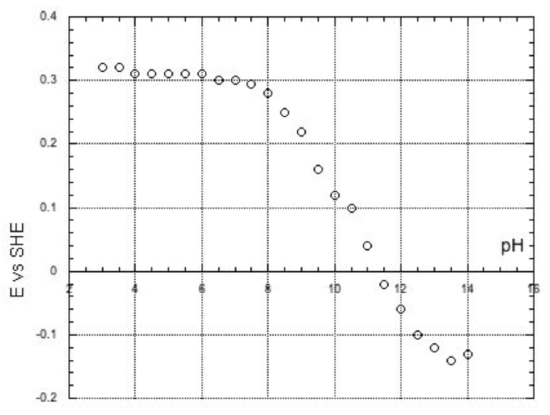
- Explain, with pictures, how pH changes influence the reduction potential of this Rieske protein.
Case Study: The Role of Neighbouring Residues in Rieske Cluster Potential
S. Ramaswamy at the University of Iowa led a team of collaborators in Canada, Sweden and the US in an investigation of amino acids found near the Rieske centre (J. Biol. Inorg. Chem., 2008, 13, 1301-1313).
The distance of certain amino acids from the Rieske centre, determined by x-ray crystallography, was compared to the reduction potential of the cluster. Results were compiled for a number of proteins, a few of which are shown here.
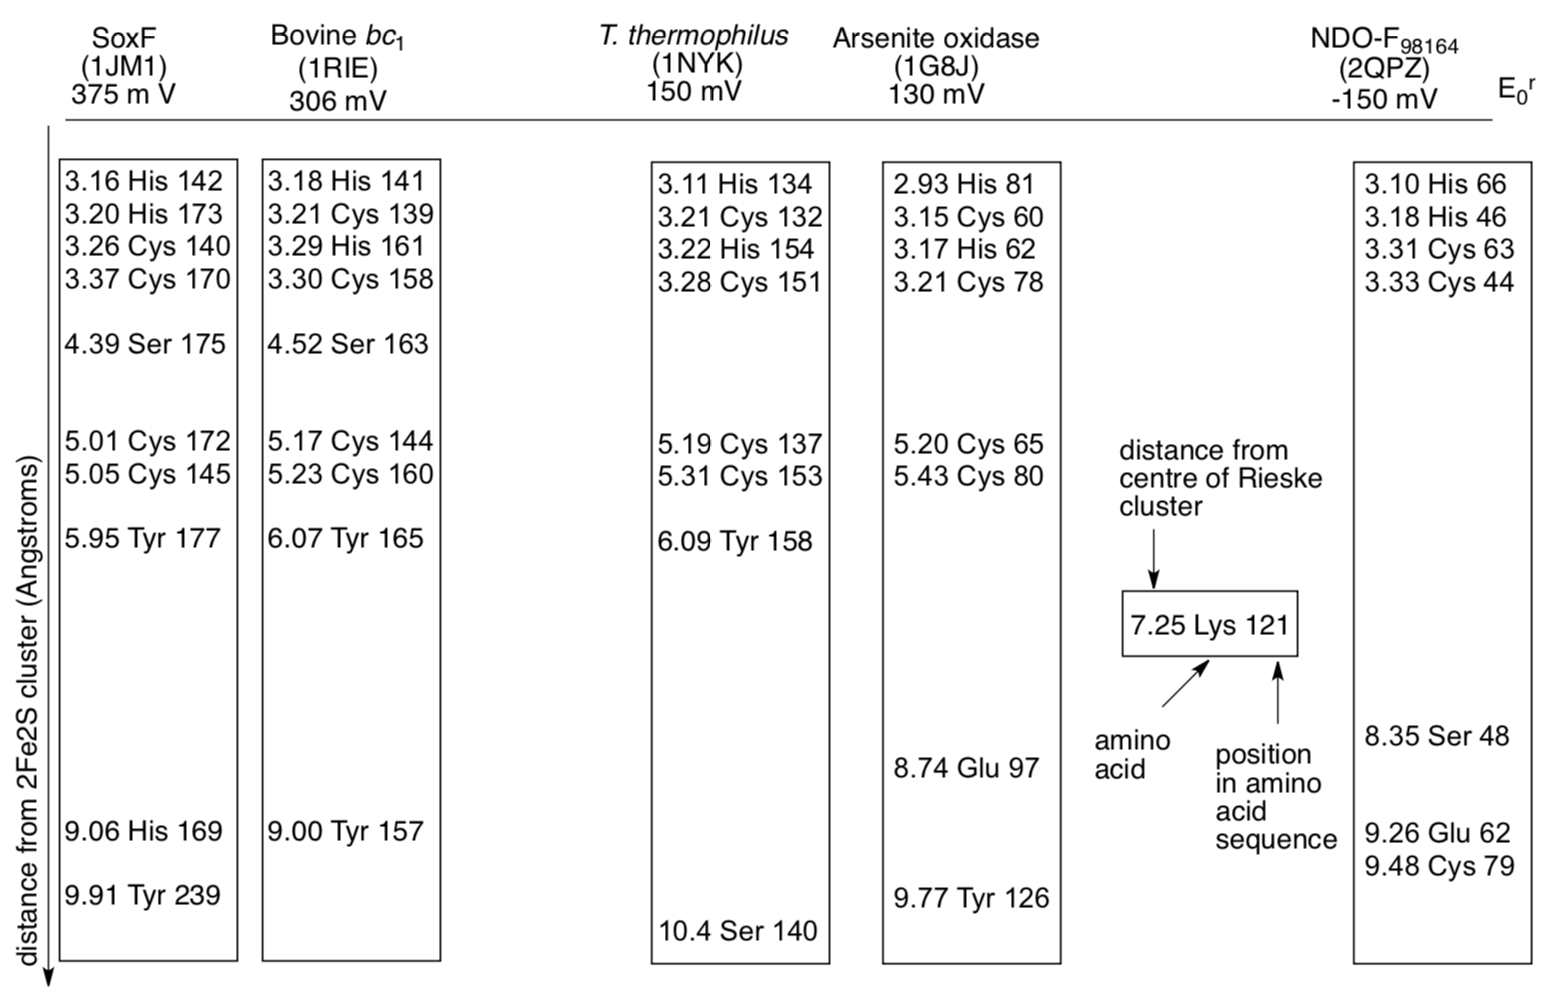
- These are not all of the amino acids. Which kinds of residues are the researchers interested in? What kinds are they probably excluding?
- Propose reasons for the trend in reduction potentials outlined here.
Case Study: The Role of Neighbouring Residues: Site-Directed Mutagenesis
Site directed mutagenesis studies in truncated bovine Rieske protein purified from bovine bc1 also support these conclusions (J. Hirst, Biochem. 2005, 44, 7048-7058.) These studies involve substitution of one amino acid for another and characterization of the resulting protein.
| Variant | Reduction Potential |
| Wild Type | 311 mV |
| S163A | 164 mV |
| Y165F | 252 mV |
| K142A | 287 mV |
In S163A, a serine (S) in position 163 was replaced with an alanine (A); Y165F replaces a tyrosine with phenylalanine; L142A makes a substitution for a lysine.
- Show the structures for the original residues and their replacements.
- Explain how these data are consistent with the structural studies comparing different Rieske proteins.
- S163 and Y165 are relatively close to the Rieske cluster, whereas L142 is further away (see results in the graph from Ramaswamy). Comment on their relative influence in the reduction potential.
Complex III to Complex IV: Cytochrome C as a mobile carrier
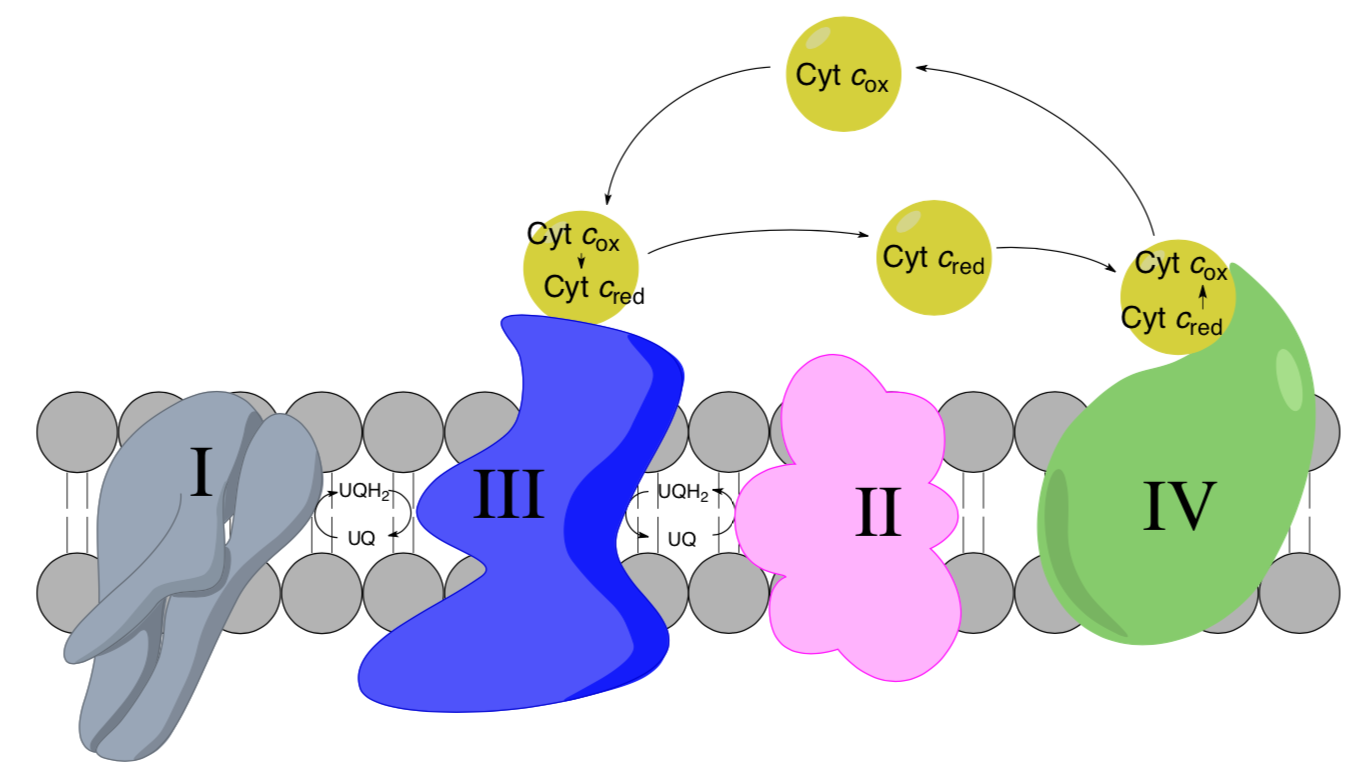
- Circle the mobile electron carriers in the picture above.
- Cytochrome c moves from Complex III to Complex IV through the intermembrane space. Predict its solubility.
- Cytochrome c needs to bind to both Complex III and Complex IV. the similarity of these binding sites.
Cytochrome c diffusion
Cytochrome c shares with ubiquinone the role of mobile electron carriers in the electron transport chain. Is this diffusion controlled?
Cytochrome c transfers electrons between cytochromes bc (Complex III) and aa (Complex IV) by rapid diffusion on the negatively charged membrane surface with correct orientation of the mobile carrier maintained by its large dipole moment.
Hochman, Ferguson-Miller, and Schindler, Biochemistry, 1985, 24, 2509-25.
- What type of amino acid residues would mediate the binding to the membrane surface?
- Describe how IMF might “steer” this protein to the redox complexes.
- How does steering help overcome diffusion limits?
Diffusion control with steering is supported by studies on the effects of chemical modification of cytochrome c on its reactivity with its redox partners, indicating that the same residues are involved in the binding of cytochrome c to both Complex III and Complex IV.
- Explain how this would be important.
Yet, when cytochrome c is cross-linked to mitochondrial inner membranes, significant rates of electron transfer are retained.
- This suggests that dissociation of cytochrome c from its redox partners (is or is NOT) required for its activity. (Circle one).
- Draw a cartoon of what might be happening if cytochrome c is NOT diffusing from Complex III to Complex IV.