
4.2: Multiple Covalent Bonds
- Page ID
- 83068
\( \newcommand{\vecs}[1]{\overset { \scriptstyle \rightharpoonup} {\mathbf{#1}} } \)
\( \newcommand{\vecd}[1]{\overset{-\!-\!\rightharpoonup}{\vphantom{a}\smash {#1}}} \)
\( \newcommand{\id}{\mathrm{id}}\) \( \newcommand{\Span}{\mathrm{span}}\)
( \newcommand{\kernel}{\mathrm{null}\,}\) \( \newcommand{\range}{\mathrm{range}\,}\)
\( \newcommand{\RealPart}{\mathrm{Re}}\) \( \newcommand{\ImaginaryPart}{\mathrm{Im}}\)
\( \newcommand{\Argument}{\mathrm{Arg}}\) \( \newcommand{\norm}[1]{\| #1 \|}\)
\( \newcommand{\inner}[2]{\langle #1, #2 \rangle}\)
\( \newcommand{\Span}{\mathrm{span}}\)
\( \newcommand{\id}{\mathrm{id}}\)
\( \newcommand{\Span}{\mathrm{span}}\)
\( \newcommand{\kernel}{\mathrm{null}\,}\)
\( \newcommand{\range}{\mathrm{range}\,}\)
\( \newcommand{\RealPart}{\mathrm{Re}}\)
\( \newcommand{\ImaginaryPart}{\mathrm{Im}}\)
\( \newcommand{\Argument}{\mathrm{Arg}}\)
\( \newcommand{\norm}[1]{\| #1 \|}\)
\( \newcommand{\inner}[2]{\langle #1, #2 \rangle}\)
\( \newcommand{\Span}{\mathrm{span}}\) \( \newcommand{\AA}{\unicode[.8,0]{x212B}}\)
\( \newcommand{\vectorA}[1]{\vec{#1}} % arrow\)
\( \newcommand{\vectorAt}[1]{\vec{\text{#1}}} % arrow\)
\( \newcommand{\vectorB}[1]{\overset { \scriptstyle \rightharpoonup} {\mathbf{#1}} } \)
\( \newcommand{\vectorC}[1]{\textbf{#1}} \)
\( \newcommand{\vectorD}[1]{\overrightarrow{#1}} \)
\( \newcommand{\vectorDt}[1]{\overrightarrow{\text{#1}}} \)
\( \newcommand{\vectE}[1]{\overset{-\!-\!\rightharpoonup}{\vphantom{a}\smash{\mathbf {#1}}}} \)
\( \newcommand{\vecs}[1]{\overset { \scriptstyle \rightharpoonup} {\mathbf{#1}} } \)
\( \newcommand{\vecd}[1]{\overset{-\!-\!\rightharpoonup}{\vphantom{a}\smash {#1}}} \)
\(\newcommand{\avec}{\mathbf a}\) \(\newcommand{\bvec}{\mathbf b}\) \(\newcommand{\cvec}{\mathbf c}\) \(\newcommand{\dvec}{\mathbf d}\) \(\newcommand{\dtil}{\widetilde{\mathbf d}}\) \(\newcommand{\evec}{\mathbf e}\) \(\newcommand{\fvec}{\mathbf f}\) \(\newcommand{\nvec}{\mathbf n}\) \(\newcommand{\pvec}{\mathbf p}\) \(\newcommand{\qvec}{\mathbf q}\) \(\newcommand{\svec}{\mathbf s}\) \(\newcommand{\tvec}{\mathbf t}\) \(\newcommand{\uvec}{\mathbf u}\) \(\newcommand{\vvec}{\mathbf v}\) \(\newcommand{\wvec}{\mathbf w}\) \(\newcommand{\xvec}{\mathbf x}\) \(\newcommand{\yvec}{\mathbf y}\) \(\newcommand{\zvec}{\mathbf z}\) \(\newcommand{\rvec}{\mathbf r}\) \(\newcommand{\mvec}{\mathbf m}\) \(\newcommand{\zerovec}{\mathbf 0}\) \(\newcommand{\onevec}{\mathbf 1}\) \(\newcommand{\real}{\mathbb R}\) \(\newcommand{\twovec}[2]{\left[\begin{array}{r}#1 \\ #2 \end{array}\right]}\) \(\newcommand{\ctwovec}[2]{\left[\begin{array}{c}#1 \\ #2 \end{array}\right]}\) \(\newcommand{\threevec}[3]{\left[\begin{array}{r}#1 \\ #2 \\ #3 \end{array}\right]}\) \(\newcommand{\cthreevec}[3]{\left[\begin{array}{c}#1 \\ #2 \\ #3 \end{array}\right]}\) \(\newcommand{\fourvec}[4]{\left[\begin{array}{r}#1 \\ #2 \\ #3 \\ #4 \end{array}\right]}\) \(\newcommand{\cfourvec}[4]{\left[\begin{array}{c}#1 \\ #2 \\ #3 \\ #4 \end{array}\right]}\) \(\newcommand{\fivevec}[5]{\left[\begin{array}{r}#1 \\ #2 \\ #3 \\ #4 \\ #5 \\ \end{array}\right]}\) \(\newcommand{\cfivevec}[5]{\left[\begin{array}{c}#1 \\ #2 \\ #3 \\ #4 \\ #5 \\ \end{array}\right]}\) \(\newcommand{\mattwo}[4]{\left[\begin{array}{rr}#1 \amp #2 \\ #3 \amp #4 \\ \end{array}\right]}\) \(\newcommand{\laspan}[1]{\text{Span}\{#1\}}\) \(\newcommand{\bcal}{\cal B}\) \(\newcommand{\ccal}{\cal C}\) \(\newcommand{\scal}{\cal S}\) \(\newcommand{\wcal}{\cal W}\) \(\newcommand{\ecal}{\cal E}\) \(\newcommand{\coords}[2]{\left\{#1\right\}_{#2}}\) \(\newcommand{\gray}[1]{\color{gray}{#1}}\) \(\newcommand{\lgray}[1]{\color{lightgray}{#1}}\) \(\newcommand{\rank}{\operatorname{rank}}\) \(\newcommand{\row}{\text{Row}}\) \(\newcommand{\col}{\text{Col}}\) \(\renewcommand{\row}{\text{Row}}\) \(\newcommand{\nul}{\text{Nul}}\) \(\newcommand{\var}{\text{Var}}\) \(\newcommand{\corr}{\text{corr}}\) \(\newcommand{\len}[1]{\left|#1\right|}\) \(\newcommand{\bbar}{\overline{\bvec}}\) \(\newcommand{\bhat}{\widehat{\bvec}}\) \(\newcommand{\bperp}{\bvec^\perp}\) \(\newcommand{\xhat}{\widehat{\xvec}}\) \(\newcommand{\vhat}{\widehat{\vvec}}\) \(\newcommand{\uhat}{\widehat{\uvec}}\) \(\newcommand{\what}{\widehat{\wvec}}\) \(\newcommand{\Sighat}{\widehat{\Sigma}}\) \(\newcommand{\lt}{<}\) \(\newcommand{\gt}{>}\) \(\newcommand{\amp}{&}\) \(\definecolor{fillinmathshade}{gray}{0.9}\)Skills to Develop
- To recognize molecules that are likely to have multiple covalent bonds.
In many molecules, the octet rule would not be satisfied if each pair of bonded atoms shares two electrons. Consider carbon dioxide (CO2). If each oxygen atom shares one electron with the carbon atom, we get the following:

This does not give the carbon atom a complete octet; you will find only six electrons in its valence shell. In addition, each oxygen atom has only seven electrons in its valence shell. Finally, no atom makes the number of bonds it typically forms. This arrangement of shared electrons is far from satisfactory.
Sometimes more than one pair of electrons must be shared between two atoms for both atoms to have an octet. In carbon dioxide, a second electron from each oxygen atom is also shared with the central carbon atom, and the carbon atom shares one more electron with each oxygen atom:

In this arrangement, the carbon atom shares four electrons (two pairs) with the oxygen atom on the left and four electrons with the oxygen atom on the right. There are now eight electrons around each atom. Two pairs of electrons shared between two atoms make a double bond between the atoms, which is represented by a double dash:

Some molecules contain triple bonds, covalent bonds in which three pairs of electrons are shared by two atoms. A simple compound that has a triple bond is acetylene (C2H2), whose Lewis diagram is as follows:

SERIES OF STEPS FOR DRAWING LEWIS STRUCTURES
STEP 3: How can the atoms share or exchange electrons to get there? (Metals tend to lose electrons. Non-metals tend to gain electrons from metals or share with other non-metals.)

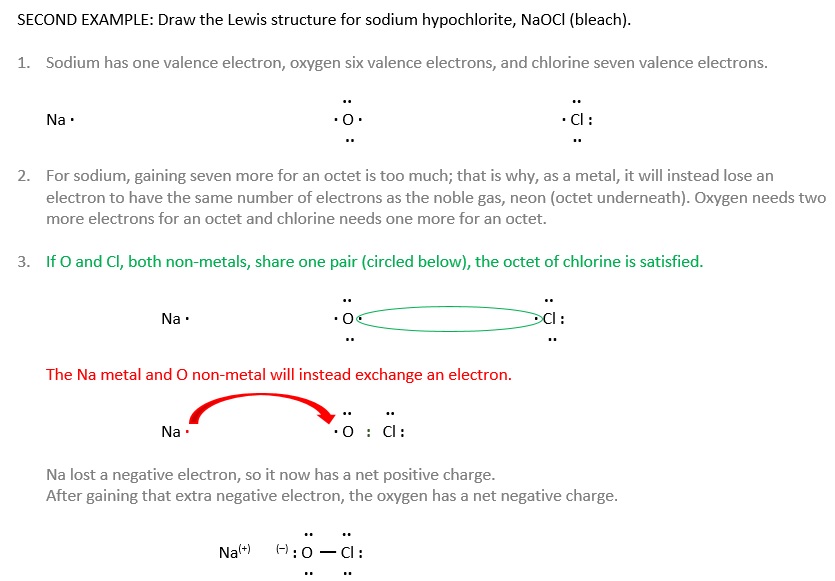
Example \(\PageIndex{1}\)
Draw the Lewis diagram for each molecule.
- N2
- CH2O (The carbon atom is the central atom.)
SOLUTION
-
Each lone nitrogen has five valence electrons (and needs three more for an octet). The two atoms share three pairs, a triple bond, to make the N2 molecule.

-
By themselves, carbon has four valence electrons (and needs four more for an octet), oxgyen has six (and needs two more for octet), and each hydrogen has one (and needs one more for duet). If the carbon makes two bonds with oxygen and one to each hydrogen, all atoms will be satisfied.
Note
One application of CH2O, also called formaldehyde, is the preservation of biological specimens. Aqueous solutions of CH2O are called formalin and have a sharp, characteristic (pungent) odor.
Concept Review Exercise
-
What is one clue that a molecule has a multiple bond?
Answer
-
If single bonds between all atoms do not give all atoms (except hydrogen) an octet, multiple covalent bonds may be present.
Key Takeaway
- Some molecules must have multiple covalent bonds between atoms to satisfy the octet rule.
Exercises
-
Each molecule contains multiple bonds. Draw the Lewis diagram for each.
- CS2 (Carbon is the central atom.)
- F2CCF2 (Two fluorines on left bonded to carbon on left, two carbons bonded to each other, and carbon on right bonded to two fluorines on right.)
- Cl2CO (Carbon is the central atom with all three other atoms bonded to carbon.)
-
Explain why hydrogen atoms do not form double bonds.
-
Why is it incorrect to draw a double bond in the Lewis diagram for MgO?
Answers
-

-
Hydrogen can accept only one more electron; multiple bonds require more than one electron pair to be shared.
3. MgO an ionic compound and exchanges electrons instead of sharing them (no covalent bonds so no lines).
Contributors
- Anonymous