2.2: Programming Logic
- Page ID
- 366302
\( \newcommand{\vecs}[1]{\overset { \scriptstyle \rightharpoonup} {\mathbf{#1}} } \)
\( \newcommand{\vecd}[1]{\overset{-\!-\!\rightharpoonup}{\vphantom{a}\smash {#1}}} \)
\( \newcommand{\id}{\mathrm{id}}\) \( \newcommand{\Span}{\mathrm{span}}\)
( \newcommand{\kernel}{\mathrm{null}\,}\) \( \newcommand{\range}{\mathrm{range}\,}\)
\( \newcommand{\RealPart}{\mathrm{Re}}\) \( \newcommand{\ImaginaryPart}{\mathrm{Im}}\)
\( \newcommand{\Argument}{\mathrm{Arg}}\) \( \newcommand{\norm}[1]{\| #1 \|}\)
\( \newcommand{\inner}[2]{\langle #1, #2 \rangle}\)
\( \newcommand{\Span}{\mathrm{span}}\)
\( \newcommand{\id}{\mathrm{id}}\)
\( \newcommand{\Span}{\mathrm{span}}\)
\( \newcommand{\kernel}{\mathrm{null}\,}\)
\( \newcommand{\range}{\mathrm{range}\,}\)
\( \newcommand{\RealPart}{\mathrm{Re}}\)
\( \newcommand{\ImaginaryPart}{\mathrm{Im}}\)
\( \newcommand{\Argument}{\mathrm{Arg}}\)
\( \newcommand{\norm}[1]{\| #1 \|}\)
\( \newcommand{\inner}[2]{\langle #1, #2 \rangle}\)
\( \newcommand{\Span}{\mathrm{span}}\) \( \newcommand{\AA}{\unicode[.8,0]{x212B}}\)
\( \newcommand{\vectorA}[1]{\vec{#1}} % arrow\)
\( \newcommand{\vectorAt}[1]{\vec{\text{#1}}} % arrow\)
\( \newcommand{\vectorB}[1]{\overset { \scriptstyle \rightharpoonup} {\mathbf{#1}} } \)
\( \newcommand{\vectorC}[1]{\textbf{#1}} \)
\( \newcommand{\vectorD}[1]{\overrightarrow{#1}} \)
\( \newcommand{\vectorDt}[1]{\overrightarrow{\text{#1}}} \)
\( \newcommand{\vectE}[1]{\overset{-\!-\!\rightharpoonup}{\vphantom{a}\smash{\mathbf {#1}}}} \)
\( \newcommand{\vecs}[1]{\overset { \scriptstyle \rightharpoonup} {\mathbf{#1}} } \)
\( \newcommand{\vecd}[1]{\overset{-\!-\!\rightharpoonup}{\vphantom{a}\smash {#1}}} \)
\(\newcommand{\avec}{\mathbf a}\) \(\newcommand{\bvec}{\mathbf b}\) \(\newcommand{\cvec}{\mathbf c}\) \(\newcommand{\dvec}{\mathbf d}\) \(\newcommand{\dtil}{\widetilde{\mathbf d}}\) \(\newcommand{\evec}{\mathbf e}\) \(\newcommand{\fvec}{\mathbf f}\) \(\newcommand{\nvec}{\mathbf n}\) \(\newcommand{\pvec}{\mathbf p}\) \(\newcommand{\qvec}{\mathbf q}\) \(\newcommand{\svec}{\mathbf s}\) \(\newcommand{\tvec}{\mathbf t}\) \(\newcommand{\uvec}{\mathbf u}\) \(\newcommand{\vvec}{\mathbf v}\) \(\newcommand{\wvec}{\mathbf w}\) \(\newcommand{\xvec}{\mathbf x}\) \(\newcommand{\yvec}{\mathbf y}\) \(\newcommand{\zvec}{\mathbf z}\) \(\newcommand{\rvec}{\mathbf r}\) \(\newcommand{\mvec}{\mathbf m}\) \(\newcommand{\zerovec}{\mathbf 0}\) \(\newcommand{\onevec}{\mathbf 1}\) \(\newcommand{\real}{\mathbb R}\) \(\newcommand{\twovec}[2]{\left[\begin{array}{r}#1 \\ #2 \end{array}\right]}\) \(\newcommand{\ctwovec}[2]{\left[\begin{array}{c}#1 \\ #2 \end{array}\right]}\) \(\newcommand{\threevec}[3]{\left[\begin{array}{r}#1 \\ #2 \\ #3 \end{array}\right]}\) \(\newcommand{\cthreevec}[3]{\left[\begin{array}{c}#1 \\ #2 \\ #3 \end{array}\right]}\) \(\newcommand{\fourvec}[4]{\left[\begin{array}{r}#1 \\ #2 \\ #3 \\ #4 \end{array}\right]}\) \(\newcommand{\cfourvec}[4]{\left[\begin{array}{c}#1 \\ #2 \\ #3 \\ #4 \end{array}\right]}\) \(\newcommand{\fivevec}[5]{\left[\begin{array}{r}#1 \\ #2 \\ #3 \\ #4 \\ #5 \\ \end{array}\right]}\) \(\newcommand{\cfivevec}[5]{\left[\begin{array}{c}#1 \\ #2 \\ #3 \\ #4 \\ #5 \\ \end{array}\right]}\) \(\newcommand{\mattwo}[4]{\left[\begin{array}{rr}#1 \amp #2 \\ #3 \amp #4 \\ \end{array}\right]}\) \(\newcommand{\laspan}[1]{\text{Span}\{#1\}}\) \(\newcommand{\bcal}{\cal B}\) \(\newcommand{\ccal}{\cal C}\) \(\newcommand{\scal}{\cal S}\) \(\newcommand{\wcal}{\cal W}\) \(\newcommand{\ecal}{\cal E}\) \(\newcommand{\coords}[2]{\left\{#1\right\}_{#2}}\) \(\newcommand{\gray}[1]{\color{gray}{#1}}\) \(\newcommand{\lgray}[1]{\color{lightgray}{#1}}\) \(\newcommand{\rank}{\operatorname{rank}}\) \(\newcommand{\row}{\text{Row}}\) \(\newcommand{\col}{\text{Col}}\) \(\renewcommand{\row}{\text{Row}}\) \(\newcommand{\nul}{\text{Nul}}\) \(\newcommand{\var}{\text{Var}}\) \(\newcommand{\corr}{\text{corr}}\) \(\newcommand{\len}[1]{\left|#1\right|}\) \(\newcommand{\bbar}{\overline{\bvec}}\) \(\newcommand{\bhat}{\widehat{\bvec}}\) \(\newcommand{\bperp}{\bvec^\perp}\) \(\newcommand{\xhat}{\widehat{\xvec}}\) \(\newcommand{\vhat}{\widehat{\vvec}}\) \(\newcommand{\uhat}{\widehat{\uvec}}\) \(\newcommand{\what}{\widehat{\wvec}}\) \(\newcommand{\Sighat}{\widehat{\Sigma}}\) \(\newcommand{\lt}{<}\) \(\newcommand{\gt}{>}\) \(\newcommand{\amp}{&}\) \(\definecolor{fillinmathshade}{gray}{0.9}\)In this section we will look at flow charts and "pseudo code". If you were to define a task, like how to maintain the water temperature in an aquaponics unit, a good first step would be to write the pseudo code and flow chart concurrently. As you build skills with programming you will be able to use names associated with the program you intend to code in, but the goal of this section is to enable a non programmer to see exactly what you are doing.
Pseudocode
Pseudocode is a structured plain language description of the steps in an algorithm that are meant to be read by a human, not a machine. There are several reasons we need to go through this exercise. First, this is an Internet of Science Things course and this level of abstraction allows us to see where the science fits in. That is, we are collecting data from real world objects and need to have a bearing on what that data is and how we are processing it. The section is this is a view that is agnostic to any particular code language and gives you a handle on how to reverse engineer code from a language you are not familiar with. That is, you may need a particular metal oxide sensor that is measuring the current across a resister and using that to determine the concentration of a gas that oxidizes the metal (forms a rust-like layer that increases the resistance as compared to pure metal). Well, that program from the manufacturer may be in a language you are unfamiliar with, but if you can understand what the code does from a pseudo code perspective, you can get a bearing on the syntax structure of the new language.
Pseudocode Conventions
The following have been adapted from Geeks for Geeks.
- Set up a Flow Chart so you have a bearing on the sequence of tasks.
- Brief Abstract Describing what the program will do
- Use Indentation to indicate code that is part of a block (subroutine), Python does this, but other languages may use different conventions
if T > 100
turn off the heat
if T < 50
turn on the heat
- Use appropriate naming conventions (we will build on this)
- snake_case - variable, file, function and subroutine names should be in snake case (everything lower case with underscore between words)
- CamelCase - Class and class methods names in Python use CamelCase (first letter of each word capitalized and no underscore)
- Use standard programming structures as much as possible, like if, when, while statements. You will build these skills as things proceed.
Remember, the goal of the pseudo code is not to be programmatically correct, but to make clear what the program does to a non-programmer.
Flow Charts
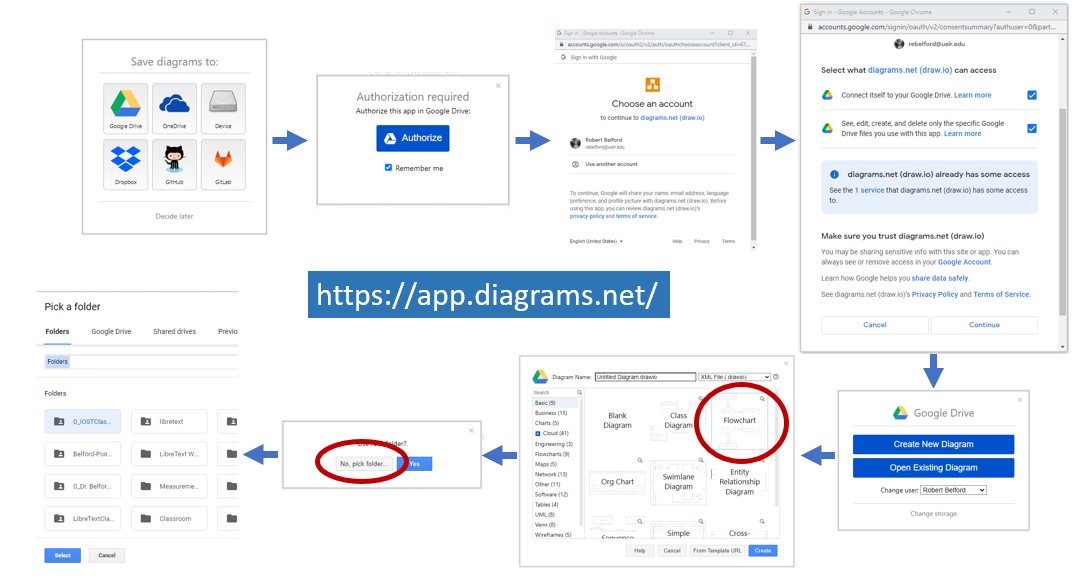
We have all seen flow charts, these are diagrams with arrows that indicate the flow of a process. In this class we will be using two types of charts; those for describing the flow process of a computer script (this section), and later, those involved with electric circuits. You can use shapes of common programs like PowerPoint or a flowchart app. We will instal and use the draw.io app at https://app.diagrams.net/ and connect this to your course folder in Google Drive.
https://app.diagrams.net/
Figure \(\PageIndex{1}\) is a flow chart that gives the steps for activating drawio and connecting it to your account. Please do not set this to your folder in Google Drive, but the subfolder called current work
 Figure \(\PageIndex{1}\): Steps for activating draw.io in your Google Drive. Be sure to use the CURRENT WORK folder of your class directory to keep flow charts you are working on. (Copyright; Bob Belford, CC 0.0)
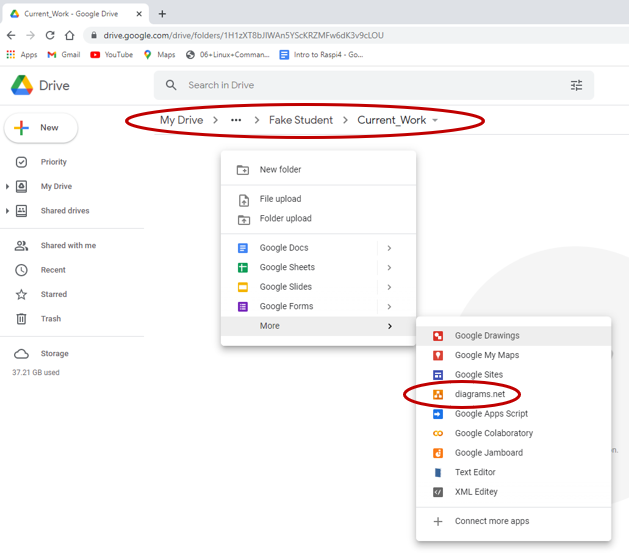
To activate the draw.io app go to your current work folder in Google drive, right click, and open diagrams.net
 Figure \(\PageIndex{2}\): Right clicking in the "Current Work" folder and choosing more gives the option to open the draw.io app. (Copyright; Bob Belford, CC 0.0)
The following is a fast no-nonsense video that you should watch before proceeding.
Video \(\PageIndex{1}\): 3:22 YouTube, "Create flowcharts with diagram.net" by Bianca Ruiz (https://youtu.be/jbAJk1pBUYk).

