
2: Google Workbook (Sheets) Basics
- Page ID
- 361510

\( \newcommand{\vecs}[1]{\overset { \scriptstyle \rightharpoonup} {\mathbf{#1}} } \)
\( \newcommand{\vecd}[1]{\overset{-\!-\!\rightharpoonup}{\vphantom{a}\smash {#1}}} \)
\( \newcommand{\dsum}{\displaystyle\sum\limits} \)
\( \newcommand{\dint}{\displaystyle\int\limits} \)
\( \newcommand{\dlim}{\displaystyle\lim\limits} \)
\( \newcommand{\id}{\mathrm{id}}\) \( \newcommand{\Span}{\mathrm{span}}\)
( \newcommand{\kernel}{\mathrm{null}\,}\) \( \newcommand{\range}{\mathrm{range}\,}\)
\( \newcommand{\RealPart}{\mathrm{Re}}\) \( \newcommand{\ImaginaryPart}{\mathrm{Im}}\)
\( \newcommand{\Argument}{\mathrm{Arg}}\) \( \newcommand{\norm}[1]{\| #1 \|}\)
\( \newcommand{\inner}[2]{\langle #1, #2 \rangle}\)
\( \newcommand{\Span}{\mathrm{span}}\)
\( \newcommand{\id}{\mathrm{id}}\)
\( \newcommand{\Span}{\mathrm{span}}\)
\( \newcommand{\kernel}{\mathrm{null}\,}\)
\( \newcommand{\range}{\mathrm{range}\,}\)
\( \newcommand{\RealPart}{\mathrm{Re}}\)
\( \newcommand{\ImaginaryPart}{\mathrm{Im}}\)
\( \newcommand{\Argument}{\mathrm{Arg}}\)
\( \newcommand{\norm}[1]{\| #1 \|}\)
\( \newcommand{\inner}[2]{\langle #1, #2 \rangle}\)
\( \newcommand{\Span}{\mathrm{span}}\) \( \newcommand{\AA}{\unicode[.8,0]{x212B}}\)
\( \newcommand{\vectorA}[1]{\vec{#1}} % arrow\)
\( \newcommand{\vectorAt}[1]{\vec{\text{#1}}} % arrow\)
\( \newcommand{\vectorB}[1]{\overset { \scriptstyle \rightharpoonup} {\mathbf{#1}} } \)
\( \newcommand{\vectorC}[1]{\textbf{#1}} \)
\( \newcommand{\vectorD}[1]{\overrightarrow{#1}} \)
\( \newcommand{\vectorDt}[1]{\overrightarrow{\text{#1}}} \)
\( \newcommand{\vectE}[1]{\overset{-\!-\!\rightharpoonup}{\vphantom{a}\smash{\mathbf {#1}}}} \)
\( \newcommand{\vecs}[1]{\overset { \scriptstyle \rightharpoonup} {\mathbf{#1}} } \)
\(\newcommand{\longvect}{\overrightarrow}\)
\( \newcommand{\vecd}[1]{\overset{-\!-\!\rightharpoonup}{\vphantom{a}\smash {#1}}} \)
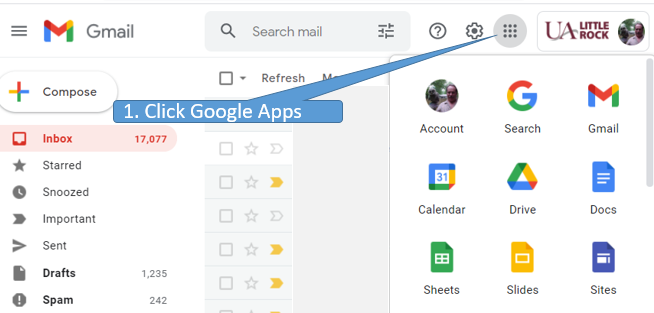
\(\newcommand{\avec}{\mathbf a}\) \(\newcommand{\bvec}{\mathbf b}\) \(\newcommand{\cvec}{\mathbf c}\) \(\newcommand{\dvec}{\mathbf d}\) \(\newcommand{\dtil}{\widetilde{\mathbf d}}\) \(\newcommand{\evec}{\mathbf e}\) \(\newcommand{\fvec}{\mathbf f}\) \(\newcommand{\nvec}{\mathbf n}\) \(\newcommand{\pvec}{\mathbf p}\) \(\newcommand{\qvec}{\mathbf q}\) \(\newcommand{\svec}{\mathbf s}\) \(\newcommand{\tvec}{\mathbf t}\) \(\newcommand{\uvec}{\mathbf u}\) \(\newcommand{\vvec}{\mathbf v}\) \(\newcommand{\wvec}{\mathbf w}\) \(\newcommand{\xvec}{\mathbf x}\) \(\newcommand{\yvec}{\mathbf y}\) \(\newcommand{\zvec}{\mathbf z}\) \(\newcommand{\rvec}{\mathbf r}\) \(\newcommand{\mvec}{\mathbf m}\) \(\newcommand{\zerovec}{\mathbf 0}\) \(\newcommand{\onevec}{\mathbf 1}\) \(\newcommand{\real}{\mathbb R}\) \(\newcommand{\twovec}[2]{\left[\begin{array}{r}#1 \\ #2 \end{array}\right]}\) \(\newcommand{\ctwovec}[2]{\left[\begin{array}{c}#1 \\ #2 \end{array}\right]}\) \(\newcommand{\threevec}[3]{\left[\begin{array}{r}#1 \\ #2 \\ #3 \end{array}\right]}\) \(\newcommand{\cthreevec}[3]{\left[\begin{array}{c}#1 \\ #2 \\ #3 \end{array}\right]}\) \(\newcommand{\fourvec}[4]{\left[\begin{array}{r}#1 \\ #2 \\ #3 \\ #4 \end{array}\right]}\) \(\newcommand{\cfourvec}[4]{\left[\begin{array}{c}#1 \\ #2 \\ #3 \\ #4 \end{array}\right]}\) \(\newcommand{\fivevec}[5]{\left[\begin{array}{r}#1 \\ #2 \\ #3 \\ #4 \\ #5 \\ \end{array}\right]}\) \(\newcommand{\cfivevec}[5]{\left[\begin{array}{c}#1 \\ #2 \\ #3 \\ #4 \\ #5 \\ \end{array}\right]}\) \(\newcommand{\mattwo}[4]{\left[\begin{array}{rr}#1 \amp #2 \\ #3 \amp #4 \\ \end{array}\right]}\) \(\newcommand{\laspan}[1]{\text{Span}\{#1\}}\) \(\newcommand{\bcal}{\cal B}\) \(\newcommand{\ccal}{\cal C}\) \(\newcommand{\scal}{\cal S}\) \(\newcommand{\wcal}{\cal W}\) \(\newcommand{\ecal}{\cal E}\) \(\newcommand{\coords}[2]{\left\{#1\right\}_{#2}}\) \(\newcommand{\gray}[1]{\color{gray}{#1}}\) \(\newcommand{\lgray}[1]{\color{lightgray}{#1}}\) \(\newcommand{\rank}{\operatorname{rank}}\) \(\newcommand{\row}{\text{Row}}\) \(\newcommand{\col}{\text{Col}}\) \(\renewcommand{\row}{\text{Row}}\) \(\newcommand{\nul}{\text{Nul}}\) \(\newcommand{\var}{\text{Var}}\) \(\newcommand{\corr}{\text{corr}}\) \(\newcommand{\len}[1]{\left|#1\right|}\) \(\newcommand{\bbar}{\overline{\bvec}}\) \(\newcommand{\bhat}{\widehat{\bvec}}\) \(\newcommand{\bperp}{\bvec^\perp}\) \(\newcommand{\xhat}{\widehat{\xvec}}\) \(\newcommand{\vhat}{\widehat{\vvec}}\) \(\newcommand{\uhat}{\widehat{\uvec}}\) \(\newcommand{\what}{\widehat{\wvec}}\) \(\newcommand{\Sighat}{\widehat{\Sigma}}\) \(\newcommand{\lt}{<}\) \(\newcommand{\gt}{>}\) \(\newcommand{\amp}{&}\) \(\definecolor{fillinmathshade}{gray}{0.9}\)When you log into your UALR email you also have access to Google Workspace and a suite of apps like Google Drive, Docs, Sheets, etc. We will take extensive advantage of these resources in this lab. To access the Google Apps you can log into your UALR email, click the 9 dots and choose the app you wish.
Before diving into Google Sheets you should create a folder in Google Drive for you lab material. Simply click on the "Drive" Icon, right click on a blank area and choose New Folder, and name it. I would name the folder 0_Chem1403Lab, as the zero will put it at the top of your list. When the class is over I would remove the zero. Now within the folder you can make as many subfolders as you want. I would make one for each lab and start the name with the lab number, that way they stay organized.
Google Workbook
When you open Google Sheets you are actually opening a Workbook, and each tab of the Workbook is a different sheet, so the "sheets" are a workbook, and the tabs are a sheet. We will be using these terms synonymously (Sheets=Workbook and Tab=Sheet).
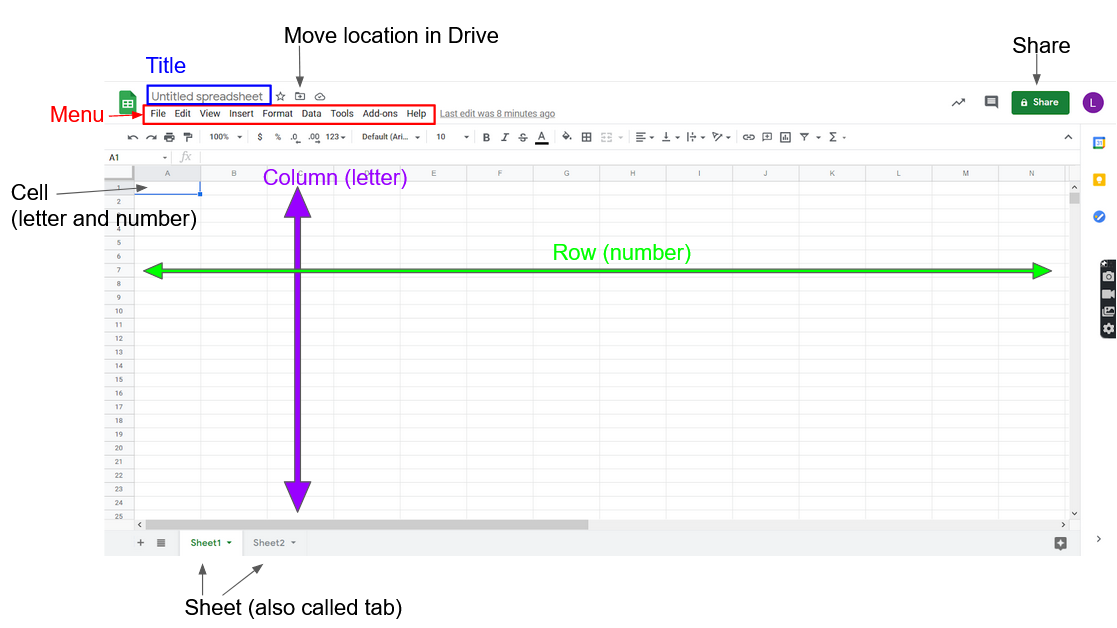
Navigating a Google Sheet
Making a Google Sheet
There are three ways to create a new Google Sheet:
- Click the "Sheets" icon in figure \(\PageIndex{1}\).
- Go to a folder in Google Drive, right click and choose Google Sheets.
- Make a copy of an existing Google Sheet, move it to the folder you want and edit it appropriately.
I usually use option (2) for creating a new sheet, and only use the Google Sheets app when I am searching for a special sheet.
First thing we will be doing is making a google sheet. There's multiple ways to access sheets but we will start with the way that is easiest to keep organized.
Video \(\PageIndex{1}\): 0:11 video on making a Google Sheet in Drive. (https://youtu.be/TAYVbgreE8s)
Step 1. Open your google drive
Step 2. Click +New in the top left corner which will open a drop down menu
Step 3. Select Google Sheets which will open your sheet in a new tab
Copy a Google Sheet
Making a copy of a sheet is a very useful tool. You can use previous sheets as a template for new data or to have an original copy to save when sharing a sheet.
Video \(\PageIndex{2}\): 0:38 video on copying and naming a Google Sheet (https://youtu.be/MIPYCvl9-Fw)
- Open the sheet you want to make a copy of
- In the menu, click File and then Make a copy.
- This will open the box where you can name your new sheet. (For students I recommend including your name in the title to help whoever is grading your sheet stay organized)
- Use folder to select where to save your new copy
- Click on OK to make your copy which will open in a new tab
Sharing a Google Sheet
Once you create a Google Sheet you can share it with your classmates or instructor. The following infographic shows the steps to share a Google Sheet
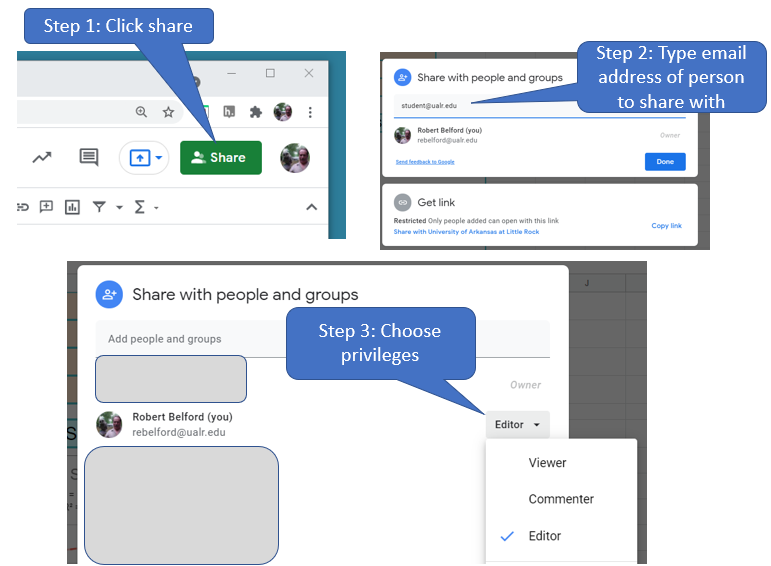
The steps for sharing a Google Sheet are:
- Click the "Share" icon in the upper right corner
- Type the email address of all people you wish to share the sheet with
- Give Appropriate privileges.
Google Sheets: Tabs
Tabs (Sheets) are a great way to organize data within one spreadsheet.
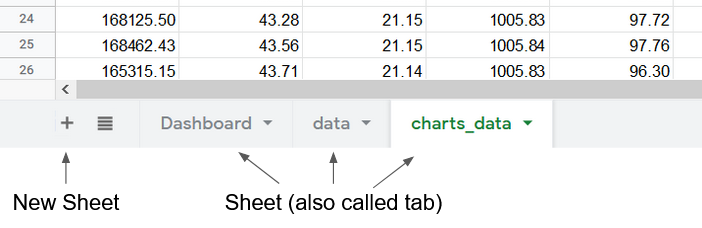
Figure \(\PageIndex{4}\): Sheets and New Sheet
Video \(\PageIndex{3}\): 2:48 Video tutorial on tabs. (https://youtu.be/WTUd8rZ2WHE)
Make new Tab (Sheet) in Spreadsheet
TimeStamp: Video 3 0:08
- Click the plus button on the bottom left corner of the screen
- Right click and select Rename
It is best practice to name sheets as all one word. This will make things a lot easier later on when referencing sheets later on. You can use and underscore (_) to replace a space.
Duplicate a Tab
TimeStamp: Video 3 0:37
- Right click on the tab you wish to make a copy of
- Select Duplicate to make a copy
- Right Click the new tab and select Rename
Organizing Tabs
To move a tab click on the tab and drag it to rearrange. TimeStamp: Video 3: 1:03
To hide a sheet Right click on the tab then select Hide Sheet. This will hide the sheet from view. TimeStamp: Video 3: 1:15
To unhide a sheet go to the menu and select View. Go down to Hidden Sheets to select the sheet you want to unhide. TimeStamp: Video 3: 1:23
To protect a sheet (meaning choosing who can edit a tab) Right click on the tab then select Protect sheet. This will open a menu to the right, click Set Permissions to choose who can edit this sheet then press done. TimeStamp: Video 3: 1:33
You can combine Protect sheet and Hide sheet to prevent anyone from being able to open a sheet TimeStamp: Video 3: 2:15
Inserting Data
Google Sheets allows you to auto fill a number or series of number by dragging highlighted cells
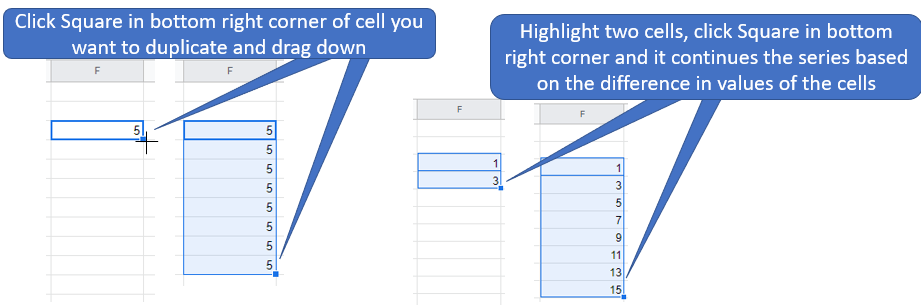
Figure \(\PageIndex{4}\): Highlighting a cell and dragging will copy its content while highlighting two cells and dragging creates a series of values based on the difference of the two cells(Bob Belford; LibreTexts CC0)
Sometimes we want to transfer calculated values from one sheet (tab) to another and a regular cut and paste of a calculated value will update if the number on the original sheet is changed. Sometimes we may want to change the data in the original sheet, but not want to change it in the sheet we pasted it to, and that is when "paste values only" comes in useful
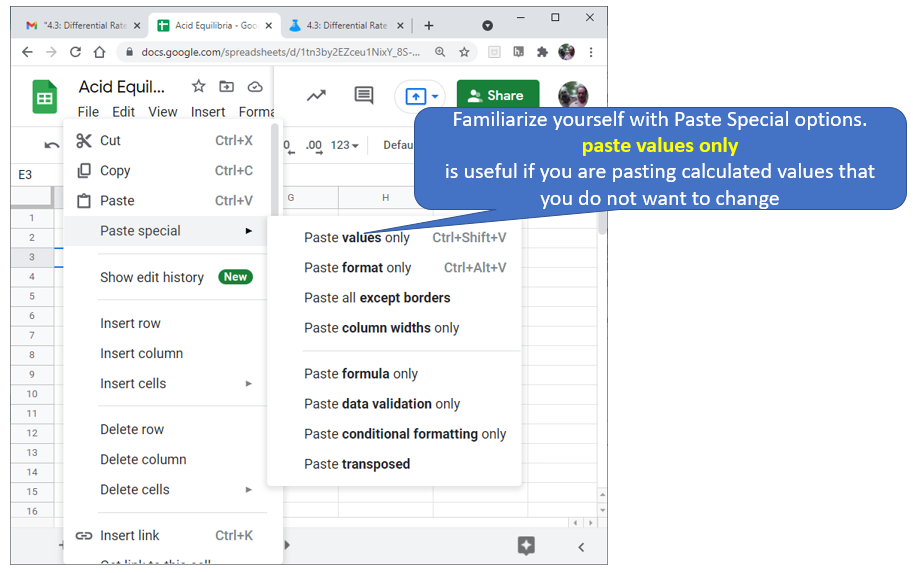 Figure \(\PageIndex{5}\): Familiarize yourself with options like paste value only. (Copyright; author via source)
Format
Numbers
To numbers go to the menu and click on Format>Number
Plain Text: Any text or string, cannot do mathematical functions on plain text
Number: strings of digits, the default is to have no trailing zeros use increase and decrease decimal places buttons to change this
Scientific: Has number in scientific notation. So for example \(1.75 \times 10^{2} \) will be written as 1.75E+02 (you only have to enter 1.75e2)
Percent: Will format a fraction as a Percent so 0.01 will be multiplied by 100 to be 1%
Decimal Places
You can change the number of decimal places that the cell displays.
The buttons for this are below Data on the Menu. You can Increase the decimal places or Decrease the decimal places. Make sure to pay attention to rounding and that it is following the correct rounding rules for your project.

Video \(\PageIndex{4}\): 0:34 Video tutorial on changing the number of decimal places. (https://youtu.be/sEyMuHi6nkg)
Robert E. Belford (University of Arkansas Little Rock; Department of Chemistry). The breadth, depth and veracity of this work is the responsibility of Robert E. Belford, rebelford@ualr.edu. You should contact him if you have any concerns. This material has both original contributions, and content built upon prior contributions of the LibreTexts Community and other resources, including but not limited to:
- Liliane Poirot