
3.1: Transferring and Weighting Methods
- Page ID
- 488989

\( \newcommand{\vecs}[1]{\overset { \scriptstyle \rightharpoonup} {\mathbf{#1}} } \)
\( \newcommand{\vecd}[1]{\overset{-\!-\!\rightharpoonup}{\vphantom{a}\smash {#1}}} \)
\( \newcommand{\dsum}{\displaystyle\sum\limits} \)
\( \newcommand{\dint}{\displaystyle\int\limits} \)
\( \newcommand{\dlim}{\displaystyle\lim\limits} \)
\( \newcommand{\id}{\mathrm{id}}\) \( \newcommand{\Span}{\mathrm{span}}\)
( \newcommand{\kernel}{\mathrm{null}\,}\) \( \newcommand{\range}{\mathrm{range}\,}\)
\( \newcommand{\RealPart}{\mathrm{Re}}\) \( \newcommand{\ImaginaryPart}{\mathrm{Im}}\)
\( \newcommand{\Argument}{\mathrm{Arg}}\) \( \newcommand{\norm}[1]{\| #1 \|}\)
\( \newcommand{\inner}[2]{\langle #1, #2 \rangle}\)
\( \newcommand{\Span}{\mathrm{span}}\)
\( \newcommand{\id}{\mathrm{id}}\)
\( \newcommand{\Span}{\mathrm{span}}\)
\( \newcommand{\kernel}{\mathrm{null}\,}\)
\( \newcommand{\range}{\mathrm{range}\,}\)
\( \newcommand{\RealPart}{\mathrm{Re}}\)
\( \newcommand{\ImaginaryPart}{\mathrm{Im}}\)
\( \newcommand{\Argument}{\mathrm{Arg}}\)
\( \newcommand{\norm}[1]{\| #1 \|}\)
\( \newcommand{\inner}[2]{\langle #1, #2 \rangle}\)
\( \newcommand{\Span}{\mathrm{span}}\) \( \newcommand{\AA}{\unicode[.8,0]{x212B}}\)
\( \newcommand{\vectorA}[1]{\vec{#1}} % arrow\)
\( \newcommand{\vectorAt}[1]{\vec{\text{#1}}} % arrow\)
\( \newcommand{\vectorB}[1]{\overset { \scriptstyle \rightharpoonup} {\mathbf{#1}} } \)
\( \newcommand{\vectorC}[1]{\textbf{#1}} \)
\( \newcommand{\vectorD}[1]{\overrightarrow{#1}} \)
\( \newcommand{\vectorDt}[1]{\overrightarrow{\text{#1}}} \)
\( \newcommand{\vectE}[1]{\overset{-\!-\!\rightharpoonup}{\vphantom{a}\smash{\mathbf {#1}}}} \)
\( \newcommand{\vecs}[1]{\overset { \scriptstyle \rightharpoonup} {\mathbf{#1}} } \)
\(\newcommand{\longvect}{\overrightarrow}\)
\( \newcommand{\vecd}[1]{\overset{-\!-\!\rightharpoonup}{\vphantom{a}\smash {#1}}} \)
\(\newcommand{\avec}{\mathbf a}\) \(\newcommand{\bvec}{\mathbf b}\) \(\newcommand{\cvec}{\mathbf c}\) \(\newcommand{\dvec}{\mathbf d}\) \(\newcommand{\dtil}{\widetilde{\mathbf d}}\) \(\newcommand{\evec}{\mathbf e}\) \(\newcommand{\fvec}{\mathbf f}\) \(\newcommand{\nvec}{\mathbf n}\) \(\newcommand{\pvec}{\mathbf p}\) \(\newcommand{\qvec}{\mathbf q}\) \(\newcommand{\svec}{\mathbf s}\) \(\newcommand{\tvec}{\mathbf t}\) \(\newcommand{\uvec}{\mathbf u}\) \(\newcommand{\vvec}{\mathbf v}\) \(\newcommand{\wvec}{\mathbf w}\) \(\newcommand{\xvec}{\mathbf x}\) \(\newcommand{\yvec}{\mathbf y}\) \(\newcommand{\zvec}{\mathbf z}\) \(\newcommand{\rvec}{\mathbf r}\) \(\newcommand{\mvec}{\mathbf m}\) \(\newcommand{\zerovec}{\mathbf 0}\) \(\newcommand{\onevec}{\mathbf 1}\) \(\newcommand{\real}{\mathbb R}\) \(\newcommand{\twovec}[2]{\left[\begin{array}{r}#1 \\ #2 \end{array}\right]}\) \(\newcommand{\ctwovec}[2]{\left[\begin{array}{c}#1 \\ #2 \end{array}\right]}\) \(\newcommand{\threevec}[3]{\left[\begin{array}{r}#1 \\ #2 \\ #3 \end{array}\right]}\) \(\newcommand{\cthreevec}[3]{\left[\begin{array}{c}#1 \\ #2 \\ #3 \end{array}\right]}\) \(\newcommand{\fourvec}[4]{\left[\begin{array}{r}#1 \\ #2 \\ #3 \\ #4 \end{array}\right]}\) \(\newcommand{\cfourvec}[4]{\left[\begin{array}{c}#1 \\ #2 \\ #3 \\ #4 \end{array}\right]}\) \(\newcommand{\fivevec}[5]{\left[\begin{array}{r}#1 \\ #2 \\ #3 \\ #4 \\ #5 \\ \end{array}\right]}\) \(\newcommand{\cfivevec}[5]{\left[\begin{array}{c}#1 \\ #2 \\ #3 \\ #4 \\ #5 \\ \end{array}\right]}\) \(\newcommand{\mattwo}[4]{\left[\begin{array}{rr}#1 \amp #2 \\ #3 \amp #4 \\ \end{array}\right]}\) \(\newcommand{\laspan}[1]{\text{Span}\{#1\}}\) \(\newcommand{\bcal}{\cal B}\) \(\newcommand{\ccal}{\cal C}\) \(\newcommand{\scal}{\cal S}\) \(\newcommand{\wcal}{\cal W}\) \(\newcommand{\ecal}{\cal E}\) \(\newcommand{\coords}[2]{\left\{#1\right\}_{#2}}\) \(\newcommand{\gray}[1]{\color{gray}{#1}}\) \(\newcommand{\lgray}[1]{\color{lightgray}{#1}}\) \(\newcommand{\rank}{\operatorname{rank}}\) \(\newcommand{\row}{\text{Row}}\) \(\newcommand{\col}{\text{Col}}\) \(\renewcommand{\row}{\text{Row}}\) \(\newcommand{\nul}{\text{Nul}}\) \(\newcommand{\var}{\text{Var}}\) \(\newcommand{\corr}{\text{corr}}\) \(\newcommand{\len}[1]{\left|#1\right|}\) \(\newcommand{\bbar}{\overline{\bvec}}\) \(\newcommand{\bhat}{\widehat{\bvec}}\) \(\newcommand{\bperp}{\bvec^\perp}\) \(\newcommand{\xhat}{\widehat{\xvec}}\) \(\newcommand{\vhat}{\widehat{\vvec}}\) \(\newcommand{\uhat}{\widehat{\uvec}}\) \(\newcommand{\what}{\widehat{\wvec}}\) \(\newcommand{\Sighat}{\widehat{\Sigma}}\) \(\newcommand{\lt}{<}\) \(\newcommand{\gt}{>}\) \(\newcommand{\amp}{&}\) \(\definecolor{fillinmathshade}{gray}{0.9}\)Transferring Solids
A solid can be dispensed from its reagent jar directly into a vessel or onto a weighing boat or creased piece of paper. If a solid is to be transferred into a vessel containing a narrow mouth (such as a round bottomed flask), a "powder funnel" or wide-mouth funnel can be used (Figure 1.15a). Alternatively, the solid can be nudged off a creased piece of paper in portions using a spatula (Figures 1.15 b+c).
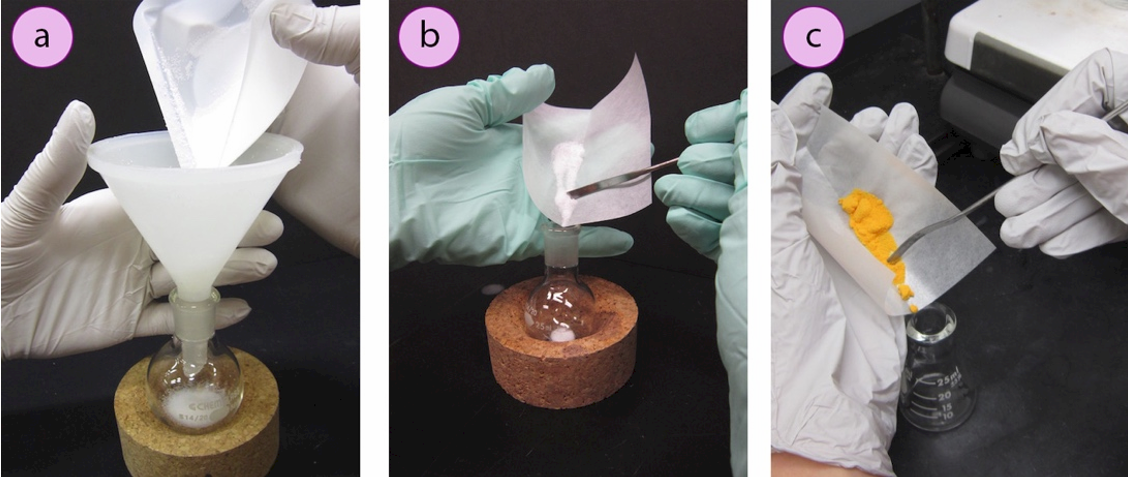
If the solid is the limiting reagent in a chemical reaction, it should ideally be dispensed from the reagent jar directly into the vessel (Figure 1.16a). However, if using a weighing boat, residue should be rinsed off with the solvent that will be used in the reaction (only if the boat is unreactive to the solvent) in order to transfer the reagent in its entirety.
Residue clinging to ground glass joints should also be dislodged with a KimWipe or rinsed into the flask with solvent to prevent joints from sticking, and to make sure the entire reagent makes it to the reaction vessel.
Certain solid compounds (e.g. \(\ce{KOH}\), \(\ce{K2CO3}\), \(\ce{CaCl2}\)) are sticky or hygroscopic (readily absorb water from the air), and these reagents should be dispensed onto glossy weighing paper (used in Figure 1.15b). This weighing paper has a wax coating so that sticky reagents more easily slide off its surface.
For transfer into vessels with very narrow mouths (e.g. NMR tubes), it is sometimes easier to dissolve solids in their eventual solvent and transfer a solution via pipette (Figures 1.16 b+c).
Pouring Liquids
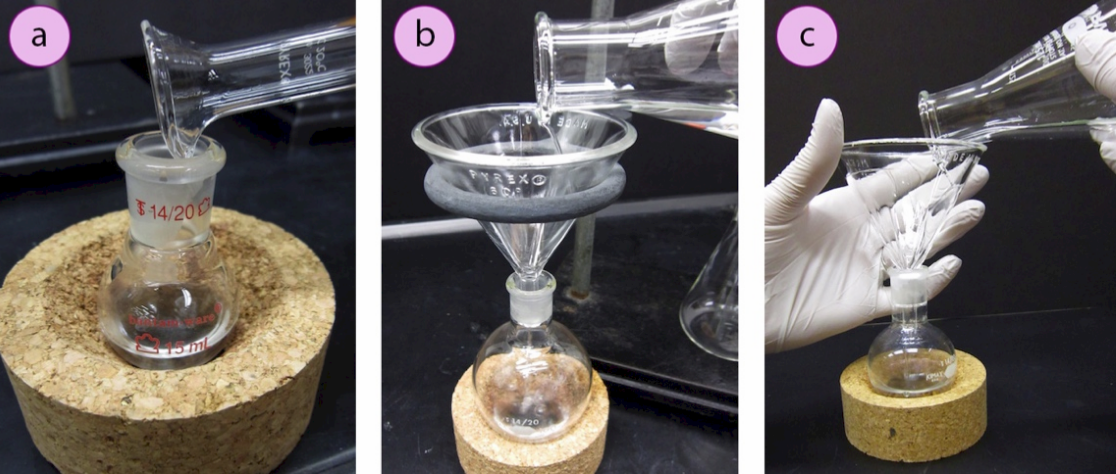
When transferring liquids with volumes greater than \(5 \: \text{mL}\), they can be poured directly into vessels. Graduated cylinders and beakers have an indentation in their mouth, so they can be poured controllably as long as the two pieces of glass touch one another (Figure 1.17a). If pouring from an Erlenmeyer flask, or transferring a liquid into a vessel containing a narrow mouth (e.g. a round bottom flask), a funnel should be used. Funnels can be securely held with a ring clamp (Figure 1.17b), or held with one hand while pouring with the other (Figure 1.17c).
Comments Regarding Measurements
In order to determine a meaningful yield for a chemical reaction, it is important to have precise measurements on the limiting reactant. It is less important to be precise when manipulating a reagent that is in excess, especially if the reagent is in several times excess. Here are a few things to remember when weighting/determine measurements.
1. Disposable weigh boats vary in weight. Thus, if you are weighing solid and forget to take the mass of the weigh boat initially you must start over with a new weigh boat. To determine an accurate mass of a solid, first weigh the weigh boat empty and then add the solid product.
2. When determining the mass of a vessel on a balance, it's best to not include the mass of a cork ring. A cork ring might get wet, have reagents spilled on it, or have pieces of cork fall out, leading to changes in mass that cannot be accounted for. Beakers used to support flasks can get mixed up, and every \(100\)-\(\text{mL}\) beaker does not have the same mass.
3. When measuring out liquids the ideal method is to use the density of the compound and determine the amount in mL (or L). Weighing liquids on a balance should only be accomplished with the chemical DOES NOT have a published density value. The balances are extremely expensive and having liquid spilled on them can destroy their electronic system.
4. Always read ahead in the procedure and determine if you will need a mass of a product. Many times the produce will be isolated during the experiment in small amounts that cannot be scraped out of the flask easily. Thus, it would be easier to know the mass of the glassware before and then gather a value afterward and use simple math to determine the change and therefore the mass of your product.
5. Not all glassware is considered accurate when trying to get precise volumes. Glassware that can provide accurate measurements are syringes, graduated cylinders, volumetric flask, and graduated pipettes. Beakers, Pasteur pipettes, Erlenmeyer/filter flasks shouldn't for exact/accurate volume measurements.
6. If you weigh out too much of a compound DO NOT place it back into the reagent/stock bottle. This can cause contamination. Dispose of the excess chemical properly in the waste.
Using Pasteur Pipettes
Pasteur pipettes (or pipets) are the most commonly used tool for transferring small volumes of liquids (< \(5 \: \text{mL}\)) from one container to another. They are considered disposable, although some institutions may clean and reuse them if they have a method for preventing the fragile tips from breaking.
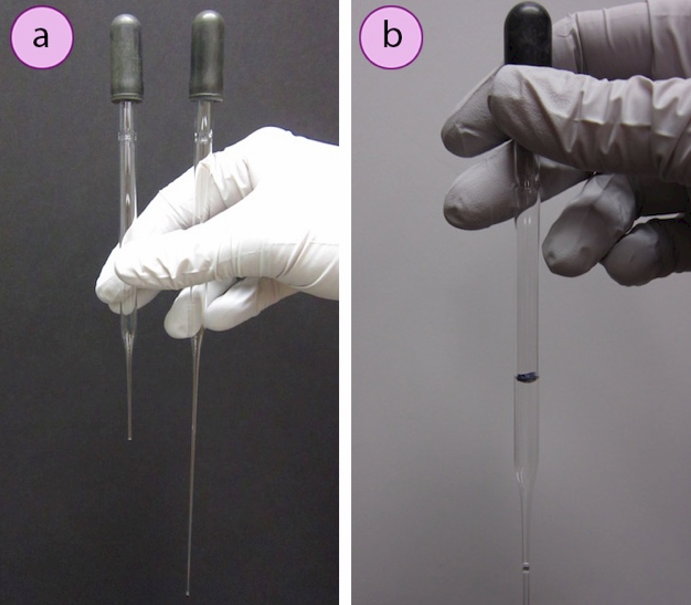
Pasteur pipettes come in two sizes (Figure 1.19a): short (5.75") and long (9"). Each can hold about \(1.5 \: \text{mL}\) of liquid, although the volume delivered is dependent on the size of the dropper bulb. The general guideline that "\(1 \: \text{mL}\) is equivalent to 20 drops" does not always hold for Pasteur pipettes, and may be inconsistent between different pipettes. NEVER USE A PIPETTE TO TRANSFER LIQUIDS ACROSS THE LAB!
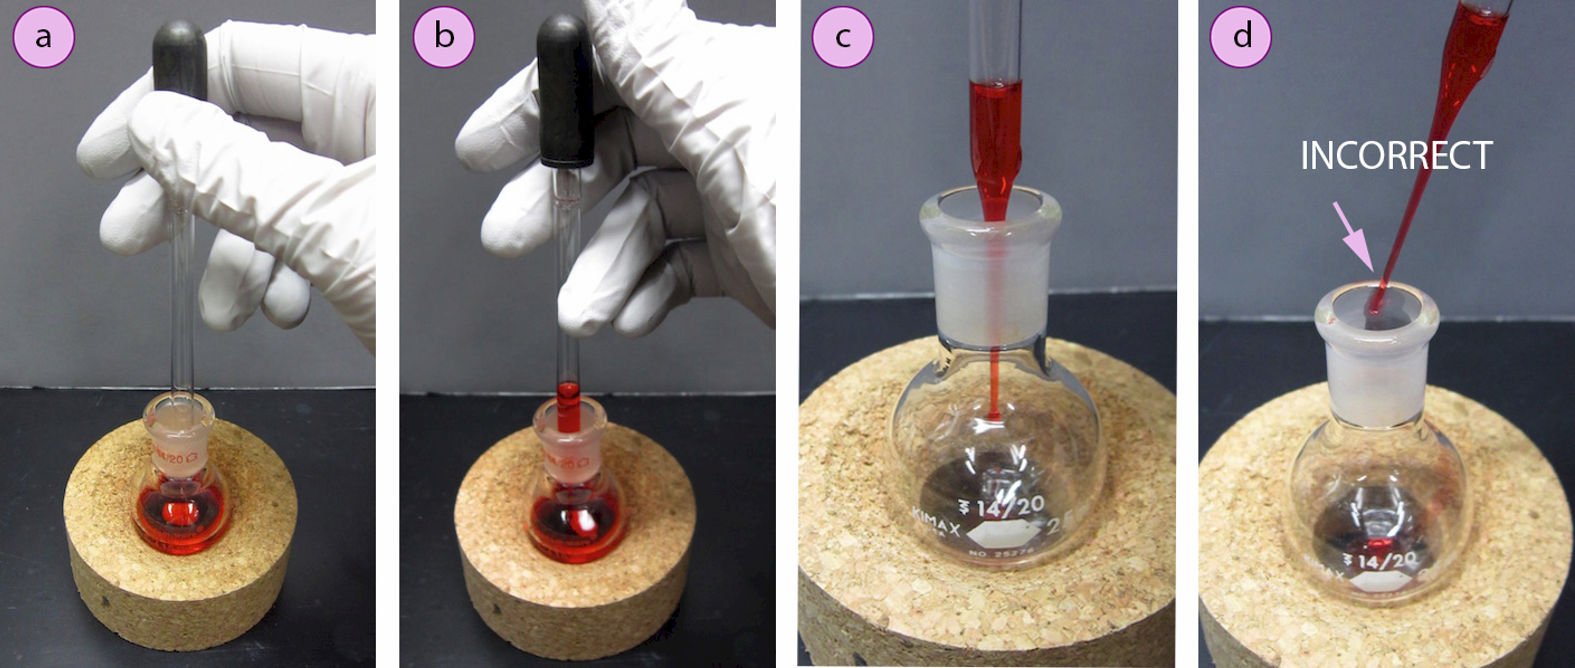
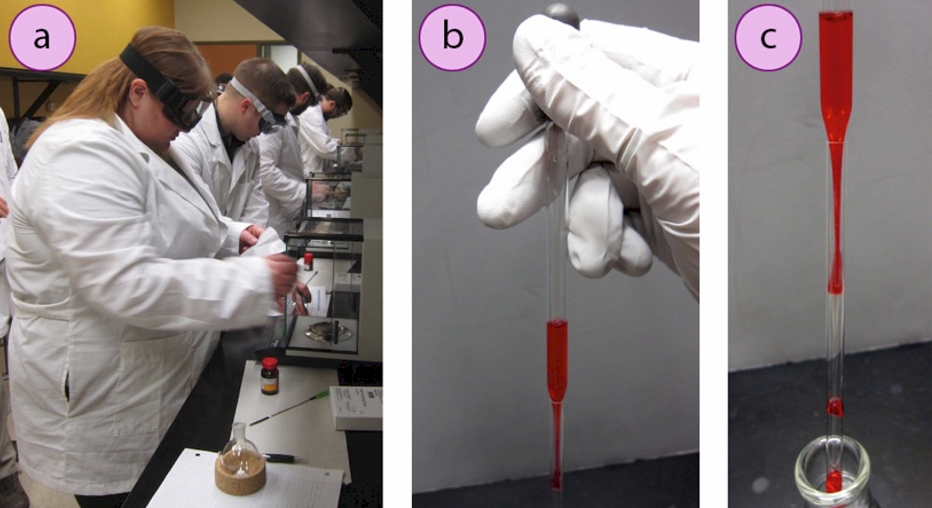
To use a pipette, attach a dropper bulb and place the pipette tip into a liquid. Squeeze then release the bulb to create suction, which will cause liquid to withdraw into the pipette (Figures 1.20 a+b). Keeping the pipette vertical, bring it to the flask where it is to be transferred, and position the pipette tip below the joint of the flask but not touching the sides before depressing the bulb to deliver the material to the flask (Figure 1.20c). The bulb can be squeezed a few times afterward to "blow out" residual liquid from the pipette.
If the receiving flask has a ground glass joint, the pipette tip should be below the joint while delivering so that liquid does not splash onto the joint, which sometimes causes pieces to freeze together when connected. If the pipette is to be reused (for example is the designated pipette for a reagent bottle), the pipette should be held so it does not touch the glassware, where it may become contaminated by other reagents in the flask (Figure 1.20d).
Dispensing Highly Volatile Liquids
When attempting to dispense highly volatile liquids (e.g. diethyl ether) via pipette, it is very common that liquid drips out of the pipette even without pressure from the dropper bulb! This occurs as the liquid evaporates into the pipette's headspace, and the additional vapor causes the headspace pressure to exceed the atmospheric pressure.
To prevent a pipette from dripping, withdraw and expunge the liquid into the pipette several times. Once the headspace is saturated with solvent vapors, the pipette will no longer drip.
Pouring Hot Liquids
It may be difficult to manipulate a vessel of hot liquid with your bare hands. If pouring a hot liquid from a beaker, a silicone hot hand protector can be used (Figure 1.26a) or beaker tongs (Figures 1.26b+c).
.png?revision=1&size=bestfit&width=1038&height=343)
When pouring a hot liquid from an Erlenmeyer flask, hot hand protectors can also be used, but do not hold the awkward shape of the flask very securely. Pouring from hot Erlenmeyer flasks can be accomplished using a makeshift "paper towel holder". A long section of paper towel is folded several times in one direction to the thickness of approximately one inch (and secured with lab tape if desired, Figure 1.27a). This folded paper towel can be wrapped around the top of a beaker or Erlenmeyer flask and pinched to hold the flask (Figures 1.26d + 1.27b).
When pouring hot liquid from an Erlenmeyer flask, the paper towel holder should be narrow enough that the towel does not reach the top of the flask. If it does, liquid will wick toward the paper as it is poured, thus weakening the holder and also removing possibly valuable solution (Figure 1.27c). When the paper towel is a distance away from the top of the flask, liquid can be poured from the flask without absorbing the liquid (Figure 1.27d).
.png?revision=1&size=bestfit&width=1100&height=272)