
11.3D: Step-by-Step Procedures for Steam Distillation
- Page ID
- 483300

\( \newcommand{\vecs}[1]{\overset { \scriptstyle \rightharpoonup} {\mathbf{#1}} } \)
\( \newcommand{\vecd}[1]{\overset{-\!-\!\rightharpoonup}{\vphantom{a}\smash {#1}}} \)
\( \newcommand{\id}{\mathrm{id}}\) \( \newcommand{\Span}{\mathrm{span}}\)
( \newcommand{\kernel}{\mathrm{null}\,}\) \( \newcommand{\range}{\mathrm{range}\,}\)
\( \newcommand{\RealPart}{\mathrm{Re}}\) \( \newcommand{\ImaginaryPart}{\mathrm{Im}}\)
\( \newcommand{\Argument}{\mathrm{Arg}}\) \( \newcommand{\norm}[1]{\| #1 \|}\)
\( \newcommand{\inner}[2]{\langle #1, #2 \rangle}\)
\( \newcommand{\Span}{\mathrm{span}}\)
\( \newcommand{\id}{\mathrm{id}}\)
\( \newcommand{\Span}{\mathrm{span}}\)
\( \newcommand{\kernel}{\mathrm{null}\,}\)
\( \newcommand{\range}{\mathrm{range}\,}\)
\( \newcommand{\RealPart}{\mathrm{Re}}\)
\( \newcommand{\ImaginaryPart}{\mathrm{Im}}\)
\( \newcommand{\Argument}{\mathrm{Arg}}\)
\( \newcommand{\norm}[1]{\| #1 \|}\)
\( \newcommand{\inner}[2]{\langle #1, #2 \rangle}\)
\( \newcommand{\Span}{\mathrm{span}}\) \( \newcommand{\AA}{\unicode[.8,0]{x212B}}\)
\( \newcommand{\vectorA}[1]{\vec{#1}} % arrow\)
\( \newcommand{\vectorAt}[1]{\vec{\text{#1}}} % arrow\)
\( \newcommand{\vectorB}[1]{\overset { \scriptstyle \rightharpoonup} {\mathbf{#1}} } \)
\( \newcommand{\vectorC}[1]{\textbf{#1}} \)
\( \newcommand{\vectorD}[1]{\overrightarrow{#1}} \)
\( \newcommand{\vectorDt}[1]{\overrightarrow{\text{#1}}} \)
\( \newcommand{\vectE}[1]{\overset{-\!-\!\rightharpoonup}{\vphantom{a}\smash{\mathbf {#1}}}} \)
\( \newcommand{\vecs}[1]{\overset { \scriptstyle \rightharpoonup} {\mathbf{#1}} } \)
\( \newcommand{\vecd}[1]{\overset{-\!-\!\rightharpoonup}{\vphantom{a}\smash {#1}}} \)
\(\newcommand{\avec}{\mathbf a}\) \(\newcommand{\bvec}{\mathbf b}\) \(\newcommand{\cvec}{\mathbf c}\) \(\newcommand{\dvec}{\mathbf d}\) \(\newcommand{\dtil}{\widetilde{\mathbf d}}\) \(\newcommand{\evec}{\mathbf e}\) \(\newcommand{\fvec}{\mathbf f}\) \(\newcommand{\nvec}{\mathbf n}\) \(\newcommand{\pvec}{\mathbf p}\) \(\newcommand{\qvec}{\mathbf q}\) \(\newcommand{\svec}{\mathbf s}\) \(\newcommand{\tvec}{\mathbf t}\) \(\newcommand{\uvec}{\mathbf u}\) \(\newcommand{\vvec}{\mathbf v}\) \(\newcommand{\wvec}{\mathbf w}\) \(\newcommand{\xvec}{\mathbf x}\) \(\newcommand{\yvec}{\mathbf y}\) \(\newcommand{\zvec}{\mathbf z}\) \(\newcommand{\rvec}{\mathbf r}\) \(\newcommand{\mvec}{\mathbf m}\) \(\newcommand{\zerovec}{\mathbf 0}\) \(\newcommand{\onevec}{\mathbf 1}\) \(\newcommand{\real}{\mathbb R}\) \(\newcommand{\twovec}[2]{\left[\begin{array}{r}#1 \\ #2 \end{array}\right]}\) \(\newcommand{\ctwovec}[2]{\left[\begin{array}{c}#1 \\ #2 \end{array}\right]}\) \(\newcommand{\threevec}[3]{\left[\begin{array}{r}#1 \\ #2 \\ #3 \end{array}\right]}\) \(\newcommand{\cthreevec}[3]{\left[\begin{array}{c}#1 \\ #2 \\ #3 \end{array}\right]}\) \(\newcommand{\fourvec}[4]{\left[\begin{array}{r}#1 \\ #2 \\ #3 \\ #4 \end{array}\right]}\) \(\newcommand{\cfourvec}[4]{\left[\begin{array}{c}#1 \\ #2 \\ #3 \\ #4 \end{array}\right]}\) \(\newcommand{\fivevec}[5]{\left[\begin{array}{r}#1 \\ #2 \\ #3 \\ #4 \\ #5 \\ \end{array}\right]}\) \(\newcommand{\cfivevec}[5]{\left[\begin{array}{c}#1 \\ #2 \\ #3 \\ #4 \\ #5 \\ \end{array}\right]}\) \(\newcommand{\mattwo}[4]{\left[\begin{array}{rr}#1 \amp #2 \\ #3 \amp #4 \\ \end{array}\right]}\) \(\newcommand{\laspan}[1]{\text{Span}\{#1\}}\) \(\newcommand{\bcal}{\cal B}\) \(\newcommand{\ccal}{\cal C}\) \(\newcommand{\scal}{\cal S}\) \(\newcommand{\wcal}{\cal W}\) \(\newcommand{\ecal}{\cal E}\) \(\newcommand{\coords}[2]{\left\{#1\right\}_{#2}}\) \(\newcommand{\gray}[1]{\color{gray}{#1}}\) \(\newcommand{\lgray}[1]{\color{lightgray}{#1}}\) \(\newcommand{\rank}{\operatorname{rank}}\) \(\newcommand{\row}{\text{Row}}\) \(\newcommand{\col}{\text{Col}}\) \(\renewcommand{\row}{\text{Row}}\) \(\newcommand{\nul}{\text{Nul}}\) \(\newcommand{\var}{\text{Var}}\) \(\newcommand{\corr}{\text{corr}}\) \(\newcommand{\len}[1]{\left|#1\right|}\) \(\newcommand{\bbar}{\overline{\bvec}}\) \(\newcommand{\bhat}{\widehat{\bvec}}\) \(\newcommand{\bperp}{\bvec^\perp}\) \(\newcommand{\xhat}{\widehat{\xvec}}\) \(\newcommand{\vhat}{\widehat{\vvec}}\) \(\newcommand{\uhat}{\widehat{\uvec}}\) \(\newcommand{\what}{\widehat{\wvec}}\) \(\newcommand{\Sighat}{\widehat{\Sigma}}\) \(\newcommand{\lt}{<}\) \(\newcommand{\gt}{>}\) \(\newcommand{\amp}{&}\) \(\definecolor{fillinmathshade}{gray}{0.9}\)Steam Distillation Procedure
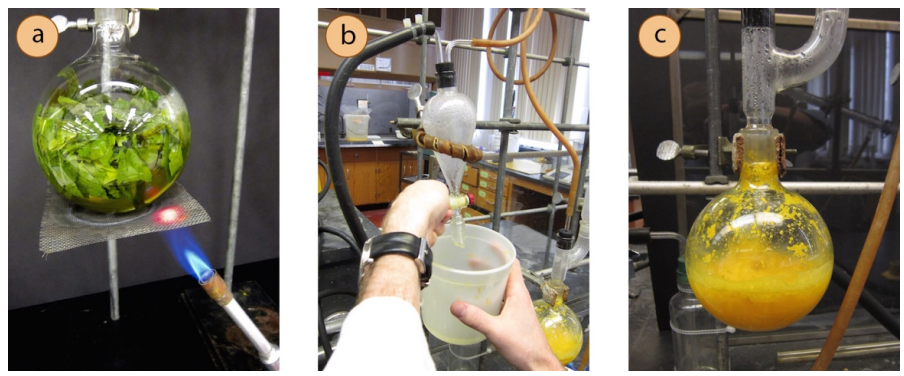
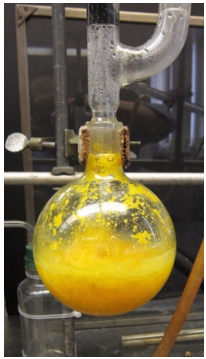
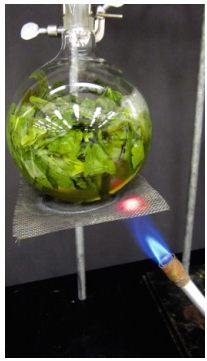
A steam distillation apparatus is shown in Figure 5.58.

Figure 5.58: Steam distillation of orange peel using water in the distilling flask and a Bunsen burner.
Prepare the Setup & Start Distilling
- Place the natural product to be extracted into a round bottom flask, no more than half full. A large amount of material is often necessary as the bulk of the material is not oil.
- Use an extension clamp to secure the large flask to the ring stand or latticework.
- Add solvent to the distilling flask.
- Add the remaining distillation apparatus (Hickman head, refluxing condenser) making sure to grease all ground joints before connecting them. DO NOT PLACE A SEPTUM ON TOP OR YOU WILL MAKE A BOMB.
- Place the distillation apparatus into a heating mantle and plug the heating mantle into a variac controller.
- Begin heating and distilling the material.
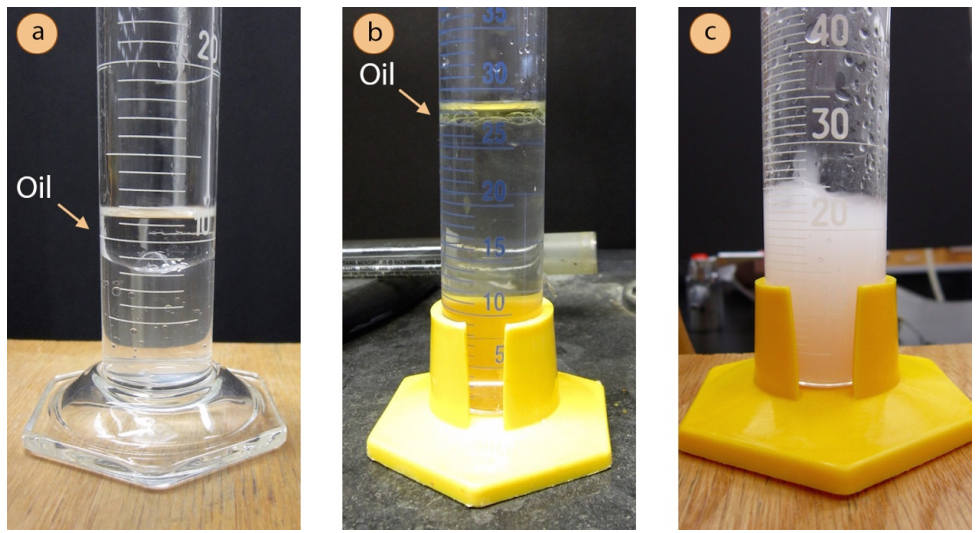
- The distillate will contain both water and oil, and may look one of two ways.
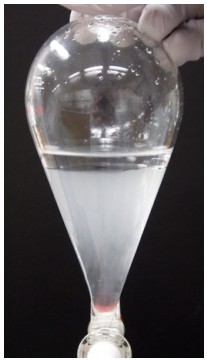
- A second layer may form, or the distillate may appear to have oily droplets clinging to the sides of the flask. This happens when the oil is very nonpolar (e.g. Figure 5.62a+b show the distillate of orange oil, which is almost entirely composed of hydrocarbons).
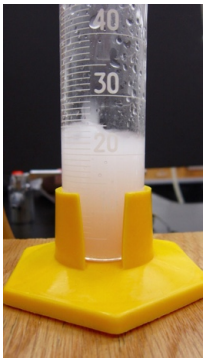
- The distillate may also appear cloudy or "milky" (Figure 5.62c shows the cloudy distillate of clove oil). A cloudy mixture forms when tiny insoluble particles are dispersed throughout the suspension. This tends to happen when the oil is water-insoluble but contains some polar functional groups (e.g. large compounds with a few alcohol or ether functional groups).
- The distillate will contain both water and oil, and may look one of two ways.
Stop the Distillation
- If following a procedure, collect the recommended quantity of distillate. If the distillate is milky, the distillation can be ceased when the distillate clarifies, indicating that only water is condensing.
Isolate the Oil
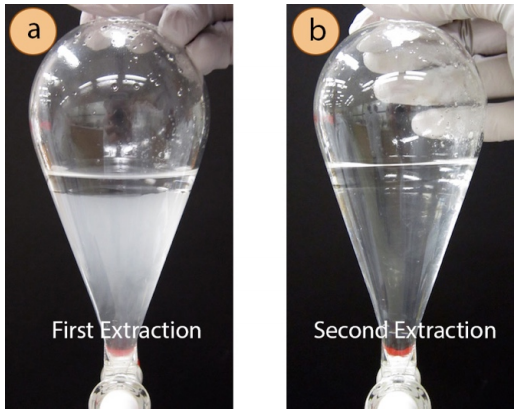
- If the oil separates from the distillate as in Figure 5.62a, it can be removed via pipette, dried with a drying agent (such as \(\ce{Na_2SO_4}\)) and analyzed directly. If milky as in Figure 5.62c, the oil must be extracted into an organic solvent, dried with a drying agent (such as \(\ce{MgSO_4}\)), and solvent removed with the rotary evaporator. Three extractions are typically necessary to fully extract the oil from a milky distillate into an organic solvent. In the extraction of the milky clove oil distillate from Figure 5.62c, notice how the aqueous layer (bottom) remains milky after the first extraction (Figure 5.63a). This milky appearance shows that the oil was not fully removed with one extraction. The aqueous layer clarifies with the second extraction (Figure 5.63b) demonstrating the importance of multiple extractions.
Steam Distillation Summary
 |
 |
 |
 |
|
Place large amount of material in a large round bottome flask (no more than half full), and just cover with water.
|
Heat the round bottom flask with the heating mantle. |
Collect the distillate. The distillate may appear cloudy, or a second layer may form on the top. If milky, the distillation can be ceased when the distillate is clear. |
If a steam line was used, be sure to drain the liquid from the steam trap before turning off the steam, to prevent back suction. Separated oil can be pipetted (then dried with \(\ce{Na_2SO_4}\)), while milky distillates need to be extracted. |