
11.3: The Octet Rule
- Page ID
- 476578

\( \newcommand{\vecs}[1]{\overset { \scriptstyle \rightharpoonup} {\mathbf{#1}} } \)
\( \newcommand{\vecd}[1]{\overset{-\!-\!\rightharpoonup}{\vphantom{a}\smash {#1}}} \)
\( \newcommand{\id}{\mathrm{id}}\) \( \newcommand{\Span}{\mathrm{span}}\)
( \newcommand{\kernel}{\mathrm{null}\,}\) \( \newcommand{\range}{\mathrm{range}\,}\)
\( \newcommand{\RealPart}{\mathrm{Re}}\) \( \newcommand{\ImaginaryPart}{\mathrm{Im}}\)
\( \newcommand{\Argument}{\mathrm{Arg}}\) \( \newcommand{\norm}[1]{\| #1 \|}\)
\( \newcommand{\inner}[2]{\langle #1, #2 \rangle}\)
\( \newcommand{\Span}{\mathrm{span}}\)
\( \newcommand{\id}{\mathrm{id}}\)
\( \newcommand{\Span}{\mathrm{span}}\)
\( \newcommand{\kernel}{\mathrm{null}\,}\)
\( \newcommand{\range}{\mathrm{range}\,}\)
\( \newcommand{\RealPart}{\mathrm{Re}}\)
\( \newcommand{\ImaginaryPart}{\mathrm{Im}}\)
\( \newcommand{\Argument}{\mathrm{Arg}}\)
\( \newcommand{\norm}[1]{\| #1 \|}\)
\( \newcommand{\inner}[2]{\langle #1, #2 \rangle}\)
\( \newcommand{\Span}{\mathrm{span}}\) \( \newcommand{\AA}{\unicode[.8,0]{x212B}}\)
\( \newcommand{\vectorA}[1]{\vec{#1}} % arrow\)
\( \newcommand{\vectorAt}[1]{\vec{\text{#1}}} % arrow\)
\( \newcommand{\vectorB}[1]{\overset { \scriptstyle \rightharpoonup} {\mathbf{#1}} } \)
\( \newcommand{\vectorC}[1]{\textbf{#1}} \)
\( \newcommand{\vectorD}[1]{\overrightarrow{#1}} \)
\( \newcommand{\vectorDt}[1]{\overrightarrow{\text{#1}}} \)
\( \newcommand{\vectE}[1]{\overset{-\!-\!\rightharpoonup}{\vphantom{a}\smash{\mathbf {#1}}}} \)
\( \newcommand{\vecs}[1]{\overset { \scriptstyle \rightharpoonup} {\mathbf{#1}} } \)
\( \newcommand{\vecd}[1]{\overset{-\!-\!\rightharpoonup}{\vphantom{a}\smash {#1}}} \)
\(\newcommand{\avec}{\mathbf a}\) \(\newcommand{\bvec}{\mathbf b}\) \(\newcommand{\cvec}{\mathbf c}\) \(\newcommand{\dvec}{\mathbf d}\) \(\newcommand{\dtil}{\widetilde{\mathbf d}}\) \(\newcommand{\evec}{\mathbf e}\) \(\newcommand{\fvec}{\mathbf f}\) \(\newcommand{\nvec}{\mathbf n}\) \(\newcommand{\pvec}{\mathbf p}\) \(\newcommand{\qvec}{\mathbf q}\) \(\newcommand{\svec}{\mathbf s}\) \(\newcommand{\tvec}{\mathbf t}\) \(\newcommand{\uvec}{\mathbf u}\) \(\newcommand{\vvec}{\mathbf v}\) \(\newcommand{\wvec}{\mathbf w}\) \(\newcommand{\xvec}{\mathbf x}\) \(\newcommand{\yvec}{\mathbf y}\) \(\newcommand{\zvec}{\mathbf z}\) \(\newcommand{\rvec}{\mathbf r}\) \(\newcommand{\mvec}{\mathbf m}\) \(\newcommand{\zerovec}{\mathbf 0}\) \(\newcommand{\onevec}{\mathbf 1}\) \(\newcommand{\real}{\mathbb R}\) \(\newcommand{\twovec}[2]{\left[\begin{array}{r}#1 \\ #2 \end{array}\right]}\) \(\newcommand{\ctwovec}[2]{\left[\begin{array}{c}#1 \\ #2 \end{array}\right]}\) \(\newcommand{\threevec}[3]{\left[\begin{array}{r}#1 \\ #2 \\ #3 \end{array}\right]}\) \(\newcommand{\cthreevec}[3]{\left[\begin{array}{c}#1 \\ #2 \\ #3 \end{array}\right]}\) \(\newcommand{\fourvec}[4]{\left[\begin{array}{r}#1 \\ #2 \\ #3 \\ #4 \end{array}\right]}\) \(\newcommand{\cfourvec}[4]{\left[\begin{array}{c}#1 \\ #2 \\ #3 \\ #4 \end{array}\right]}\) \(\newcommand{\fivevec}[5]{\left[\begin{array}{r}#1 \\ #2 \\ #3 \\ #4 \\ #5 \\ \end{array}\right]}\) \(\newcommand{\cfivevec}[5]{\left[\begin{array}{c}#1 \\ #2 \\ #3 \\ #4 \\ #5 \\ \end{array}\right]}\) \(\newcommand{\mattwo}[4]{\left[\begin{array}{rr}#1 \amp #2 \\ #3 \amp #4 \\ \end{array}\right]}\) \(\newcommand{\laspan}[1]{\text{Span}\{#1\}}\) \(\newcommand{\bcal}{\cal B}\) \(\newcommand{\ccal}{\cal C}\) \(\newcommand{\scal}{\cal S}\) \(\newcommand{\wcal}{\cal W}\) \(\newcommand{\ecal}{\cal E}\) \(\newcommand{\coords}[2]{\left\{#1\right\}_{#2}}\) \(\newcommand{\gray}[1]{\color{gray}{#1}}\) \(\newcommand{\lgray}[1]{\color{lightgray}{#1}}\) \(\newcommand{\rank}{\operatorname{rank}}\) \(\newcommand{\row}{\text{Row}}\) \(\newcommand{\col}{\text{Col}}\) \(\renewcommand{\row}{\text{Row}}\) \(\newcommand{\nul}{\text{Nul}}\) \(\newcommand{\var}{\text{Var}}\) \(\newcommand{\corr}{\text{corr}}\) \(\newcommand{\len}[1]{\left|#1\right|}\) \(\newcommand{\bbar}{\overline{\bvec}}\) \(\newcommand{\bhat}{\widehat{\bvec}}\) \(\newcommand{\bperp}{\bvec^\perp}\) \(\newcommand{\xhat}{\widehat{\xvec}}\) \(\newcommand{\vhat}{\widehat{\vvec}}\) \(\newcommand{\uhat}{\widehat{\uvec}}\) \(\newcommand{\what}{\widehat{\wvec}}\) \(\newcommand{\Sighat}{\widehat{\Sigma}}\) \(\newcommand{\lt}{<}\) \(\newcommand{\gt}{>}\) \(\newcommand{\amp}{&}\) \(\definecolor{fillinmathshade}{gray}{0.9}\)- Draw an electron configuration for any of the representative elements.
- Explain how the Octet Rule predicts trends in chemical bonding.
How are electrons organized in atoms?
Graduations are exciting events in one's life. The processional, the ceremonies, even the speeches can be handled because this marks the end of a stage of life and the beginning of another one. The ceremony itself is challenging for those organizing it. There are just enough seats on the stage for the graduates. How do you avoid getting too many people in a row and not enough in the next row? Someone is stationed at the end of the row to count the students as they enter. Only so many are allowed to go into a row, and then you begin to fill the next row. Electrons in atoms behave the same way. There are rules that determine where electrons go in compounds.
Electron Dot Diagrams
Recall that the valence electrons of an atom are the electrons located in the highest occupied principal energy level. Valence electrons are primarily responsible for the chemical properties of elements. The number of valence electrons can be easily determined from the group of the periodic table that an element is located in. Several examples from the second period elements are shown in the table below. In each case, valence electrons are those in the second principal energy level. As one proceeds left to right across a period, the number of valence electrons increases by one.
Table \(\PageIndex{1}\):
| Element | Group Number | Number of Valence Electrons |
|---|---|---|
| lithium | 1 | 1 |
| beryllium | 2 | 2 |
| nitrogen | 5 | 5 |
| neon | 8 | 8 |
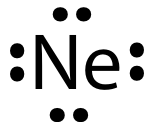
When examining chemical bonding, it is necessary to keep track of the valence electrons of each atom. Electron dot diagrams are diagrams in which the valence electrons of an atom are shown as dots distributed around the element's symbol. A beryllium atom, with two valence electrons, has the electron dot diagram below:
Since electrons repel each other, the dots for a given atom are distributed evenly around the symbol before they are paired. The table below shows the electron dot diagrams for the entire second period.
Table \(\PageIndex{2}\): Electron Dot Diagrams for the Second Period Elements
| Group Number | Electron Dot Diagram |
|---|---|
| 1 |
|
| 2 |
|
| 13 |
|
| 14 |
|
| 15 |
|
| 16 |
|
| 17 |
|
| 18 |
|
Electron dot diagrams would be the same for each element in the same groups as those listed here. The Octet Rule only applies to these representative elements, and we will not be using it for transition metals. It is important to understand these dot diagrams for the representative elements before we are able to understand chemical bonding. The following video provides an additional resource to practice this concept.
Octet Rule
The noble gases are unreactive because of their electron configurations. The noble gas neon has a full outer shell and cannot incorporate any more electrons into the valence shell. The other noble gases have the same outer shell electron configuration, even though they have different numbers of inner-shell electrons.
American chemist Gilbert Lewis (1875-1946) used this observation to explain the types of ions and molecules that are formed by other elements. He called his explanation the octet rule. The octet rule states that atoms tend to form compounds in ways that give them eight valence electrons, and thus the electron configuration of a noble gas. An exception to an octet of electrons is in the case of the first noble gas, helium, which only has two valence electrons. This primarily affects the element hydrogen, which forms stable compounds by achieving two valence electrons. Lithium, an alkali metal with three valence electrons, is also an exception to the octet rule. Lithium tends to lose one electron to take on the electron configuration of the nearest noble gas, helium, leaving it with two valence electrons.
Atoms tend to form compounds in ways that give them eight valence electrons, and thus the electron configuration of a noble gas.
There are two ways in which atoms can satisfy the octet rule. One way is by sharing their valence electrons with other atoms. The second way is by transferring valence electrons from one atom to another. Atoms of metals tend to lose all of their valence electrons, which leaves them with an octet from the next lowest principal energy level. Atoms of nonmetals tend to gain electrons in order to fill their outermost principal energy level with an octet. We will explore these bonding concepts as we continue to move through the chapter.
Summary
- Electron dot diagrams show the valence electrons for an atom.
- The dot diagrams are the same for each element in the representative element groups.
- Atoms form compounds in ways that give them eight valence electrons.
- Metals tend to lose electrons to achieve this configuration.
- Nonmetals tend to gain electrons to achieve this configuration.
Glossary
- electron dot diagrams
- diagrams in which the valence electrons of an atom are shown as dots distributed around the element's symbol.
- octet rule
- Atoms tend to form compounds in ways that give them eight valence electrons, and thus the electron configuration of a noble gas.