
11.4: Covalent Bonds
- Page ID
- 289426
\( \newcommand{\vecs}[1]{\overset { \scriptstyle \rightharpoonup} {\mathbf{#1}} } \)
\( \newcommand{\vecd}[1]{\overset{-\!-\!\rightharpoonup}{\vphantom{a}\smash {#1}}} \)
\( \newcommand{\dsum}{\displaystyle\sum\limits} \)
\( \newcommand{\dint}{\displaystyle\int\limits} \)
\( \newcommand{\dlim}{\displaystyle\lim\limits} \)
\( \newcommand{\id}{\mathrm{id}}\) \( \newcommand{\Span}{\mathrm{span}}\)
( \newcommand{\kernel}{\mathrm{null}\,}\) \( \newcommand{\range}{\mathrm{range}\,}\)
\( \newcommand{\RealPart}{\mathrm{Re}}\) \( \newcommand{\ImaginaryPart}{\mathrm{Im}}\)
\( \newcommand{\Argument}{\mathrm{Arg}}\) \( \newcommand{\norm}[1]{\| #1 \|}\)
\( \newcommand{\inner}[2]{\langle #1, #2 \rangle}\)
\( \newcommand{\Span}{\mathrm{span}}\)
\( \newcommand{\id}{\mathrm{id}}\)
\( \newcommand{\Span}{\mathrm{span}}\)
\( \newcommand{\kernel}{\mathrm{null}\,}\)
\( \newcommand{\range}{\mathrm{range}\,}\)
\( \newcommand{\RealPart}{\mathrm{Re}}\)
\( \newcommand{\ImaginaryPart}{\mathrm{Im}}\)
\( \newcommand{\Argument}{\mathrm{Arg}}\)
\( \newcommand{\norm}[1]{\| #1 \|}\)
\( \newcommand{\inner}[2]{\langle #1, #2 \rangle}\)
\( \newcommand{\Span}{\mathrm{span}}\) \( \newcommand{\AA}{\unicode[.8,0]{x212B}}\)
\( \newcommand{\vectorA}[1]{\vec{#1}} % arrow\)
\( \newcommand{\vectorAt}[1]{\vec{\text{#1}}} % arrow\)
\( \newcommand{\vectorB}[1]{\overset { \scriptstyle \rightharpoonup} {\mathbf{#1}} } \)
\( \newcommand{\vectorC}[1]{\textbf{#1}} \)
\( \newcommand{\vectorD}[1]{\overrightarrow{#1}} \)
\( \newcommand{\vectorDt}[1]{\overrightarrow{\text{#1}}} \)
\( \newcommand{\vectE}[1]{\overset{-\!-\!\rightharpoonup}{\vphantom{a}\smash{\mathbf {#1}}}} \)
\( \newcommand{\vecs}[1]{\overset { \scriptstyle \rightharpoonup} {\mathbf{#1}} } \)
\(\newcommand{\longvect}{\overrightarrow}\)
\( \newcommand{\vecd}[1]{\overset{-\!-\!\rightharpoonup}{\vphantom{a}\smash {#1}}} \)
\(\newcommand{\avec}{\mathbf a}\) \(\newcommand{\bvec}{\mathbf b}\) \(\newcommand{\cvec}{\mathbf c}\) \(\newcommand{\dvec}{\mathbf d}\) \(\newcommand{\dtil}{\widetilde{\mathbf d}}\) \(\newcommand{\evec}{\mathbf e}\) \(\newcommand{\fvec}{\mathbf f}\) \(\newcommand{\nvec}{\mathbf n}\) \(\newcommand{\pvec}{\mathbf p}\) \(\newcommand{\qvec}{\mathbf q}\) \(\newcommand{\svec}{\mathbf s}\) \(\newcommand{\tvec}{\mathbf t}\) \(\newcommand{\uvec}{\mathbf u}\) \(\newcommand{\vvec}{\mathbf v}\) \(\newcommand{\wvec}{\mathbf w}\) \(\newcommand{\xvec}{\mathbf x}\) \(\newcommand{\yvec}{\mathbf y}\) \(\newcommand{\zvec}{\mathbf z}\) \(\newcommand{\rvec}{\mathbf r}\) \(\newcommand{\mvec}{\mathbf m}\) \(\newcommand{\zerovec}{\mathbf 0}\) \(\newcommand{\onevec}{\mathbf 1}\) \(\newcommand{\real}{\mathbb R}\) \(\newcommand{\twovec}[2]{\left[\begin{array}{r}#1 \\ #2 \end{array}\right]}\) \(\newcommand{\ctwovec}[2]{\left[\begin{array}{c}#1 \\ #2 \end{array}\right]}\) \(\newcommand{\threevec}[3]{\left[\begin{array}{r}#1 \\ #2 \\ #3 \end{array}\right]}\) \(\newcommand{\cthreevec}[3]{\left[\begin{array}{c}#1 \\ #2 \\ #3 \end{array}\right]}\) \(\newcommand{\fourvec}[4]{\left[\begin{array}{r}#1 \\ #2 \\ #3 \\ #4 \end{array}\right]}\) \(\newcommand{\cfourvec}[4]{\left[\begin{array}{c}#1 \\ #2 \\ #3 \\ #4 \end{array}\right]}\) \(\newcommand{\fivevec}[5]{\left[\begin{array}{r}#1 \\ #2 \\ #3 \\ #4 \\ #5 \\ \end{array}\right]}\) \(\newcommand{\cfivevec}[5]{\left[\begin{array}{c}#1 \\ #2 \\ #3 \\ #4 \\ #5 \\ \end{array}\right]}\) \(\newcommand{\mattwo}[4]{\left[\begin{array}{rr}#1 \amp #2 \\ #3 \amp #4 \\ \end{array}\right]}\) \(\newcommand{\laspan}[1]{\text{Span}\{#1\}}\) \(\newcommand{\bcal}{\cal B}\) \(\newcommand{\ccal}{\cal C}\) \(\newcommand{\scal}{\cal S}\) \(\newcommand{\wcal}{\cal W}\) \(\newcommand{\ecal}{\cal E}\) \(\newcommand{\coords}[2]{\left\{#1\right\}_{#2}}\) \(\newcommand{\gray}[1]{\color{gray}{#1}}\) \(\newcommand{\lgray}[1]{\color{lightgray}{#1}}\) \(\newcommand{\rank}{\operatorname{rank}}\) \(\newcommand{\row}{\text{Row}}\) \(\newcommand{\col}{\text{Col}}\) \(\renewcommand{\row}{\text{Row}}\) \(\newcommand{\nul}{\text{Nul}}\) \(\newcommand{\var}{\text{Var}}\) \(\newcommand{\corr}{\text{corr}}\) \(\newcommand{\len}[1]{\left|#1\right|}\) \(\newcommand{\bbar}{\overline{\bvec}}\) \(\newcommand{\bhat}{\widehat{\bvec}}\) \(\newcommand{\bperp}{\bvec^\perp}\) \(\newcommand{\xhat}{\widehat{\xvec}}\) \(\newcommand{\vhat}{\widehat{\vvec}}\) \(\newcommand{\uhat}{\widehat{\uvec}}\) \(\newcommand{\what}{\widehat{\wvec}}\) \(\newcommand{\Sighat}{\widehat{\Sigma}}\) \(\newcommand{\lt}{<}\) \(\newcommand{\gt}{>}\) \(\newcommand{\amp}{&}\) \(\definecolor{fillinmathshade}{gray}{0.9}\)⚙️ Learning Objectives
- Define covalent bond.
- Illustrate covalent bond formation using Lewis diagrams.
Consider a compound that forms between the elements iodine and bromine, iodine monobromide, IBr. Iodine and bromine both have 7 valence electrons and need one more electron to complete their valence shell:
\(\overset{⬝\,⬝}{\underset{⬝\,⬝}{:\mathrm{I}\,⋅}}\) \(\overset{⬝\,⬝}{\underset{⬝\,⬝}{⋅\,\mathrm{Br}:}}\)
If either iodine or bromine were to given up valence electrons to form a cation, they would have to give up all seven valence electrons to reveal the next energy level below as the new valence shell. Giving up seven valence electrons is energetically impossible, as it would imply the formation of an ion with a 7+ charge. Since opposite charges attract, the removal of each successive electron becomes increasingly difficult due to the increasing attraction between the nucleus and electrons in the electron cloud. It is much easier for each atom to gain one electron than it is to lose seven.
As the case illustrates above, it isn't easy for an atom to lose a whole bunch of electrons. Likewise, it isn't easy for an atom to gain a whole bunch of electrons. When working with an element like magnesium, we noticed that magnesium lost its two valence electrons to form magnesium ions, Mg2+, rather than gaining six electrons to fill the valence shell to form ions with a 6– charge. Since like charges repel, the addition of each successive electron becomes increasingly difficult due to the increasing repulsions between electrons in the electron cloud. It is much easier for each atom to lose two electrons than it is to gain six.
If this is the case, how is a compound such as iodine monobromide, IBr, possible? A second type of chemical bond, called a covalent bond, involves the sharing of electrons to complete a valence shell rather than transferring electrons. A covalent bond typically forms between nonmetals and/or metalloids, since they have a valence shell that usually contains four or more valence electrons.
⚓️ Covalent Bond
A chemical bond that forms between nonmetals and/or metalloids that is the result of sharing their valence electrons.
Let's illustrate how a covalent bond forms between iodine and bromine, with the understanding that each atom only needs one more electron to complete an octet in the valence shell. The iodine and bromine atoms each share one electron with the other.
Through sharing, the iodine atom now has access to eight valence electrons, as does the bromine atom. The portion where the circles overlap represent a shared pair of electrons, otherwise known as a covalent bond. Electrons that are not a part of a covalent bond are called lone pairs.

When two atoms share a single pair of electrons, the bond is called a single covalent bond, or simply, a single bond. When writing out a Lewis structure, a dash is used to represent a shared pair of electrons in place of two dots. Therefore, the Lewis structure for iodine monobromide, IBr, is shown in Figure \(\PageIndex{1}\):
| \(\overset{⬝\,⬝}{\underset{⬝\,⬝}{:\mathrm{I}\,\;}}—\overset{⬝\,⬝}{\underset{⬝\,⬝}{\;\,\mathrm{Br}:}}\) | or |  |
Something might stand out when looking at the Lewis structure of IBr above – all of the electrons are paired up, whether they are bonding pairs (called covalent bonds) or nonbonding pairs (called lone pairs). In fact, this is usual standard for valence electrons in molecules – they are always paired, with a few exceptions that are not covered in this text. As we will learn in Section 11.7, the presence of lone pairs on the central atom(s) of a molecule contributes to its three-dimensional shape.
Let's look next at the structure of a water molecule. The chemical formula for water is H2O. Each hydrogen atom has 1 valence electron. Because the first energy level holds a maximum of two valence electrons, it only needs one more electron to complete its valence shell. This sometimes called the duet rule. An oxygen atom has 6 valence electrons and needs two additional electrons to complete its valence shell:
\({\color[rgb]{0.8, 0.0, 0.0}\begin{array}{c}\mathrm H\,⋅\\\mathrm H\,⋅\end{array}}\;\;\;\;{\color[rgb]{0.0, 0.0, 1.0}\overset{⬝\,⬝}{\underset⬝{⋅\,\mathrm O:}}}\)
Let's illustrate how covalent bonds form between hydrogen and oxygen:
Notice that the oxygen atom makes two single bonds, one to each of the two hydrogen atoms. This makes sense, since the oxygen atom needed two electrons to complete its valence shell. The Lewis structure for water is

There is nothing special about the orientation of the water molecule shown above. In fact, any of the orientations shown in Figure \(\PageIndex{2}\) may be drawn, as well as an infinite number of additional orientations in three-dimensional space, since molecules are in constant motion.
 |
 |
 |
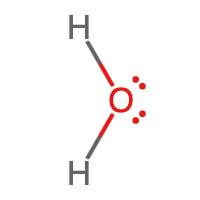 |
Figure \(\PageIndex{3}\) shows the bent three-dimensional shape of a water molecule that is due to the presence of lone pairs on the oxygen atom. The shapes of molecules are discussed in further detail in Section 11.7.
✅ Example \(\PageIndex{1}\)
Write the Lewis structure for SCl2.
Solution
Each chlorine atom has 7 valence electrons and needs one more electron to complete its valence shell. The sulfur atom has 6 valence electrons and needs two additional electrons to complete its valence shell:
The sulfur atom makes two single bonds, one to each of the two chlorine atoms. Once again, the orientation in three-dimensional space doesn't matter.

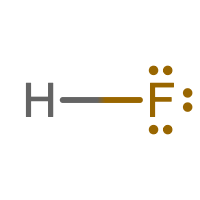
✏️ Exercise \(\PageIndex{1}\)
Write the Lewis structure for HF.
- Answer
Summary
- Covalent bonds are formed when atoms share electrons.
- Lewis structures may be drawn to illustrate covalent bond formation.
This page is shared under a CK-12 license and was authored, remixed, and/or curated by Lance S. Lund (Anoka-Ramsey Community College), Anonymous (by request), Melissa Alviar-Agnew, and Henry Agnew. Original source: https://www.ck12.org/c/chemistry/.
