6.3.3: RK3. Activation Barriers
- Page ID
- 4325
\( \newcommand{\vecs}[1]{\overset { \scriptstyle \rightharpoonup} {\mathbf{#1}} } \)
\( \newcommand{\vecd}[1]{\overset{-\!-\!\rightharpoonup}{\vphantom{a}\smash {#1}}} \)
\( \newcommand{\dsum}{\displaystyle\sum\limits} \)
\( \newcommand{\dint}{\displaystyle\int\limits} \)
\( \newcommand{\dlim}{\displaystyle\lim\limits} \)
\( \newcommand{\id}{\mathrm{id}}\) \( \newcommand{\Span}{\mathrm{span}}\)
( \newcommand{\kernel}{\mathrm{null}\,}\) \( \newcommand{\range}{\mathrm{range}\,}\)
\( \newcommand{\RealPart}{\mathrm{Re}}\) \( \newcommand{\ImaginaryPart}{\mathrm{Im}}\)
\( \newcommand{\Argument}{\mathrm{Arg}}\) \( \newcommand{\norm}[1]{\| #1 \|}\)
\( \newcommand{\inner}[2]{\langle #1, #2 \rangle}\)
\( \newcommand{\Span}{\mathrm{span}}\)
\( \newcommand{\id}{\mathrm{id}}\)
\( \newcommand{\Span}{\mathrm{span}}\)
\( \newcommand{\kernel}{\mathrm{null}\,}\)
\( \newcommand{\range}{\mathrm{range}\,}\)
\( \newcommand{\RealPart}{\mathrm{Re}}\)
\( \newcommand{\ImaginaryPart}{\mathrm{Im}}\)
\( \newcommand{\Argument}{\mathrm{Arg}}\)
\( \newcommand{\norm}[1]{\| #1 \|}\)
\( \newcommand{\inner}[2]{\langle #1, #2 \rangle}\)
\( \newcommand{\Span}{\mathrm{span}}\) \( \newcommand{\AA}{\unicode[.8,0]{x212B}}\)
\( \newcommand{\vectorA}[1]{\vec{#1}} % arrow\)
\( \newcommand{\vectorAt}[1]{\vec{\text{#1}}} % arrow\)
\( \newcommand{\vectorB}[1]{\overset { \scriptstyle \rightharpoonup} {\mathbf{#1}} } \)
\( \newcommand{\vectorC}[1]{\textbf{#1}} \)
\( \newcommand{\vectorD}[1]{\overrightarrow{#1}} \)
\( \newcommand{\vectorDt}[1]{\overrightarrow{\text{#1}}} \)
\( \newcommand{\vectE}[1]{\overset{-\!-\!\rightharpoonup}{\vphantom{a}\smash{\mathbf {#1}}}} \)
\( \newcommand{\vecs}[1]{\overset { \scriptstyle \rightharpoonup} {\mathbf{#1}} } \)
\(\newcommand{\longvect}{\overrightarrow}\)
\( \newcommand{\vecd}[1]{\overset{-\!-\!\rightharpoonup}{\vphantom{a}\smash {#1}}} \)
\(\newcommand{\avec}{\mathbf a}\) \(\newcommand{\bvec}{\mathbf b}\) \(\newcommand{\cvec}{\mathbf c}\) \(\newcommand{\dvec}{\mathbf d}\) \(\newcommand{\dtil}{\widetilde{\mathbf d}}\) \(\newcommand{\evec}{\mathbf e}\) \(\newcommand{\fvec}{\mathbf f}\) \(\newcommand{\nvec}{\mathbf n}\) \(\newcommand{\pvec}{\mathbf p}\) \(\newcommand{\qvec}{\mathbf q}\) \(\newcommand{\svec}{\mathbf s}\) \(\newcommand{\tvec}{\mathbf t}\) \(\newcommand{\uvec}{\mathbf u}\) \(\newcommand{\vvec}{\mathbf v}\) \(\newcommand{\wvec}{\mathbf w}\) \(\newcommand{\xvec}{\mathbf x}\) \(\newcommand{\yvec}{\mathbf y}\) \(\newcommand{\zvec}{\mathbf z}\) \(\newcommand{\rvec}{\mathbf r}\) \(\newcommand{\mvec}{\mathbf m}\) \(\newcommand{\zerovec}{\mathbf 0}\) \(\newcommand{\onevec}{\mathbf 1}\) \(\newcommand{\real}{\mathbb R}\) \(\newcommand{\twovec}[2]{\left[\begin{array}{r}#1 \\ #2 \end{array}\right]}\) \(\newcommand{\ctwovec}[2]{\left[\begin{array}{c}#1 \\ #2 \end{array}\right]}\) \(\newcommand{\threevec}[3]{\left[\begin{array}{r}#1 \\ #2 \\ #3 \end{array}\right]}\) \(\newcommand{\cthreevec}[3]{\left[\begin{array}{c}#1 \\ #2 \\ #3 \end{array}\right]}\) \(\newcommand{\fourvec}[4]{\left[\begin{array}{r}#1 \\ #2 \\ #3 \\ #4 \end{array}\right]}\) \(\newcommand{\cfourvec}[4]{\left[\begin{array}{c}#1 \\ #2 \\ #3 \\ #4 \end{array}\right]}\) \(\newcommand{\fivevec}[5]{\left[\begin{array}{r}#1 \\ #2 \\ #3 \\ #4 \\ #5 \\ \end{array}\right]}\) \(\newcommand{\cfivevec}[5]{\left[\begin{array}{c}#1 \\ #2 \\ #3 \\ #4 \\ #5 \\ \end{array}\right]}\) \(\newcommand{\mattwo}[4]{\left[\begin{array}{rr}#1 \amp #2 \\ #3 \amp #4 \\ \end{array}\right]}\) \(\newcommand{\laspan}[1]{\text{Span}\{#1\}}\) \(\newcommand{\bcal}{\cal B}\) \(\newcommand{\ccal}{\cal C}\) \(\newcommand{\scal}{\cal S}\) \(\newcommand{\wcal}{\cal W}\) \(\newcommand{\ecal}{\cal E}\) \(\newcommand{\coords}[2]{\left\{#1\right\}_{#2}}\) \(\newcommand{\gray}[1]{\color{gray}{#1}}\) \(\newcommand{\lgray}[1]{\color{lightgray}{#1}}\) \(\newcommand{\rank}{\operatorname{rank}}\) \(\newcommand{\row}{\text{Row}}\) \(\newcommand{\col}{\text{Col}}\) \(\renewcommand{\row}{\text{Row}}\) \(\newcommand{\nul}{\text{Nul}}\) \(\newcommand{\var}{\text{Var}}\) \(\newcommand{\corr}{\text{corr}}\) \(\newcommand{\len}[1]{\left|#1\right|}\) \(\newcommand{\bbar}{\overline{\bvec}}\) \(\newcommand{\bhat}{\widehat{\bvec}}\) \(\newcommand{\bperp}{\bvec^\perp}\) \(\newcommand{\xhat}{\widehat{\xvec}}\) \(\newcommand{\vhat}{\widehat{\vvec}}\) \(\newcommand{\uhat}{\widehat{\uvec}}\) \(\newcommand{\what}{\widehat{\wvec}}\) \(\newcommand{\Sighat}{\widehat{\Sigma}}\) \(\newcommand{\lt}{<}\) \(\newcommand{\gt}{>}\) \(\newcommand{\amp}{&}\) \(\definecolor{fillinmathshade}{gray}{0.9}\)Why do reactions take place at different rates? Why do some happen quickly, and others proceed very slowly? Why might the same reaction proceed at different rates under different conditions? There are a number of factors that influence reaction rates, but this article focuses on the activation barrier.
An activation barrier is a sort of energetic hurdle that a reaction must bypass. Some reactions have higher hurdles and some have lower hurdles. It is easier to overcome lower hurdles, so reactions with low activation barriers can proceed more quickly than ones with higher activation barriers:
- A low activation barrier allows a reaction to happen quickly.
- A high activation barrier makes a reaction proceed more slowly.
A reaction can be exergonic overall, but still have an activation barrier at the beginning. Even if the system decreases in energy by the end of the reaction, it generally experiences an initial increase in energy.
- Even if a reaction gives off energy overall, energy must be added initially to get the reaction started.
This situation is similar to investing in a business. A business generally requires a financial investment to get started. If the business is successful, it will eventually make products and pay money back to the investors. If the business is unable to make back its initial investment, it may fail.
Reactions require an initial investment of energy. This energy may come from surrounding molecules or the environment in general. If the reaction is successful, it will proceed to make products and it will emit energy back to its surroundings.
- It always "costs" a molecule energy to enter into a reaction; it "borrows" that energy from its environment.
- That initial investment of energy may be "paid back" as the reaction proceeds.
All reactions must overcome activation barriers in order to occur. The activation barrier is the sum of the energy that must be expended to get the reaction going. An activation barrier is often pictured as a hill the reactants must climb over during the reaction. Once, there, it can slide down the other side of the hill to become products. At the top of the hill, the molecule exists in what is called the "transition state." At the transition state, the structure is somewhere between its original form and the structure of the products.
The type of diagram shown above is sometimes called a "reaction progress diagram." It shows energy changes in the system as a reaction proceeds. One or more activation barriers may exist along the reaction pathways, due to various elementary steps in the reaction.
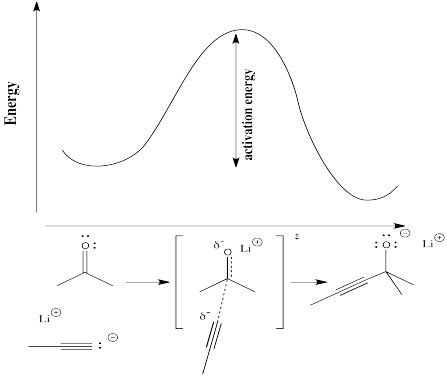
In order to understand more concretely the terms "reaction progress" and "transition state," consider a real reaction. Suppose a nucleophile, such as an acetylide ion, donates its electrons to an electrophilic carbonyl. The π bond breaks and an alkoxide ion is formed.
"Reaction progress" refers to how far the reaction has proceeded. The transition state refers specifically to the highest energy point on the pathway from reactants to products. It refers to the structure at that point, and the energy associated with that structure.
In the following diagram, the term "reaction progress" has been replaced by an illustration that matches the status of the reaction with the corresponding point in the energy curve. The structure in the square brackets is the transition state, corresponding to the maximum of the curve. The "double dagger" symbol indicates a transition state structure.
The transition state is not a true chemical structure. It does not necessarily obey the rules of Lewis structures, because some new bonds have started to form and some old bonds have started to break; partial bonds have no place in a Lewis structure.
Physically, the transition state structure cannot be isolated. Because it sits at the top of an energy curve, the transition state tends to convert into something else. A change in either direction will lower its energy. The tendency is to proceed to lowest energy if possible. As soon as the transition state forms, it will either slide back into the original starting materials or slip forward into the final products.
- The transition state is inherently a high-energy, unstable structure with a very short lifetime. As soon as it is formed, it disappears.
Contributors and Attributions
Chris P Schaller, Ph.D., (College of Saint Benedict / Saint John's University)


