
1.6: Lewis Structures and Formal Charges (Review)
- Page ID
- 44631
\( \newcommand{\vecs}[1]{\overset { \scriptstyle \rightharpoonup} {\mathbf{#1}} } \)
\( \newcommand{\vecd}[1]{\overset{-\!-\!\rightharpoonup}{\vphantom{a}\smash {#1}}} \)
\( \newcommand{\id}{\mathrm{id}}\) \( \newcommand{\Span}{\mathrm{span}}\)
( \newcommand{\kernel}{\mathrm{null}\,}\) \( \newcommand{\range}{\mathrm{range}\,}\)
\( \newcommand{\RealPart}{\mathrm{Re}}\) \( \newcommand{\ImaginaryPart}{\mathrm{Im}}\)
\( \newcommand{\Argument}{\mathrm{Arg}}\) \( \newcommand{\norm}[1]{\| #1 \|}\)
\( \newcommand{\inner}[2]{\langle #1, #2 \rangle}\)
\( \newcommand{\Span}{\mathrm{span}}\)
\( \newcommand{\id}{\mathrm{id}}\)
\( \newcommand{\Span}{\mathrm{span}}\)
\( \newcommand{\kernel}{\mathrm{null}\,}\)
\( \newcommand{\range}{\mathrm{range}\,}\)
\( \newcommand{\RealPart}{\mathrm{Re}}\)
\( \newcommand{\ImaginaryPart}{\mathrm{Im}}\)
\( \newcommand{\Argument}{\mathrm{Arg}}\)
\( \newcommand{\norm}[1]{\| #1 \|}\)
\( \newcommand{\inner}[2]{\langle #1, #2 \rangle}\)
\( \newcommand{\Span}{\mathrm{span}}\) \( \newcommand{\AA}{\unicode[.8,0]{x212B}}\)
\( \newcommand{\vectorA}[1]{\vec{#1}} % arrow\)
\( \newcommand{\vectorAt}[1]{\vec{\text{#1}}} % arrow\)
\( \newcommand{\vectorB}[1]{\overset { \scriptstyle \rightharpoonup} {\mathbf{#1}} } \)
\( \newcommand{\vectorC}[1]{\textbf{#1}} \)
\( \newcommand{\vectorD}[1]{\overrightarrow{#1}} \)
\( \newcommand{\vectorDt}[1]{\overrightarrow{\text{#1}}} \)
\( \newcommand{\vectE}[1]{\overset{-\!-\!\rightharpoonup}{\vphantom{a}\smash{\mathbf {#1}}}} \)
\( \newcommand{\vecs}[1]{\overset { \scriptstyle \rightharpoonup} {\mathbf{#1}} } \)
\( \newcommand{\vecd}[1]{\overset{-\!-\!\rightharpoonup}{\vphantom{a}\smash {#1}}} \)
\(\newcommand{\avec}{\mathbf a}\) \(\newcommand{\bvec}{\mathbf b}\) \(\newcommand{\cvec}{\mathbf c}\) \(\newcommand{\dvec}{\mathbf d}\) \(\newcommand{\dtil}{\widetilde{\mathbf d}}\) \(\newcommand{\evec}{\mathbf e}\) \(\newcommand{\fvec}{\mathbf f}\) \(\newcommand{\nvec}{\mathbf n}\) \(\newcommand{\pvec}{\mathbf p}\) \(\newcommand{\qvec}{\mathbf q}\) \(\newcommand{\svec}{\mathbf s}\) \(\newcommand{\tvec}{\mathbf t}\) \(\newcommand{\uvec}{\mathbf u}\) \(\newcommand{\vvec}{\mathbf v}\) \(\newcommand{\wvec}{\mathbf w}\) \(\newcommand{\xvec}{\mathbf x}\) \(\newcommand{\yvec}{\mathbf y}\) \(\newcommand{\zvec}{\mathbf z}\) \(\newcommand{\rvec}{\mathbf r}\) \(\newcommand{\mvec}{\mathbf m}\) \(\newcommand{\zerovec}{\mathbf 0}\) \(\newcommand{\onevec}{\mathbf 1}\) \(\newcommand{\real}{\mathbb R}\) \(\newcommand{\twovec}[2]{\left[\begin{array}{r}#1 \\ #2 \end{array}\right]}\) \(\newcommand{\ctwovec}[2]{\left[\begin{array}{c}#1 \\ #2 \end{array}\right]}\) \(\newcommand{\threevec}[3]{\left[\begin{array}{r}#1 \\ #2 \\ #3 \end{array}\right]}\) \(\newcommand{\cthreevec}[3]{\left[\begin{array}{c}#1 \\ #2 \\ #3 \end{array}\right]}\) \(\newcommand{\fourvec}[4]{\left[\begin{array}{r}#1 \\ #2 \\ #3 \\ #4 \end{array}\right]}\) \(\newcommand{\cfourvec}[4]{\left[\begin{array}{c}#1 \\ #2 \\ #3 \\ #4 \end{array}\right]}\) \(\newcommand{\fivevec}[5]{\left[\begin{array}{r}#1 \\ #2 \\ #3 \\ #4 \\ #5 \\ \end{array}\right]}\) \(\newcommand{\cfivevec}[5]{\left[\begin{array}{c}#1 \\ #2 \\ #3 \\ #4 \\ #5 \\ \end{array}\right]}\) \(\newcommand{\mattwo}[4]{\left[\begin{array}{rr}#1 \amp #2 \\ #3 \amp #4 \\ \end{array}\right]}\) \(\newcommand{\laspan}[1]{\text{Span}\{#1\}}\) \(\newcommand{\bcal}{\cal B}\) \(\newcommand{\ccal}{\cal C}\) \(\newcommand{\scal}{\cal S}\) \(\newcommand{\wcal}{\cal W}\) \(\newcommand{\ecal}{\cal E}\) \(\newcommand{\coords}[2]{\left\{#1\right\}_{#2}}\) \(\newcommand{\gray}[1]{\color{gray}{#1}}\) \(\newcommand{\lgray}[1]{\color{lightgray}{#1}}\) \(\newcommand{\rank}{\operatorname{rank}}\) \(\newcommand{\row}{\text{Row}}\) \(\newcommand{\col}{\text{Col}}\) \(\renewcommand{\row}{\text{Row}}\) \(\newcommand{\nul}{\text{Nul}}\) \(\newcommand{\var}{\text{Var}}\) \(\newcommand{\corr}{\text{corr}}\) \(\newcommand{\len}[1]{\left|#1\right|}\) \(\newcommand{\bbar}{\overline{\bvec}}\) \(\newcommand{\bhat}{\widehat{\bvec}}\) \(\newcommand{\bperp}{\bvec^\perp}\) \(\newcommand{\xhat}{\widehat{\xvec}}\) \(\newcommand{\vhat}{\widehat{\vvec}}\) \(\newcommand{\uhat}{\widehat{\uvec}}\) \(\newcommand{\what}{\widehat{\wvec}}\) \(\newcommand{\Sighat}{\widehat{\Sigma}}\) \(\newcommand{\lt}{<}\) \(\newcommand{\gt}{>}\) \(\newcommand{\amp}{&}\) \(\definecolor{fillinmathshade}{gray}{0.9}\)Learning Objective
Draw, interpret, and convert between Lewis (Kekule), Condensed, and Bond-line Structures
Note: The review of general chemistry in sections 1.3 - 1.6 is integrated into the above Learning Objective for organic chemistry in sections 1.7 and 1.8.
Lewis Structures
Lewis structures, also known as Lewis-dot diagrams, show the bonding relationship between atoms of a molecule and the lone pairs of electrons in a molecule. While it can be helpful initially to write the individual shared electrons, this approach quickly becomes awkward.
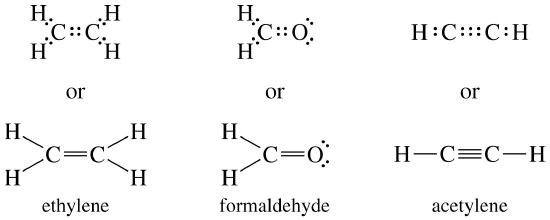
A single line is used to represent one pair of shared electrons. Line representations are only used for shared electrons. Lone pair (unshared) electrons are still shown as individual electrons. Double and triple bonds can also be communicated with lines as shown below.
2 shared electrons form a single bond shown as ‘:’ or ‘–‘
4 shared electrons form a double bond shown as ‘::’ or ‘=’
6 shared electrons form at triple bond shown as ‘:::’ or 
Unshared electrons are also called ‘Lone Pairs’ and are shown as ‘:’
Drawing Lone Pairs
Since the lone pair electrons are often NOT shown in chemical structures, it is important to mentally add the lone pairs. In the beginning, it can be helpful to physically add the lone pair electrons.

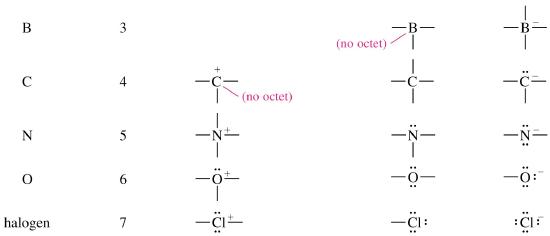
Bonding Patterns
For organic chemistry, the common bonding patterns of carbon, oxygen, and nitrogen have useful applications when evaluating chemical structures and reactivity.
Formal charges
Organic molecules can also have positive or negative charges associated with them. During chemical reactions, it is common to have charge reactant, intermediates, and/or products. Recognizing and distinguishing between neutral and charged bonding patterns will be helpful in learning reaction mechanisms. Consider the Lewis structure of methanol, CH3OH (methanol is the so-called ‘wood alcohol’ that unscrupulous bootleggers sometimes sold during the prohibition days in the 1920's, often causing the people who drank it to go blind). Methanol itself is a neutral molecule, but can lose a proton to become a molecular anion (CH3O-), or gain a proton to become a molecular cation (CH3OH2+).
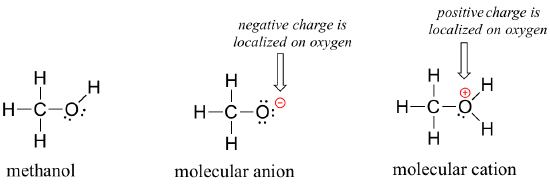
The molecular anion and cation have overall charges of -1 and +1, respectively. But we can be more specific than that - we can also state for each molecular ion that a formal charge is located specifically on the oxygen atom, rather than on the carbon or any of the hydrogen atoms.
Figuring out the formal charge on different atoms of a molecule is a straightforward process - it’s simply a matter of adding up valence electrons.
A unbound oxygen atom has 6 valence electrons. When it is bound as part of a methanol molecule, however, an oxygen atom is surrounded by 8 valence electrons: 4 nonbonding electrons (two 'lone pairs') and 2 electrons in each of its two covalent bonds (one to carbon, one to hydrogen). In the formal charge convention, we say that the oxygen 'owns' all 4 nonbonding electrons. However, it only 'owns' one electron from each of the two covalent bonds, because covalent bonds involve the sharing of electrons between atoms. Therefore, the oxygen atom in methanol owns 2 + 2 + (½ x 4) = 6 valence electrons.
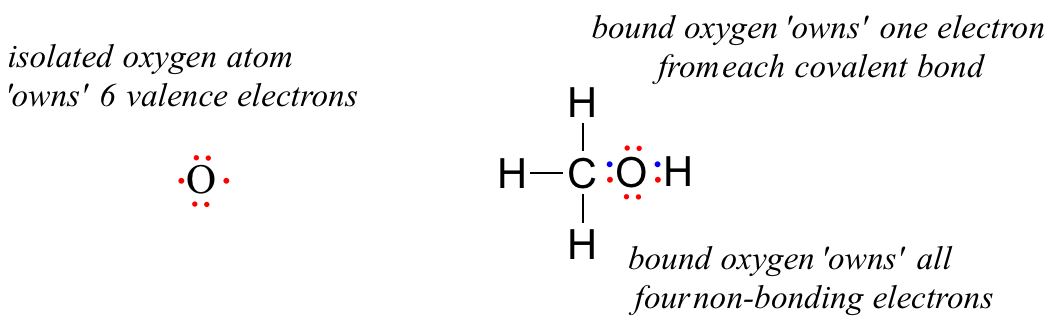
The formal charge on an atom is calculated as the number of valence electrons owned by the isolated atom minus the number of valence electrons owned by the bound atom in the molecule: