
4.6: Covalent Bonds- Shared Electron Pairs
- Page ID
- 152159
\( \newcommand{\vecs}[1]{\overset { \scriptstyle \rightharpoonup} {\mathbf{#1}} } \)
\( \newcommand{\vecd}[1]{\overset{-\!-\!\rightharpoonup}{\vphantom{a}\smash {#1}}} \)
\( \newcommand{\id}{\mathrm{id}}\) \( \newcommand{\Span}{\mathrm{span}}\)
( \newcommand{\kernel}{\mathrm{null}\,}\) \( \newcommand{\range}{\mathrm{range}\,}\)
\( \newcommand{\RealPart}{\mathrm{Re}}\) \( \newcommand{\ImaginaryPart}{\mathrm{Im}}\)
\( \newcommand{\Argument}{\mathrm{Arg}}\) \( \newcommand{\norm}[1]{\| #1 \|}\)
\( \newcommand{\inner}[2]{\langle #1, #2 \rangle}\)
\( \newcommand{\Span}{\mathrm{span}}\)
\( \newcommand{\id}{\mathrm{id}}\)
\( \newcommand{\Span}{\mathrm{span}}\)
\( \newcommand{\kernel}{\mathrm{null}\,}\)
\( \newcommand{\range}{\mathrm{range}\,}\)
\( \newcommand{\RealPart}{\mathrm{Re}}\)
\( \newcommand{\ImaginaryPart}{\mathrm{Im}}\)
\( \newcommand{\Argument}{\mathrm{Arg}}\)
\( \newcommand{\norm}[1]{\| #1 \|}\)
\( \newcommand{\inner}[2]{\langle #1, #2 \rangle}\)
\( \newcommand{\Span}{\mathrm{span}}\) \( \newcommand{\AA}{\unicode[.8,0]{x212B}}\)
\( \newcommand{\vectorA}[1]{\vec{#1}} % arrow\)
\( \newcommand{\vectorAt}[1]{\vec{\text{#1}}} % arrow\)
\( \newcommand{\vectorB}[1]{\overset { \scriptstyle \rightharpoonup} {\mathbf{#1}} } \)
\( \newcommand{\vectorC}[1]{\textbf{#1}} \)
\( \newcommand{\vectorD}[1]{\overrightarrow{#1}} \)
\( \newcommand{\vectorDt}[1]{\overrightarrow{\text{#1}}} \)
\( \newcommand{\vectE}[1]{\overset{-\!-\!\rightharpoonup}{\vphantom{a}\smash{\mathbf {#1}}}} \)
\( \newcommand{\vecs}[1]{\overset { \scriptstyle \rightharpoonup} {\mathbf{#1}} } \)
\( \newcommand{\vecd}[1]{\overset{-\!-\!\rightharpoonup}{\vphantom{a}\smash {#1}}} \)
\(\newcommand{\avec}{\mathbf a}\) \(\newcommand{\bvec}{\mathbf b}\) \(\newcommand{\cvec}{\mathbf c}\) \(\newcommand{\dvec}{\mathbf d}\) \(\newcommand{\dtil}{\widetilde{\mathbf d}}\) \(\newcommand{\evec}{\mathbf e}\) \(\newcommand{\fvec}{\mathbf f}\) \(\newcommand{\nvec}{\mathbf n}\) \(\newcommand{\pvec}{\mathbf p}\) \(\newcommand{\qvec}{\mathbf q}\) \(\newcommand{\svec}{\mathbf s}\) \(\newcommand{\tvec}{\mathbf t}\) \(\newcommand{\uvec}{\mathbf u}\) \(\newcommand{\vvec}{\mathbf v}\) \(\newcommand{\wvec}{\mathbf w}\) \(\newcommand{\xvec}{\mathbf x}\) \(\newcommand{\yvec}{\mathbf y}\) \(\newcommand{\zvec}{\mathbf z}\) \(\newcommand{\rvec}{\mathbf r}\) \(\newcommand{\mvec}{\mathbf m}\) \(\newcommand{\zerovec}{\mathbf 0}\) \(\newcommand{\onevec}{\mathbf 1}\) \(\newcommand{\real}{\mathbb R}\) \(\newcommand{\twovec}[2]{\left[\begin{array}{r}#1 \\ #2 \end{array}\right]}\) \(\newcommand{\ctwovec}[2]{\left[\begin{array}{c}#1 \\ #2 \end{array}\right]}\) \(\newcommand{\threevec}[3]{\left[\begin{array}{r}#1 \\ #2 \\ #3 \end{array}\right]}\) \(\newcommand{\cthreevec}[3]{\left[\begin{array}{c}#1 \\ #2 \\ #3 \end{array}\right]}\) \(\newcommand{\fourvec}[4]{\left[\begin{array}{r}#1 \\ #2 \\ #3 \\ #4 \end{array}\right]}\) \(\newcommand{\cfourvec}[4]{\left[\begin{array}{c}#1 \\ #2 \\ #3 \\ #4 \end{array}\right]}\) \(\newcommand{\fivevec}[5]{\left[\begin{array}{r}#1 \\ #2 \\ #3 \\ #4 \\ #5 \\ \end{array}\right]}\) \(\newcommand{\cfivevec}[5]{\left[\begin{array}{c}#1 \\ #2 \\ #3 \\ #4 \\ #5 \\ \end{array}\right]}\) \(\newcommand{\mattwo}[4]{\left[\begin{array}{rr}#1 \amp #2 \\ #3 \amp #4 \\ \end{array}\right]}\) \(\newcommand{\laspan}[1]{\text{Span}\{#1\}}\) \(\newcommand{\bcal}{\cal B}\) \(\newcommand{\ccal}{\cal C}\) \(\newcommand{\scal}{\cal S}\) \(\newcommand{\wcal}{\cal W}\) \(\newcommand{\ecal}{\cal E}\) \(\newcommand{\coords}[2]{\left\{#1\right\}_{#2}}\) \(\newcommand{\gray}[1]{\color{gray}{#1}}\) \(\newcommand{\lgray}[1]{\color{lightgray}{#1}}\) \(\newcommand{\rank}{\operatorname{rank}}\) \(\newcommand{\row}{\text{Row}}\) \(\newcommand{\col}{\text{Col}}\) \(\renewcommand{\row}{\text{Row}}\) \(\newcommand{\nul}{\text{Nul}}\) \(\newcommand{\var}{\text{Var}}\) \(\newcommand{\corr}{\text{corr}}\) \(\newcommand{\len}[1]{\left|#1\right|}\) \(\newcommand{\bbar}{\overline{\bvec}}\) \(\newcommand{\bhat}{\widehat{\bvec}}\) \(\newcommand{\bperp}{\bvec^\perp}\) \(\newcommand{\xhat}{\widehat{\xvec}}\) \(\newcommand{\vhat}{\widehat{\vvec}}\) \(\newcommand{\uhat}{\widehat{\uvec}}\) \(\newcommand{\what}{\widehat{\wvec}}\) \(\newcommand{\Sighat}{\widehat{\Sigma}}\) \(\newcommand{\lt}{<}\) \(\newcommand{\gt}{>}\) \(\newcommand{\amp}{&}\) \(\definecolor{fillinmathshade}{gray}{0.9}\)- Define covalent bond.
- Illustrate covalent bond formation with Lewis electron dot diagrams.
Ionic bonding typically occurs when it is easy for one atom to lose one or more electrons and another atom to gain one or more electrons. However, some atoms won’t give up or gain electrons easily. Yet they still participate in compound formation. How? There is another mechanism for obtaining a complete valence shell: sharing electrons. When electrons are shared between two atoms, they make a bond called a covalent bond.
Chemists frequently use Lewis diagrams to represent covalent bonding in molecular substances. For example, the Lewis diagrams of two separate hydrogen atoms are as follows:

The Lewis diagram of two hydrogen atoms sharing electrons looks like this:

We can use circles to show that each H atom has two electrons around the nucleus, completely filling each atom’s valence shell:

Because each H atom has a filled valence shell, this bond is stable, and we have made a diatomic hydrogen molecule. (This explains why hydrogen is one of the diatomic elements.) For simplicity’s sake, it is not unusual to represent the covalent bond with a dash, instead of with two dots:
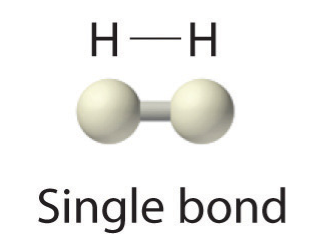
Because two atoms are sharing one pair of electrons, this covalent bond is called a single bond. As another example, consider fluorine. F atoms have seven electrons in their valence shell:

These two atoms can do the same thing that the H atoms did; they share their unpaired electrons to make a covalent bond.

Note that each F atom has a complete octet around it now:

We can also write this using a dash to represent the shared electron pair:

There are two different types of electrons in the fluorine diatomic molecule. The bonding electron pair makes the covalent bond. Each F atom has three other pairs of electrons that do not participate in the bonding; they are called lone pair electrons. Each F atom has one bonding pair and three lone pairs of electrons.
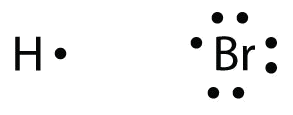
Covalent bonds can be made between different elements as well. One example is HF. Each atom starts out with an odd number of electrons in its valence shell:

The two atoms can share their unpaired electrons to make a covalent bond:

In this molecule, the hydrogen atom does not have nonbonding electrons, while the fluorine atom has six nonbonding electrons (three lone electron pairs). The circles show how the valence electron shells are filled for both atoms.
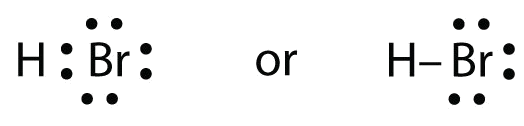
Use Lewis electron dot diagrams to illustrate the covalent bond formation in HBr.
Solution
HBr is very similar to HF, except that it has Br instead of F. The atoms are as follows:
The two atoms can share their unpaired electron:
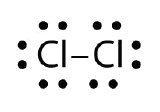
Use Lewis electron dot diagrams to illustrate the covalent bond formation in Cl2.
- Answer:
When working with covalent structures, it sometimes looks like you have leftover electrons. You apply the rules you learned so far and there are still some electrons hanging out there unattached. You can't just leave them there. So where do you put them?
Multiple Covalent Bonds
The sharing of a pair of electrons represents a single covalent bond, usually just referred to as a single bond. However, in many molecules atoms attain complete octets by sharing more than one pair of electrons between them:
- Two electron pairs shared a double bond
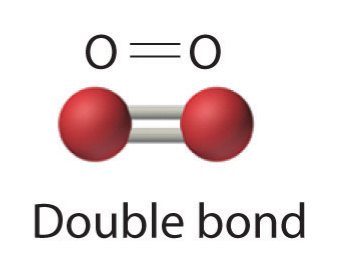
- Three electron pairs shared a triple bond
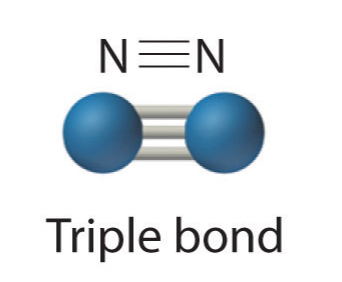
Because each nitrogen contains 5 valence electrons, they need to share 3 pairs to each achieve a valence octet. N2 is fairly inert, due to the strong triple bond between the two nitrogen atoms.

Summary
- Covalent bonds are formed when atoms share electrons.
- Lewis electron dot diagrams can be drawn to illustrate covalent bond formation.
- Double bonds or triple bonds between atoms may be necessary to properly illustrate the bonding in some molecules.
Contributors and Attributions
- Anonymous
Henry Agnew (UC Davis)