
Homework Problems Chapter 7
- Page ID
- 290604

\( \newcommand{\vecs}[1]{\overset { \scriptstyle \rightharpoonup} {\mathbf{#1}} } \)
\( \newcommand{\vecd}[1]{\overset{-\!-\!\rightharpoonup}{\vphantom{a}\smash {#1}}} \)
\( \newcommand{\id}{\mathrm{id}}\) \( \newcommand{\Span}{\mathrm{span}}\)
( \newcommand{\kernel}{\mathrm{null}\,}\) \( \newcommand{\range}{\mathrm{range}\,}\)
\( \newcommand{\RealPart}{\mathrm{Re}}\) \( \newcommand{\ImaginaryPart}{\mathrm{Im}}\)
\( \newcommand{\Argument}{\mathrm{Arg}}\) \( \newcommand{\norm}[1]{\| #1 \|}\)
\( \newcommand{\inner}[2]{\langle #1, #2 \rangle}\)
\( \newcommand{\Span}{\mathrm{span}}\)
\( \newcommand{\id}{\mathrm{id}}\)
\( \newcommand{\Span}{\mathrm{span}}\)
\( \newcommand{\kernel}{\mathrm{null}\,}\)
\( \newcommand{\range}{\mathrm{range}\,}\)
\( \newcommand{\RealPart}{\mathrm{Re}}\)
\( \newcommand{\ImaginaryPart}{\mathrm{Im}}\)
\( \newcommand{\Argument}{\mathrm{Arg}}\)
\( \newcommand{\norm}[1]{\| #1 \|}\)
\( \newcommand{\inner}[2]{\langle #1, #2 \rangle}\)
\( \newcommand{\Span}{\mathrm{span}}\) \( \newcommand{\AA}{\unicode[.8,0]{x212B}}\)
\( \newcommand{\vectorA}[1]{\vec{#1}} % arrow\)
\( \newcommand{\vectorAt}[1]{\vec{\text{#1}}} % arrow\)
\( \newcommand{\vectorB}[1]{\overset { \scriptstyle \rightharpoonup} {\mathbf{#1}} } \)
\( \newcommand{\vectorC}[1]{\textbf{#1}} \)
\( \newcommand{\vectorD}[1]{\overrightarrow{#1}} \)
\( \newcommand{\vectorDt}[1]{\overrightarrow{\text{#1}}} \)
\( \newcommand{\vectE}[1]{\overset{-\!-\!\rightharpoonup}{\vphantom{a}\smash{\mathbf {#1}}}} \)
\( \newcommand{\vecs}[1]{\overset { \scriptstyle \rightharpoonup} {\mathbf{#1}} } \)
\( \newcommand{\vecd}[1]{\overset{-\!-\!\rightharpoonup}{\vphantom{a}\smash {#1}}} \)
\(\newcommand{\avec}{\mathbf a}\) \(\newcommand{\bvec}{\mathbf b}\) \(\newcommand{\cvec}{\mathbf c}\) \(\newcommand{\dvec}{\mathbf d}\) \(\newcommand{\dtil}{\widetilde{\mathbf d}}\) \(\newcommand{\evec}{\mathbf e}\) \(\newcommand{\fvec}{\mathbf f}\) \(\newcommand{\nvec}{\mathbf n}\) \(\newcommand{\pvec}{\mathbf p}\) \(\newcommand{\qvec}{\mathbf q}\) \(\newcommand{\svec}{\mathbf s}\) \(\newcommand{\tvec}{\mathbf t}\) \(\newcommand{\uvec}{\mathbf u}\) \(\newcommand{\vvec}{\mathbf v}\) \(\newcommand{\wvec}{\mathbf w}\) \(\newcommand{\xvec}{\mathbf x}\) \(\newcommand{\yvec}{\mathbf y}\) \(\newcommand{\zvec}{\mathbf z}\) \(\newcommand{\rvec}{\mathbf r}\) \(\newcommand{\mvec}{\mathbf m}\) \(\newcommand{\zerovec}{\mathbf 0}\) \(\newcommand{\onevec}{\mathbf 1}\) \(\newcommand{\real}{\mathbb R}\) \(\newcommand{\twovec}[2]{\left[\begin{array}{r}#1 \\ #2 \end{array}\right]}\) \(\newcommand{\ctwovec}[2]{\left[\begin{array}{c}#1 \\ #2 \end{array}\right]}\) \(\newcommand{\threevec}[3]{\left[\begin{array}{r}#1 \\ #2 \\ #3 \end{array}\right]}\) \(\newcommand{\cthreevec}[3]{\left[\begin{array}{c}#1 \\ #2 \\ #3 \end{array}\right]}\) \(\newcommand{\fourvec}[4]{\left[\begin{array}{r}#1 \\ #2 \\ #3 \\ #4 \end{array}\right]}\) \(\newcommand{\cfourvec}[4]{\left[\begin{array}{c}#1 \\ #2 \\ #3 \\ #4 \end{array}\right]}\) \(\newcommand{\fivevec}[5]{\left[\begin{array}{r}#1 \\ #2 \\ #3 \\ #4 \\ #5 \\ \end{array}\right]}\) \(\newcommand{\cfivevec}[5]{\left[\begin{array}{c}#1 \\ #2 \\ #3 \\ #4 \\ #5 \\ \end{array}\right]}\) \(\newcommand{\mattwo}[4]{\left[\begin{array}{rr}#1 \amp #2 \\ #3 \amp #4 \\ \end{array}\right]}\) \(\newcommand{\laspan}[1]{\text{Span}\{#1\}}\) \(\newcommand{\bcal}{\cal B}\) \(\newcommand{\ccal}{\cal C}\) \(\newcommand{\scal}{\cal S}\) \(\newcommand{\wcal}{\cal W}\) \(\newcommand{\ecal}{\cal E}\) \(\newcommand{\coords}[2]{\left\{#1\right\}_{#2}}\) \(\newcommand{\gray}[1]{\color{gray}{#1}}\) \(\newcommand{\lgray}[1]{\color{lightgray}{#1}}\) \(\newcommand{\rank}{\operatorname{rank}}\) \(\newcommand{\row}{\text{Row}}\) \(\newcommand{\col}{\text{Col}}\) \(\renewcommand{\row}{\text{Row}}\) \(\newcommand{\nul}{\text{Nul}}\) \(\newcommand{\var}{\text{Var}}\) \(\newcommand{\corr}{\text{corr}}\) \(\newcommand{\len}[1]{\left|#1\right|}\) \(\newcommand{\bbar}{\overline{\bvec}}\) \(\newcommand{\bhat}{\widehat{\bvec}}\) \(\newcommand{\bperp}{\bvec^\perp}\) \(\newcommand{\xhat}{\widehat{\xvec}}\) \(\newcommand{\vhat}{\widehat{\vvec}}\) \(\newcommand{\uhat}{\widehat{\uvec}}\) \(\newcommand{\what}{\widehat{\wvec}}\) \(\newcommand{\Sighat}{\widehat{\Sigma}}\) \(\newcommand{\lt}{<}\) \(\newcommand{\gt}{>}\) \(\newcommand{\amp}{&}\) \(\definecolor{fillinmathshade}{gray}{0.9}\)Homework Problems
Section 1
Exercise 1
Decide if valence bond theory is able to explain shapes of the following species. Explain your decision using appropriate electron box diagrams.
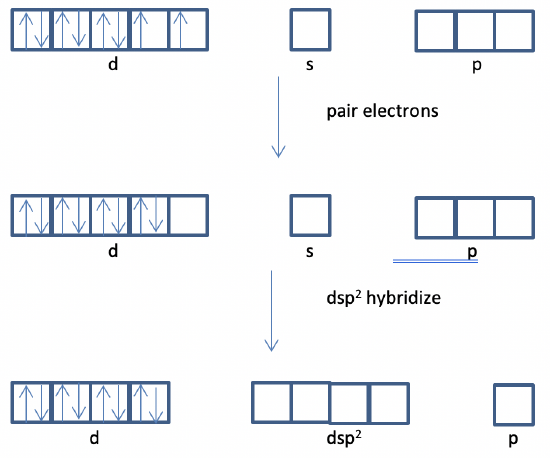
- PdCl42- (square planar)
- NiCl42- (tetrahedral)
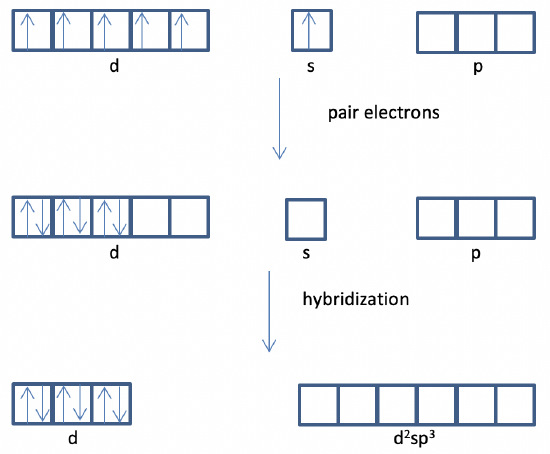
- Cr(CO)6 (octahedral)
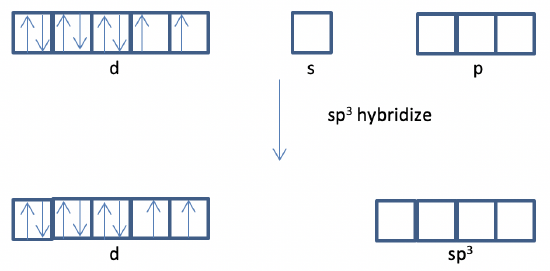
- ZnCl42- (tetrahedral)
- Ag(NH3)2+ (linear)
- Au(PPh3)3+ (trigonal planar)
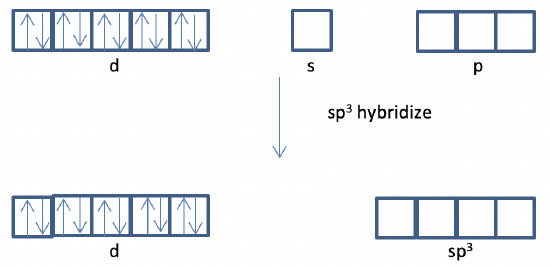
- Cu(NH3)42+ (tetrahedral)
- Answer
-
a) No. One would need to move an electron from one half-filled d-orbital into the other half-filled d-orbital. This would require to reverse the spin of the electron which is quantum-mechanically not allowed.
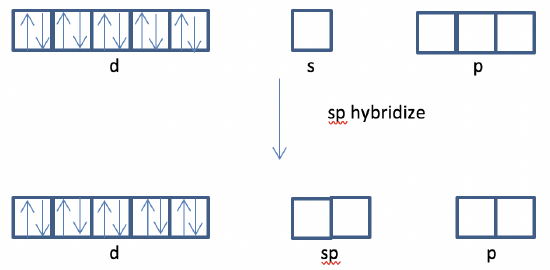
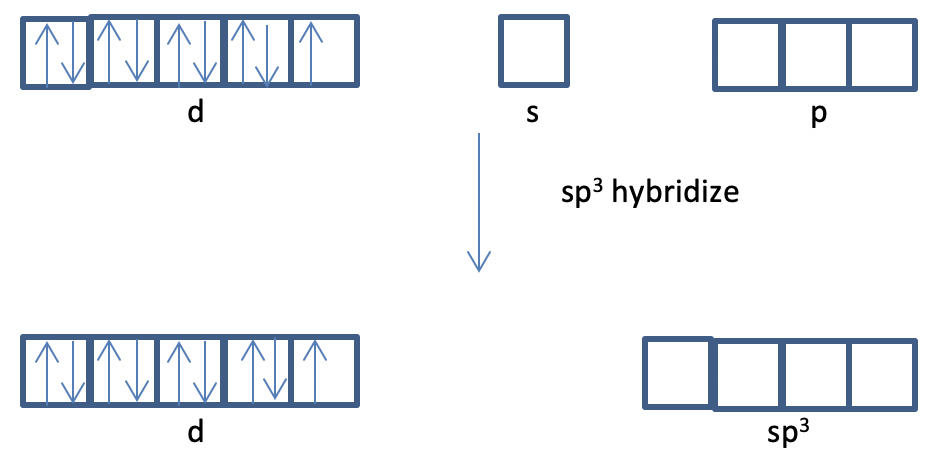
b) Yes, because s and p orbitals are empty and can be sp3 hybridized:
c) No, because one would need to move and spin-pair one s and two d electrons under spin-reversal.
d) Yes, because empty s and p orbitals are available for hybridization
e) Yes, because empty s and p orbitals are available for sp hybridization which is able to explain linear shape.
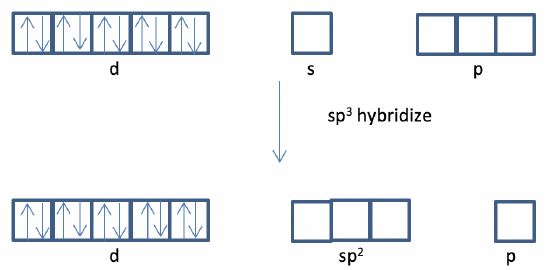
f) Yes, because empty s and p orbitals are available for sp2 hybridization which is able to explain trigonal planar shape.
g) Yes, because empty s and p orbitals are available for sp3 hybridization which is able to explain tetrahedral shape.
Exercise 2
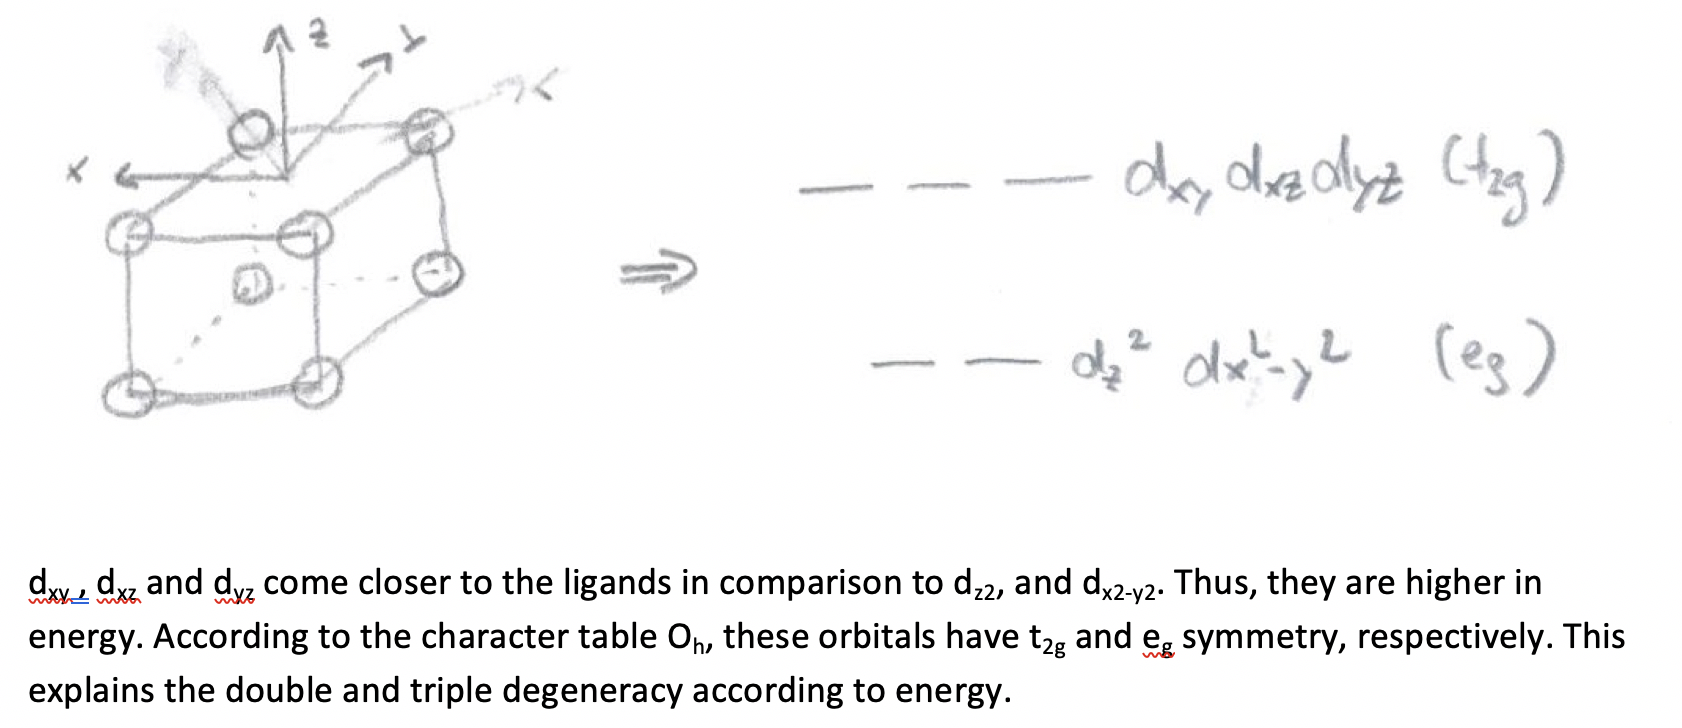
We assume a hypothetical cubic crystal field. Predict how the energies of the metal d-orbitals split in this crystal field? Explain your decision briefly. What is the symmetry of these orbitals?
- Answer
-
Exercise 3
The octahedral crystal field ΔO for a d4 metal complex is larger than the spin pairing energy. How many unpaired electrons would you expect in this complex?
- Answer
-
I would expect two unpaired electrons.
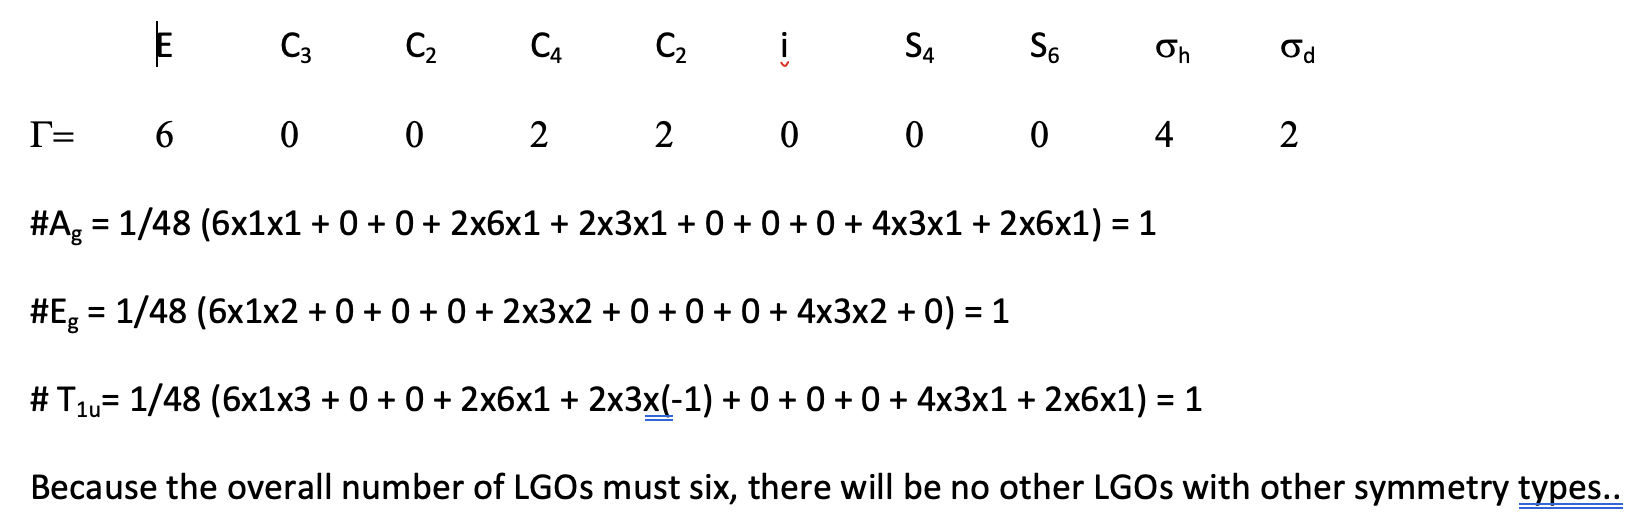
Exercise 4
Verify by applying the symmetry adapted linear combination of atomic orbitals (SALC) method that the ligand group orbitals suitable for sigma bonding have the symmetry types Ag, Eg, and T1u for an octahedral complex.
- Answer
-
Exercise 5
Can the 4p orbitals of a period 4 transition metal also make pi-bonding with the ligands in an octahedral complex? Explain your decision briefly?
- Answer
-
Yes, the 4p orbitals have T1u symmetry which is suitable to make pi-bonding with the T1u pi-ligand group orbitals.
Exercise 6
Which of the following ligands would you expect to be π-acceptors? Explain your decision briefly.
a) NO+
b) H-
c) Cl-
d) CH3-
- Answer
-
Only NO+, because it is the only ligand that has π*-orbitals.
Exercise 7
A general trigonal planar complex of the composition M(CN)3 is given. How many π- and π* orbitals of the ligands will be involved in the π-bonding?
- Answer
-
3*4=12 orbitals
Exercise 8
The energies of the metal d orbitals of the above complex are -24 eV. The energies of the π-orbitals of the ligand are -27 eV, the energies of the π*-orbitals are -10 eV. Would you expect the ligand to act as a π-donor or as a π-acceptor? Why?
- Answer
-
It would act as a pi-donor, because the energy of the pi-orbitals is much closer to the energy of the metal d orbitals.
Exercise 9
Two octahedral complexes MX6 and MY6 are given. The energy of the ligand HOMOs suitable for sigma-bonding is about the same, but the orbital overlap between the metal and the ligand Y is significantly greater than the orbital overlap between the ligand X and the metal. For which complex would you expect a larger ΔO?
- Answer
-
ΔO will be greater for the orbitals with the ligand Y. This is because the stronger interactions raise the energy of the eg* orbitals, and thus the energy difference between these orbitals and the t2g orbitals becomes larger.
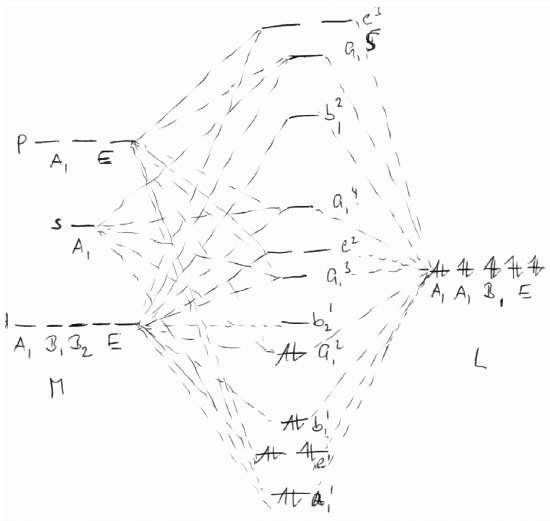
Exercise 10
Construct a qualitative molecular orbital diagram of a square pyramidal complex using the symmetry adapted linear combination of atomic orbitals approach. Consider sigma-bonding only.
- Answer
-
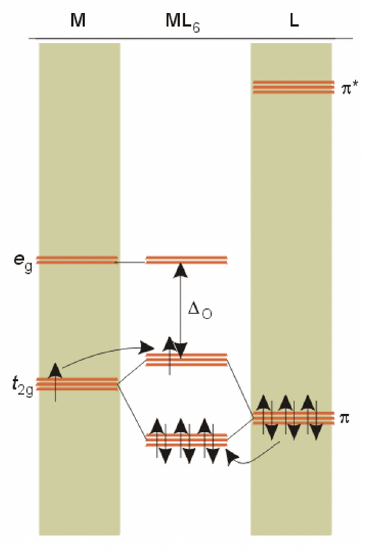
Exercise 11
Strong π-donating ligands lead to a decrease of the octahedral ligand field Δo. Illustrate this by sketching the relevant part of MO diagram.
- Answer
-
Dr. Kai Landskron (Lehigh University). If you like this textbook, please consider to make a donation to support the author's research at Lehigh University: Click Here to Donate.