1.2: Fundamental Properties - Ionization Energy
- Page ID
- 212613
\( \newcommand{\vecs}[1]{\overset { \scriptstyle \rightharpoonup} {\mathbf{#1}} } \)
\( \newcommand{\vecd}[1]{\overset{-\!-\!\rightharpoonup}{\vphantom{a}\smash {#1}}} \)
\( \newcommand{\id}{\mathrm{id}}\) \( \newcommand{\Span}{\mathrm{span}}\)
( \newcommand{\kernel}{\mathrm{null}\,}\) \( \newcommand{\range}{\mathrm{range}\,}\)
\( \newcommand{\RealPart}{\mathrm{Re}}\) \( \newcommand{\ImaginaryPart}{\mathrm{Im}}\)
\( \newcommand{\Argument}{\mathrm{Arg}}\) \( \newcommand{\norm}[1]{\| #1 \|}\)
\( \newcommand{\inner}[2]{\langle #1, #2 \rangle}\)
\( \newcommand{\Span}{\mathrm{span}}\)
\( \newcommand{\id}{\mathrm{id}}\)
\( \newcommand{\Span}{\mathrm{span}}\)
\( \newcommand{\kernel}{\mathrm{null}\,}\)
\( \newcommand{\range}{\mathrm{range}\,}\)
\( \newcommand{\RealPart}{\mathrm{Re}}\)
\( \newcommand{\ImaginaryPart}{\mathrm{Im}}\)
\( \newcommand{\Argument}{\mathrm{Arg}}\)
\( \newcommand{\norm}[1]{\| #1 \|}\)
\( \newcommand{\inner}[2]{\langle #1, #2 \rangle}\)
\( \newcommand{\Span}{\mathrm{span}}\) \( \newcommand{\AA}{\unicode[.8,0]{x212B}}\)
\( \newcommand{\vectorA}[1]{\vec{#1}} % arrow\)
\( \newcommand{\vectorAt}[1]{\vec{\text{#1}}} % arrow\)
\( \newcommand{\vectorB}[1]{\overset { \scriptstyle \rightharpoonup} {\mathbf{#1}} } \)
\( \newcommand{\vectorC}[1]{\textbf{#1}} \)
\( \newcommand{\vectorD}[1]{\overrightarrow{#1}} \)
\( \newcommand{\vectorDt}[1]{\overrightarrow{\text{#1}}} \)
\( \newcommand{\vectE}[1]{\overset{-\!-\!\rightharpoonup}{\vphantom{a}\smash{\mathbf {#1}}}} \)
\( \newcommand{\vecs}[1]{\overset { \scriptstyle \rightharpoonup} {\mathbf{#1}} } \)
\( \newcommand{\vecd}[1]{\overset{-\!-\!\rightharpoonup}{\vphantom{a}\smash {#1}}} \)
\(\newcommand{\avec}{\mathbf a}\) \(\newcommand{\bvec}{\mathbf b}\) \(\newcommand{\cvec}{\mathbf c}\) \(\newcommand{\dvec}{\mathbf d}\) \(\newcommand{\dtil}{\widetilde{\mathbf d}}\) \(\newcommand{\evec}{\mathbf e}\) \(\newcommand{\fvec}{\mathbf f}\) \(\newcommand{\nvec}{\mathbf n}\) \(\newcommand{\pvec}{\mathbf p}\) \(\newcommand{\qvec}{\mathbf q}\) \(\newcommand{\svec}{\mathbf s}\) \(\newcommand{\tvec}{\mathbf t}\) \(\newcommand{\uvec}{\mathbf u}\) \(\newcommand{\vvec}{\mathbf v}\) \(\newcommand{\wvec}{\mathbf w}\) \(\newcommand{\xvec}{\mathbf x}\) \(\newcommand{\yvec}{\mathbf y}\) \(\newcommand{\zvec}{\mathbf z}\) \(\newcommand{\rvec}{\mathbf r}\) \(\newcommand{\mvec}{\mathbf m}\) \(\newcommand{\zerovec}{\mathbf 0}\) \(\newcommand{\onevec}{\mathbf 1}\) \(\newcommand{\real}{\mathbb R}\) \(\newcommand{\twovec}[2]{\left[\begin{array}{r}#1 \\ #2 \end{array}\right]}\) \(\newcommand{\ctwovec}[2]{\left[\begin{array}{c}#1 \\ #2 \end{array}\right]}\) \(\newcommand{\threevec}[3]{\left[\begin{array}{r}#1 \\ #2 \\ #3 \end{array}\right]}\) \(\newcommand{\cthreevec}[3]{\left[\begin{array}{c}#1 \\ #2 \\ #3 \end{array}\right]}\) \(\newcommand{\fourvec}[4]{\left[\begin{array}{r}#1 \\ #2 \\ #3 \\ #4 \end{array}\right]}\) \(\newcommand{\cfourvec}[4]{\left[\begin{array}{c}#1 \\ #2 \\ #3 \\ #4 \end{array}\right]}\) \(\newcommand{\fivevec}[5]{\left[\begin{array}{r}#1 \\ #2 \\ #3 \\ #4 \\ #5 \\ \end{array}\right]}\) \(\newcommand{\cfivevec}[5]{\left[\begin{array}{c}#1 \\ #2 \\ #3 \\ #4 \\ #5 \\ \end{array}\right]}\) \(\newcommand{\mattwo}[4]{\left[\begin{array}{rr}#1 \amp #2 \\ #3 \amp #4 \\ \end{array}\right]}\) \(\newcommand{\laspan}[1]{\text{Span}\{#1\}}\) \(\newcommand{\bcal}{\cal B}\) \(\newcommand{\ccal}{\cal C}\) \(\newcommand{\scal}{\cal S}\) \(\newcommand{\wcal}{\cal W}\) \(\newcommand{\ecal}{\cal E}\) \(\newcommand{\coords}[2]{\left\{#1\right\}_{#2}}\) \(\newcommand{\gray}[1]{\color{gray}{#1}}\) \(\newcommand{\lgray}[1]{\color{lightgray}{#1}}\) \(\newcommand{\rank}{\operatorname{rank}}\) \(\newcommand{\row}{\text{Row}}\) \(\newcommand{\col}{\text{Col}}\) \(\renewcommand{\row}{\text{Row}}\) \(\newcommand{\nul}{\text{Nul}}\) \(\newcommand{\var}{\text{Var}}\) \(\newcommand{\corr}{\text{corr}}\) \(\newcommand{\len}[1]{\left|#1\right|}\) \(\newcommand{\bbar}{\overline{\bvec}}\) \(\newcommand{\bhat}{\widehat{\bvec}}\) \(\newcommand{\bperp}{\bvec^\perp}\) \(\newcommand{\xhat}{\widehat{\xvec}}\) \(\newcommand{\vhat}{\widehat{\vvec}}\) \(\newcommand{\uhat}{\widehat{\uvec}}\) \(\newcommand{\what}{\widehat{\wvec}}\) \(\newcommand{\Sighat}{\widehat{\Sigma}}\) \(\newcommand{\lt}{<}\) \(\newcommand{\gt}{>}\) \(\newcommand{\amp}{&}\) \(\definecolor{fillinmathshade}{gray}{0.9}\)The ionization energy (IE), or more properly the ionization enthalpy, is defined as the energy required to loose an electron from a gaseous atom or ion.
\[M^{n+}_{(g)} \rightarrow M^{(n+1)+}_{(g)} + e^-\]
Each subsequent ionization energy is greater than the previous one because of the increase in charge on the ion. For example, for any given atom or ion the 1st ionization energy is less than the 2nd ionization energy, and so on. This is shown in Table \(\PageIndex{1}\).1.
| Ionization | Ionization energy (kJ/mol) |
| \[Al^0 \rightarrow Al^+ + e^-\] | 548 |
| \[Al^+ \rightarrow Al^{2+} + e^-\] | 1823 |
| \[Al^{2+} \rightarrow Al^{3+} + e^-\] | 2751 |
How does the ionization energy vary with elements in the periodic table? If we consider the 1st ionization potential of the elements in a particular group of the periodic table we note that there is a decrease in ionization potential as you go down the Group. The reason for this trend is due to the increased shielding of the outer shell electrons (ns1) by the completed (filled) inner shells. The ns1 electron thus exhibits a lower effective nuclear charge and makes it easier to remove. For example, Table \(\PageIndex{1}\).2 shows the 1st ionization potential for the Group 1 alkali metals.
| Element |
Ionization energy (kJ/mol) |
| Li | 526 |
| Na | 502 |
| K | 425 |
| Rb | 409 |
| Cs | 382 |
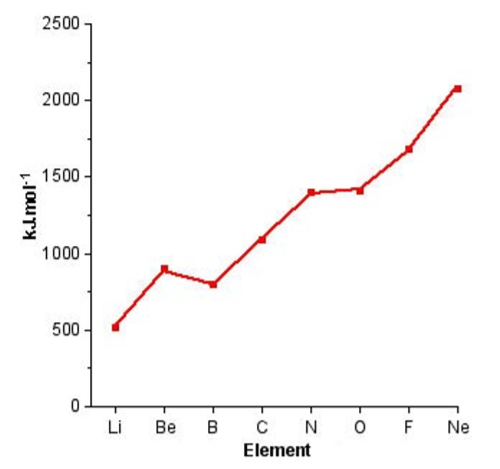
In contrast, to individual Groups, moving across a particular Period results in a general increase in the ionization potential as is shown in Figure \(\PageIndex{1}\).1. The lack of additional screening of filled shells across the Period means that the ionization energy for the outer shell electrons is dominated by the increase in nuclear charge (number of protons) with increased atomic number.

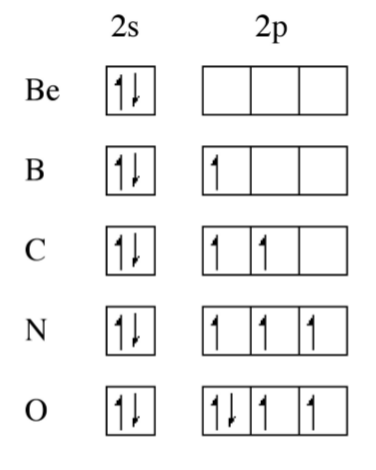
From Figure \(\PageIndex{1}\).1 it can be seen that the Periodic trend is not linear, there are significant steps in the plot. Boron, for example, has a lower first ionization potential than beryllium, why? A consideration of the electron configuration for the elements provides in answer (Figure \(\PageIndex{1}\).2). Beryllium has a 2s2 outer shell configuration, while boron has a 2s2 2p1 configuration. The 2p1 electron is easy to remove because it exhibits increased shielding from the nucleus due to the filled 2s orbital.

As we move from, boron to nitrogen, the 2p shell is filled (Figure \(\PageIndex{1}\).2) without additional shielding and the effect of the increased nuclear charge dominates. Finally, the 2p4 configuration for oxygen (Figure \(\PageIndex{1}\).2) results in an electron pair, which repel each other, thus making it easier to remove an electron (lower ionization potential) that expected from the increased nuclear charge. From Figure \(\PageIndex{1}\) we can see that the effect of electron pairing is less than that of a filled shell.
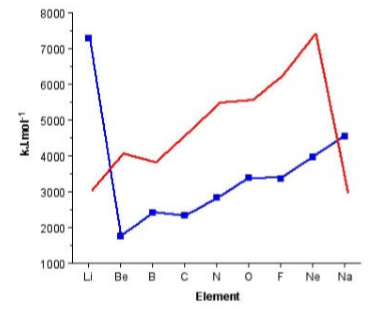
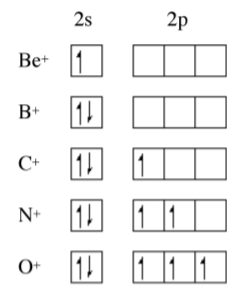
The trend for the 2nd ionization potential is similar, but different, to that of the 1st ionization potential. As may be seen in Figure \(\PageIndex{1}\).3 the steps observed for the 1st ionization energy plot (i.e., between Be/B and N/O have moved one element to the right. A view of the electron conguration for the E+ ions (Figure \(\PageIndex{1}\).4) shows that the rational for the trend in the 1st ionization potential trends still applies but to the ion of the element to the right in the Periodic table. Now B+ has a 2s2 outer shell conguration, while C+ has a 2s2 2p1 configuration. A similar plot for the 3rd ionization energy would move the steps another element to the right.


The other observation to be made from Figure \(\PageIndex{1}\).3 is the very large 2nd ionization potential for lithium associated with the ionization of Li+ to Li2+. The large increase is due to the removal of an electron from the filled 1s2 shell.


