Resonance
- Page ID
- 53417
\( \newcommand{\vecs}[1]{\overset { \scriptstyle \rightharpoonup} {\mathbf{#1}} } \)
\( \newcommand{\vecd}[1]{\overset{-\!-\!\rightharpoonup}{\vphantom{a}\smash {#1}}} \)
\( \newcommand{\dsum}{\displaystyle\sum\limits} \)
\( \newcommand{\dint}{\displaystyle\int\limits} \)
\( \newcommand{\dlim}{\displaystyle\lim\limits} \)
\( \newcommand{\id}{\mathrm{id}}\) \( \newcommand{\Span}{\mathrm{span}}\)
( \newcommand{\kernel}{\mathrm{null}\,}\) \( \newcommand{\range}{\mathrm{range}\,}\)
\( \newcommand{\RealPart}{\mathrm{Re}}\) \( \newcommand{\ImaginaryPart}{\mathrm{Im}}\)
\( \newcommand{\Argument}{\mathrm{Arg}}\) \( \newcommand{\norm}[1]{\| #1 \|}\)
\( \newcommand{\inner}[2]{\langle #1, #2 \rangle}\)
\( \newcommand{\Span}{\mathrm{span}}\)
\( \newcommand{\id}{\mathrm{id}}\)
\( \newcommand{\Span}{\mathrm{span}}\)
\( \newcommand{\kernel}{\mathrm{null}\,}\)
\( \newcommand{\range}{\mathrm{range}\,}\)
\( \newcommand{\RealPart}{\mathrm{Re}}\)
\( \newcommand{\ImaginaryPart}{\mathrm{Im}}\)
\( \newcommand{\Argument}{\mathrm{Arg}}\)
\( \newcommand{\norm}[1]{\| #1 \|}\)
\( \newcommand{\inner}[2]{\langle #1, #2 \rangle}\)
\( \newcommand{\Span}{\mathrm{span}}\) \( \newcommand{\AA}{\unicode[.8,0]{x212B}}\)
\( \newcommand{\vectorA}[1]{\vec{#1}} % arrow\)
\( \newcommand{\vectorAt}[1]{\vec{\text{#1}}} % arrow\)
\( \newcommand{\vectorB}[1]{\overset { \scriptstyle \rightharpoonup} {\mathbf{#1}} } \)
\( \newcommand{\vectorC}[1]{\textbf{#1}} \)
\( \newcommand{\vectorD}[1]{\overrightarrow{#1}} \)
\( \newcommand{\vectorDt}[1]{\overrightarrow{\text{#1}}} \)
\( \newcommand{\vectE}[1]{\overset{-\!-\!\rightharpoonup}{\vphantom{a}\smash{\mathbf {#1}}}} \)
\( \newcommand{\vecs}[1]{\overset { \scriptstyle \rightharpoonup} {\mathbf{#1}} } \)
\(\newcommand{\longvect}{\overrightarrow}\)
\( \newcommand{\vecd}[1]{\overset{-\!-\!\rightharpoonup}{\vphantom{a}\smash {#1}}} \)
\(\newcommand{\avec}{\mathbf a}\) \(\newcommand{\bvec}{\mathbf b}\) \(\newcommand{\cvec}{\mathbf c}\) \(\newcommand{\dvec}{\mathbf d}\) \(\newcommand{\dtil}{\widetilde{\mathbf d}}\) \(\newcommand{\evec}{\mathbf e}\) \(\newcommand{\fvec}{\mathbf f}\) \(\newcommand{\nvec}{\mathbf n}\) \(\newcommand{\pvec}{\mathbf p}\) \(\newcommand{\qvec}{\mathbf q}\) \(\newcommand{\svec}{\mathbf s}\) \(\newcommand{\tvec}{\mathbf t}\) \(\newcommand{\uvec}{\mathbf u}\) \(\newcommand{\vvec}{\mathbf v}\) \(\newcommand{\wvec}{\mathbf w}\) \(\newcommand{\xvec}{\mathbf x}\) \(\newcommand{\yvec}{\mathbf y}\) \(\newcommand{\zvec}{\mathbf z}\) \(\newcommand{\rvec}{\mathbf r}\) \(\newcommand{\mvec}{\mathbf m}\) \(\newcommand{\zerovec}{\mathbf 0}\) \(\newcommand{\onevec}{\mathbf 1}\) \(\newcommand{\real}{\mathbb R}\) \(\newcommand{\twovec}[2]{\left[\begin{array}{r}#1 \\ #2 \end{array}\right]}\) \(\newcommand{\ctwovec}[2]{\left[\begin{array}{c}#1 \\ #2 \end{array}\right]}\) \(\newcommand{\threevec}[3]{\left[\begin{array}{r}#1 \\ #2 \\ #3 \end{array}\right]}\) \(\newcommand{\cthreevec}[3]{\left[\begin{array}{c}#1 \\ #2 \\ #3 \end{array}\right]}\) \(\newcommand{\fourvec}[4]{\left[\begin{array}{r}#1 \\ #2 \\ #3 \\ #4 \end{array}\right]}\) \(\newcommand{\cfourvec}[4]{\left[\begin{array}{c}#1 \\ #2 \\ #3 \\ #4 \end{array}\right]}\) \(\newcommand{\fivevec}[5]{\left[\begin{array}{r}#1 \\ #2 \\ #3 \\ #4 \\ #5 \\ \end{array}\right]}\) \(\newcommand{\cfivevec}[5]{\left[\begin{array}{c}#1 \\ #2 \\ #3 \\ #4 \\ #5 \\ \end{array}\right]}\) \(\newcommand{\mattwo}[4]{\left[\begin{array}{rr}#1 \amp #2 \\ #3 \amp #4 \\ \end{array}\right]}\) \(\newcommand{\laspan}[1]{\text{Span}\{#1\}}\) \(\newcommand{\bcal}{\cal B}\) \(\newcommand{\ccal}{\cal C}\) \(\newcommand{\scal}{\cal S}\) \(\newcommand{\wcal}{\cal W}\) \(\newcommand{\ecal}{\cal E}\) \(\newcommand{\coords}[2]{\left\{#1\right\}_{#2}}\) \(\newcommand{\gray}[1]{\color{gray}{#1}}\) \(\newcommand{\lgray}[1]{\color{lightgray}{#1}}\) \(\newcommand{\rank}{\operatorname{rank}}\) \(\newcommand{\row}{\text{Row}}\) \(\newcommand{\col}{\text{Col}}\) \(\renewcommand{\row}{\text{Row}}\) \(\newcommand{\nul}{\text{Nul}}\) \(\newcommand{\var}{\text{Var}}\) \(\newcommand{\corr}{\text{corr}}\) \(\newcommand{\len}[1]{\left|#1\right|}\) \(\newcommand{\bbar}{\overline{\bvec}}\) \(\newcommand{\bhat}{\widehat{\bvec}}\) \(\newcommand{\bperp}{\bvec^\perp}\) \(\newcommand{\xhat}{\widehat{\xvec}}\) \(\newcommand{\vhat}{\widehat{\vvec}}\) \(\newcommand{\uhat}{\widehat{\uvec}}\) \(\newcommand{\what}{\widehat{\wvec}}\) \(\newcommand{\Sighat}{\widehat{\Sigma}}\) \(\newcommand{\lt}{<}\) \(\newcommand{\gt}{>}\) \(\newcommand{\amp}{&}\) \(\definecolor{fillinmathshade}{gray}{0.9}\)Skills to Develop
- Describe the 3 types of resonance
We previously discussed a different kind of resonance, which is the tendency of some systems, such as the strings of instruments, to vibrate easily at particular frequencies. Now we will talk about quantum mechanical resonance. First, it may be easier to understand if you think about Fourier analysis. Perhaps you have heard before that any function can be written as a sum of sin and cos waves, like this:
\[f(x) = \Sigma_{n} a_{n}sin(nx) + \Sigma_{m} b_{m} cos(mx)\]
When we try to find wavefunctions for real chemical systems, it is too complicated to find an exact solution like the solutions for single hydrogen atoms. Instead, we usually describe the real wavefunction ψ(x,y,z,t) using series of functions (call them φ(x,y,z,t)) like a Fourier transform.
\[\Psi = \Sigma_{n} a_{n} \varphi_{n} (x, y, z, t)\]
Often the functions φn used to build the real wavefunction ψ are the hydrogen wavefunctions we talked about before, including s, p, d, and f orbitals in each shell. There is a principle that says that if you choose the coefficients (an) so that the energy of the total wavefunction is minimized, those are the best coefficients that get closest to the real wavefunction ψ. In other words, real life finds the lowest possible energy (highest stability), so the lowest energy we can find is the closest to the real thing. If we imagine a system that might be described by φ1 or φ2,
\[\Psi = a \varphi_{1} + b \varphi_{2} \]
we can calculate the ratio a:b that minimizes the energy of ψ. If a:b is very big, φ1 is a good description of the system (at least compared to φ2). If a:b is very small, φ2 is a good description. If a:b is close to 1, then the real system is somewhere in between. The system is described as resonating between the two states. This doesn't mean that it alternates between them. It's like the difference between blue and yellow stripes (alternating between colors), and green (resonance, a mix of blue and yellow). The energy calculated for the combination will be lower than either single energy, and this difference is called the resonance energy.

Example
We can use different Lewis structures to represent the trial wavefunctions φ. For instance, imagine the formation of a bond between a H atom and a H+ ion (H nucleus). We can consider 2 trial wavefunctions corresponding to the following structures:
Structure 1: HA+ • HB
Structure 2: HA • HB+
If we calculate energy as a function of distance between the nuclei, for either structure 1 or structure 2 we don't predict a bond to form (instead, we expect the nucleus and atom to repel each other). If we allow resonance between structure 1 and structure 2, then we find that at a certain distance, 1.06 Å, the energy is a minimum. This means a bond can form. The resonance between the 2 structures means that the electron spends time near both nuclei. Since it has to move back and forth (very quickly, but maybe in a random motion, we don't know exactly), it must spend more of its time between the nuclei. When it is between them, we can expect that both nuclei are attracted to the electron, so it holds them together in a bond.
Ionic Resonance in H2
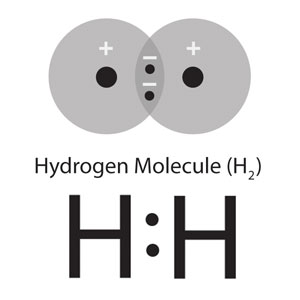
In the hydrogen molecule, we can use a similar model. We use the 2 structures HA(1) • HB(2) + HA(2) • HB(1) (where HA and HB are the 2 nuclei, and 1 and 2 are the electrons) to represent the normal covalent bond, H—H. We get closer to the experimental data when we include the ionic structures [HA+][:HB–] + [:HA–][HB+]. At the normal bond length, the Coulomb attraction between the ions makes these structures stable enough to contribute about 2% to the full description of the molecule.

Ionic Resonance in Other Bonds
Ionic resonance structures are much more important in cases where the bond is between different elements. For instance, in HF, we expect the structure [F–][H+] to be very important, perhaps as important as H—F, because F pulls much harder on electrons. We will keep discussing this in the next sections.

Outside Links
- Khan Academy: Resonance (12 min)
- Khan Academy: Resonance and dot structures (6 min)
Contributors and Attributions
Emily V Eames (City College of San Francisco)

