4. Combinations of Half Cells
- Page ID
- 3848
\( \newcommand{\vecs}[1]{\overset { \scriptstyle \rightharpoonup} {\mathbf{#1}} } \)
\( \newcommand{\vecd}[1]{\overset{-\!-\!\rightharpoonup}{\vphantom{a}\smash {#1}}} \)
\( \newcommand{\dsum}{\displaystyle\sum\limits} \)
\( \newcommand{\dint}{\displaystyle\int\limits} \)
\( \newcommand{\dlim}{\displaystyle\lim\limits} \)
\( \newcommand{\id}{\mathrm{id}}\) \( \newcommand{\Span}{\mathrm{span}}\)
( \newcommand{\kernel}{\mathrm{null}\,}\) \( \newcommand{\range}{\mathrm{range}\,}\)
\( \newcommand{\RealPart}{\mathrm{Re}}\) \( \newcommand{\ImaginaryPart}{\mathrm{Im}}\)
\( \newcommand{\Argument}{\mathrm{Arg}}\) \( \newcommand{\norm}[1]{\| #1 \|}\)
\( \newcommand{\inner}[2]{\langle #1, #2 \rangle}\)
\( \newcommand{\Span}{\mathrm{span}}\)
\( \newcommand{\id}{\mathrm{id}}\)
\( \newcommand{\Span}{\mathrm{span}}\)
\( \newcommand{\kernel}{\mathrm{null}\,}\)
\( \newcommand{\range}{\mathrm{range}\,}\)
\( \newcommand{\RealPart}{\mathrm{Re}}\)
\( \newcommand{\ImaginaryPart}{\mathrm{Im}}\)
\( \newcommand{\Argument}{\mathrm{Arg}}\)
\( \newcommand{\norm}[1]{\| #1 \|}\)
\( \newcommand{\inner}[2]{\langle #1, #2 \rangle}\)
\( \newcommand{\Span}{\mathrm{span}}\) \( \newcommand{\AA}{\unicode[.8,0]{x212B}}\)
\( \newcommand{\vectorA}[1]{\vec{#1}} % arrow\)
\( \newcommand{\vectorAt}[1]{\vec{\text{#1}}} % arrow\)
\( \newcommand{\vectorB}[1]{\overset { \scriptstyle \rightharpoonup} {\mathbf{#1}} } \)
\( \newcommand{\vectorC}[1]{\textbf{#1}} \)
\( \newcommand{\vectorD}[1]{\overrightarrow{#1}} \)
\( \newcommand{\vectorDt}[1]{\overrightarrow{\text{#1}}} \)
\( \newcommand{\vectE}[1]{\overset{-\!-\!\rightharpoonup}{\vphantom{a}\smash{\mathbf {#1}}}} \)
\( \newcommand{\vecs}[1]{\overset { \scriptstyle \rightharpoonup} {\mathbf{#1}} } \)
\(\newcommand{\longvect}{\overrightarrow}\)
\( \newcommand{\vecd}[1]{\overset{-\!-\!\rightharpoonup}{\vphantom{a}\smash {#1}}} \)
\(\newcommand{\avec}{\mathbf a}\) \(\newcommand{\bvec}{\mathbf b}\) \(\newcommand{\cvec}{\mathbf c}\) \(\newcommand{\dvec}{\mathbf d}\) \(\newcommand{\dtil}{\widetilde{\mathbf d}}\) \(\newcommand{\evec}{\mathbf e}\) \(\newcommand{\fvec}{\mathbf f}\) \(\newcommand{\nvec}{\mathbf n}\) \(\newcommand{\pvec}{\mathbf p}\) \(\newcommand{\qvec}{\mathbf q}\) \(\newcommand{\svec}{\mathbf s}\) \(\newcommand{\tvec}{\mathbf t}\) \(\newcommand{\uvec}{\mathbf u}\) \(\newcommand{\vvec}{\mathbf v}\) \(\newcommand{\wvec}{\mathbf w}\) \(\newcommand{\xvec}{\mathbf x}\) \(\newcommand{\yvec}{\mathbf y}\) \(\newcommand{\zvec}{\mathbf z}\) \(\newcommand{\rvec}{\mathbf r}\) \(\newcommand{\mvec}{\mathbf m}\) \(\newcommand{\zerovec}{\mathbf 0}\) \(\newcommand{\onevec}{\mathbf 1}\) \(\newcommand{\real}{\mathbb R}\) \(\newcommand{\twovec}[2]{\left[\begin{array}{r}#1 \\ #2 \end{array}\right]}\) \(\newcommand{\ctwovec}[2]{\left[\begin{array}{c}#1 \\ #2 \end{array}\right]}\) \(\newcommand{\threevec}[3]{\left[\begin{array}{r}#1 \\ #2 \\ #3 \end{array}\right]}\) \(\newcommand{\cthreevec}[3]{\left[\begin{array}{c}#1 \\ #2 \\ #3 \end{array}\right]}\) \(\newcommand{\fourvec}[4]{\left[\begin{array}{r}#1 \\ #2 \\ #3 \\ #4 \end{array}\right]}\) \(\newcommand{\cfourvec}[4]{\left[\begin{array}{c}#1 \\ #2 \\ #3 \\ #4 \end{array}\right]}\) \(\newcommand{\fivevec}[5]{\left[\begin{array}{r}#1 \\ #2 \\ #3 \\ #4 \\ #5 \\ \end{array}\right]}\) \(\newcommand{\cfivevec}[5]{\left[\begin{array}{c}#1 \\ #2 \\ #3 \\ #4 \\ #5 \\ \end{array}\right]}\) \(\newcommand{\mattwo}[4]{\left[\begin{array}{rr}#1 \amp #2 \\ #3 \amp #4 \\ \end{array}\right]}\) \(\newcommand{\laspan}[1]{\text{Span}\{#1\}}\) \(\newcommand{\bcal}{\cal B}\) \(\newcommand{\ccal}{\cal C}\) \(\newcommand{\scal}{\cal S}\) \(\newcommand{\wcal}{\cal W}\) \(\newcommand{\ecal}{\cal E}\) \(\newcommand{\coords}[2]{\left\{#1\right\}_{#2}}\) \(\newcommand{\gray}[1]{\color{gray}{#1}}\) \(\newcommand{\lgray}[1]{\color{lightgray}{#1}}\) \(\newcommand{\rank}{\operatorname{rank}}\) \(\newcommand{\row}{\text{Row}}\) \(\newcommand{\col}{\text{Col}}\) \(\renewcommand{\row}{\text{Row}}\) \(\newcommand{\nul}{\text{Nul}}\) \(\newcommand{\var}{\text{Var}}\) \(\newcommand{\corr}{\text{corr}}\) \(\newcommand{\len}[1]{\left|#1\right|}\) \(\newcommand{\bbar}{\overline{\bvec}}\) \(\newcommand{\bhat}{\widehat{\bvec}}\) \(\newcommand{\bperp}{\bvec^\perp}\) \(\newcommand{\xhat}{\widehat{\xvec}}\) \(\newcommand{\vhat}{\widehat{\vvec}}\) \(\newcommand{\uhat}{\widehat{\uvec}}\) \(\newcommand{\what}{\widehat{\wvec}}\) \(\newcommand{\Sighat}{\widehat{\Sigma}}\) \(\newcommand{\lt}{<}\) \(\newcommand{\gt}{>}\) \(\newcommand{\amp}{&}\) \(\definecolor{fillinmathshade}{gray}{0.9}\)
p{
 color: blue;
 font-family: Helvetica, Arial;
 text-align: left;
}
Combining a zinc with a copper half cell
So far in this series of pages, we have looked at combinations of a hydrogen electrode with the half cell we have been interested in. However, there isn't any reason why you can't couple any two half cells together.
This next bit looks at what happens if you combine a zinc half cell with a copper half cell.
In the presence of a high resistance voltmeter
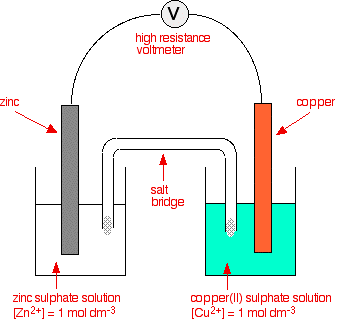
The two equilibria which are set up in the half cells are:
![]()
![]()
![]()
![]()
The negative sign of the zinc E° value shows that it releases electrons more readily than hydrogen does. The positive sign of the copper E° shows that it releases electrons less readily than hydrogen.
That means that you can compare any two equilibria directly. For example, in this case you can see that the zinc releases electrons more readily than the copper does - the position of the zinc equilibrium lies further to the left than the copper equilibrium.
Stripping everything else out of the diagram, and looking only at the build up of electrons on the two pieces of metal:
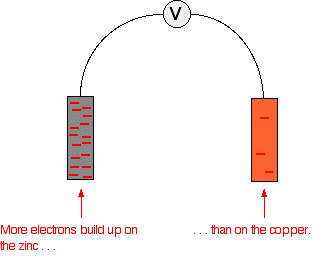
Obviously, the voltmeter will show that the zinc is the negative electrode, and copper is the (relatively) positive one. It will register a voltage showing the difference between them.
Removing the voltmeter
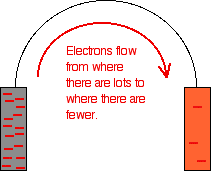
The high resistance of the voltmeter is deliberately designed to stop any current flow in the circuit. What happens if you remove the voltmeter and replace it with a bit of wire?
Electrons will flow from where there are a lot of them (on the zinc) to where there are fewer (on the copper). The movement of the electrons is an electrical current.
The effect of this on the equilibria
These are just simple equilibria, and you can apply Le Chatelier's Principle to them.
Electrons are flowing away from the zinc equilibrium. According to Le Chatelier's Principle, the position of equilibrium will move to replace the lost electrons.
Electrons are being dumped onto the piece of copper in the copper equilibrium. According to Le Chatelier's Principle, the position of equilibrium will move to remove these extra electrons.
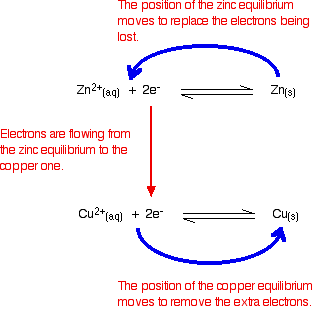
If electrons continue to flow, the positions of equilibrium keep on shifting. The two equilibria essentially turn into two one-way reactions. The zinc continues to ionise, and the copper(II) ions keep on picking up electrons.
![]()
![]()
![]()
![]()
Taking the apparatus as a whole, there is a chemical reaction going on in which zinc is going into solution as zinc ions, and is giving electrons to copper(II) ions to turn them into metallic copper.
Relating this to a test tube reaction
This is exactly the same reaction that occurs when you drop a piece of zinc into some copper(II) sulphate solution. The blue colour of the solution fades as the copper(II) ions are converted into brown copper metal. The final solution contains zinc sulphate. (The sulphate ions are spectator ions.)
You can add the two electron-half-equations above to give the overall ionic equation for the reaction.
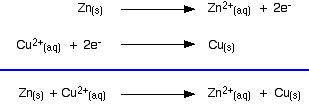
The only difference in this case is that the zinc gives the electrons directly to the copper(II) ions rather than the electrons having to travel along a bit of wire first.
The test tube reaction happens because of the relative tendency of the zinc and copper to lose electrons to form ions. You can find out this relative tendency by looking at the E° values. That means that any redox reaction could be discussed in a similar way.
The rest of the examples on this page illustrate this.
The reaction between copper and silver nitrate solution
The reaction in a test tube
If you hang a coil of copper wire in some colourless silver nitrate solution, the copper gets covered in silver - partly as a grey fur, and partly as delicate crystals. The solution turns blue.
Building the ionic equation from the two half-equations:

Removing the voltmeter
The high resistance of the voltmeter is deliberately designed to stop any current flow in the circuit. What happens if you remove the voltmeter and replace it with a bit of wire?
Electrons will flow from where there are a lot of them (on the zinc) to where there are fewer (on the copper). The movement of the electrons is an electrical current.

The effect of this on the equilibria
These are just simple equilibria, and you can apply Le Chatelier's Principle to them.
Electrons are flowing away from the zinc equilibrium. According to Le Chatelier's Principle, the position of equilibrium will move to replace the lost electrons.
Electrons are being dumped onto the piece of copper in the copper equilibrium. According to Le Chatelier's Principle, the position of equilibrium will move to remove these extra electrons.

If electrons continue to flow, the positions of equilibrium keep on shifting. The two equilibria essentially turn into two one-way reactions. The zinc continues to ionise, and the copper(II) ions keep on picking up electrons.
![]()
![]()
![]()
![]()
Taking the apparatus as a whole, there is a chemical reaction going on in which zinc is going into solution as zinc ions, and is giving electrons to copper(II) ions to turn them into metallic copper.
Relating this to a test tube reaction
This is exactly the same reaction that occurs when you drop a piece of zinc into some copper(II) sulphate solution. The blue colour of the solution fades as the copper(II) ions are converted into brown copper metal. The final solution contains zinc sulphate. (The sulphate ions are spectator ions.)
You can add the two electron-half-equations above to give the overall ionic equation for the reaction.

The only difference in this case is that the zinc gives the electrons directly to the copper(II) ions rather than the electrons having to travel along a bit of wire first.
The test tube reaction happens because of the relative tendency of the zinc and copper to lose electrons to form ions. You can find out this relative tendency by looking at the E° values. That means that any redox reaction could be discussed in a similar way.
The rest of the examples on this page illustrate this.
The reaction between copper and silver nitrate solution
The reaction in a test tube
If you hang a coil of copper wire in some colourless silver nitrate solution, the copper gets covered in silver - partly as a grey fur, and partly as delicate crystals. The solution turns blue.
Building the ionic equation from the two half-equations:

Working from the redox potentials
How does this relate to the E° values for copper and silver?
![]()
![]()
![]()
![]()
You can see that both of these E° values are positive. Neither copper nor silver produce ions and release electrons as easily as hydrogen does.
However, of the two, copper releases electrons more readily. In a cell, the copper would have the greater build up of electrons, and be the negative electrode. If the copper and silver were connected by a bit of wire, electrons would flow from the copper to the silver.
That, of course, will upset the two equilibria:
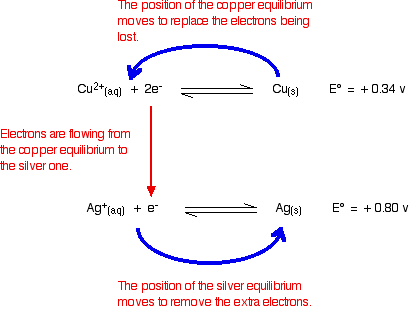
Electrons will continue to flow and the two equilibria will again turn into one-way reactions to give the electron-half-equations we've just used to build the ionic equation. Showing that again:

A useful "rule of thumb"
Whenever you link two of these equilibria together (either via a bit of wire, or by allowing one of the substances to give electrons directly to another one in a test tube):
-
The equilibrium with the more negative (or less positive) E° value will move to the left.
-
The equilibrium with the more positive (or less negative) E° value will move to the right.
It sounds simple, but that is the key to using E° values in most of the situations you will come across.
The reaction between magnesium and dilute sulfuric acid
The reaction in a test tube
Magnesium reacts with dilute sulphuric acid to give hydrogen and a colourless solution containing magnesium sulphate.
Is this what you would expect from the E° values?
Working from the redox potentials
Putting all the argument onto one diagram:
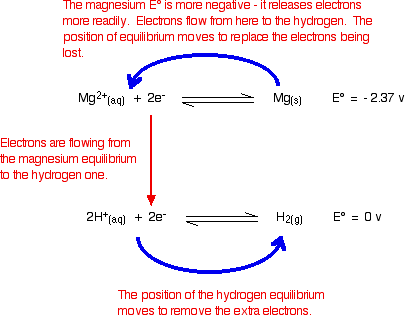
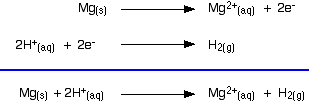
The two equilibria become one-way reactions which you can use to build the ionic equation:
Using potassium dichromate(VI) as an oxidising agent
The reaction in a test tube
Potassium dichromate(VI) acidified with dilute sulphuric acid oxidises iron(II) ions to iron(III) ions. The orange solution containing the dichromate(VI) ions turns green as chromium(III) ions are formed.
How does this relate to the E° values?
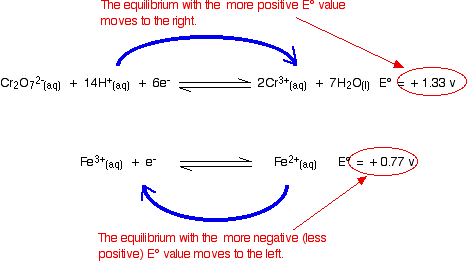
Building the ionic equation then works like this:


