
Extra Credit 11
- Page ID
- 82921
\( \newcommand{\vecs}[1]{\overset { \scriptstyle \rightharpoonup} {\mathbf{#1}} } \)
\( \newcommand{\vecd}[1]{\overset{-\!-\!\rightharpoonup}{\vphantom{a}\smash {#1}}} \)
\( \newcommand{\id}{\mathrm{id}}\) \( \newcommand{\Span}{\mathrm{span}}\)
( \newcommand{\kernel}{\mathrm{null}\,}\) \( \newcommand{\range}{\mathrm{range}\,}\)
\( \newcommand{\RealPart}{\mathrm{Re}}\) \( \newcommand{\ImaginaryPart}{\mathrm{Im}}\)
\( \newcommand{\Argument}{\mathrm{Arg}}\) \( \newcommand{\norm}[1]{\| #1 \|}\)
\( \newcommand{\inner}[2]{\langle #1, #2 \rangle}\)
\( \newcommand{\Span}{\mathrm{span}}\)
\( \newcommand{\id}{\mathrm{id}}\)
\( \newcommand{\Span}{\mathrm{span}}\)
\( \newcommand{\kernel}{\mathrm{null}\,}\)
\( \newcommand{\range}{\mathrm{range}\,}\)
\( \newcommand{\RealPart}{\mathrm{Re}}\)
\( \newcommand{\ImaginaryPart}{\mathrm{Im}}\)
\( \newcommand{\Argument}{\mathrm{Arg}}\)
\( \newcommand{\norm}[1]{\| #1 \|}\)
\( \newcommand{\inner}[2]{\langle #1, #2 \rangle}\)
\( \newcommand{\Span}{\mathrm{span}}\) \( \newcommand{\AA}{\unicode[.8,0]{x212B}}\)
\( \newcommand{\vectorA}[1]{\vec{#1}} % arrow\)
\( \newcommand{\vectorAt}[1]{\vec{\text{#1}}} % arrow\)
\( \newcommand{\vectorB}[1]{\overset { \scriptstyle \rightharpoonup} {\mathbf{#1}} } \)
\( \newcommand{\vectorC}[1]{\textbf{#1}} \)
\( \newcommand{\vectorD}[1]{\overrightarrow{#1}} \)
\( \newcommand{\vectorDt}[1]{\overrightarrow{\text{#1}}} \)
\( \newcommand{\vectE}[1]{\overset{-\!-\!\rightharpoonup}{\vphantom{a}\smash{\mathbf {#1}}}} \)
\( \newcommand{\vecs}[1]{\overset { \scriptstyle \rightharpoonup} {\mathbf{#1}} } \)
\( \newcommand{\vecd}[1]{\overset{-\!-\!\rightharpoonup}{\vphantom{a}\smash {#1}}} \)
\(\newcommand{\avec}{\mathbf a}\) \(\newcommand{\bvec}{\mathbf b}\) \(\newcommand{\cvec}{\mathbf c}\) \(\newcommand{\dvec}{\mathbf d}\) \(\newcommand{\dtil}{\widetilde{\mathbf d}}\) \(\newcommand{\evec}{\mathbf e}\) \(\newcommand{\fvec}{\mathbf f}\) \(\newcommand{\nvec}{\mathbf n}\) \(\newcommand{\pvec}{\mathbf p}\) \(\newcommand{\qvec}{\mathbf q}\) \(\newcommand{\svec}{\mathbf s}\) \(\newcommand{\tvec}{\mathbf t}\) \(\newcommand{\uvec}{\mathbf u}\) \(\newcommand{\vvec}{\mathbf v}\) \(\newcommand{\wvec}{\mathbf w}\) \(\newcommand{\xvec}{\mathbf x}\) \(\newcommand{\yvec}{\mathbf y}\) \(\newcommand{\zvec}{\mathbf z}\) \(\newcommand{\rvec}{\mathbf r}\) \(\newcommand{\mvec}{\mathbf m}\) \(\newcommand{\zerovec}{\mathbf 0}\) \(\newcommand{\onevec}{\mathbf 1}\) \(\newcommand{\real}{\mathbb R}\) \(\newcommand{\twovec}[2]{\left[\begin{array}{r}#1 \\ #2 \end{array}\right]}\) \(\newcommand{\ctwovec}[2]{\left[\begin{array}{c}#1 \\ #2 \end{array}\right]}\) \(\newcommand{\threevec}[3]{\left[\begin{array}{r}#1 \\ #2 \\ #3 \end{array}\right]}\) \(\newcommand{\cthreevec}[3]{\left[\begin{array}{c}#1 \\ #2 \\ #3 \end{array}\right]}\) \(\newcommand{\fourvec}[4]{\left[\begin{array}{r}#1 \\ #2 \\ #3 \\ #4 \end{array}\right]}\) \(\newcommand{\cfourvec}[4]{\left[\begin{array}{c}#1 \\ #2 \\ #3 \\ #4 \end{array}\right]}\) \(\newcommand{\fivevec}[5]{\left[\begin{array}{r}#1 \\ #2 \\ #3 \\ #4 \\ #5 \\ \end{array}\right]}\) \(\newcommand{\cfivevec}[5]{\left[\begin{array}{c}#1 \\ #2 \\ #3 \\ #4 \\ #5 \\ \end{array}\right]}\) \(\newcommand{\mattwo}[4]{\left[\begin{array}{rr}#1 \amp #2 \\ #3 \amp #4 \\ \end{array}\right]}\) \(\newcommand{\laspan}[1]{\text{Span}\{#1\}}\) \(\newcommand{\bcal}{\cal B}\) \(\newcommand{\ccal}{\cal C}\) \(\newcommand{\scal}{\cal S}\) \(\newcommand{\wcal}{\cal W}\) \(\newcommand{\ecal}{\cal E}\) \(\newcommand{\coords}[2]{\left\{#1\right\}_{#2}}\) \(\newcommand{\gray}[1]{\color{gray}{#1}}\) \(\newcommand{\lgray}[1]{\color{lightgray}{#1}}\) \(\newcommand{\rank}{\operatorname{rank}}\) \(\newcommand{\row}{\text{Row}}\) \(\newcommand{\col}{\text{Col}}\) \(\renewcommand{\row}{\text{Row}}\) \(\newcommand{\nul}{\text{Nul}}\) \(\newcommand{\var}{\text{Var}}\) \(\newcommand{\corr}{\text{corr}}\) \(\newcommand{\len}[1]{\left|#1\right|}\) \(\newcommand{\bbar}{\overline{\bvec}}\) \(\newcommand{\bhat}{\widehat{\bvec}}\) \(\newcommand{\bperp}{\bvec^\perp}\) \(\newcommand{\xhat}{\widehat{\xvec}}\) \(\newcommand{\vhat}{\widehat{\vvec}}\) \(\newcommand{\uhat}{\widehat{\uvec}}\) \(\newcommand{\what}{\widehat{\wvec}}\) \(\newcommand{\Sighat}{\widehat{\Sigma}}\) \(\newcommand{\lt}{<}\) \(\newcommand{\gt}{>}\) \(\newcommand{\amp}{&}\) \(\definecolor{fillinmathshade}{gray}{0.9}\)Q17.1.10:
Why must the charge balance in red-ox reactions?
S17.1.10:
Due to the fact that both half-reaction involve either the losing or gaining electrons, the electrons cannot just be destroyed. Therefore, the amount of electrons lost via oxidation of one species must be the same amount gained by the reduced species, so there is a complete transfer of electrons and the charge balances out. If there is an unbalanced number of electrons, then the charge of those half-reactions will be different as well. In order to let them come together, they must have the same charge so that no electrons are created or destroyed.
This is the first law of thermodynamics, the conservation of energy.
Q19.1.9:
Why is the formation of slag useful during the smelting of iron?
S19.1.9:
The formation of slag is useful in the process smelting of iron because it becomes a sacrificial anode so that the iron will not become re-oxizided. Since, CaSiO3 has a higher standard reduction potential than iron then it is more willing to be oxidized. Thus, creating a protective barrier so the oxidization of iron does not occur.
Phase 2 student: The above solution is incorrect. The formation of slag (the waste product when iron is separated from its ore) is useful in the smelting of iron because it has a more negative standard reduction potential than iron, and therefore, will be oxidized in the presence of iron. This means that slag prevents the corrosion (unwanted oxidation) of iron and therefore, acts as a sacrificial anode in cathodic protection (adding a metal higher in the activity series onto the metal so that the lower activity metal is not oxidized) by preventing the re-oxidation of molten iron before it is cooled into its solid pure product.
Q19.3.1:
Determine the number of unpaired electrons expected for [Fe(NO2)6]3- and for [FeF6]3- in terms of crystal field theory.
S19.3.1:
Step One: find the charge of Fe for each complex compound
[Fe(NO2)6]3- the charge of Fe for this complex compound is +3 because the NO2 ligand has a charge of -1 and the overall charge of the complex compound is -3; therefore, -1(6) + Fe = -3; Fe=+3
[FeF6]3- the charge of Fe for this complex compound is +3 because the F ligand has a charge of -1 and the overall charge of the complex compound is -3; therefore, -1(6) + Fe = -3; Fe=+3
Step Two: determine the number of electrons in the d-orbital
for both ligands the number of d-orbital electrons in Fe3+ is 5 electrons because the configuration for Fe is [Ar]4s23d6 and when it loses 3 electrons to have a +3 charge, transition metals lose the 2 4s electrons first, therefore the configuration fo Fe3+ is [Ar]3d5. There are 5 electrons available to fill d-orbitals.
Step Three: Is the complex ion octahedral, square planar, or tetrahedral?
Because there are 6 ligands bound to the transition metal in both [Fe(NO2)6]3- and [FeF6]3- they will have octahedral crystal field splitting of the d-orbitals.
Step Four: Is the compound in low or high spin?
To figure out whether there is in low or high spin, the spectrochemical series will be needed:
weak field I-<Br-<SCN-≈Cl-<F-<OH-< ONO-<ox<H2O<SCN-<EDTA<NH3<en<NO2-<CN- strong field
Strong Field Ligands have a large Δo so the P< Δo for strong field ligands where P is the pairing energy. So, strong field ligands have low spin meaning the dxy, dyz, dxz are filled with electrons first, before the higher energy dx2-y2, and dx2, are filled. Because NO2 is a strong field ligand, [Fe(NO2)6]3- is low spin.
Weak Field Ligands have a small Δo so the P> Δo for weak field ligands where P is the pairing energy. So, weak field ligands have high spin meaning the dxy, dyz, dxz are filled, with one electron in each instead of 2, and then the higher energy dx2-y2, and dx2, are filled with one electron each before then the electrons are placed in the lower orbitals again and then go back up to higher energy orbitals to complete those. Because F- is a weak field ligand, [FeF6]3- is high spin.
Step Five: count the number of unpaired electrons

[Fe(NO2)6]3- is low spin→ 1 unpaired electron

[FeF6]3- is high spin→ 5 unpaired electrons
Q12.4.1:
Describe how graphical methods can be used to determine the order of a reaction and its rate constant from a series of data that includes the concentration of A at varying times.
S12.4.1:
Graphical methods can help determine the order of the reaction and its rate constant where equations for the [A] vs, time for each order reaction is...
zero order (rate=k ) [A]t=-kt+[A]0
first order (rate=k[A]) ln[A]t=-kt+ln[A]0 all of these in the form y=mx+b
second order (rate=k[A]2) 1/[A]t=kt+1/[A]0
In these equations, the rate constant k represents the slope of the graph. To test to see what order a reaction is, you must plot three graphs:
1. [A] vs. time
2. ln[A] vs. time
3. 1/[A] vs. time
Whichever graph has a linear line plot will be the order of the reaction, the slope of the line m is the rate constant...
for a zero order and first order reaction the slope= -k, therefore the rate constant will be -(slope)
for a second order reaction the slope= k, therefore the rate constant will be the slope.
Q12.7.4:
For each of the following pairs of reaction diagrams, identify which of the pair is catalyzed:
(a)
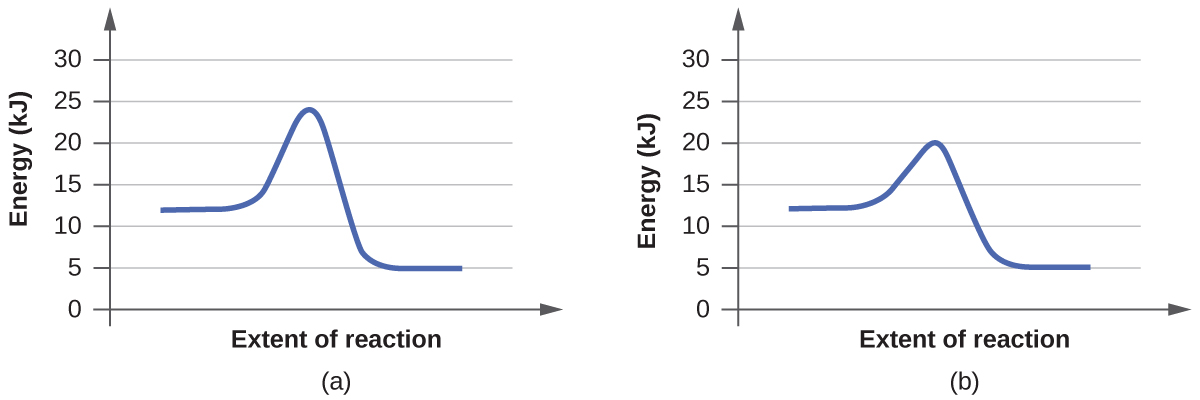
(b)
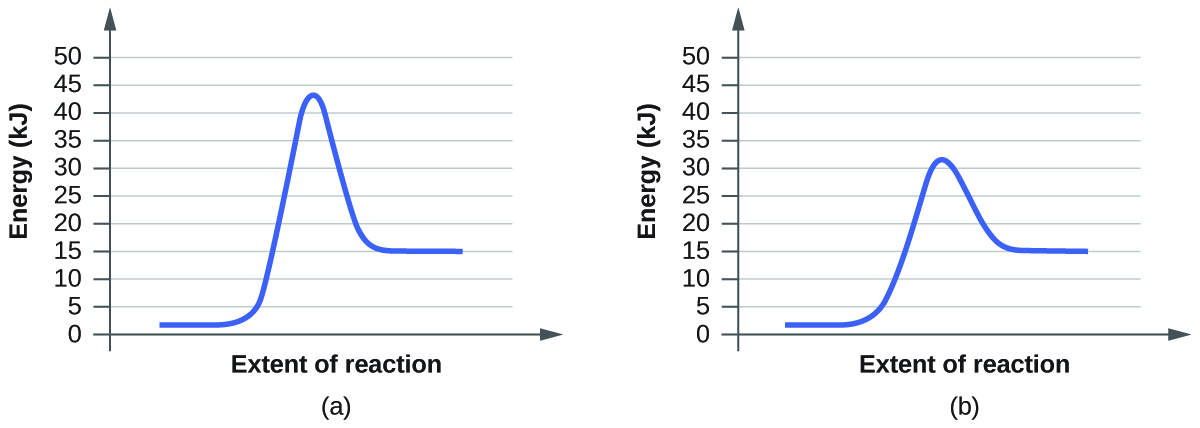
S12.7.4:
Step One: find the difference between the two graphs
(a) the top graph is shorter than the bottom graph
(b) the top graph is taller than the bottom graph
Step Two: which one is shorter
(a) the top graph
(b) the bottom graph
Step Three: explain why it is the graph showing the reactions with a catalyst
(a) Catalyst speed up the process of a reaction; therefore, the activation energy decreases making the graph shorter
(b) Catalyst speed up the process of a reaction; therefore, the activation energy decreases making the graph shorter
Phase 2 student: The above answer is incorrect. A catalyst allows for a new path for the reaction to take with a lower activation energy. The activation energy is the change in potential energy between the transition state and the potential energy of the reactants. The transition state has the highest potential energy in the graph (always).
In the first pair of graphs, graph (a) transition state has about 24 kJ of energy, and the reactants are at 12 kJ energy level. The change in these energies is the activation energy=24-12= 12 kJ. In graph (b) the transition state has about 20 kJ of energy and the reactants have 12 kJ, the same energy as graph (a), because catalysts don't effect the energy of reactants or products, only the activation energy. The change in these energies is the activation energy=20-12= 8 kJ. Because the activation energy is lower in graph (b) of the first pair of graphs, 8<12 kJ, graph (b) is catalyzed.
In the second pair of graphs, graph (a) transition state has about 43 kJ of energy, and the reactants are at 2 kJ energy level. The change in these energies is the activation energy=43-2= 41 kJ. In graph (b) the transition state has about 32 kJ of energy and the reactants have 2kJ, the same energy as graph (a), because catalysts don't effect the energy of reactants or products, only the activation energy. The change in these energies is the activation energy=32-2= 30 kJ. Because the activation energy is lower in graph (b) of the first pair of graphs, 30<41 kJ, graph (b) is catalyzed.
Q21.4.27:
Write a balanced equation for each of the following nuclear reactions:
- bismuth-212 decays into polonium-212
- beryllium-8 and a positron are produced by the decay of an unstable nucleus
- neptunium-239 forms from the reaction of uranium-238 with a neutron and then spontaneously converts into plutonium-239
- strontium-90 decays into yttrium-90
S21.4.27:
Step One: write element(s) and particle(s) in their ZAX notation using the periodic table where Z is mass number (number of protons+neutrons), A is atomic number of the element (number of protons, and this is unique to every element), and X is the element:
(a) a 21283Bi decays into 21284Po
(b) 84Be and a 01e are produced by a decay of an unstable nucleus
(c) 23993Np forms from the reaction of 23892U with a 10n and then spontaneously convert into 23994Pu
(d) 9038Sr decays into 9039Y
Step Two: decide where the given elements are on the product or reactant side of the equation
(a) 21283Bi decays; thus, it is on the reactant side. 21284Po is what it decays into; therefore, it is on the products side
(b) 84Be and 01e are produced; thus, they're on the products side
(c) 23993Np forms; therefore, it is on the products side for the first equation. For the second equation23993Np will be converted; thus, it is on the reactant side. 23892U and a neutron form 23993Np; therefore, they are on the reactants side for the first equation and they are not in the second equation at all. 23994Pu is converted from 23993Np; therefore, it is on the products side of the second equation and it is not involved in the first
(d) 9038Sr decays, so it is on the reactants side and 9039Y was what it decayed into; thus, it is on the products side
Step Three: writing the unbalanced equation
(a) 21283Bi→ 21284Po + ?
(b) ? → 84Be+01e
(c) 23892U+10n→23993Np +? then 23993Np →23994Pu + ?
(d) 9038Sr→9039Y
Step Four: writing the balanced equation
(a) 21283Bi→21284Po+0-1e 0-1e is added to the equation to balance out the protons. Beta decay.
(b) 85B→84Be+01e 85B is added as reactant because the masses of the 84Be and 01e add up to 8, and the protons added up to 5. +Beta decay
(c) 23892U+10n→23993Np+0-1e
23993Np→23994Pu+0-1e- so then...
23892U+10n→23993Np + 0-1e→ 23994Pu + 2 0-1e
The 0-1e is added to the first equation to make sure there are the same number of protons both sides of the equation. And the 2 0-1e is added to the second equation for the same reason as the first.
(d) 9038Sr→9039Y+0-1e The 0-1e is added to the products sided to make sure that there are the same number of protons on both sides of the equation. Beta decay.
Q20.3.13:
For each galvanic cell represented by these cell diagrams, determine the spontaneous half-reactions and the overall reaction. Indicate which reaction occurs at the anode and which occurs at the cathode.
- Zn(s)∣Zn2+(aq) ∥ H+(aq)∣H2(g), Pt(s)
- Ag(s)∣AgCl(s)∣Cl−(aq) ∥ H+(aq)∣H2(g)∣Pt(s)
- Pt(s)∣H2(g)∣H+(aq) ∥ Fe2+(aq), Fe3+(aq)∣Pt(s)
S20.3.13:
Step One: find out what compound/element is being oxidized (losing electrons) and which is being reduced (gaining electrons): The reaction on the left of the of the double ll is always the oxidation reaction (reaction at the anode), and the reaction on the right of the ll is always the reduction reaction (reaction at the cathode)..
(a) Zn(s)-oxidized & H+(aq)-reduced: The reactant for the anode is Zn(s) which has an oxidation number of 0, and the product is Zn2+ which indications solid Zn lost 2 electrons and therefore was oxidized. The cathode reactant was H+ with has an oxidation number of +1, and the product is H2 which has an oxidation number of 0 indicating that H+ gained an electron and therefore was reduced. Following the same thought process...
(b) H2(g)-oxidized & AgCl(s)-reduced
(c) H2(g)-oxidized & Fe3+(aq)-reduced
Step Two: write balanced half-reactions for anode (oxidation half reaction because oxidation occurs at the anode) and cathode (reduction half reaction because reduction occurs at the cathode), remember, the charge has to be balanced and the elements have to be balanced in each half reaction...
(a) Cathode: 2H+(aq) + 2e- → H2(g)
Anode: Zn(s) → Zn2+(aq) + 2e-
(b) Cathode: 2x(AgCl(s) + e- →Ag(s) +Cl-(aq)) multiply by 2 so the anode and cathode electrons cancel each other
Anode: H2(g) → 2H+(aq) + 2e-
(c) Cathode: 2x(Fe3+(aq) + e- → Fe2+(aq)) multiply by 2 so the anode and cathode electrons cancel each other
Anode: H2(g) → 2H+(aq) + 2e-
Step Five: Write the overall equations (be sure to cancel out anything that is on both the reactants and products sides)
(a) Zn(s) + 2H+(aq) → Zn2+(aq) + H2(s)
(b) 2AgCl(s) + H2(g) → 2H+(aq) + 2Ag(s) + 2Cl−(aq)
(c) 2Fe3+(aq) + H2(g) → 2H+(aq) + 2Fe2+(aq)
Q20.5.26:
Ideally, any half-reaction with E° > 1.23 V will oxidize water as a result of the following half-reaction:
\[O_2(g) + 4H^+(aq) + 4e^− → 2H_2O(l)\]
- Will \(FeO_4^{2−}\) oxidize water if the half-reaction for the reduction of Fe(VI) → Fe(III) is FeO42−(aq) + 8H+(aq) + 3e− → Fe3+(aq) + 4H2O; E° = 1.9 V?
- What is the highest pH at which this reaction will proceed spontaneously if [Fe3+] = [FeO42−] = 1.0 M and \(P_\mathrm{O_2}\)= 1.0 atm?
S20.5.26:
Step One (a): Identify what the E° is
The E° for the half-reaction FeO42−(aq) + 8H+(aq) + 3e− → Fe3+(aq) + 4H2O is equal to 1.9 V
Step Two (a): is it bigger than E° > 1.23 V
Yes, 1.9 V is larger than 1.23 V
Step Three (a): Will it oxidize?
Yes, because the question stated that "any half-reaction with E° > 1.23 V will oxidize water." The half-reaction equation FeO42−(aq) + 8H+(aq) + 3e− → Fe3+(aq) + 4H2O has a E° of 1.9 V, and it is greater than 1.23 V, then this half-reaction will oxidize water.
Step One (b): write the overall equation
oxidization: FeO42−(aq) + 8H+(aq) + 3e− → Fe3+(aq) + 4H2O(l) (multiple the whole half-reaction by 4) 4FeO42−(aq) + 32H+(aq) + 12e− → 4Fe3+(aq) + 16H2O(l)
reduction: O2(g) + 4H+(aq) + 4e− → 2H2O(l) (multiple the whole half-reaction by 3 and flip the equation) 6H2O(l) → 3O2(g) + 12H+(aq) + 12e−
overall: 4FeO42−(aq) + 20H+(aq) → 4Fe3+(aq) + 10H2O(l) + 3O2(g)
Step Two (b): find E°cell
E°cell=E°reduction-E°oxidization
E°cell=1.23-1.9= -.67V
Step Three (b): find K
E°cell=(RT/nF)lnK
-.67=[(8.3145*25)/(12*96.485)]lnK
lnK=-3.732
elnK=e-3.732
K=.02395
Step Four (b): write the equilibrium constant equation
k=[Fe3+]4[PO2]3/[FeO4-]4[H+]20
Step Five (b): find H+
.02395=[1]4[1]3/[1]4[H+]20
[H+]20=41.754
[H+]=1.205
Step Six (b): find the pH
pH=-log[H+]
pH=-log[1.205]
pH=-.081
Phase 2 Student: The answer for part a of this question is correct, the part b answer is incorrect.
Step One (b): write the oxidation and reduction half reactions
reduction: FeO42−(aq) + 8H+(aq) + 3e− → Fe3+(aq) + 4H2O(l)
oxidation: 2H2O(l)→ O2(g) + 4H+(aq) + 4e−
Step Two (b): write the overall reaction: first you have to balance the equations in term of electrons, so there is equal charge on both sides of the reaction...
reduction: 4x(FeO42−(aq) + 8H+(aq) + 3e− → Fe3+(aq) + 4H2O(l))
oxidation: 3x(2H2O(l)→ O2(g) + 4H+(aq) + 4e−)
adding them together: 4FeO42−(aq) + 32H+(aq) + 6H2O(l) → 4Fe3+(aq) + 16H2O(l) + 3O2(g) + 12H+(aq)
need to cancel out water and hydrogen ions because they are on both sides...
overall reaction: 4FeO42−(aq) + 20H+(aq) → 4Fe3+(aq) + 10H2O(l) + 3O2(g)
Step Three (b): find E°cell which is... E°cell=E°reduction-E°oxidization
E°cell=1.9-1.23= 0.67 V
Step Four (b): determine reaction quotient Q where for aA + bB → cC +dD, Q=([C]c[D]d)/([A]a[B]b) where if the A,B,C, or D are solids or liquids, their concentration is 1. So for the reaction 4FeO42−(aq) + 20H+(aq) → 4Fe3+(aq) + 10H2O(l) + 3O2(g), Q will be...
\[Q= \frac{[Fe^{3+}]^4[O_2]^3}{[FeO_4^{2-}]^4[H^+]^{20}}\]and it is given that [Fe3+] = [FeO42−] = 1.0 M and \(P_\mathrm{O_2}\)= 1.0 atm so \[Q= \frac{[1]^4[1]^3}{[1]^4[H^+]^{20}}\] \[Q= \frac{1}{[H^+]^{20}}\]
Step Five (b): Find [H+] so that Ecell> 0 V in \(E_{cell}=E°- \frac{0.0592}{n}logQ\) where n is the number of electrons transferred, which, looking back at the balanced half reactions, was 12. In order for a reaction to occur spontaneously, Ecell> 0 V.
\[E_{cell}=\; 0.67 - \frac{0.0592}{12}log(\frac{1}{[H^+]^{20}})\] \[0<\; 0.67 - \frac{0.0592}{12}log(\frac{1}{[H^+]^{20}})\] \[\frac{-0.67(12)}{-0.0592}>\; log(\frac{1}{[H^+]^{20}})\] \[10^{\frac{-0.67(12)}{-0.0592}}>\; \frac{1}{[H^+]^{20}})\] \[[H^+]^{20} > \frac{1}{10^{\frac{-0.67(12)}{-0.0592}}}\] \[[H^+]> 1.62x10^{-7} M\]
Step Six (b): convert [H+] to pH by pH= -log[H+]
pH=-log[1.62x10⁻⁷]
pH= 6.8
Therefore, the highest pH in which the reaction under the stated conditions will proceed spontaneously is a pH of 6.8