
Extra Credit 39
- Page ID
- 83010
\( \newcommand{\vecs}[1]{\overset { \scriptstyle \rightharpoonup} {\mathbf{#1}} } \)
\( \newcommand{\vecd}[1]{\overset{-\!-\!\rightharpoonup}{\vphantom{a}\smash {#1}}} \)
\( \newcommand{\id}{\mathrm{id}}\) \( \newcommand{\Span}{\mathrm{span}}\)
( \newcommand{\kernel}{\mathrm{null}\,}\) \( \newcommand{\range}{\mathrm{range}\,}\)
\( \newcommand{\RealPart}{\mathrm{Re}}\) \( \newcommand{\ImaginaryPart}{\mathrm{Im}}\)
\( \newcommand{\Argument}{\mathrm{Arg}}\) \( \newcommand{\norm}[1]{\| #1 \|}\)
\( \newcommand{\inner}[2]{\langle #1, #2 \rangle}\)
\( \newcommand{\Span}{\mathrm{span}}\)
\( \newcommand{\id}{\mathrm{id}}\)
\( \newcommand{\Span}{\mathrm{span}}\)
\( \newcommand{\kernel}{\mathrm{null}\,}\)
\( \newcommand{\range}{\mathrm{range}\,}\)
\( \newcommand{\RealPart}{\mathrm{Re}}\)
\( \newcommand{\ImaginaryPart}{\mathrm{Im}}\)
\( \newcommand{\Argument}{\mathrm{Arg}}\)
\( \newcommand{\norm}[1]{\| #1 \|}\)
\( \newcommand{\inner}[2]{\langle #1, #2 \rangle}\)
\( \newcommand{\Span}{\mathrm{span}}\) \( \newcommand{\AA}{\unicode[.8,0]{x212B}}\)
\( \newcommand{\vectorA}[1]{\vec{#1}} % arrow\)
\( \newcommand{\vectorAt}[1]{\vec{\text{#1}}} % arrow\)
\( \newcommand{\vectorB}[1]{\overset { \scriptstyle \rightharpoonup} {\mathbf{#1}} } \)
\( \newcommand{\vectorC}[1]{\textbf{#1}} \)
\( \newcommand{\vectorD}[1]{\overrightarrow{#1}} \)
\( \newcommand{\vectorDt}[1]{\overrightarrow{\text{#1}}} \)
\( \newcommand{\vectE}[1]{\overset{-\!-\!\rightharpoonup}{\vphantom{a}\smash{\mathbf {#1}}}} \)
\( \newcommand{\vecs}[1]{\overset { \scriptstyle \rightharpoonup} {\mathbf{#1}} } \)
\( \newcommand{\vecd}[1]{\overset{-\!-\!\rightharpoonup}{\vphantom{a}\smash {#1}}} \)
\(\newcommand{\avec}{\mathbf a}\) \(\newcommand{\bvec}{\mathbf b}\) \(\newcommand{\cvec}{\mathbf c}\) \(\newcommand{\dvec}{\mathbf d}\) \(\newcommand{\dtil}{\widetilde{\mathbf d}}\) \(\newcommand{\evec}{\mathbf e}\) \(\newcommand{\fvec}{\mathbf f}\) \(\newcommand{\nvec}{\mathbf n}\) \(\newcommand{\pvec}{\mathbf p}\) \(\newcommand{\qvec}{\mathbf q}\) \(\newcommand{\svec}{\mathbf s}\) \(\newcommand{\tvec}{\mathbf t}\) \(\newcommand{\uvec}{\mathbf u}\) \(\newcommand{\vvec}{\mathbf v}\) \(\newcommand{\wvec}{\mathbf w}\) \(\newcommand{\xvec}{\mathbf x}\) \(\newcommand{\yvec}{\mathbf y}\) \(\newcommand{\zvec}{\mathbf z}\) \(\newcommand{\rvec}{\mathbf r}\) \(\newcommand{\mvec}{\mathbf m}\) \(\newcommand{\zerovec}{\mathbf 0}\) \(\newcommand{\onevec}{\mathbf 1}\) \(\newcommand{\real}{\mathbb R}\) \(\newcommand{\twovec}[2]{\left[\begin{array}{r}#1 \\ #2 \end{array}\right]}\) \(\newcommand{\ctwovec}[2]{\left[\begin{array}{c}#1 \\ #2 \end{array}\right]}\) \(\newcommand{\threevec}[3]{\left[\begin{array}{r}#1 \\ #2 \\ #3 \end{array}\right]}\) \(\newcommand{\cthreevec}[3]{\left[\begin{array}{c}#1 \\ #2 \\ #3 \end{array}\right]}\) \(\newcommand{\fourvec}[4]{\left[\begin{array}{r}#1 \\ #2 \\ #3 \\ #4 \end{array}\right]}\) \(\newcommand{\cfourvec}[4]{\left[\begin{array}{c}#1 \\ #2 \\ #3 \\ #4 \end{array}\right]}\) \(\newcommand{\fivevec}[5]{\left[\begin{array}{r}#1 \\ #2 \\ #3 \\ #4 \\ #5 \\ \end{array}\right]}\) \(\newcommand{\cfivevec}[5]{\left[\begin{array}{c}#1 \\ #2 \\ #3 \\ #4 \\ #5 \\ \end{array}\right]}\) \(\newcommand{\mattwo}[4]{\left[\begin{array}{rr}#1 \amp #2 \\ #3 \amp #4 \\ \end{array}\right]}\) \(\newcommand{\laspan}[1]{\text{Span}\{#1\}}\) \(\newcommand{\bcal}{\cal B}\) \(\newcommand{\ccal}{\cal C}\) \(\newcommand{\scal}{\cal S}\) \(\newcommand{\wcal}{\cal W}\) \(\newcommand{\ecal}{\cal E}\) \(\newcommand{\coords}[2]{\left\{#1\right\}_{#2}}\) \(\newcommand{\gray}[1]{\color{gray}{#1}}\) \(\newcommand{\lgray}[1]{\color{lightgray}{#1}}\) \(\newcommand{\rank}{\operatorname{rank}}\) \(\newcommand{\row}{\text{Row}}\) \(\newcommand{\col}{\text{Col}}\) \(\renewcommand{\row}{\text{Row}}\) \(\newcommand{\nul}{\text{Nul}}\) \(\newcommand{\var}{\text{Var}}\) \(\newcommand{\corr}{\text{corr}}\) \(\newcommand{\len}[1]{\left|#1\right|}\) \(\newcommand{\bbar}{\overline{\bvec}}\) \(\newcommand{\bhat}{\widehat{\bvec}}\) \(\newcommand{\bperp}{\bvec^\perp}\) \(\newcommand{\xhat}{\widehat{\xvec}}\) \(\newcommand{\vhat}{\widehat{\vvec}}\) \(\newcommand{\uhat}{\widehat{\uvec}}\) \(\newcommand{\what}{\widehat{\wvec}}\) \(\newcommand{\Sighat}{\widehat{\Sigma}}\) \(\newcommand{\lt}{<}\) \(\newcommand{\gt}{>}\) \(\newcommand{\amp}{&}\) \(\definecolor{fillinmathshade}{gray}{0.9}\)Q 17.5.7
To begin this problem, first look at the Nernst Equation :
\[E = E^o - \dfrac{RT}{nF} \ln Q \tag{1}\]
-Q in the equation by the law of mass action is [Concentration of products]/[Concentration of reactants]
•As the reactants in the battery are used, products will increase, therefore Q will increase. Since ln(Q) is being subtracted from Eo, E will decrease, meaning voltage will decrease.
Q 12.3.2
To begin this problem remember that the order for an "n" order reaction is Rate = [reactant X]n. Now, let's look at what is given first:
a) "Doubling the concentration of a reactant increases the rate of a reaction four times"
-Rate x 4 = [2 x reactant A]n
- n is the order which we are looking for
• 4 = 2n ⟶ log24=n ⟶ n=2
b) "Tripling the concentration of a different reactant increases the rate of a reaction three times"
-Rate x 3 = [3 x reactant B]m
- m is the order which we are looking for
• 3 = 3m ⟶ log33=m ⟶ m=1
Bonus: Overall rxn order = m+n = 3
Q 12.5.11
To begin this problem, use the Arrhenius Equation:

-Then solve the equation for Ea, the activation energy:
\[ E_a = \dfrac{R \ln \dfrac{k_2}{k_1}}{\dfrac{1}{T_1}-\dfrac{1}{T_2}}\]
- "the rate of the reaction increases 1.47 times"; this means that k2= 1.47 x k1 since we're dealing with the exact same reaction.
- Convert the given temperatures in the problem from Celsius to Kelvin
• oC + 273 = K
- R is the gas constant; for this equation use 8.314 J⋅mol-1⋅K-1 (which will give us an answer in unit of Joules per mol).
•Now, it's just "plug and chug" to get the answer.
\[E_a = \dfrac{(8.314)(\ln 1.47/1)}{\dfrac{1}{30+273} – \dfrac{1}{37+273}} = \dfrac{(8.314)(.3853)}{0.00330 K^{-1} – 0.003226 \; K^{-1}} \]
Answer: 43288J mol-1 = 43.288 kJ mol-1
Q 21.4.6

a) If a heavy element is below the belt of stability it means there are too many protons and the repulsions between them are causing instability. It will likely undergo positron emission because by converting a proton into a neutron and positron this will increase its neutron-to-proton ratio.
b) Likewise, if a heavy element is above the belt of stability it means there are too many neutrons. It will likely undergo ß-particle emission to reduce the ratio of neutrons to protons.
Note that in general unstable heavy nuclides (atomic number Z > 83) will prefer to reach stability through alpha decay since it's the only decay that allows them to lose mass.
Q 20.2.10
Follow these steps for each Reduction Oxidation Reaction (RedOx rxn):
-First, assign oxidation states (OS) to all elements in the given reaction using these rules:
- Any element in its free (uncombined) state has an OS of zero
- The OS of a monatomic ion equals its charge
- Group 1A: +1
- Group 2A: +2
- Hydrogen: +1 with non metals, and -1 with metals and boron
- Oxygen: -1 with peroxides, and -2 with other compounds except F
- Group 7A: -1
- Fluorine (or 8A group): -1
- The sum of the OS's of a neutral compound is 0
- Sum of OS's = charge of the poly atomic ion
-Next, see which species of elements decrease in oxidation state and which ones increase.
•If an element's oxidation state decreases, it is gaining electrons therefore it is reduced.
•If an element's oxidation state increases, it is loosing electrons therefore it is being oxidized.
-OIL RIG is a good way to remember this rule.
•OIL = Oxidation is loss of electrons
•RIG = Reduction is gaining of electrons
-Next, separate the species of elements into two separate rxn: reduction and oxidation half reactions and balance each separately, including the charges
•First, balance species other than hydrogen and oxygen.
•Next, balance oxygen by adding H2O to which ever side needs more oxygen.
•Then, balance hydrogen by adding H+ to which ever side needs more hydrogen.
- If the rxn is taking place in a basic solution, add the same amount OH- , as the H+ added earlier, to both sides of the rxn
•If charge is not balanced, add electrons to which ever side is more positive.
-Once both equations are completely balanced separately, multiply each rxn so that both rxns use the same amount of electrons.
-Finally, add the two separate equations together and cancel out like species.
a) MnO4−(aq) + S2O32−(aq) → Mn2+(aq) + SO42−(aq); acidic solution
Oxidation States: reactants: Mn = +7, S = +2
products: Mn2+= +2, S = +6
Reduction Rxn: MnO4- (aq) → Mn2+(aq)
[MnO4- (aq) + 8H+ (aq) + 5e- → Mn2+(aq) + 4H2O (l)] x 4
Oxidation Rxn: S2O32−(aq) → SO42−(aq)
[S2O32−(aq) + 5H2O (l) → 2SO42−(aq) + 10H+(aq)+ 4e-] x 5
Total Rxn: 4MnO4- (aq) + 5S2O32−(aq) + 9H2O (l) → 10SO42−(aq) + 4Mn2+(aq) + 18H+(aq)
[Follow these same steps for the other redox reactions in acidic solutions]
b) Fe2+(aq) + Cr2O72−(aq) → Fe3+(aq) + Cr3+(aq); acidic solution
Oxidation States: reactants: Fe = +2, Cr = +6
products: Fe = +3, Cr = +3
Reduction: Cr2O72−(aq) → Cr3+(aq)
Cr2O72−(aq) + 14H+(aq) + 6e- → 2Cr3+(aq) + 7H2O (l)
Oxidation: Fe2+(aq) → Fe3+(aq)
[Fe2+(aq) → Fe3+(aq) + 1e-] x 6
Total Rxn: 6Fe2+(aq) + Cr2O72−(aq) + 14H+(aq) → 6Fe3+(aq)+ 2Cr3+(aq) + 7H2O (l)
c) Fe(s) + CrO42−(aq) → Fe2O3(s) + Cr2O3(s); basic solution
Oxidation States: reactants: Fe = 0, Cr = +6
products: Fe = +3, Cr = +3
Reduction: CrO42−(aq) → Cr2O3(s)
2CrO42−(aq) + 10H+(aq) + 10 OH-(aq) → Cr2O3(s) + 5H2O (l) + 10 OH-(aq)
2CrO42−(aq) + 5H2O (l) + 6e- → Cr2O3(s) + 10 OH-(aq)
Oxidation: Fe(s) → Fe2O3(s)
2Fe(s) + 3H2O(l) + 6OH-(aq)→ Fe2O3(s) + 6H+(aq) + 6OH-(aq)
2Fe(s) + 6OH-(aq)→ Fe2O3(s) + 3H2O (aq) +6e-
Total Rxn: 2CrO42−(aq) + 2Fe(s) + 2H2O (l) → Fe2O3(s) + Cr2O3(s) + 4OH-(aq)
d) Cl2(aq) → ClO3−(aq) + Cl−(aq); acidic solution
Oxidation States: reactants: Cl = 0
products: Cl = +5, Cl = -1
Reduction: Cl2(aq) → Cl−(aq)
[Cl2(aq) + 2e-→ 2Cl−(aq)] x 5
Oxidation: Cl2(aq) → ClO3−(aq)
Cl2(aq) + 6H2O (l) → 2ClO3−(aq) + 12H+(aq) + 10e-
Total Rxn: 6Cl2(aq) + 6H2O(l) → 2ClO3−(aq) + 10Cl−(aq) + 12H+(aq)
e) CO32−(aq) + N2H4(aq) → CO(g) + N2(g); basic solution
Oxidation States: reactants: C = +4, N=-2
products: C = +2, N = 0
Reduction: CO32−(aq) → CO(g)
CO32−(aq) + 4H+(aq) + 4OH-(aq) → CO(g) + 2H2O (l) + 4OH-(aq)
[CO32−(aq) + 2H2O (l) + 2e- → CO(g) + 4OH-(aq)] x 2
Oxidation: N2H4(aq) + 4OH-(aq) → N2(g) + 4H+(aq) + 4OH-(aq)
N2H4(aq) + 4OH-(aq) → N2(g) + 4H2O (l) + 4e-
Total Rxn: 2CO32−(aq) + N2H4(aq) → N2(g) + 2CO(g) + 4OH-(aq)
Q 20.5.5
There are three electrochemical methods of analysis: potentiometry, coulometry, and voltammetry. On top of the big triangle of chemistry, we can understand the relationship between the Eo potential, Gibbs free energy, concentration, and the equilibrium (K) constant. We can then use any or all of those factors to help us predict whether a reaction will be spontaneous, or at equilibrium, or reversible, etc.
-For example, "under standard conditions, the reaction of Co(s) with Ni2+(aq) to form Ni(s) and Co2+(aq) occurs spontaneously, but if we reduce the concentration of Ni2+ by a factor of 100, so that [Ni2+] is 0.01 M, then the reverse reaction occurs spontaneously instead" (Andy Shmitz, Principles of General Chemistry)
Q 24.6.1
Crystal Field Theory:
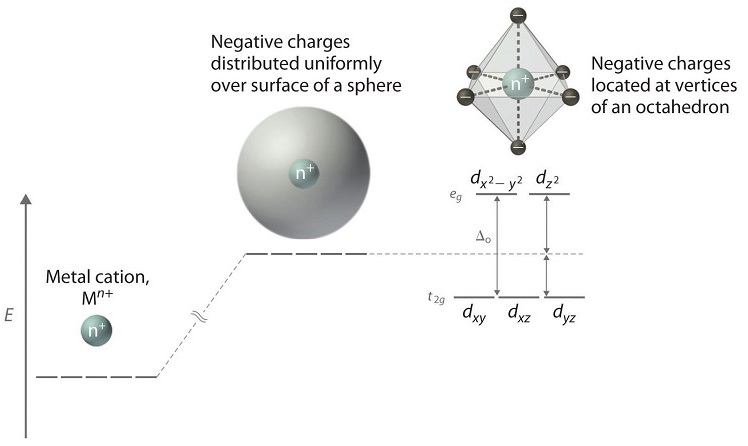
a) Assumptions:
- There are only electrostatic interactions between the metal ion's and the ligands
- The ligands are treated as point charges instead of a long compound
- The valance electrons of the metal ion experience repulsive forces from those on the ligands
- The valance electrons on metal occupy those d-orbitals farthest away from the direction of approach of ligands
b) Valence bond Theory:
- Strengths:
- Shows that covalent bonding is an overlap of atomic orbitals
- Weaknesses:
- Fails to show how some atoms like BeCl2, BF3 and CH4 can bond if they don't have enough electrons to bond.
Crystal Field Bond Theory:
- Weaknesses:
- Since it is assumed that the interactions between metal and ligand in purely electrostatic, it is not very realistic.
- Only accounts for d orbitals, ignores the s and p orbitals.
- Views ligands as a point charge, so the orbitals of ligands are insignificant, which is very unrealistic.
- Strengths:
- Helps explain the magnetic properties of transition metals ions and their complexes.
- Shows the energy splitting of d orbitals within a ligand complex.
- Accounts for the spectrophotometry observed in complex compounds.
Q 14.7.9


a) Although the catalytic center will not be directly affected as much from a large pH change, the substrate will be heavily affected. When an enzyme is not in the optimal pH range, it will greatly lower the activity the enzyme will have.
b) Enzymes are made up of amino acids have carboxyl and amine functional groups on their side chains. Since these two functional groups are polar, it will interact with the ions in the liquid. This will affect the overall shape of the enzyme, which will change its functions since shape dictates function.