
Extra Credit 11
- Page ID
- 83241
\( \newcommand{\vecs}[1]{\overset { \scriptstyle \rightharpoonup} {\mathbf{#1}} } \)
\( \newcommand{\vecd}[1]{\overset{-\!-\!\rightharpoonup}{\vphantom{a}\smash {#1}}} \)
\( \newcommand{\id}{\mathrm{id}}\) \( \newcommand{\Span}{\mathrm{span}}\)
( \newcommand{\kernel}{\mathrm{null}\,}\) \( \newcommand{\range}{\mathrm{range}\,}\)
\( \newcommand{\RealPart}{\mathrm{Re}}\) \( \newcommand{\ImaginaryPart}{\mathrm{Im}}\)
\( \newcommand{\Argument}{\mathrm{Arg}}\) \( \newcommand{\norm}[1]{\| #1 \|}\)
\( \newcommand{\inner}[2]{\langle #1, #2 \rangle}\)
\( \newcommand{\Span}{\mathrm{span}}\)
\( \newcommand{\id}{\mathrm{id}}\)
\( \newcommand{\Span}{\mathrm{span}}\)
\( \newcommand{\kernel}{\mathrm{null}\,}\)
\( \newcommand{\range}{\mathrm{range}\,}\)
\( \newcommand{\RealPart}{\mathrm{Re}}\)
\( \newcommand{\ImaginaryPart}{\mathrm{Im}}\)
\( \newcommand{\Argument}{\mathrm{Arg}}\)
\( \newcommand{\norm}[1]{\| #1 \|}\)
\( \newcommand{\inner}[2]{\langle #1, #2 \rangle}\)
\( \newcommand{\Span}{\mathrm{span}}\) \( \newcommand{\AA}{\unicode[.8,0]{x212B}}\)
\( \newcommand{\vectorA}[1]{\vec{#1}} % arrow\)
\( \newcommand{\vectorAt}[1]{\vec{\text{#1}}} % arrow\)
\( \newcommand{\vectorB}[1]{\overset { \scriptstyle \rightharpoonup} {\mathbf{#1}} } \)
\( \newcommand{\vectorC}[1]{\textbf{#1}} \)
\( \newcommand{\vectorD}[1]{\overrightarrow{#1}} \)
\( \newcommand{\vectorDt}[1]{\overrightarrow{\text{#1}}} \)
\( \newcommand{\vectE}[1]{\overset{-\!-\!\rightharpoonup}{\vphantom{a}\smash{\mathbf {#1}}}} \)
\( \newcommand{\vecs}[1]{\overset { \scriptstyle \rightharpoonup} {\mathbf{#1}} } \)
\( \newcommand{\vecd}[1]{\overset{-\!-\!\rightharpoonup}{\vphantom{a}\smash {#1}}} \)
\(\newcommand{\avec}{\mathbf a}\) \(\newcommand{\bvec}{\mathbf b}\) \(\newcommand{\cvec}{\mathbf c}\) \(\newcommand{\dvec}{\mathbf d}\) \(\newcommand{\dtil}{\widetilde{\mathbf d}}\) \(\newcommand{\evec}{\mathbf e}\) \(\newcommand{\fvec}{\mathbf f}\) \(\newcommand{\nvec}{\mathbf n}\) \(\newcommand{\pvec}{\mathbf p}\) \(\newcommand{\qvec}{\mathbf q}\) \(\newcommand{\svec}{\mathbf s}\) \(\newcommand{\tvec}{\mathbf t}\) \(\newcommand{\uvec}{\mathbf u}\) \(\newcommand{\vvec}{\mathbf v}\) \(\newcommand{\wvec}{\mathbf w}\) \(\newcommand{\xvec}{\mathbf x}\) \(\newcommand{\yvec}{\mathbf y}\) \(\newcommand{\zvec}{\mathbf z}\) \(\newcommand{\rvec}{\mathbf r}\) \(\newcommand{\mvec}{\mathbf m}\) \(\newcommand{\zerovec}{\mathbf 0}\) \(\newcommand{\onevec}{\mathbf 1}\) \(\newcommand{\real}{\mathbb R}\) \(\newcommand{\twovec}[2]{\left[\begin{array}{r}#1 \\ #2 \end{array}\right]}\) \(\newcommand{\ctwovec}[2]{\left[\begin{array}{c}#1 \\ #2 \end{array}\right]}\) \(\newcommand{\threevec}[3]{\left[\begin{array}{r}#1 \\ #2 \\ #3 \end{array}\right]}\) \(\newcommand{\cthreevec}[3]{\left[\begin{array}{c}#1 \\ #2 \\ #3 \end{array}\right]}\) \(\newcommand{\fourvec}[4]{\left[\begin{array}{r}#1 \\ #2 \\ #3 \\ #4 \end{array}\right]}\) \(\newcommand{\cfourvec}[4]{\left[\begin{array}{c}#1 \\ #2 \\ #3 \\ #4 \end{array}\right]}\) \(\newcommand{\fivevec}[5]{\left[\begin{array}{r}#1 \\ #2 \\ #3 \\ #4 \\ #5 \\ \end{array}\right]}\) \(\newcommand{\cfivevec}[5]{\left[\begin{array}{c}#1 \\ #2 \\ #3 \\ #4 \\ #5 \\ \end{array}\right]}\) \(\newcommand{\mattwo}[4]{\left[\begin{array}{rr}#1 \amp #2 \\ #3 \amp #4 \\ \end{array}\right]}\) \(\newcommand{\laspan}[1]{\text{Span}\{#1\}}\) \(\newcommand{\bcal}{\cal B}\) \(\newcommand{\ccal}{\cal C}\) \(\newcommand{\scal}{\cal S}\) \(\newcommand{\wcal}{\cal W}\) \(\newcommand{\ecal}{\cal E}\) \(\newcommand{\coords}[2]{\left\{#1\right\}_{#2}}\) \(\newcommand{\gray}[1]{\color{gray}{#1}}\) \(\newcommand{\lgray}[1]{\color{lightgray}{#1}}\) \(\newcommand{\rank}{\operatorname{rank}}\) \(\newcommand{\row}{\text{Row}}\) \(\newcommand{\col}{\text{Col}}\) \(\renewcommand{\row}{\text{Row}}\) \(\newcommand{\nul}{\text{Nul}}\) \(\newcommand{\var}{\text{Var}}\) \(\newcommand{\corr}{\text{corr}}\) \(\newcommand{\len}[1]{\left|#1\right|}\) \(\newcommand{\bbar}{\overline{\bvec}}\) \(\newcommand{\bhat}{\widehat{\bvec}}\) \(\newcommand{\bperp}{\bvec^\perp}\) \(\newcommand{\xhat}{\widehat{\xvec}}\) \(\newcommand{\vhat}{\widehat{\vvec}}\) \(\newcommand{\uhat}{\widehat{\uvec}}\) \(\newcommand{\what}{\widehat{\wvec}}\) \(\newcommand{\Sighat}{\widehat{\Sigma}}\) \(\newcommand{\lt}{<}\) \(\newcommand{\gt}{>}\) \(\newcommand{\amp}{&}\) \(\definecolor{fillinmathshade}{gray}{0.9}\)Q17.1.10
![]()
Edits are highlighted in this blue shade. None of the problems were incorrect according to my own calculations, so I added to it to make the problems seem more complete. Some, though, were already nicely written
Tessa Ferrari, editor of this set of problems.
Why must the charge balance in oxidation-reduction reactions?
Q17.1.10
A redox reaction is a reaction where an exchange of electrons takes place after balancing elements, then balancing oxygen using water, then balancing hydrogen using \(H^+\), and lastly balancing the charge of each side by adding electrons. According to the Law of conservation of mass, matter cannot be created or destroyed so any electrons present on one side of the reaction will be present on the other side, which balances the charges. The charges of the reaction needs to be balanced in order to obey the Law of Conservation of Mass.
Q19.1.9
Why is the formation of slag useful during the smelting of iron?
Q19.1.9
Slag is first formed when you smelt an iron ore and the raw iron is separated from the other parts. It is a bi-product of the smelting process, but can be very useful in the further smelting process. Slag can be used for temperature control, and in the final stages of smelting it can also act a sacrificial anode and prevent iron from being oxidized. These processes make the iron ore more stable in its final product.
Q19.3.1
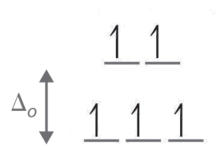
Determine the number of unpaired electrons expected for [Fe(NO2)6]3−and for [FeF6]3− in terms of crystal field theory.
Q19.3.1
In order to do this problem we must consider a couple facts for each compound. We must understand strong and weak field ligands according to the spectrochemical series, we must be able to identify how many electrons the compound has based on its charge and the ligand's charge, and we must be able to identify the coordination number to know what geometry it has.
For [Fe(NO2)6]3− \(NO_2^-\) is a strong field ligand, which means it has large splitting energy and consequently it is more energetically favorable for the electrons to be paired together rather than split apart in a crystal field splitting diagram, meaning it will have a low spin geometry. Also, since the ligand has a charge of -1 and there are six of them, that gives the inside molecule a 6- charge. We can also see that it has an overall charge of -3, meaning the inside charges must equal -3 to balance. So, the charge of the metal must be 3+. Since there are 6 of the ligands, we can dictate this as an octahedral geometry, and draw the splitting diagram accordingly. Now, if we consider a \(Fe^{3+}\) molecule, it has 5 electrons. These are drawn according to low spin geometry and get this diagram.The crystal field diagram show that there is only one unpaired electron.

For [FeF6]3− F is a weak field ligand which means it has a low splitting enery. Since there is low splitting energy the electrons can jump up to the next energy level. So there is a high spin geometry. This is also an octahedral molecule. We can go through the same process like we did with the previous molecule, and see that it also has a 3+ charge, and 5 electrons. Drawing the octahedral geometry, we have 5 unpaired electrons.
Q12.4.1
Describe how graphical methods can be used to determine the order of a reaction and its rate constant from a series of data that includes the concentration of A at varying times.
Q12.4.1
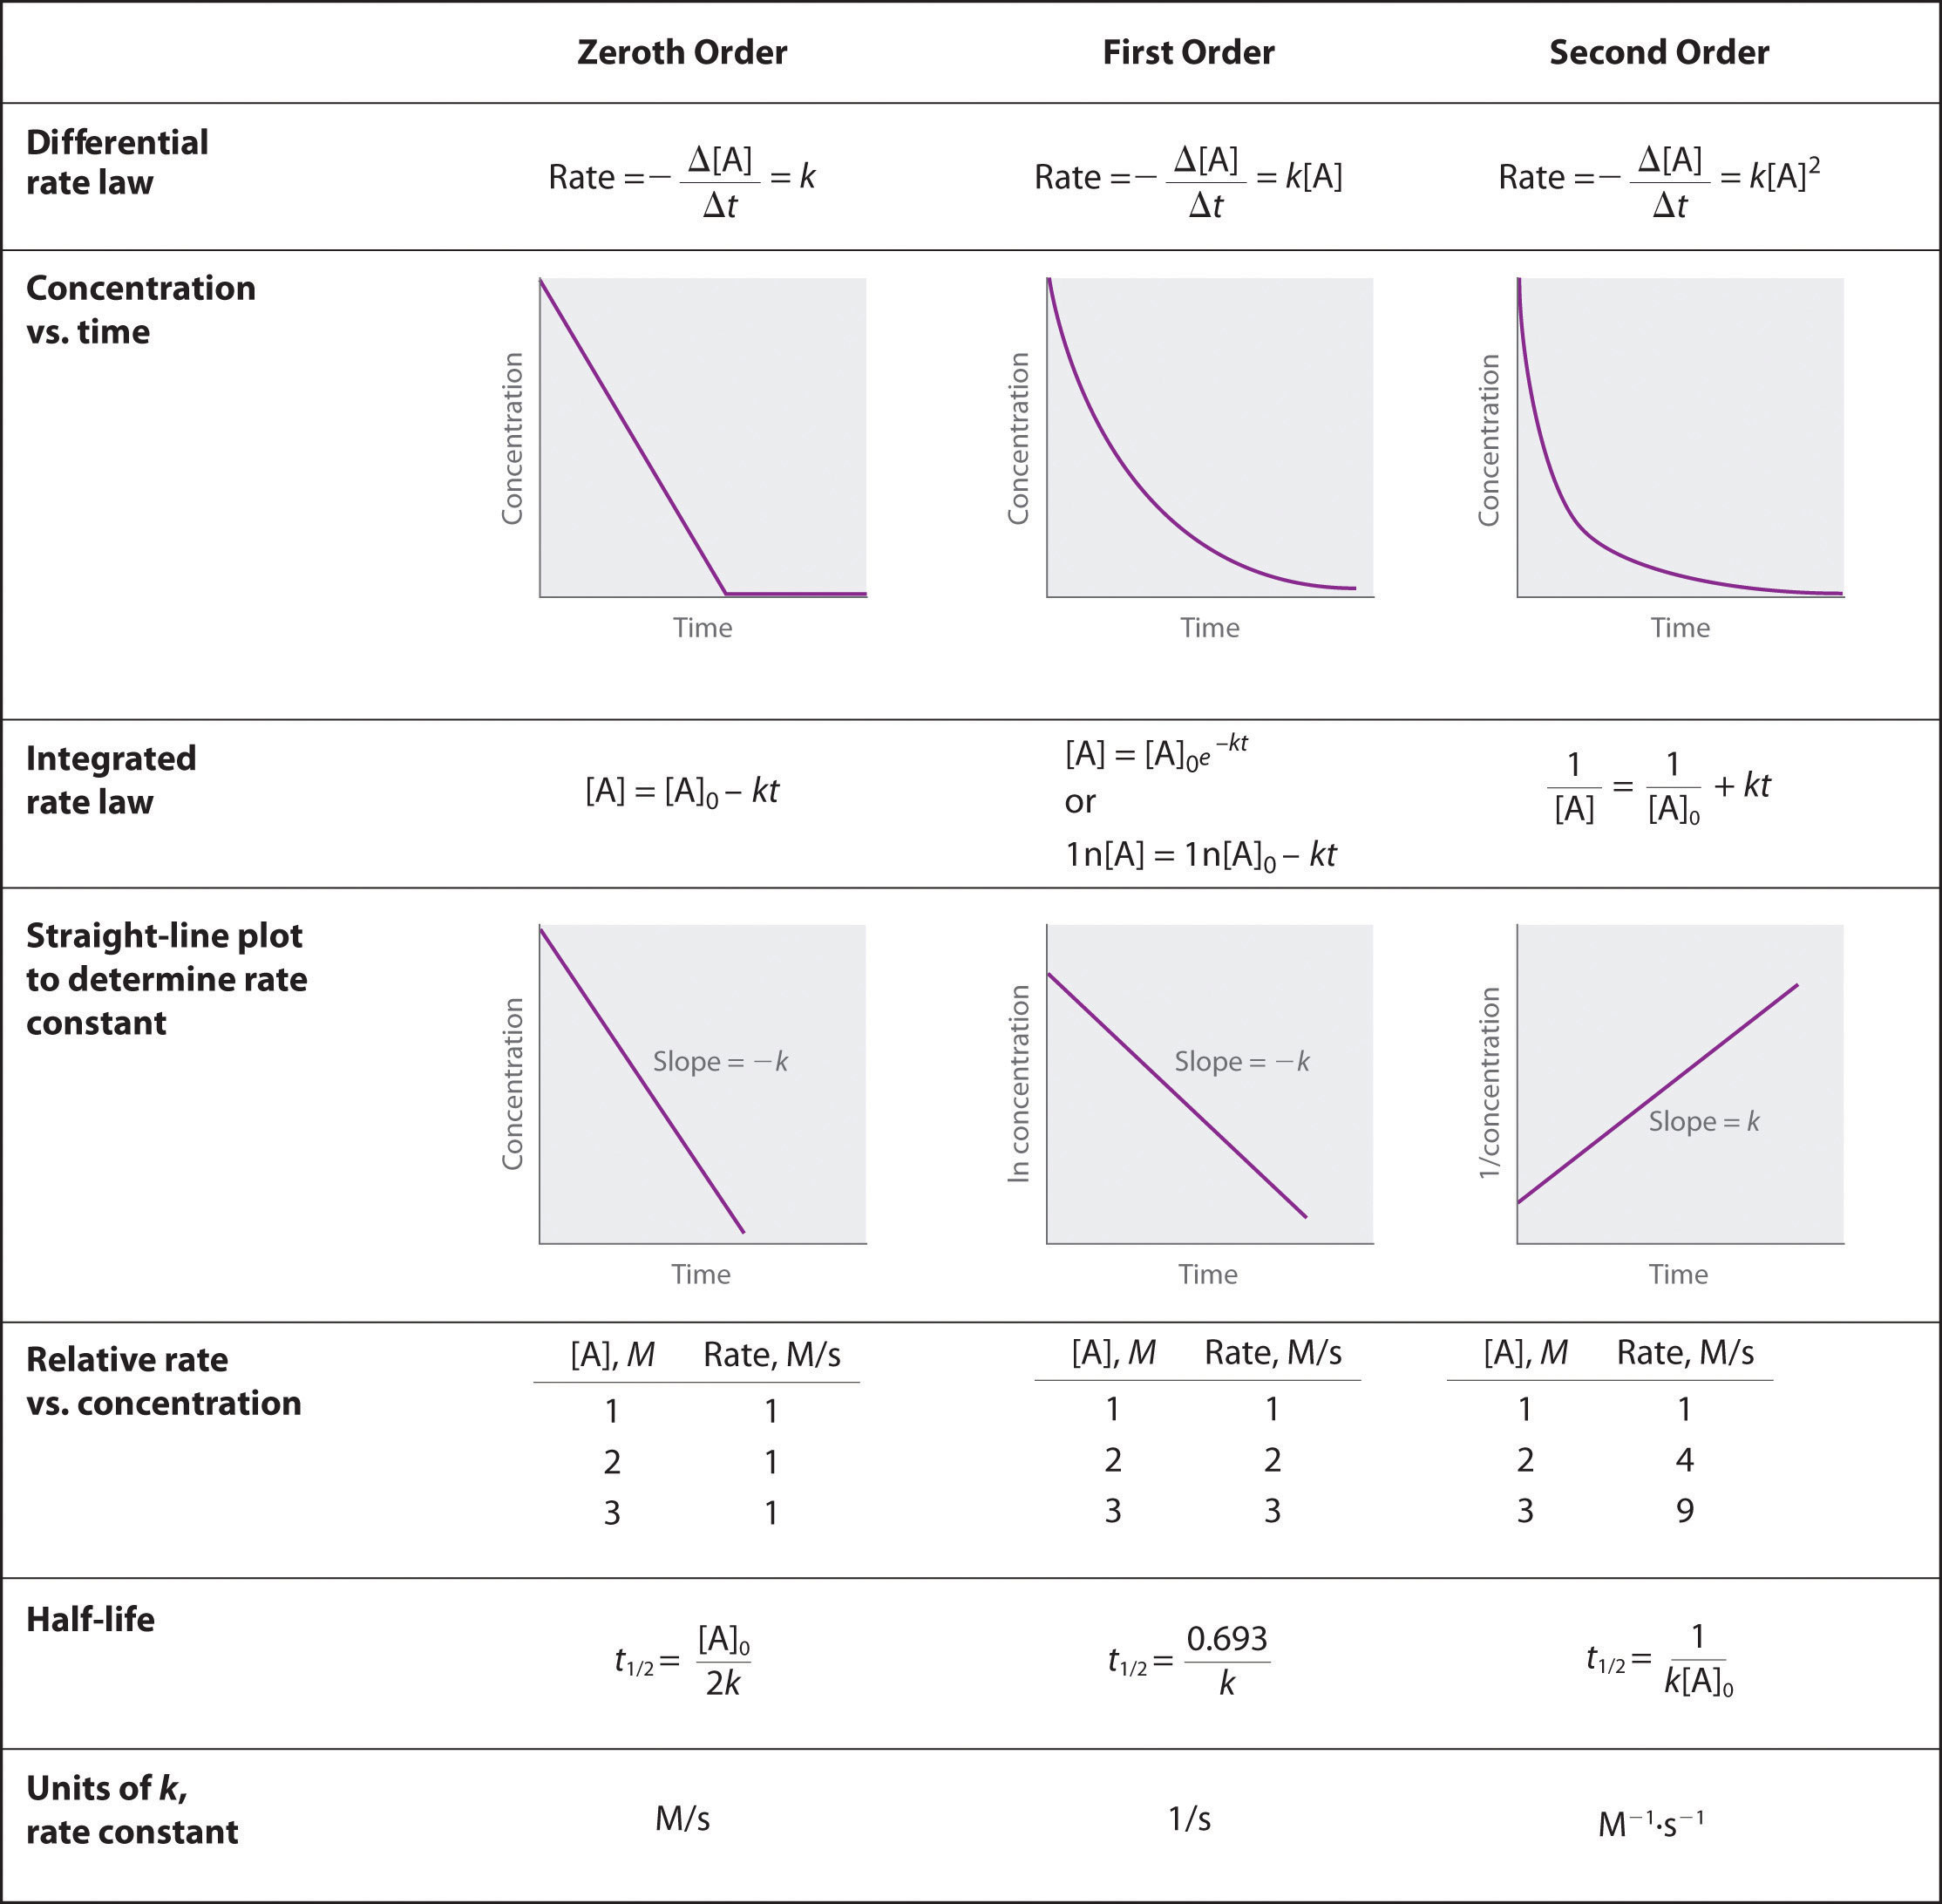
To determine the order of a reaction when given the data series, one must graph the data how it is, graph it as natural log of [A], and graph it as 1/[A]. Whichever method yields a straight line will determine the order. Respective of the methods of graphing above, if a straight line is yielded by the first graphing method its a 0 order, if by the second method it's a 1st order, and the third graphing method its a 2nd order. When the order of the graph is known, a series of equations, given in the above image, can be used with the various points on the graph to determine the value of k. We can see that we need an initial value of A and a final value of A, and both of these would be given by the data.
Zeroth order when plotting initial concentrating versus final concentration you have a negative linear slope.
\[[A] = [A]_0 − kt\]
First order when plotting ln[initial concentration] versus ln[ final concentration] you have a negative linear slope.
\[\ln[A] = \ln[A]_0 − kt\]
Second order when plotting the 1/[initial concentration] versus 1/[final concentration] you have a positive linear slope.
\[\dfrac{1}{[\textrm A]}=\dfrac{1}{[\textrm A]_0}+kt\]
Q12.7.4
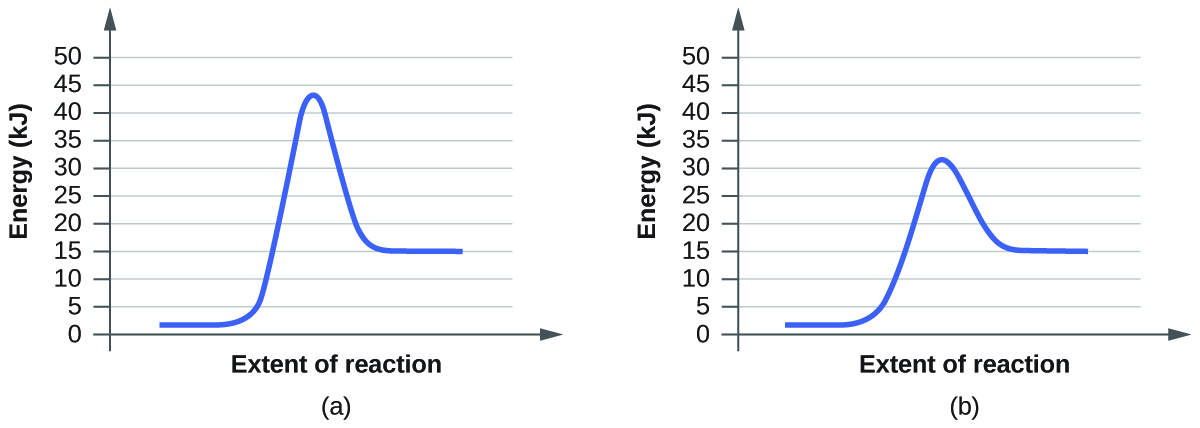
For each of the following pairs of reaction diagrams, identify which of the pair is catalyzed:
(a)
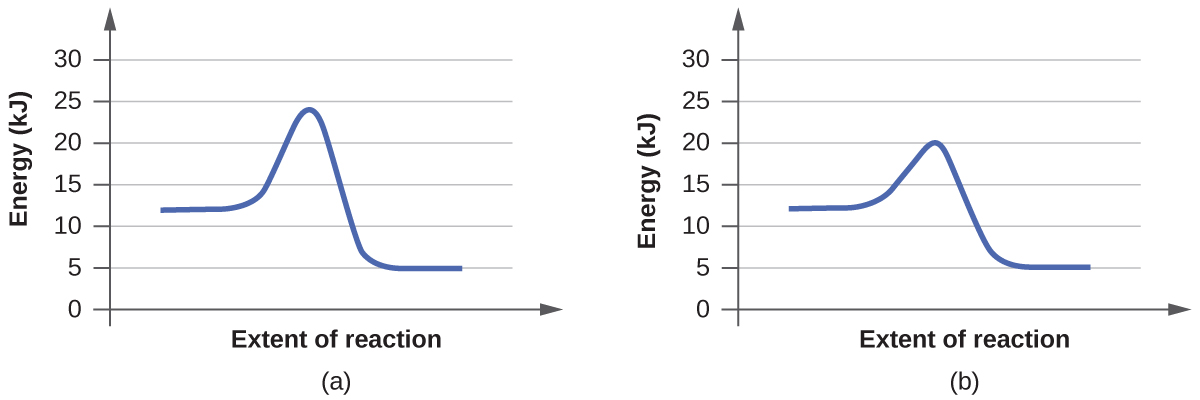
(b)
S12.7.4
In the first pair of reactions, reaction B is catalyzed because the energy level of the transition state is lower than reaction. What a catalyst does for a reaction is lower the activation barrier, which is represented by the hump in the graph. This allows the reaction to proceed forward faster and easier. Looking at both the graphs, the hump is lower in reaction B, meaning it was lowered by a catalyst.
Applying the same definitions to the second set of reactions, we can see that the second reaction, reaction B, is catalyzed because it has a lower energy transition state than reaction A. Applying the idea of a "smaller hump" we can see reaction B is the catalyzed.
Q21.4.27
Write a balanced equation for each of the following nuclear reactions:
- bismuth-212 decays into polonium-212
- beryllium-8 and a positron are produced by the decay of an unstable nucleus
- neptunium-239 forms from the reaction of uranium-238 with a neutron and then spontaneously converts into plutonium-239
- strontium-90 decays into yttrium-90
Q21.4.27
We must perform some algebra in order to do these reactions. The top number is the mass and the bottom is the number of protons. Both of these numbers must be balanced on each side.
1. \(^{212}_{83}\textrm{Bi} \rightarrow \,^{0}_{-1}\textrm{e} + \,^{212}_{84}\textrm{Po}\)
2.\(^8_5B \rightarrow ^8_4 Be+ ^0_1 e\)
3. \(^{238}_{92}\textrm{U} + \, ^{1}_{0}\textrm{n} \rightarrow \,^{239}_{92}\textrm{U}\rightarrow \,^{239}_{93}\textrm{Np}\)
\(^{239}_{93}\textrm{Np} + \, ^{1}_{0}\textrm{n} \rightarrow \,^{239}_{94}\textrm{Pu}\)
4. \(^{90}_{38} \rightarrow \,^{0}_{-1}\textrm{e} + \,^{90}_{39}\textrm{Y}\)
Q20.3.13
![]()
For each galvanic cell represented by these cell diagrams, determine the spontaneous half-reactions and the overall reaction. Indicate which reaction occurs at the anode and which occurs at the cathode.
- Zn(s)∣Zn2+(aq) ∥ H+(aq)∣H2(g), Pt(s)
- Ag(s)∣AgCl(s)∣Cl−(aq) ∥ H+(aq)∣H2(g)∣Pt(s)
- Pt(s)∣H2(g)∣H+(aq) ∥ Fe2+(aq), Fe3+(aq)∣Pt(s)
Q20.3.13
.jpg?revision=1)
For the half reactions there is always an element that gets reduced and one side of the reaction gets oxidized. The element that gets oxidized looses electrons in number one Zn loses two electrons. Since one element looses electrons, the other element must accept the electrons, this element becomes reduced. In the first problem \(H^+\) gains electrons and becomes \(H_2\). The half reactions can be found on the reduction potential table. Then to get the overall reaction, the oxidation and reduction halves need to be combined. First the electrons on both sides of the reactions need to equal to each other then the repeating elements on both sides will cancel out and what is left is the overall reaction. In the cell diagrams given by the problem, the elements on the left of the double bar, which indicates a salt bridge, is the oxidation half reaction and occurs at the anode. The reduction happens on the right of the double bar, at the cathode. Also, the single line represents a phase change while a comma represents the same phase. An electrode must be placed in either the anode or cathode reaction when there is no solid metal in the solution. These electrodes do not participate and will not be written in the reaction.
1. Oxidation: Anode \(Zn(s)→ Zn^{2+} (aq) + 2e^-\)
Reduction: Cathode \(2H^+ (aq) + 2e^- → H_2(g)\)
Overall \(Zn(s) + 2H^+ → Zn^{2+} (aq) H_2(g)\)
2. Oxidation: Anode \(Ag(s) →Ag(aq) + e^–\)
Reduction: Cathode \(2H^+ (aq) + 2e^– → H_2(g)\)
Overall \(2Ag(s) + 2Cl^- (aq) + 2H^+ (aq) →AgCl(s) + H_2(g)\)
3. Oxidation: Anode \(H_2(g) → 2H^+ (aq) + 2e^-\)
Reduction: Cathode \(Fe^{3+} (aq) + e^- → Fe^{2+} (aq)\)
Overall \(H_2(aq) + 2Fe^{3+} (aq) → 2H^+ + 2Fe^{2+}\)
Q20.5.26
![]()
Ideally, any half-reaction with E° > 1.23 V will oxidize water as a result of the half-reaction O2(g) + 4H+(aq) + 4e− → 2H2O(l).
- Will FeO42− oxidize water if the half-reaction for the reduction of Fe(VI) → Fe(III) is FeO42−(aq) + 8H+(aq) + 3e− → Fe3+(aq) + 4H2O; E° = 1.9 V?
- What is the highest pH at which this reaction will proceed spontaneously if [Fe3+] = [FeO42−] = 1.0 M and PO2PO2= 1.0 atm?
Q20.5.26
1. FeO42- will oxidize water because it has a higher E cell than 1.23.
2.\(E = \textrm E^\circ - \dfrac{0.0592\: \textrm V}{n} \log {Q}\)
This is the Nerst equation and we will be using this equation to first find the concetration of H. The Nerst equation is used when we are in non-standard conditions (when molarity is not equal to 1; when atmospheric pressure is not equal to 1atm).
\(1.23= 1.9 - \dfrac{0.0592}{3} \ln \dfrac{1}{[H]^8}\)
We plug in the cell potential for the half reation that is given to us, which is 1.23 V. then we also plug in the standard cell potential that is given to us in the problem, which is 1.9 V. We set Q as \(\dfrac{1}{[H]^8}\) because we want to find the concentration of H.
\(-0.67= -0.00855 \ln \dfrac{1}{[H]^8}\)
Subtract 1.9 on both sides.
\(e^{78.28} = e^ {\ln \dfrac{1}{[H]^8}}\)
To get rid of ln we need to rise both sides to e.
\(9.28= \dfrac{1}{[H]^8}\)
\({[H]^8} = 1.011X10^-34\)
Take the recipricol of 9.28 to find \({[H]^8}\).
\([H] = 5.631X10^-5\)
Take the eighth root of \(1.011X10^-34\)
\(pH = -log[H]\)
This is the formula to find the pH from concentration.
\(pH = -log(5.631X10^-5)\)
\(pH = 4.249\)
.jpg?revision=1)