
Extra Credit 40
- Page ID
- 83437
\( \newcommand{\vecs}[1]{\overset { \scriptstyle \rightharpoonup} {\mathbf{#1}} } \)
\( \newcommand{\vecd}[1]{\overset{-\!-\!\rightharpoonup}{\vphantom{a}\smash {#1}}} \)
\( \newcommand{\id}{\mathrm{id}}\) \( \newcommand{\Span}{\mathrm{span}}\)
( \newcommand{\kernel}{\mathrm{null}\,}\) \( \newcommand{\range}{\mathrm{range}\,}\)
\( \newcommand{\RealPart}{\mathrm{Re}}\) \( \newcommand{\ImaginaryPart}{\mathrm{Im}}\)
\( \newcommand{\Argument}{\mathrm{Arg}}\) \( \newcommand{\norm}[1]{\| #1 \|}\)
\( \newcommand{\inner}[2]{\langle #1, #2 \rangle}\)
\( \newcommand{\Span}{\mathrm{span}}\)
\( \newcommand{\id}{\mathrm{id}}\)
\( \newcommand{\Span}{\mathrm{span}}\)
\( \newcommand{\kernel}{\mathrm{null}\,}\)
\( \newcommand{\range}{\mathrm{range}\,}\)
\( \newcommand{\RealPart}{\mathrm{Re}}\)
\( \newcommand{\ImaginaryPart}{\mathrm{Im}}\)
\( \newcommand{\Argument}{\mathrm{Arg}}\)
\( \newcommand{\norm}[1]{\| #1 \|}\)
\( \newcommand{\inner}[2]{\langle #1, #2 \rangle}\)
\( \newcommand{\Span}{\mathrm{span}}\) \( \newcommand{\AA}{\unicode[.8,0]{x212B}}\)
\( \newcommand{\vectorA}[1]{\vec{#1}} % arrow\)
\( \newcommand{\vectorAt}[1]{\vec{\text{#1}}} % arrow\)
\( \newcommand{\vectorB}[1]{\overset { \scriptstyle \rightharpoonup} {\mathbf{#1}} } \)
\( \newcommand{\vectorC}[1]{\textbf{#1}} \)
\( \newcommand{\vectorD}[1]{\overrightarrow{#1}} \)
\( \newcommand{\vectorDt}[1]{\overrightarrow{\text{#1}}} \)
\( \newcommand{\vectE}[1]{\overset{-\!-\!\rightharpoonup}{\vphantom{a}\smash{\mathbf {#1}}}} \)
\( \newcommand{\vecs}[1]{\overset { \scriptstyle \rightharpoonup} {\mathbf{#1}} } \)
\( \newcommand{\vecd}[1]{\overset{-\!-\!\rightharpoonup}{\vphantom{a}\smash {#1}}} \)
\(\newcommand{\avec}{\mathbf a}\) \(\newcommand{\bvec}{\mathbf b}\) \(\newcommand{\cvec}{\mathbf c}\) \(\newcommand{\dvec}{\mathbf d}\) \(\newcommand{\dtil}{\widetilde{\mathbf d}}\) \(\newcommand{\evec}{\mathbf e}\) \(\newcommand{\fvec}{\mathbf f}\) \(\newcommand{\nvec}{\mathbf n}\) \(\newcommand{\pvec}{\mathbf p}\) \(\newcommand{\qvec}{\mathbf q}\) \(\newcommand{\svec}{\mathbf s}\) \(\newcommand{\tvec}{\mathbf t}\) \(\newcommand{\uvec}{\mathbf u}\) \(\newcommand{\vvec}{\mathbf v}\) \(\newcommand{\wvec}{\mathbf w}\) \(\newcommand{\xvec}{\mathbf x}\) \(\newcommand{\yvec}{\mathbf y}\) \(\newcommand{\zvec}{\mathbf z}\) \(\newcommand{\rvec}{\mathbf r}\) \(\newcommand{\mvec}{\mathbf m}\) \(\newcommand{\zerovec}{\mathbf 0}\) \(\newcommand{\onevec}{\mathbf 1}\) \(\newcommand{\real}{\mathbb R}\) \(\newcommand{\twovec}[2]{\left[\begin{array}{r}#1 \\ #2 \end{array}\right]}\) \(\newcommand{\ctwovec}[2]{\left[\begin{array}{c}#1 \\ #2 \end{array}\right]}\) \(\newcommand{\threevec}[3]{\left[\begin{array}{r}#1 \\ #2 \\ #3 \end{array}\right]}\) \(\newcommand{\cthreevec}[3]{\left[\begin{array}{c}#1 \\ #2 \\ #3 \end{array}\right]}\) \(\newcommand{\fourvec}[4]{\left[\begin{array}{r}#1 \\ #2 \\ #3 \\ #4 \end{array}\right]}\) \(\newcommand{\cfourvec}[4]{\left[\begin{array}{c}#1 \\ #2 \\ #3 \\ #4 \end{array}\right]}\) \(\newcommand{\fivevec}[5]{\left[\begin{array}{r}#1 \\ #2 \\ #3 \\ #4 \\ #5 \\ \end{array}\right]}\) \(\newcommand{\cfivevec}[5]{\left[\begin{array}{c}#1 \\ #2 \\ #3 \\ #4 \\ #5 \\ \end{array}\right]}\) \(\newcommand{\mattwo}[4]{\left[\begin{array}{rr}#1 \amp #2 \\ #3 \amp #4 \\ \end{array}\right]}\) \(\newcommand{\laspan}[1]{\text{Span}\{#1\}}\) \(\newcommand{\bcal}{\cal B}\) \(\newcommand{\ccal}{\cal C}\) \(\newcommand{\scal}{\cal S}\) \(\newcommand{\wcal}{\cal W}\) \(\newcommand{\ecal}{\cal E}\) \(\newcommand{\coords}[2]{\left\{#1\right\}_{#2}}\) \(\newcommand{\gray}[1]{\color{gray}{#1}}\) \(\newcommand{\lgray}[1]{\color{lightgray}{#1}}\) \(\newcommand{\rank}{\operatorname{rank}}\) \(\newcommand{\row}{\text{Row}}\) \(\newcommand{\col}{\text{Col}}\) \(\renewcommand{\row}{\text{Row}}\) \(\newcommand{\nul}{\text{Nul}}\) \(\newcommand{\var}{\text{Var}}\) \(\newcommand{\corr}{\text{corr}}\) \(\newcommand{\len}[1]{\left|#1\right|}\) \(\newcommand{\bbar}{\overline{\bvec}}\) \(\newcommand{\bhat}{\widehat{\bvec}}\) \(\newcommand{\bperp}{\bvec^\perp}\) \(\newcommand{\xhat}{\widehat{\xvec}}\) \(\newcommand{\vhat}{\widehat{\vvec}}\) \(\newcommand{\uhat}{\widehat{\uvec}}\) \(\newcommand{\what}{\widehat{\wvec}}\) \(\newcommand{\Sighat}{\widehat{\Sigma}}\) \(\newcommand{\lt}{<}\) \(\newcommand{\gt}{>}\) \(\newcommand{\amp}{&}\) \(\definecolor{fillinmathshade}{gray}{0.9}\)*additional comments by the editor, Janine Mozoomdar, in red and denoted with an asterisk for now, just for easy spotting and convenience.
Q19.19A
Write cell reactions for the electrochemical cells diagrammed, and use data from the table of standard electrode potentials to calculate E°cell for each reaction.
- Fe(s)|Fe2+(aq)||Zn2+(aq)|Zn(s)
- Na(s)|Na+(aq)||Cl2(g)|Cl−(aq)
- Co(s)|Co2+(aq)||Mn2+(aq)|Mn(s)
- Pt(s)|Fe2+(aq),Fe3+(aq)||Pb2+(aq)|Pb(s)
Necessary Information:
A.) By convention, Cell Diagrams are formatted so that the anode (where oxidation occurs) is written to the far left of the notation, and the cathode (where reduction occurs) is written to the far left of the notation. The double lines in the center represent a salt bridge that separates two half reactions that compose the galvanic cell. The oxidation half reaction is thus represented on the far left of the notation, and the reduction half reaction is represented on the far right of the notation.
e.g. (Example #1)
Fe(s)|Fe2+(aq)||Zn2+|Zn(s)(aq)
(Anode) (Salt Bridge) (Cathode)
B.) "The overall cell reaction is the sum of the two half reactions, but the cell potential (E°cell) is the difference between the reduction potentials"
E°cell = E°cathode - E°anode (19.2.3)
C.) Table of Standard Reduction Potentials: (Table P1)
S19.19A
1.
Fe(s)|Fe2+(aq)||Zn2+(aq)|Zn(s)
Step #1:
Identify each half reaction of the cell and write each as a chemical reaction equation. The oxidation half reaction occurs at the anode, and results in the appearance of electrons in the products (a loss of electrons). The reduction half reaction occurs at the cathode, and results in the appearance of electrons in the reactants (a gain of electrons). (The number of electrons is determined by the charge of the opposite side of the equation. Add enough electrons to balance the charge on both sides of the equation [e.g. make the charges equivalent])
Answer:
Oxidation Half Reaction: Fe(s) → Fe2+(aq) + 2e-
Reduction Half Reaction: Zn2+(aq) + 2e- → Zn(s)
Step #2:
Combine the oxidation and and reduction half reactions to make the net reaction. Before combining them, you can multiply a half reaction by a coefficient to make the number electrons in the products equal to the number of the electrons in the reactants; this will allow the electrons to cancel in the net reaction (see example 2, step #2).
Answer:
Net Reaction: Fe(s) + Zn2+(aq) → Fe2+(aq) + Zn(s)
Step #3:
From the list of Standard Reduction Potentials (SRP), identify the SRP (in volts [V]) of each half reaction. Table of Standard Reduction Potentials: (Table P1)
-For the oxidation half reaction, reverse the equation to find its corresponding reduction reaction. (The Standard Oxidation Potential is simply the opposite of the Standard Reduction Potential). *Reversing the equation will not affect the value of E°cell when you plug them into the given formula.
e.g. Fe(s) → Fe2+(aq) + 2e- ⇒ Fe2+(aq) + 2e- → Fe(s)
(Oxidation reaction) (Reduction reaction)
-Look for this reduction reaction in the list of SRPs, and use its Standard Reduction Potential value when calculating the Standard Cell Potential (E°cell).
Answer:
Oxidation Half Reaction: Fe(s) → Fe2+(aq) + 2e- SRP: E°anode = -0.440 V
Reduction Half Reaction: Zn2+(aq) + 2e- → Zn(s) SRP: E°cathode = -0.7621 V
Step #4:
Using the Standard Reduction Potentials of the anode and the cathode, utilize the relation:
E°cell = E°cathode - E°anode
Use this relation to calculate the Standard Cell Potential (E°cell) of the net reaction.
Answer:
E°cell = -0.7621 V - (-0.440 V)
Net Reaction: Fe(s) + Zn2+(aq) → Fe2+(aq) + Zn(s) SRP: E°cell = -0.3321 V
This concludes the solution to example #1. The following will be the solutions to the remaining examples separated into the corresponding steps outlined in the walkthrough above. These solutions will feature commentary on any outstanding details that require explanation.
2.
Na(s)|Na+(aq)||Cl2(g)|Cl−(aq)
Step #1:
Answer:
Oxidation Half Reaction: Na(s) → Na+(aq) + e-
Reduction Half Reaction: Cl2(g) + 2e- → 2Cl-(aq)
Step #2:
In this instance, the oxidation half reaction must be multiplied by a coefficient of 2 in order to balance the number of electrons within the products and reactants of the net reaction.
e.g. (Na(s) → Na+(aq) + e-) × 2 ⇒ 2Na(s) → 2Na2+(aq) + 2e-
Now you may combine the reduction half reaction with this new form of the oxidation half reaction in order to create the net reaction equation.
Answer:
Net Reaction: 2Na(s) + Cl2(g) → 2Na+(aq) + 2Cl-(aq)
Step #3:
For the oxidation half reaction, proceed in the same manner as in Example #1, Step #3. Use the unaltered oxidation half reaction to find its SRP in the table of Standard Reduction Potentials (Table P1).
e.g. Na+(aq) + e- → Na(s)
There is no need to multiply the SRP of the oxidation half reaction by the coefficient in which you multiplied the reaction by in the previous step. The stoichiometry of the net reaction does not affect the Standard Cell Potential (E°cell); * This is because voltage is an intensive property, meaning it does not change in value when the amount changes.
Answer:
Oxidation Half Reaction: Na(s) → Na+(aq) + e- SRP: E°anode = -2.7144 V
Reduction Half Reaction: Cl2(g) + 2e- → 2Cl-(aq) SRP: E°cathode = 1.3601 V
Step #4:
Answer:
E°cell = 1.3601 V - (-2.7144 V)
Net Reaction: 2Na(s) + Cl2(g) → 2Na+(aq) + 2Cl-(aq) SRP: E°cell = 4.0745 V
3.
Co(s)|Co2+(aq)||Mn2+(aq)|Mn(s)
Step #1:
Answer:
Oxidation Half Reaction: Co(s) → Co2+ + 2e-
Reduction Half Reaction: Mn2+(aq) + 2e- → Mn(s)
Step#2:
Answer:
Net Reaction: Co(s) + Mn2+(aq) → Co2+(aq) + Mn(s)
Step #3:
Table of Standard Reduction Potentials: (Table P1)
Answer:
Oxidation Half Reaction: Co(s) → Co2+ + 2e- SRP: E°anode = -0.277 V
Reduction Half Reaction: Mn2+(aq) + 2e- → Mn(s) SRP: E°cathode = -1.182 V
Step #4:
Answer:
E°cell = -1.182 V - (-0.277 V)
Net Reaction: Co(s) + Mn2+(aq) → Co2+(aq) + Mn(s) SRP: E°cell = -0.905
4.
Pt(s)|Fe2+(aq),Fe3+(aq)||Pb2+(aq)|Pb(s)
Step #1:
The anode of this example's cell notation is still the location where the oxidation half reaction occurs. However, the Pt(s) serves as an inert electrode (anode), which allows the flow of electrons in order for the oxidation reaction to occur and for the cell to have potential, but the platinum itself does not take part in the reaction. The rest of the elements to the left of the salt bridge will be used in the oxidation reaction.
Answer:
Oxidation Half Reaction: Fe2+(aq) → Fe3+(aq) + e-
Reduction Half Reaction: Pb2+(aq) + 2e- → Pb(s)
Step #2:
The oxidation half reaction must be multiplied by a coefficient of 2. (see example 2, step #2)
e.g. (Fe2+(aq) → Fe3+(aq) + e-) × 2 ⇒ 2Fe2+(aq) → 2Fe3+(aq) + 2e-
Answer:
Net Reaction: 2Fe2+(aq) + Pb2+(aq) → 2Fe3+(aq) + Pb(s)
Step #3:
Table of Standard Reduction Potentials: (Table P1)
Answer:
Oxidation Half Reaction: Fe2+(aq) → Fe3+(aq) + e- SRP: E°anode = 0.771 V
Reduction Half Reaction: Pb2+(aq) + 2e- → Pb(s) SRP: E°cathode = -0.125 V
Step #4:
Answer:
E°cell = -0.125 V - 0.771 V
Net Reaction: 2Fe2+(aq) + Pb2+(aq) → 2Fe3+(aq) + Pb(s) SRP: E°cell = -0.896 V
(Q19.19A Fin.)
Q20.1E
Write electron configurations and orbital diagrams for the following transition element atom and ions:
- Ag+
- Fe2+
- V
- Mn3+
- Zn2+
- Cu+
Necessary Information:
A.) In electron configurations and orbital diagrams, all orbitals before a given orbital must be filled before the given orbital can begin taking on electrons.
B.) In an orbital diagram, all electron pairs in an orbital must have one upward spin electron before electrons begin pairing.
C.) Neon gasses have completed electron shells. Valence orbitals simply refer to the outermost orbitals in an atoms shell that contain the valence electrons of the atom.
D.) For transition metals, the s valence orbital will lose electrons before the d valence orbital when the atom is ionized.
E.) For certain transition metals, an electron may be taken from the s valence orbital to complete the d valence orbital and increase stability.
F.) The completed shell of electrons before the outermost orbitals that contain the valence electrons in an atom can simply be represented in an electron configuration as the Noble Gas that has that completed shell.
e.g. (Example #3)
[Ar] ⇒ 1s22s22p63s23p6
[V] ⇒ 1s22s22p63s23p64s23d3 = [Ar] 4s23d3 (simply replace 1s22s22p63s23p6, the completed shell, with [Ar])
G.) The s orbitals can contain up to two electrons, and the d orbitals can contain up to 10 electrons.
H.) The d coefficient of the d orbital, begins one value below the coefficient of the corresponding s and p orbitals.
e.g. (example #3)
[V] ⇒ [Ar] 4s23d3 (the first d orbital is the 3d orbital rather than the 4d orbital)
I.) A positively charged ion has lost electrons. The number of electrons lost by this ion is equivalent to the magnitude of the ions positive charge.
S20.1E
1. Ag+
*In order to avoid silly miscounting errors when dealing with ions, it is wise to first write out the original electron configuration.
electron configuration: Ag = [Kr] 5s24d9
Now just take one electron off, which will come from the 5s group.
electron configuration: Ag+ ⇒ [Kr] 5s14d9
-Ag is a transition metal in group 11, meaning it will have 11 valence electrons. However, Ag+ is an ion of +1 charge. Therefore Ag+ is missing an electron, and will only have 10 tottal valence electrons.
-Ag+ is in period 5, so [Kr] is used to replace all non-valence orbitals in the electron configuration.
-The s orbital only has one electron because the lost electron is removed from the s orbital. In a transition metal, electrons will be removed from the s orbital before any are removed from the d orbital.
Orbital Diagram:

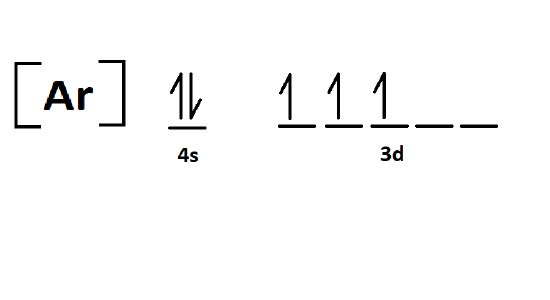
2. Fe2+
* electron configuration: Fe => [Ar]4s2d6
Now take off two electrons, which will both come from the 4s group.
electron configuration: Fe2+ ⇒ [Ar] 3d6
-Fe2+ is in group 8 and has charge of 2+. Therefore the ion will have 6 total valence electrons.
-Fe2+ is in period 4, so [Ar] is used to replace all non-valence orbitals in the electron configuration.
-Fe2+ has lost two electrons, both of which will be taken from the s orbital, removing the s orbital entirely, leaving only the d orbital.
Orbital Diagram:

3. V
electron configuration: V ⇒ [Ar] 4s23d3
-V is in group 5 and has no charge. Therefore it is not an ion and will have 5 total electrons.
-V is in period 4, so [Ar] is used to replace all non-valence orbitals in the electron configuration.
Orbital Diagram:
4. Mn3+
*electron configuration: Mn ⇒ [Ar] 4s2 3d5
Remove 3 electrons, the first two from the 4s, and one from the 3d.
electron configuration: Mn3+ ⇒ [Ar] 3d4
-Mn3+ is in group 7 and has a charge of 3+. Therefore the ion will have 4 total electrons.
-Mn3+ is in period 4, so [Ar] is used to replace all non-valence orbitals in the electron configuration.
-Mn3+ has lost 3 electrons, 2 of which are taken from the s orbital, and one of which will be taken from the d orbital. The s orbital is thus removed entirely and the d orbital has lost an electron.
Orbital Diagram:

5. Zn2+
*electron configuration: Zn ⇒ [Ar] 4s2 3d10
Remove two electrons, both come from 4s.
electron configuration: Zn2+ ⇒ [Ar] 3d10
-Zn2+ is in group 12 and has a charge of 2+. Therefore the ion will have 10 total electrons.
-Zn2+ is in period 4, so [Ar] is used to replace all non-valence orbitals in the electron configuration.
-Zn2+ has lost 2 electrons, both of which are taken from the s orbital, removing the s orbital entirely, but leaving a completed d orbital with 10 electrons.
Orbital Diagram:

6. Cu+
*electron configuration: Cu ⇒ [Ar] 4s13d10; note this is a strange configuration, as the d block fills before the 4s. This is because Cu wants a full d block, as it is more stable, therefore an electron from 4s is excited and rises to the 3d block. This also occurs in Chromium, as a half d block is also very desirable.
Remove an electron, which comes from the 4s block.
electron configuration: Cu+ ⇒ [Ar] 3d10
-Cu+ is in group 11 and has a charge of 1+. Therefore the ion will have 10 total electrons.
-Cu+ is in period 4, so [Ar] is used to replace all non-valence orbitals in the electron configuration.
-Cu+ has lost one electron, which is taken from the s orbital.
-Cu+ has one unpaired electron in its d orbital. In order to reach a more stable state, the d orbital will take an electron from the s orbital. The unpaired electron in the s orbital is taken and the s orbital is removed entirely, leaving a completed d orbital with 10 electrons.
Orbital Diagram:
(Q20.1E Fin.)
Q21.13A
If E, F, G, H are four different ligands,
- how many geometric isomers will be found for square planar [PtEFGH]2+?
- will tetrahedral [ZnEFGH]2+ display optical isomerism?
Necessary Information:
A.) A geometric isomer is a coordination compound that has the same formula as another coordination compound, but with a different arrangement of the same ligands about the central transition metal.
B.) A cis isomer occurs when two specific ligands are positioned 90º from one another.
C.) A trans isomer occurs when two specific ligands are positioned 180º (across) from one another.
D.) A square planar structure is created by the four ligands being positioned at the four corners of a flat square with the transition metal positioned in the center.
E.) A tetrahedral structure is created by the four ligands creating a pyramid with a triangular base. The ligands are still bound to the transition metal in the center.
F.) Optical Isomerism occurs when an isomer, if mirrored across any plane of symmetry will create a completely new isomer that can not be made to look exactly like the original isomer by simply rotating the isomer. These types of isomers are known as chiral.
S21.13A
1.
The four ligands form a square planar structure. Each ligand has the possibility to be trans (180º across from) to the three other ligands.
The three possible geometric isomers will look like:
Ligand E trans to ligand H

Ligand E trans to ligand G

Ligand E trans to ligand F

If the two other trans ligands are swapped, each of the other ligands are still cis to those ligands as they were before, and thus will not change the compound's structure.
There are 3 possible geometric isomers.
2.
A tetrahedral structure of the four different ligands would not create the exact same compound when mirrored. The isomers would be chiral. The best way to know for sure is to look at the compound and a mirror image of it, and compare them. (F.)
The coordination compund [ZnEFGH]2+

When mirrored
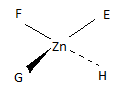
The mirrored coordination compound can not be made to look exactly like the original coordination compound by simply rotating the molecule about its center in any direction. Therefore, this is an optical isomer and [ZnEFGH]2+ is chiral.
[ZnEFGH]2+ does display optical isomerism.
*Important note, a tetrahedral complex with four different ligands will ALWAYS be chiral.
(Q21.12A Fin.)
Q24.19C
The reaction A to product is first order in A.
- If 2.4 g of A is allowed to decompose for 30 minutes, the mass of A remaining undecomposed is found to be .6g. What is the half life, t1/2, of this reaction.
- Starting with 2.4g of A what is the mass of A remaining undecomposed after 1 hour
Necessary Information:
A.) Half life, t1/2 is the amount of time in which it takes for half of a sample of a substance to decompose.
B.) The half life of a first order reaction (in which the half life does not depend on the initial concentration, [A0]) is:
t1/2 = (ln(2))/k
-Where k is a reaction constant specific to the decomposing substance.
C.) The concentration of a first order reaction, [A] is equal to:
[A] = [A0]e-kt
-where t is the time passed from the beginning of the reaction/decomposition.
This equation can be rearranged as:
ln([A]/[A0]) = -kt
This gives a convenient equation to solve for the time passed or the reaction constant.
The half life version of this formula is simply:
ln(1/2) = -kt
S24.19C
1.
Notice that .6g is 1/4 of the original mass of the compound:
(2.4g)/(.6g) = 4
Therefore, over the 30 minute period the mass has decreased to 1/4 of its original mass. After a single half life, 1/2 of the original, mass will remain. Observe:
(1/2)(1/2) = (1/4)
This means that two half lives have elapsed in the course of 30 minutes. In a first order reaction or decomposition, the length of a half life is constant regardless of the initial concentration. So the length of the half life in this instance can be represented as:
2 × t1/2 = 30 minutes
Divide the period of time (30 minutes) by the number of half lives that have elapsed in that period of time to get the actual half life:
t1/2 = 15 minutes
*Another way to do this is by plugging in the given values into the ln([A]/[A0]) = -kt to find k, then using k to find the half life using ln(1/2) = -kt .
When [A] = .6 g, [Ao]= 2.4 g, t = 30 min; k will equal .0462
When k=.0462, t1/2 will equal 15 minutes.
2.
Utilizing the relationship of half life of a first order reaction to the constant value k (B.), we can solve for the constant value k using the information from our previous example which uses the same substance:
k = (ln(2))/(15 minutes) = 0.0462 min-1
Now knowing the value of constant k for this particular substance, we can use the equation for concentration (C.) and solve for the final concentration after one hour:
[A] = (2.4g)e-(0.0462min^(-1))(60 min)
[A] = 0.150g of A
(Q24.19C Fin.)
Q25.2A
Write the following nuclear reactions:
- bombardment of 9Be with protons to produce 10B and γ(gamma) rays
- bombardment of 7Li with 2H to produce 8Be
- bombardment of 12C with neutrons to produce 12B
Necessary Information:
A.) Protons are represented as 1H (Hydrogen only ever has one proton, and the 1 in 1H represents mass number of the isotope. Since hydrogen always has one proton, that means there are no neutrons in this isotope, only a singular proton).
B.) γ(Gamma) rays have neither a mass number nor an atomic number, *are often emitted with alpha and beta particle emission.
C.) Neutrons are represented as 1n (The 1 in 1n represents the mass number which is composed of the single neutron. A Neutron has no atomic number).
D.) When writing balanced nuclear equations, the total mass number and atomic number of the reactants must be equal to those of the products.
S25.2A
1.
Begin by writing the nuclear equation using the information in which we are given:
9Be + 1H → 10B + γ
Now make sure that the total mass numbers and atomic numbers of the reactants are balanced with those of the products. Let's look at the mass number first.
The total mass number of the reactants is:
9 + 1 = 10
The total mass number of the products is:
10 + 0 = 10
Now look at the atomic numbers.
The total atomic number of the reactants is:
-The atomic number of Be is 4
-The atomic number of H is 1
4 +1 = 5
The total atomic number of the products is:
-The atomic number of B is 5
-The atomic number of γ(gamma) rays are 0
5 + 0 = 5
The mass numbers and atomic numbers are already balanced with a single proton, so the answer remains:
9Be + 1H → 10B + γ
2.
Begin by writing the nuclear equation using the information in which we are given:
7Li + 2H → 8Be + 1n
Now make sure that the total mass numbers and atomic numbers of the reactants are balanced with those of the products. Let's look at the mass number first.
The total mass number of the reactants is:
7 + 2 = 9
The total mass number of the products is:
8 + 1 = 9
Now look at the atomic numbers.
The total atomic number of the reactants is:
-The atomic number of Li is 3
-The atomic number of H is 1
3 +1 = 4
The total atomic number of the products is:
-The atomic number of Be is 4
-The atomic number of a neutron is 0
4 + 0 = 4
The mass numbers and atomic numbers are already balanced with a single 2H in the reactants and a single 1n in the products, so the answer remains:
7Li + 2H → 8Be + 1n
3.
Begin by writing the nuclear equation using the information in which we are given:
12C + 1n → 12B + 1H
Now make sure that the total mass numbers and atomic numbers of the reactants are balanced with those of the products. Let's look at the mass number first.
The total mass number of the reactants is:
12 + 1 = 13
The total mass number of the products is:
12 + 1 = 13
Now look at the atomic numbers.
The total atomic number of the reactants is:
-The atomic number of C is 6
-The atomic number of a neutron is 0
6 +0 = 6
The total atomic number of the products is:
-The atomic number of B is 5
-The atomic number of a H is 1
5 + 1 = 6
The mass numbers and atomic numbers are already balanced with a single neutron in the reactants and a single 1H in the products, so the answer remains:
12C + 1n → 12B + 1H
(Q25.2A Fin.)
Q25.37D
Predict if each of the following radionuclides decays by beta or positron emission:
- 29Si
- 27Si
- 112Sn
- 120Sn
Necessary Information
A) an unstable nucleus will experience radioactive decay until it transmutates into a stable compound.
B) The Belt of Stability: (if there is any foreseeable issue with my choice to use this image, then simply remove the image)
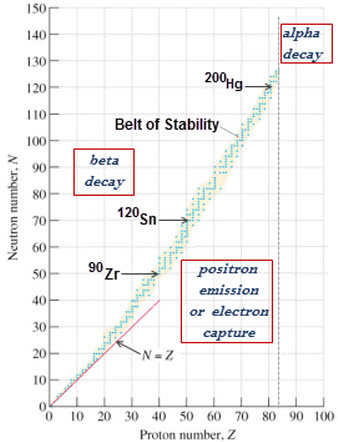
- The belt of stability is a visible trend of stable nuclei on a graph of The Number of Neutrons vs. The Number of Protons.
- This trend depicts a diagonal strip of a neutron to proton ratios that will produce a stable nucleus.
-*Alpha decay is usually done for elements with Z>83, in order to decrease Z.
- Positron emission will cause an isotope to move up and to the left on the belt of stability graph. Therefore, unstable nuclei that are located below and to the right of the belt of stability will most likely experience positron emission. (Positron emission: A loss of a proton in the nucleus; A gain of a neutron in the nucleus).
- Beta decay will cause an isotope to move down and to the right on the belt of stability graph. Therefore, unstable nuclei that are located above and to the left of the belt of stability will most likely experience beta decay. (Beta decay: A gain of a proton in the nucleus; A loss of a neutron in the nucleus).
C.) To find which kind of radioactive decay a nucleus will experience, simply find its position in relation to the belt of stability on the graph of The Number of Neutrons vs. The Number of Protons.
D.) The Mass Number is the total number of neutrons and protons in a nucleus.
E.) The Atomic Number is the number of protons in an element.
e.g. (Example #1) mass number→ 29Si
S25.37D
1. 29Si
To find where this isotope is in relation to the belt of stability, find the number of protons and the number of neutrons in the nucleus.
- Si has 12 protons
To find the number of isotopes, subtract the number of protons of the element from the mass number of the isotope.
- 29Si has a mass number of 29
29 - 12 = 17
Therefore, 29Si has 17 neutrons and 12 protons. Now, look for the coordinate (12,17) on the belt of stability (B.). This is where 29Si will be located.
- 29Si is located above and to the left of the belt of stability.
29Si will need to shift to the right and down (gain a proton, lose a neutron): Beta Emission
2. 27Si
To find where this isotope is in relation to the belt of stability, find the number of protons and the number of neutrons in the nucleus.
- Si has 12 protons
To find the number of isotopes, subtract the number of protons of the element from the mass number of the isotope.
- 27Si has a mass number of 27
27 - 12 = 15
Therefore, 27Si has 15 neutrons and 12 protons. Now, look for the coordinate (12,15) on the belt of stability (B.). This is where 27Si will be located.
- 27Si is located below and to the right of the belt of stability.
27Si will need to shift to the left and up (lose a proton, gain a neutron): Positron Emission
3. 112Sn
To find where this isotope is in relation to the belt of stability, find the number of protons and the number of neutrons in the nucleus.
- Sn has 50 protons
To find the number of isotopes, subtract the number of protons of the element from the mass number of the isotope.
- 112Sn has a mass number of 112
112 - 50 = 62
Therefore, 112Sn has 62 neutrons and 50 protons. Now, look for the coordinate (50,62) on the belt of stability (B.). This is where 112Sn will be located.
- 112Sn is located below and to the right of the belt of stability.
112Sn will need to shift to the left and up (lose a proton, gain a neutron): Positron Emission
4. 120Sn
To find where this isotope is in relation to the belt of stability, find the number of protons and the number of neutrons in the nucleus.
- Sn has 50 protons
To find the number of isotopes, subtract the number of protons of the element from the mass number of the isotope.
- 120Sn has a mass number of 120
120 - 50 = 70
Therefore, 120Sn has 70 neutrons and 50 protons. Now, look for the coordinate (50,70) on the belt of stability (B.). This is where 120Sn will be located.
- 120Sn is located below and to the right of the belt of stability.
120Sn will need to shift to the right and down (gain a proton, lose a neutron): Beta Emission
(Q25.37D Fin.)
Q21.2.8
Numerous elements can undergo fission, but only a few can be used as fuels in a reactor. What aspect of nuclear fission allows a nuclear chain reaction to occur?
S21.2.8
"A chain reaction refers to a process in which neutrons released in fission produce an additional fission in at least one further nucleus. This nucleus in turn produces neutrons, and the process repeats." (Larsen, Delmar; Chemistry 2C Lecture 26: June 7th, 2017)
*A chain reaction only needs to be initiated once, after that it will continue on its own. After the initial collision, the following reactions that occur do not need input from outside the system.
Nuclear fission is the breaking or decomposition of a large nuclease into smaller smaller pieces. In the artificial radioactivity produced by the bombardment of a large and relatively stable nucleus by neutrons, the collision of the the neutrons with the nucleus will destabilize the isotope, causing it to split and form a variety of different products including more neutrons to collide with other large nuclei. The release of more fast moving neutrons when a large nucleus is split allows for more large nuclei to become unstable, split and then produce more neutrons to continue the reaction. This is the cause of the chain reaction. Substances that can sustain a nuclear fission chain reaction are called fissionable, and will produce enough neutrons to replace the neutrons that needed to be absorbed to begin the reaction, and will thus continue on the reaction. (5.8 Nuclear Fission)
(Q21.2.8 Fin.)
Q20.3.6
It is often more accurate to measure the potential of a redox reaction by immersing two electrodes in a single beaker rather than in two beakers. Why?
S20.3.6
Within a galvanic cell, a salt bridge allows for the flow of ions between the two compartments so that the charge can flow in a circuit, maintaining the voltage output of the cell. In a single beaker, these ions may flow freely, providing a more accurate reading than a salt bridge, *however, while it does allow for the flow between the two cells, *it still creates resistance for the flow of charge.
From the text:
"The voltage produced by a redox reaction can be measured more accurately using two electrodes immersed in a single beaker containing an electrolyte that completes the circuit. This arrangement reduces errors caused by resistance to the flow of charge at a boundary, called the junction potential."
"A single-compartment galvanic cell will initially exhibit the same voltage as a galvanic cell constructed using separate compartments, but it will discharge rapidly because of the direct reaction of the reactant at the anode with the oxidized member of the cathodic redox couple. Consequently, cells of this type are not particularly useful for producing electricity." (19.1: Galvanic Cells)
(Q20.3.6 Fin.)