
Extra Credit 35
- Page ID
- 82794
\( \newcommand{\vecs}[1]{\overset { \scriptstyle \rightharpoonup} {\mathbf{#1}} } \)
\( \newcommand{\vecd}[1]{\overset{-\!-\!\rightharpoonup}{\vphantom{a}\smash {#1}}} \)
\( \newcommand{\id}{\mathrm{id}}\) \( \newcommand{\Span}{\mathrm{span}}\)
( \newcommand{\kernel}{\mathrm{null}\,}\) \( \newcommand{\range}{\mathrm{range}\,}\)
\( \newcommand{\RealPart}{\mathrm{Re}}\) \( \newcommand{\ImaginaryPart}{\mathrm{Im}}\)
\( \newcommand{\Argument}{\mathrm{Arg}}\) \( \newcommand{\norm}[1]{\| #1 \|}\)
\( \newcommand{\inner}[2]{\langle #1, #2 \rangle}\)
\( \newcommand{\Span}{\mathrm{span}}\)
\( \newcommand{\id}{\mathrm{id}}\)
\( \newcommand{\Span}{\mathrm{span}}\)
\( \newcommand{\kernel}{\mathrm{null}\,}\)
\( \newcommand{\range}{\mathrm{range}\,}\)
\( \newcommand{\RealPart}{\mathrm{Re}}\)
\( \newcommand{\ImaginaryPart}{\mathrm{Im}}\)
\( \newcommand{\Argument}{\mathrm{Arg}}\)
\( \newcommand{\norm}[1]{\| #1 \|}\)
\( \newcommand{\inner}[2]{\langle #1, #2 \rangle}\)
\( \newcommand{\Span}{\mathrm{span}}\) \( \newcommand{\AA}{\unicode[.8,0]{x212B}}\)
\( \newcommand{\vectorA}[1]{\vec{#1}} % arrow\)
\( \newcommand{\vectorAt}[1]{\vec{\text{#1}}} % arrow\)
\( \newcommand{\vectorB}[1]{\overset { \scriptstyle \rightharpoonup} {\mathbf{#1}} } \)
\( \newcommand{\vectorC}[1]{\textbf{#1}} \)
\( \newcommand{\vectorD}[1]{\overrightarrow{#1}} \)
\( \newcommand{\vectorDt}[1]{\overrightarrow{\text{#1}}} \)
\( \newcommand{\vectE}[1]{\overset{-\!-\!\rightharpoonup}{\vphantom{a}\smash{\mathbf {#1}}}} \)
\( \newcommand{\vecs}[1]{\overset { \scriptstyle \rightharpoonup} {\mathbf{#1}} } \)
\( \newcommand{\vecd}[1]{\overset{-\!-\!\rightharpoonup}{\vphantom{a}\smash {#1}}} \)
\(\newcommand{\avec}{\mathbf a}\) \(\newcommand{\bvec}{\mathbf b}\) \(\newcommand{\cvec}{\mathbf c}\) \(\newcommand{\dvec}{\mathbf d}\) \(\newcommand{\dtil}{\widetilde{\mathbf d}}\) \(\newcommand{\evec}{\mathbf e}\) \(\newcommand{\fvec}{\mathbf f}\) \(\newcommand{\nvec}{\mathbf n}\) \(\newcommand{\pvec}{\mathbf p}\) \(\newcommand{\qvec}{\mathbf q}\) \(\newcommand{\svec}{\mathbf s}\) \(\newcommand{\tvec}{\mathbf t}\) \(\newcommand{\uvec}{\mathbf u}\) \(\newcommand{\vvec}{\mathbf v}\) \(\newcommand{\wvec}{\mathbf w}\) \(\newcommand{\xvec}{\mathbf x}\) \(\newcommand{\yvec}{\mathbf y}\) \(\newcommand{\zvec}{\mathbf z}\) \(\newcommand{\rvec}{\mathbf r}\) \(\newcommand{\mvec}{\mathbf m}\) \(\newcommand{\zerovec}{\mathbf 0}\) \(\newcommand{\onevec}{\mathbf 1}\) \(\newcommand{\real}{\mathbb R}\) \(\newcommand{\twovec}[2]{\left[\begin{array}{r}#1 \\ #2 \end{array}\right]}\) \(\newcommand{\ctwovec}[2]{\left[\begin{array}{c}#1 \\ #2 \end{array}\right]}\) \(\newcommand{\threevec}[3]{\left[\begin{array}{r}#1 \\ #2 \\ #3 \end{array}\right]}\) \(\newcommand{\cthreevec}[3]{\left[\begin{array}{c}#1 \\ #2 \\ #3 \end{array}\right]}\) \(\newcommand{\fourvec}[4]{\left[\begin{array}{r}#1 \\ #2 \\ #3 \\ #4 \end{array}\right]}\) \(\newcommand{\cfourvec}[4]{\left[\begin{array}{c}#1 \\ #2 \\ #3 \\ #4 \end{array}\right]}\) \(\newcommand{\fivevec}[5]{\left[\begin{array}{r}#1 \\ #2 \\ #3 \\ #4 \\ #5 \\ \end{array}\right]}\) \(\newcommand{\cfivevec}[5]{\left[\begin{array}{c}#1 \\ #2 \\ #3 \\ #4 \\ #5 \\ \end{array}\right]}\) \(\newcommand{\mattwo}[4]{\left[\begin{array}{rr}#1 \amp #2 \\ #3 \amp #4 \\ \end{array}\right]}\) \(\newcommand{\laspan}[1]{\text{Span}\{#1\}}\) \(\newcommand{\bcal}{\cal B}\) \(\newcommand{\ccal}{\cal C}\) \(\newcommand{\scal}{\cal S}\) \(\newcommand{\wcal}{\cal W}\) \(\newcommand{\ecal}{\cal E}\) \(\newcommand{\coords}[2]{\left\{#1\right\}_{#2}}\) \(\newcommand{\gray}[1]{\color{gray}{#1}}\) \(\newcommand{\lgray}[1]{\color{lightgray}{#1}}\) \(\newcommand{\rank}{\operatorname{rank}}\) \(\newcommand{\row}{\text{Row}}\) \(\newcommand{\col}{\text{Col}}\) \(\renewcommand{\row}{\text{Row}}\) \(\newcommand{\nul}{\text{Nul}}\) \(\newcommand{\var}{\text{Var}}\) \(\newcommand{\corr}{\text{corr}}\) \(\newcommand{\len}[1]{\left|#1\right|}\) \(\newcommand{\bbar}{\overline{\bvec}}\) \(\newcommand{\bhat}{\widehat{\bvec}}\) \(\newcommand{\bperp}{\bvec^\perp}\) \(\newcommand{\xhat}{\widehat{\xvec}}\) \(\newcommand{\vhat}{\widehat{\vvec}}\) \(\newcommand{\uhat}{\widehat{\uvec}}\) \(\newcommand{\what}{\widehat{\wvec}}\) \(\newcommand{\Sighat}{\widehat{\Sigma}}\) \(\newcommand{\lt}{<}\) \(\newcommand{\gt}{>}\) \(\newcommand{\amp}{&}\) \(\definecolor{fillinmathshade}{gray}{0.9}\)Q17.5.3
Consider a battery made from one half-cell that consists of a copper electrode in 1 M CuSO4 solution and another half-cell that consists of a lead electrode in 1 M Pb(NO3)2 solution.
- What are the reactions at the anode, cathode, and the overall reaction?
- What is the standard cell potential for the battery?
- Most devices designed to use dry-cell batteries can operate between 1.0 and 1.5 V. Could this cell be used to make a battery that could replace a dry-cell battery? Why or why not.
- Suppose sulfuric acid is added to the half-cell with the lead electrode and some \(Pb{SO_4}\) forms. Would the cell potential increase, decrease, or remain the same?
Solution for Q 17.5.3
a) Since the anode is the site where oxidation occurs while the cathode is where reduction occurs, the first thing we should determine is which of the central elements (Pb or Cu) is reduced and which is oxidized, which we can determine by referring to the table of standard reduction potentials. The higher the standard reduction potential, the more the element or compound wants to be reduced.
$$Cu^{2+}(aq)+2e^-\to Cu(s) \qquad E^\circ=0.34V$$
$$Pb^{2+}(aq)+2e^-\to Pb(s) \qquad E^\circ=-0.13V$$
So, as we can see, since \(Pb^{2+}\) has a lower standard reduction potential, it will be oxidized while \(Cu^{2+}\), which has a higher standard reduction potential, will be reduced.
So at the anode: $$Pb(s) \to Pb^{2+}(aq)+2e^- \qquad E^\circ=-0.13V$$ The original solution was incorrect (the anode had a reduction reaction).
While at the cathode: $$Cu^{2+}(aq)+2e^-\to Cu(s) \qquad E^\circ=0.34V$$
With the overall reaction being: \(Cu^{2+}(aq) + Pb(s) \to Pb^{2+}(aq) + Cu(s) \)
The original solution was incorrect (the overall reaction included \(Pb{SO_4}\) and \(CuSO_4\), making the reaction unbalanced).
b) The standard cell potential for the battery (\(E^\circ\)) is given by the equation: \(E^\circ = E^{\circ}_{cathode} - E^{\circ}_{anode} \)
$$E^{\circ}_{cathode} = 0.34V$$
$$E^{\circ}_{anode} = -0.13V$$
Note: the standard reduction value stays the same regardless if the reaction is reversed (i.e. \(Cu^{2+}(aq)+2e^-\to Cu(s)\) to \(Cu(s) \to Cu^{2+}(aq)+2e^-\))
$$0.34V - (-0.13V) = 0.47V = E^{\circ}_{cell}$$
c) Since the \(E^{\circ}_{cell}\) for this reaction is only 0.47V, it would take at least three of these cells (0.47V times 3) to replace a dry cell battery (since we need 1.0V - 1.5V). This \(E^{\circ}_{cell}\) alone would not be able to replace a dry cell battery, but if multiple of these cells are put together then the answer is yes.
d) In order to determine if the cell potential increases or decreases, we need to use the Nernst Equation and compare the cell potential under the standard and the non standard conditions.
\[E_{cell} = E^{\circ}_{cell} - \left ( \frac{RT}{nF} \right )lnQ\]
By adding more SO4, the only factor that changes in this equation is Q, which, according to our overall reaction, is
$$Q=\frac{[Pb^{2+}]}{[Cu^{2+}]}$$
So, at standard conditions, this ratio Q equals one. By adding more SO4 in the half cell with the lead electrode, more \(Pb{SO_4}\)(s) forms. More \(Pb{SO_4}\)(s) means more \(Pb^{2+}\) is used up meaning less \(Pb{{(NO_3)}_2}\)(aq), therefore lowering Q under 1 under these conditions. As a result of Q being less of 1, the ln of any number lower than 1 is negative, so the Nernst equation in this case becomes
\[E_{cell} = E^{\circ}_{cell} + \left ( \frac{RT}{nF} \right )(positive \ number)\]
As a result, the cell potential increases.
Q12.2.2
Go to the PhET Reactions & Rates interactive. Use the Single Collision tab to represent how the collision between monatomic oxygen (O) and carbon monoxide (CO) results in the breaking of one bond and the formation of another. Pull back on the red plunger to release the atom and observe the results. Then, click on “Reload Launcher” and change to “Angled shot” to see the difference.
- What happens when the angle of the collision is changed?
- Explain how this is relevant to rate of reaction.
Solution for Q 12.2.2
-
According to the collision theory, there are many factors that cause a reaction to happen, with three of the factors being how often the molecules or atoms collide, the molecules' or atoms' orientations, and if there is sufficient energy for the reaction to happen. So, if the angle of the plunger is changed, the atom that is shot (a lone Oxygen atom in this case) will hit the other molecule (CO in this case) at a different spot and at a different angle, therefore changing the orientation and the number of proper collisions will most likely not cause for a reaction to happen. Thanks to the simulation, we can see that this is true: depending on the angle selected, the atom may take a long time to collide with the molecule and, when a collision does occur, it may not result in the breaking of the bond and the forming of the other (no reaction happens).
-
In this particular case, the rate of the reaction will decrease because, by changing the angle, the molecules or atoms won't collide with the correct orientation or as often with the correct orientation.
Q12.5.7
The rate of a certain reaction doubles for every 10 °C rise in temperature.
- How much faster does the reaction proceed at 45 °C than at 25 °C?
- How much faster does the reaction proceed at 95 °C than at 25 °C?
Solution for Q12.5.7
-
By finding the difference in temperature, 45 °C - 25 °C, we get 20 °C. Since the rate of the reaction doubles every 10 °C increase in temperature and the rate of the reaction experienced a 20 °C increase in temperature, we see that the reaction rate doubled twice (22 = 4). As a result, the reaction proceeds four times faster.
-
Following the same process as in part a, we get the difference in temperature to be 70 °C. Since the rate of the reaction doubles every 10 °C increase in temperature and the system experienced a 70 °C change, we see that the reaction doubled seven times (27 = 128). We can see the reaction proceeds 128 times faster.
Q21.4.2
What changes occur to the atomic number and mass of a nucleus during each of the following decay scenarios?
- an α particle is emitted
- a β particle is emitted
- γ radiation is emitted
- a positron is emitted
- an electron is captured
Solution for Q21.4.2
-
An \(\alpha\) particle is essentially a helium atom with 2 protons and 2 neutrons, with a total mass number of 4 amu. So when an \(\alpha\) particle is emitted, the mass of a nucleus decreases by 4 amu and the atomic number decreases by 2.
-
When a neutron splits, it can split into multiple particles: a proton, an electron (β-), and an antineutrino. The proton stays inside the nucleus, resulting in the mass of the nucleus virtually remaining the same and the β- particle is emitted. However, as a result, the nucleus essentially loses a neutron and gains a proton, so the atomic number increases by 1.
-
When γ radiation is emitted, it does not change the atomic number or the mass of the nucleus as γ radiation is electromagnetic radiation (massless) emitted from the nucleus.
-
When a proton splits, it can split into multiple particles: a neutron, a positron (β+), and a neutrino. A positron is a particle like an electron but with a positive charge. As a result of the proton being converted into all of these particles, the mass number of a nucleus stays the same, since the neutron stays inside the nucleus and a neutron has about the same mass as a proton, and the atomic number decreases by 1 as a proton is lost.
-
When an electron is captured, a proton in the nucleus combines with that electron, producing a neutron (which stays in the nucleus) and a neutrino (which is emitted). As a result, the mass number stays the same, and the atomic number decreases by one (since a proton is essentially lost).
Q20.2.6
Of these elements, which would you expect to be easiest to reduce: Se, Sr, or Ni? Explain your reasoning.
Solution for Q20.2.6
We know two periodic table trends, with atomic radii tending to increase down a group and increase going from right to left across a row, and electronegativity (how bad an element wants a electron or reducing strength) decreasing down a group and decreasing going from right to left. Most elements want to achieve a full octet as well, so the elements on the lower left hand side of the periodic table (with larger radii and smaller electronegativities) tend to want to get rid of their electrons to achieve this full octet (8 electrons in the outermost shell, mimicking stable noble gas configuration).
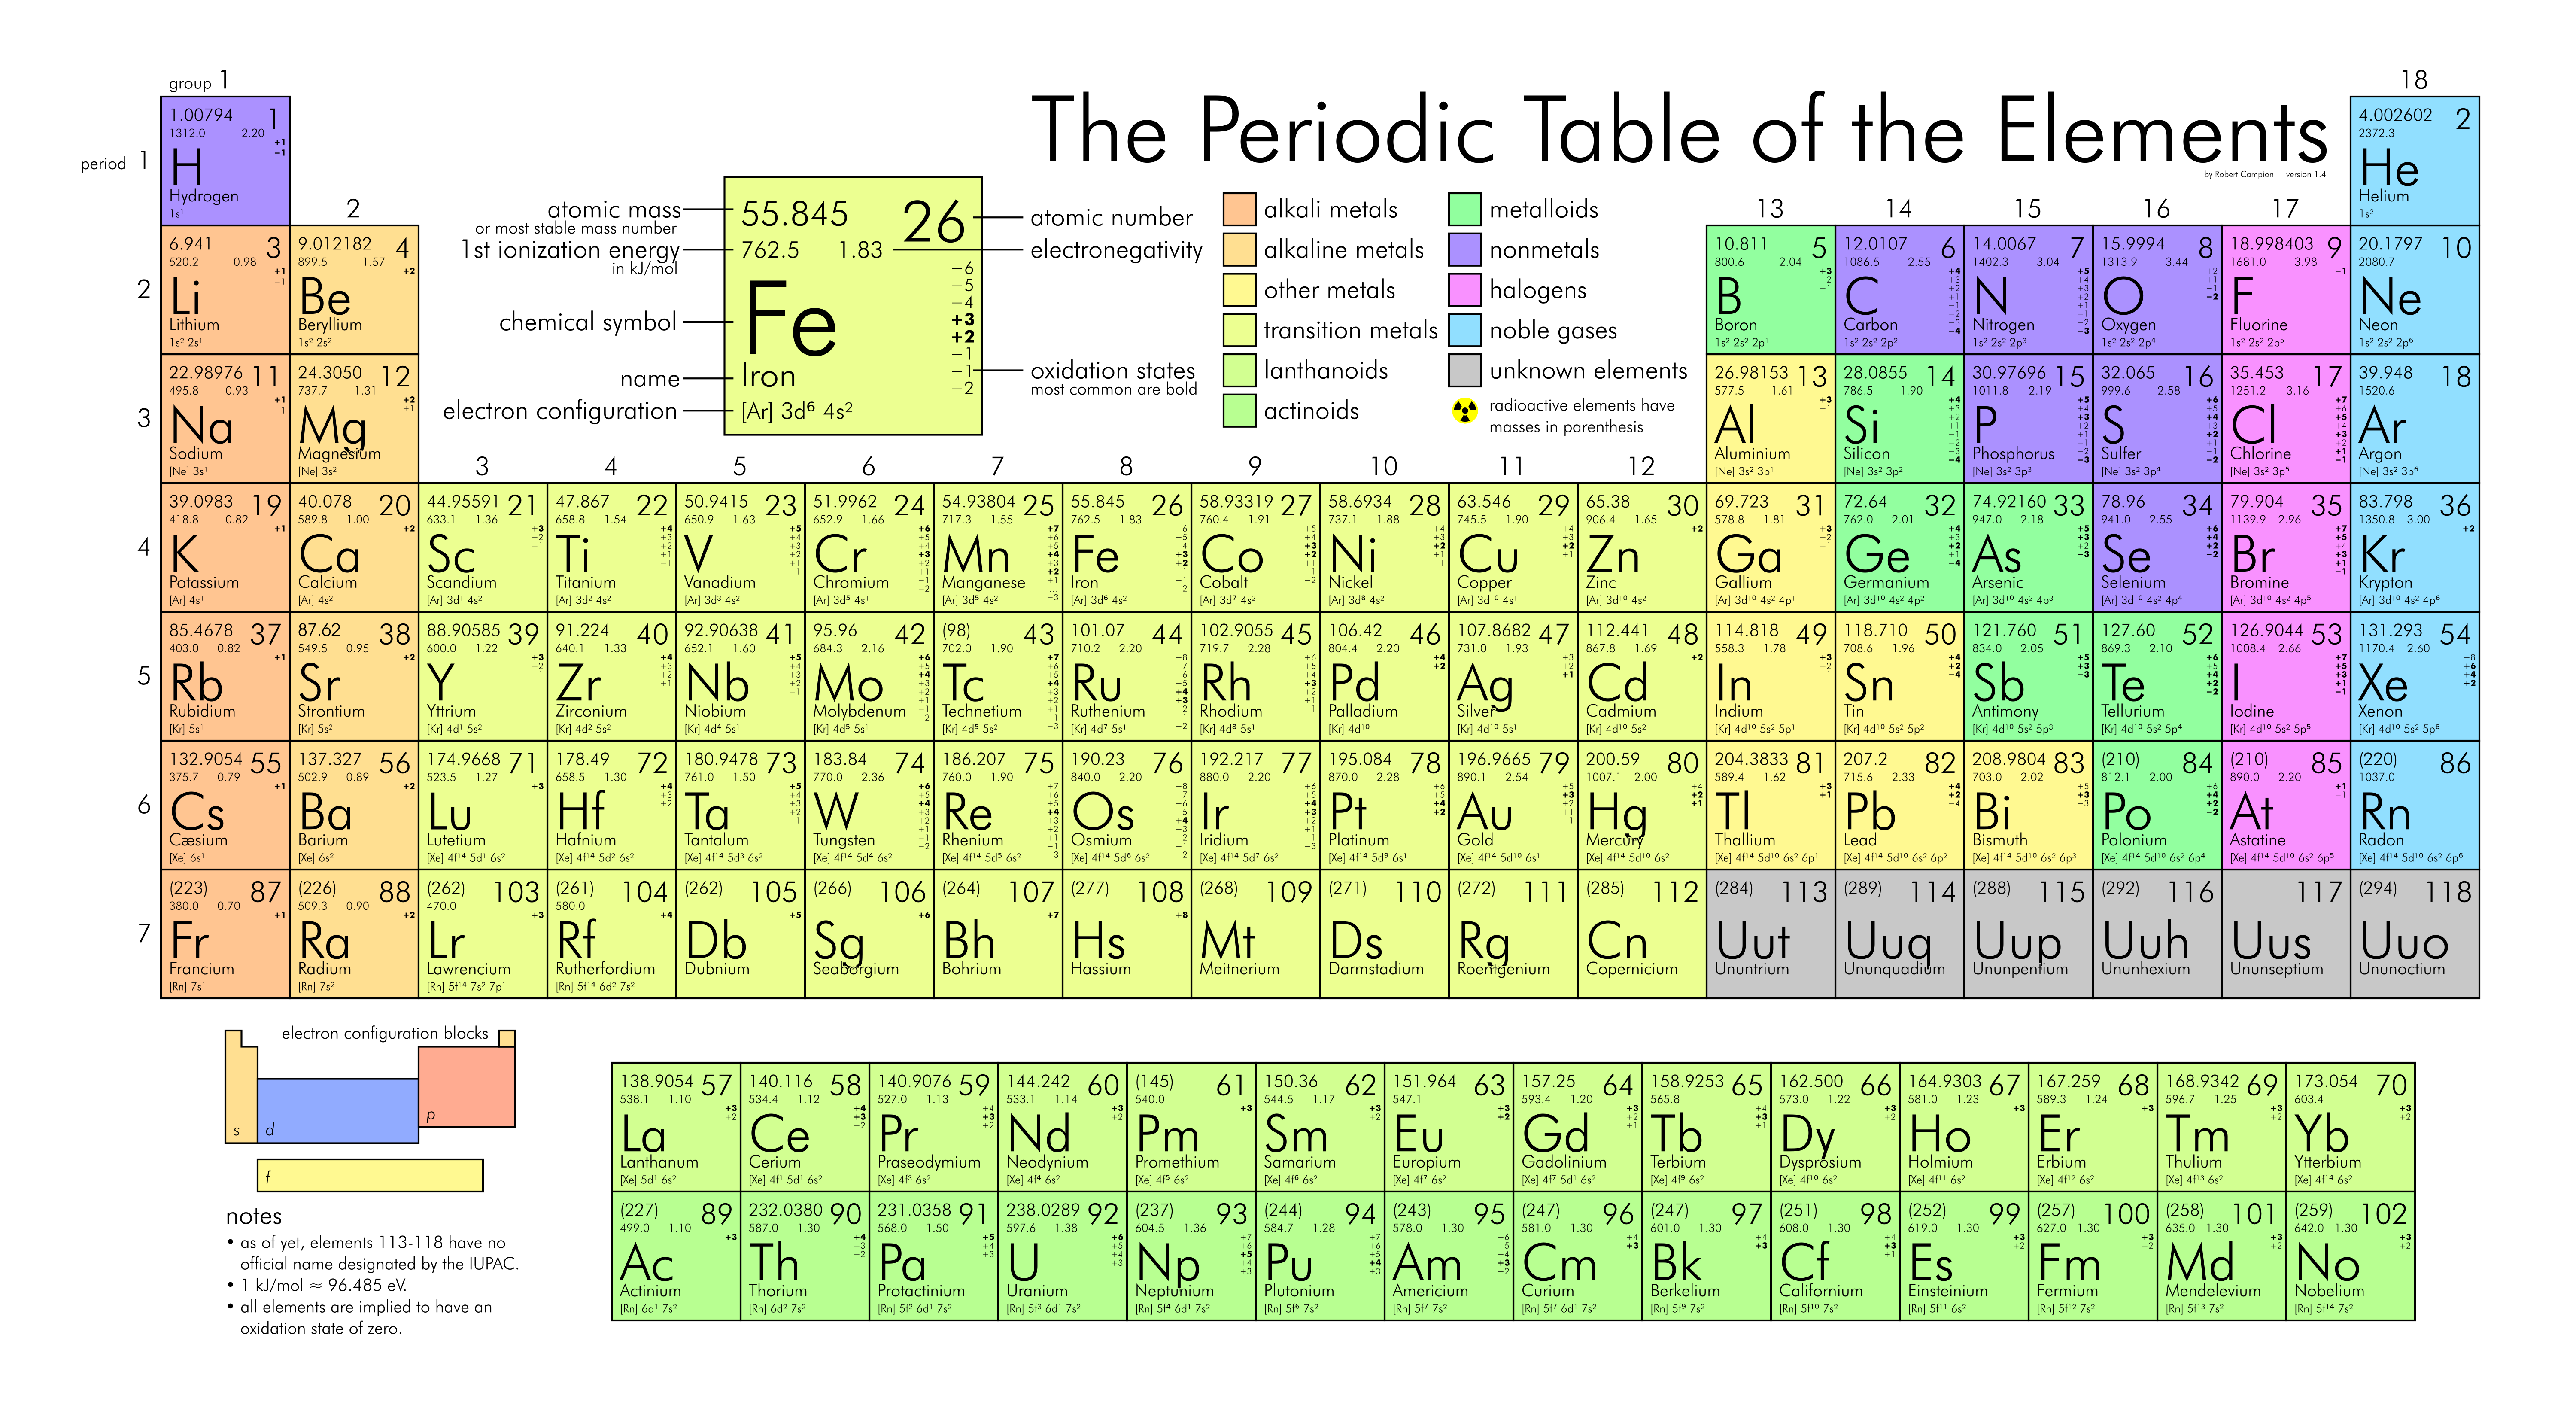
So, from the periodic table, we can see that Se is the farthest right on the row compared to Ni and in a higher row compared to Sr, meaning it most likely has the highest electronegativity (wants electrons the most) and, as a result, most likely be the easiest to reduce.
Q20.5.1
State whether you agree or disagree with this reasoning and explain your answer: Standard electrode potentials arise from the number of electrons transferred. The greater the number of electrons transferred, the greater the measured potential difference. If 1 mol of a substance produces 0.76 V when 2 mol of electrons are transferred—as in Zn(s) → Zn2+(aq) + 2e−—then 0.5 mol of the substance will produce 0.76/2 V because only 1 mol of electrons is transferred.
Solution for Q20.5.1
Standard electrode potentials remain constant or the same regardless of the concentrations - there is no direct connection or proportionality between standard electrode potentials and concentration and therefore, the standard electron potential is independent of concentrations - so I disagree with this reasoning. All that matters is that the standard reduction potential correlates to the correct metal ion (i.e. \(Zn^{2+}\) ).
Q20.9.10
Electrolysis of Cr3+(aq) produces Cr2+(aq). If you had 500 mL of a 0.15 M solution of Cr3+(aq), how long would it take to reduce the Cr3+ to Cr2+ using a 0.158 A current?
Solution for Q20.9.10
In order to find the time it would take to reduce Cr3+ to Cr2+ using a 0.158 A current, we can use the following equation:
$$n_{e}=\frac{It}{F}$$
Where t is the time in seconds, F is Faraday's constant, I is the current, and ne is the number of electrons transferred. We can find the number of electrons transferred by using the following equation
$$Cr^{3+} + e^{-} \to Cr^{2+}$$
and by finding out how many mols of \(Cr^{3+}\) we started with by using dimensional analysis
$$M=\frac{moles}{Volume}$$
$$moles=MV$$
$$moles=0.15\frac{moles}{L}0.5L$$
$$0.075\,moles\,of\,Cr^{3+}$$
We see that the moles of Cr3+ and the moles of e- is a one to one ratio so we have
$$0.075\,moles\,of\,e^{-} = n_{e}$$
now that we have all of our data we plug them into the equation solving for time (t)
$$t=\frac{n_{e}F}{I}$$
$$t=\frac{0.075\,moles\,of\,e^{-} \cdot 96485 \frac{C}{mol\, e^{-}}}{0.158 A}$$
Since 1A = 1 Coulumb (C), all of the units cancel out, leaving us with
$$t=45799.8s$$
So it would take about 45800 seconds to reduce the Cr3+ to Cr2+ using a 0.158 A current
We can convert this time into hours to better understand the length of this process.
\( 45799.8s \times \frac{1 \, s}{3600 \, hr} = 12.7 hr \)
Q14.6.8
Nitramide (O2NNH2) decomposes in aqueous solution to N2O and H2O. What is the experimental rate law (Δ[N2O]/Δt) for the decomposition of nitramide if the mechanism for the decomposition is as follows?
| $$\mathrm{O_2NNH_2}\overset{k_1}{\underset{k_{-1}}{\rightleftharpoons}}\mathrm{O_2NNH^-}+\mathrm{H^+}$$ |
$$(\textrm{fast})$$ |
| $$(\mathrm{O_2NNH^-}\xrightarrow{k_2}\mathrm{N_2O}+\mathrm{OH^-}$$ | \((\textrm{slow})\) |
| \(\mathrm{H^+}+\mathrm{OH^-}\xrightarrow{k_3}\mathrm{H_2O}\) | \((\textrm{fast})\) |
Assume that the rates of the forward and reverse reactions in the first equation are equal.
Solution for Q14.6.8
We know that the slowest step of the reaction is the rate determining step, since it usually has the highest activation energy requirement. As a result, the slowest step of the reaction is the experimental rate law we are looking for.
Note: since the slowest step is the rate determining step, that usually means there is some intermediate in between. Intermediates should NEVER be a part of the rate law mechanism.
$$rate = rate_2 = {k_2}{[O_2NNH^{-}]}$$
Since Nitramide is an intermediate, we must find some way to substitute it. To solve that problem, we look for where Nitramide is produced and consumed. We see that
$$rate_1 = {k_1}{[O_2NNH_2]}$$
$$rate_{-1} = {k_{-1}}{[O_2NNH^-]}{[H^+]}$$
Since these two rates produce and consume the same amount of \(O_2NNH^{-}\) over the same time period, we cant set them equal to each other and solve for the intermediate
$$rate_1 = rate_{-1}$$
$${k_1}{[O_2NNH_2]} = {k_{-1}}{[O_2NNH^-]}{[H^+]}$$
$${[O_2NNH^-]} = \frac{k_1{[O_2NNH_2]}}{k_{-1}{[H^+]}}$$
Substituting this equation back into our original equation gives us
$$rate=rate_2=k_2\frac{k_1[O_2NNH_2]}{k_{-1}[H^+]}$$
With all of the rate constants (k), we can clean up our equation a little bit by saying
$$k = \frac{k_2{k_1}}{k_{-1}}$$
Leaving us with
$$rate = \frac{k[O_2NNH_2]}{[H^+]}$$