
3.5: Structures of Ionic Solids
- Page ID
- 189623

\( \newcommand{\vecs}[1]{\overset { \scriptstyle \rightharpoonup} {\mathbf{#1}} } \)
\( \newcommand{\vecd}[1]{\overset{-\!-\!\rightharpoonup}{\vphantom{a}\smash {#1}}} \)
\( \newcommand{\id}{\mathrm{id}}\) \( \newcommand{\Span}{\mathrm{span}}\)
( \newcommand{\kernel}{\mathrm{null}\,}\) \( \newcommand{\range}{\mathrm{range}\,}\)
\( \newcommand{\RealPart}{\mathrm{Re}}\) \( \newcommand{\ImaginaryPart}{\mathrm{Im}}\)
\( \newcommand{\Argument}{\mathrm{Arg}}\) \( \newcommand{\norm}[1]{\| #1 \|}\)
\( \newcommand{\inner}[2]{\langle #1, #2 \rangle}\)
\( \newcommand{\Span}{\mathrm{span}}\)
\( \newcommand{\id}{\mathrm{id}}\)
\( \newcommand{\Span}{\mathrm{span}}\)
\( \newcommand{\kernel}{\mathrm{null}\,}\)
\( \newcommand{\range}{\mathrm{range}\,}\)
\( \newcommand{\RealPart}{\mathrm{Re}}\)
\( \newcommand{\ImaginaryPart}{\mathrm{Im}}\)
\( \newcommand{\Argument}{\mathrm{Arg}}\)
\( \newcommand{\norm}[1]{\| #1 \|}\)
\( \newcommand{\inner}[2]{\langle #1, #2 \rangle}\)
\( \newcommand{\Span}{\mathrm{span}}\) \( \newcommand{\AA}{\unicode[.8,0]{x212B}}\)
\( \newcommand{\vectorA}[1]{\vec{#1}} % arrow\)
\( \newcommand{\vectorAt}[1]{\vec{\text{#1}}} % arrow\)
\( \newcommand{\vectorB}[1]{\overset { \scriptstyle \rightharpoonup} {\mathbf{#1}} } \)
\( \newcommand{\vectorC}[1]{\textbf{#1}} \)
\( \newcommand{\vectorD}[1]{\overrightarrow{#1}} \)
\( \newcommand{\vectorDt}[1]{\overrightarrow{\text{#1}}} \)
\( \newcommand{\vectE}[1]{\overset{-\!-\!\rightharpoonup}{\vphantom{a}\smash{\mathbf {#1}}}} \)
\( \newcommand{\vecs}[1]{\overset { \scriptstyle \rightharpoonup} {\mathbf{#1}} } \)
\( \newcommand{\vecd}[1]{\overset{-\!-\!\rightharpoonup}{\vphantom{a}\smash {#1}}} \)
\(\newcommand{\avec}{\mathbf a}\) \(\newcommand{\bvec}{\mathbf b}\) \(\newcommand{\cvec}{\mathbf c}\) \(\newcommand{\dvec}{\mathbf d}\) \(\newcommand{\dtil}{\widetilde{\mathbf d}}\) \(\newcommand{\evec}{\mathbf e}\) \(\newcommand{\fvec}{\mathbf f}\) \(\newcommand{\nvec}{\mathbf n}\) \(\newcommand{\pvec}{\mathbf p}\) \(\newcommand{\qvec}{\mathbf q}\) \(\newcommand{\svec}{\mathbf s}\) \(\newcommand{\tvec}{\mathbf t}\) \(\newcommand{\uvec}{\mathbf u}\) \(\newcommand{\vvec}{\mathbf v}\) \(\newcommand{\wvec}{\mathbf w}\) \(\newcommand{\xvec}{\mathbf x}\) \(\newcommand{\yvec}{\mathbf y}\) \(\newcommand{\zvec}{\mathbf z}\) \(\newcommand{\rvec}{\mathbf r}\) \(\newcommand{\mvec}{\mathbf m}\) \(\newcommand{\zerovec}{\mathbf 0}\) \(\newcommand{\onevec}{\mathbf 1}\) \(\newcommand{\real}{\mathbb R}\) \(\newcommand{\twovec}[2]{\left[\begin{array}{r}#1 \\ #2 \end{array}\right]}\) \(\newcommand{\ctwovec}[2]{\left[\begin{array}{c}#1 \\ #2 \end{array}\right]}\) \(\newcommand{\threevec}[3]{\left[\begin{array}{r}#1 \\ #2 \\ #3 \end{array}\right]}\) \(\newcommand{\cthreevec}[3]{\left[\begin{array}{c}#1 \\ #2 \\ #3 \end{array}\right]}\) \(\newcommand{\fourvec}[4]{\left[\begin{array}{r}#1 \\ #2 \\ #3 \\ #4 \end{array}\right]}\) \(\newcommand{\cfourvec}[4]{\left[\begin{array}{c}#1 \\ #2 \\ #3 \\ #4 \end{array}\right]}\) \(\newcommand{\fivevec}[5]{\left[\begin{array}{r}#1 \\ #2 \\ #3 \\ #4 \\ #5 \\ \end{array}\right]}\) \(\newcommand{\cfivevec}[5]{\left[\begin{array}{c}#1 \\ #2 \\ #3 \\ #4 \\ #5 \\ \end{array}\right]}\) \(\newcommand{\mattwo}[4]{\left[\begin{array}{rr}#1 \amp #2 \\ #3 \amp #4 \\ \end{array}\right]}\) \(\newcommand{\laspan}[1]{\text{Span}\{#1\}}\) \(\newcommand{\bcal}{\cal B}\) \(\newcommand{\ccal}{\cal C}\) \(\newcommand{\scal}{\cal S}\) \(\newcommand{\wcal}{\cal W}\) \(\newcommand{\ecal}{\cal E}\) \(\newcommand{\coords}[2]{\left\{#1\right\}_{#2}}\) \(\newcommand{\gray}[1]{\color{gray}{#1}}\) \(\newcommand{\lgray}[1]{\color{lightgray}{#1}}\) \(\newcommand{\rank}{\operatorname{rank}}\) \(\newcommand{\row}{\text{Row}}\) \(\newcommand{\col}{\text{Col}}\) \(\renewcommand{\row}{\text{Row}}\) \(\newcommand{\nul}{\text{Nul}}\) \(\newcommand{\var}{\text{Var}}\) \(\newcommand{\corr}{\text{corr}}\) \(\newcommand{\len}[1]{\left|#1\right|}\) \(\newcommand{\bbar}{\overline{\bvec}}\) \(\newcommand{\bhat}{\widehat{\bvec}}\) \(\newcommand{\bperp}{\bvec^\perp}\) \(\newcommand{\xhat}{\widehat{\xvec}}\) \(\newcommand{\vhat}{\widehat{\vvec}}\) \(\newcommand{\uhat}{\widehat{\uvec}}\) \(\newcommand{\what}{\widehat{\wvec}}\) \(\newcommand{\Sighat}{\widehat{\Sigma}}\) \(\newcommand{\lt}{<}\) \(\newcommand{\gt}{>}\) \(\newcommand{\amp}{&}\) \(\definecolor{fillinmathshade}{gray}{0.9}\)The structure of ionic solids is determined by how the cations and anions can pack together. Generally, one of the ions adopts a standard packing structure, like the metal atoms in a metallic solid. The counterions then fit into the holes or interstitial spaces among these ions. It is pretty common for the anions to form a close-packed structure, and for cations to find room in the resulting holes, but sometimes it is the other way around.
Match each isoelectronic ion with the correct picture of its radius.
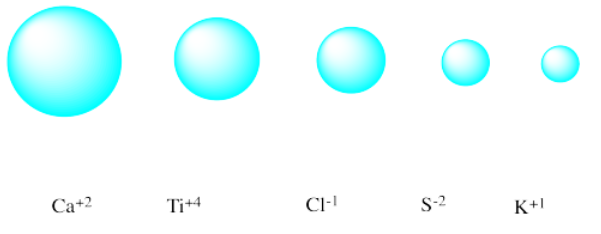
- Answer
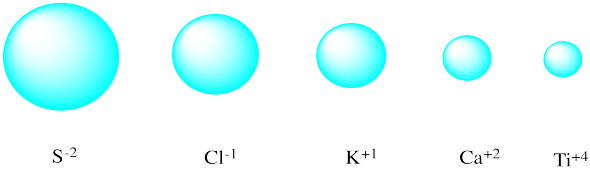
AnswerDiagrams of five atoms, ordered left to right from largest to smallest atomic radii. Answer choices, from left to right: Ca2+, Ti4+, Cl1-, S2-, K1+.
Why might anions more commonly pack into a close-packed structure, rather than the cations?
- Answer
-
Generally, but not always, anions are bigger than cations, so cations can pack efficiently into the holes between the anions.
The holes between the atoms have particular coordination numbers and geometries. There are many possible holes of different shapes where a counterion can find room. However, some of these geometries are very common.
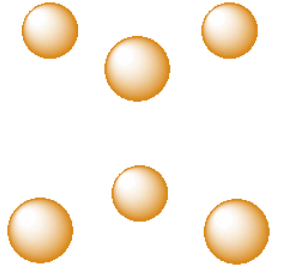
For example, in the center of a simple cube, there is room for an additional atom. This atom is described as sitting in a cubic hole.
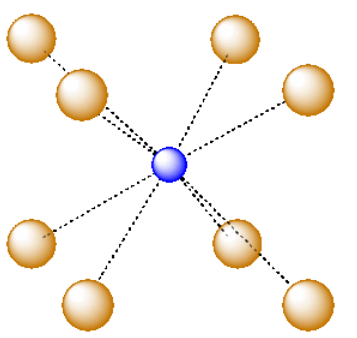
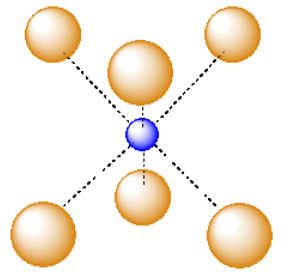
The above drawing emphasizes the relationship between the central atom and the atoms that form the corners of the cube. The central atom is in a cubic coordination geometry. Alternatively, we could describe the coordination number of the central atom. Instead of describing the shape formed by the surrounding atoms, we simply count the number of near neighbors. In this case, the coordination number of the central atom is 8. We can think of the central atom as sharing ionic bonding with its eight near neighbors.
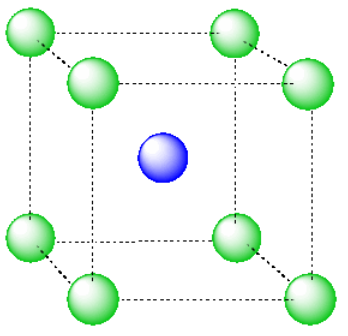
An atom in a cubic hole might be viewed more easily if we draw lines between the various atoms at the corners of the cube, however. In that way,we can see more clearly the cubic shape of the cage in which the central atom is sitting.
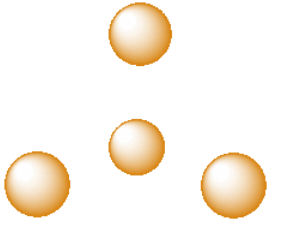
Another common interstitial space in ionic solids is an octahedral hole. An octahedral hole forms in between two close-packed layers. Because the atoms in the layers are packed more tightly than in a simple cube, this octahedral hole is generally a little smaller than a cubic hole.
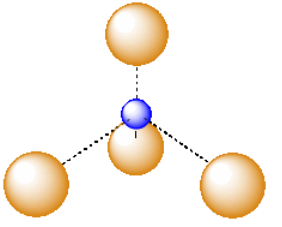
A third, common type of interstitial space is a tetrahedral hole. Tetrahedral holes, like octahedral holes, are found between two close-packed layers.
In the following structures, the anions are represented in red and the cations are represented in blue. For each structure,
- identify the type of unit cell that is visible
- identify the type of hole occupied by the counter ion
- identify the fraction of those holes that are occupied
- identify the number of anions and cations in the unit cell
- state the empirical formula (the lowest possible ratio of atoms in the material)
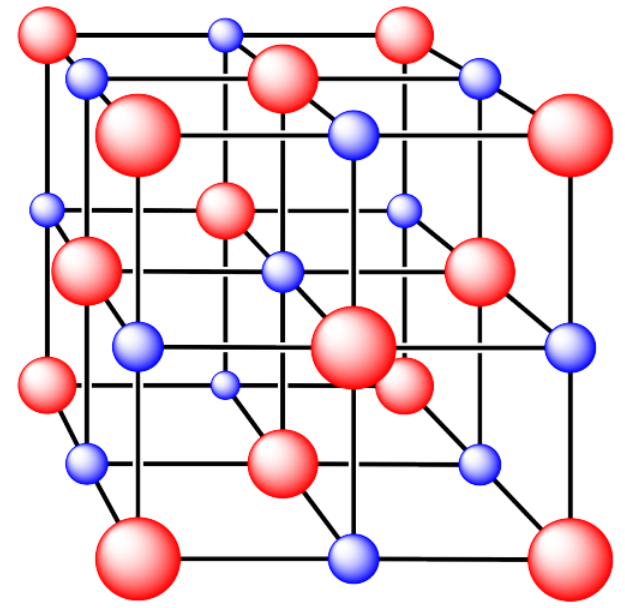
i. The ions are formed from cesium and chlorine
- Answer i. a):
- Answer i. b):
- Answer i. c):
- Answer i. d):
- Answer i. e):
Answer i. a):simple cubicAnswer i. b):cubic holeAnswer i. c):coordination number = 8Answer i. d):all occupiedAnswer i. e):8 x 1/8 Cl and 1 Cs (or vice versa, depending on how you define a unit cell)An ionic compound composed of eight cubes. Red atoms are at the vertices of each cube, and several blue atoms are at the core of each cube.
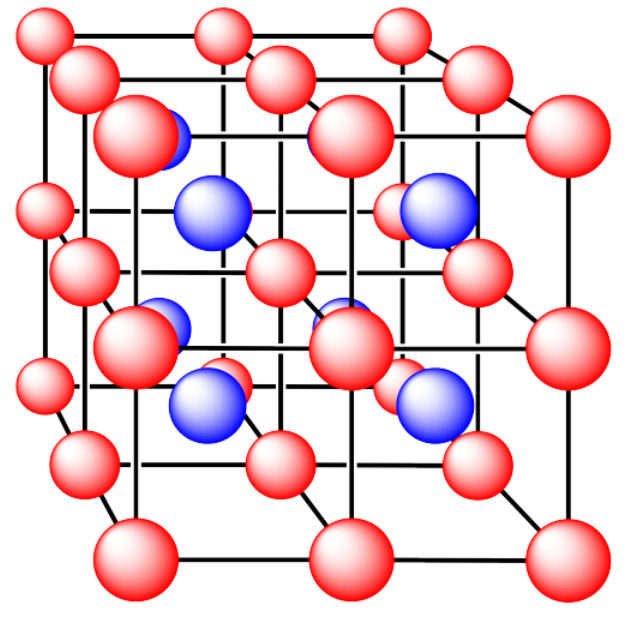
ii. The ions are formed from sodium and chlorine.
- Answer ii. a):
- Answer ii. b):
- Answer ii. c):
- Answer ii. d):
- Answer ii. e):
Answer ii. a):face centered cubicAnswer ii. b):octahedral holeAnswer ii. c):coordination number = 6Answer ii. d):all occupiedAnswer ii. e):6 x 1/2 plus 8 x 1/8 = 4 Cl and 1 plus 12 x 1/4 = 4 Na (or vice versa, depending on how you define a unit cell)An ionic compound composed of eight cubes. Half of the vertices have red atoms, and the other vertices have blue atoms.
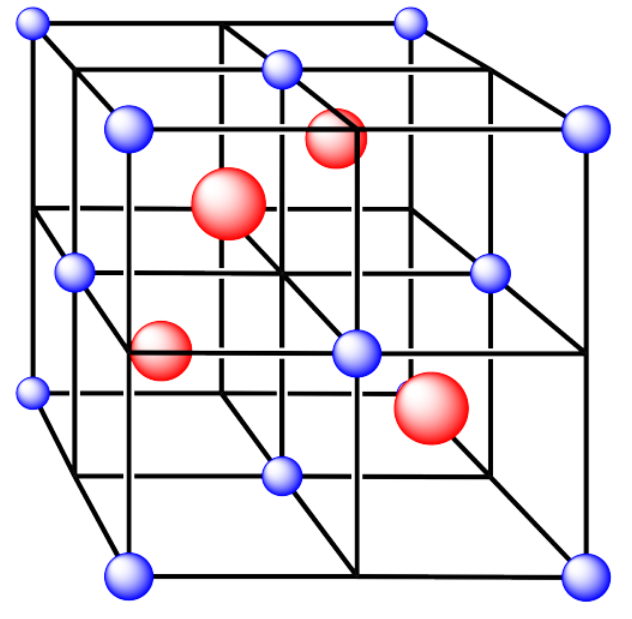
iii. The cations are formed from calcium and the anions are formed from fluorine.

- Answer iii. a):
- Answer iii. b):
- Answer iii. c):
- Answer iii. d):
- Answer iii. e):
Answer iii. a):face centered cubicAnswer iii. b):tetrahedral holeAnswer iii. c):coordination number = 4Answer iii. d):all occupiedAnswer iii. e):6 x 1/2 plus 8 x 1/8 = 4 Ca and 8 FAn ionic solid composed of eight cubes. Blue atoms are at every other vertex. Red atoms are at the center of each cube.
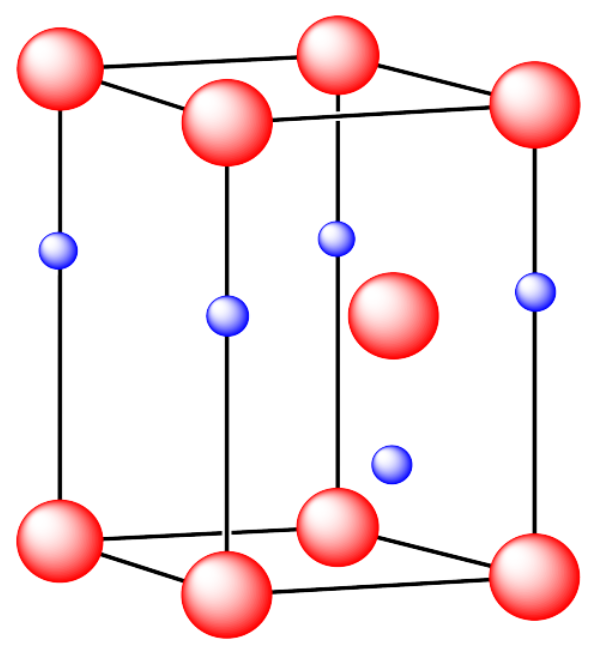
iv. The cations are formed from zinc and the anions are formed from sulfur.
v. The cations are formed from zinc and the anions are formed from sulfur.
Additional Information on solid structures:
Liverpool Solid State
Visualization of solid state structures: unit cells, etc.
Visualization of solid state structures: unit cells, etc.
Oxford University Solid Structures
Visualization of solid state structures: unit cells, etc.