
11.10: The E1 and E1cB Reactions
- Page ID
- 482397

\( \newcommand{\vecs}[1]{\overset { \scriptstyle \rightharpoonup} {\mathbf{#1}} } \)
\( \newcommand{\vecd}[1]{\overset{-\!-\!\rightharpoonup}{\vphantom{a}\smash {#1}}} \)
\( \newcommand{\dsum}{\displaystyle\sum\limits} \)
\( \newcommand{\dint}{\displaystyle\int\limits} \)
\( \newcommand{\dlim}{\displaystyle\lim\limits} \)
\( \newcommand{\id}{\mathrm{id}}\) \( \newcommand{\Span}{\mathrm{span}}\)
( \newcommand{\kernel}{\mathrm{null}\,}\) \( \newcommand{\range}{\mathrm{range}\,}\)
\( \newcommand{\RealPart}{\mathrm{Re}}\) \( \newcommand{\ImaginaryPart}{\mathrm{Im}}\)
\( \newcommand{\Argument}{\mathrm{Arg}}\) \( \newcommand{\norm}[1]{\| #1 \|}\)
\( \newcommand{\inner}[2]{\langle #1, #2 \rangle}\)
\( \newcommand{\Span}{\mathrm{span}}\)
\( \newcommand{\id}{\mathrm{id}}\)
\( \newcommand{\Span}{\mathrm{span}}\)
\( \newcommand{\kernel}{\mathrm{null}\,}\)
\( \newcommand{\range}{\mathrm{range}\,}\)
\( \newcommand{\RealPart}{\mathrm{Re}}\)
\( \newcommand{\ImaginaryPart}{\mathrm{Im}}\)
\( \newcommand{\Argument}{\mathrm{Arg}}\)
\( \newcommand{\norm}[1]{\| #1 \|}\)
\( \newcommand{\inner}[2]{\langle #1, #2 \rangle}\)
\( \newcommand{\Span}{\mathrm{span}}\) \( \newcommand{\AA}{\unicode[.8,0]{x212B}}\)
\( \newcommand{\vectorA}[1]{\vec{#1}} % arrow\)
\( \newcommand{\vectorAt}[1]{\vec{\text{#1}}} % arrow\)
\( \newcommand{\vectorB}[1]{\overset { \scriptstyle \rightharpoonup} {\mathbf{#1}} } \)
\( \newcommand{\vectorC}[1]{\textbf{#1}} \)
\( \newcommand{\vectorD}[1]{\overrightarrow{#1}} \)
\( \newcommand{\vectorDt}[1]{\overrightarrow{\text{#1}}} \)
\( \newcommand{\vectE}[1]{\overset{-\!-\!\rightharpoonup}{\vphantom{a}\smash{\mathbf {#1}}}} \)
\( \newcommand{\vecs}[1]{\overset { \scriptstyle \rightharpoonup} {\mathbf{#1}} } \)
\(\newcommand{\longvect}{\overrightarrow}\)
\( \newcommand{\vecd}[1]{\overset{-\!-\!\rightharpoonup}{\vphantom{a}\smash {#1}}} \)
\(\newcommand{\avec}{\mathbf a}\) \(\newcommand{\bvec}{\mathbf b}\) \(\newcommand{\cvec}{\mathbf c}\) \(\newcommand{\dvec}{\mathbf d}\) \(\newcommand{\dtil}{\widetilde{\mathbf d}}\) \(\newcommand{\evec}{\mathbf e}\) \(\newcommand{\fvec}{\mathbf f}\) \(\newcommand{\nvec}{\mathbf n}\) \(\newcommand{\pvec}{\mathbf p}\) \(\newcommand{\qvec}{\mathbf q}\) \(\newcommand{\svec}{\mathbf s}\) \(\newcommand{\tvec}{\mathbf t}\) \(\newcommand{\uvec}{\mathbf u}\) \(\newcommand{\vvec}{\mathbf v}\) \(\newcommand{\wvec}{\mathbf w}\) \(\newcommand{\xvec}{\mathbf x}\) \(\newcommand{\yvec}{\mathbf y}\) \(\newcommand{\zvec}{\mathbf z}\) \(\newcommand{\rvec}{\mathbf r}\) \(\newcommand{\mvec}{\mathbf m}\) \(\newcommand{\zerovec}{\mathbf 0}\) \(\newcommand{\onevec}{\mathbf 1}\) \(\newcommand{\real}{\mathbb R}\) \(\newcommand{\twovec}[2]{\left[\begin{array}{r}#1 \\ #2 \end{array}\right]}\) \(\newcommand{\ctwovec}[2]{\left[\begin{array}{c}#1 \\ #2 \end{array}\right]}\) \(\newcommand{\threevec}[3]{\left[\begin{array}{r}#1 \\ #2 \\ #3 \end{array}\right]}\) \(\newcommand{\cthreevec}[3]{\left[\begin{array}{c}#1 \\ #2 \\ #3 \end{array}\right]}\) \(\newcommand{\fourvec}[4]{\left[\begin{array}{r}#1 \\ #2 \\ #3 \\ #4 \end{array}\right]}\) \(\newcommand{\cfourvec}[4]{\left[\begin{array}{c}#1 \\ #2 \\ #3 \\ #4 \end{array}\right]}\) \(\newcommand{\fivevec}[5]{\left[\begin{array}{r}#1 \\ #2 \\ #3 \\ #4 \\ #5 \\ \end{array}\right]}\) \(\newcommand{\cfivevec}[5]{\left[\begin{array}{c}#1 \\ #2 \\ #3 \\ #4 \\ #5 \\ \end{array}\right]}\) \(\newcommand{\mattwo}[4]{\left[\begin{array}{rr}#1 \amp #2 \\ #3 \amp #4 \\ \end{array}\right]}\) \(\newcommand{\laspan}[1]{\text{Span}\{#1\}}\) \(\newcommand{\bcal}{\cal B}\) \(\newcommand{\ccal}{\cal C}\) \(\newcommand{\scal}{\cal S}\) \(\newcommand{\wcal}{\cal W}\) \(\newcommand{\ecal}{\cal E}\) \(\newcommand{\coords}[2]{\left\{#1\right\}_{#2}}\) \(\newcommand{\gray}[1]{\color{gray}{#1}}\) \(\newcommand{\lgray}[1]{\color{lightgray}{#1}}\) \(\newcommand{\rank}{\operatorname{rank}}\) \(\newcommand{\row}{\text{Row}}\) \(\newcommand{\col}{\text{Col}}\) \(\renewcommand{\row}{\text{Row}}\) \(\newcommand{\nul}{\text{Nul}}\) \(\newcommand{\var}{\text{Var}}\) \(\newcommand{\corr}{\text{corr}}\) \(\newcommand{\len}[1]{\left|#1\right|}\) \(\newcommand{\bbar}{\overline{\bvec}}\) \(\newcommand{\bhat}{\widehat{\bvec}}\) \(\newcommand{\bperp}{\bvec^\perp}\) \(\newcommand{\xhat}{\widehat{\xvec}}\) \(\newcommand{\vhat}{\widehat{\vvec}}\) \(\newcommand{\uhat}{\widehat{\uvec}}\) \(\newcommand{\what}{\widehat{\wvec}}\) \(\newcommand{\Sighat}{\widehat{\Sigma}}\) \(\newcommand{\lt}{<}\) \(\newcommand{\gt}{>}\) \(\newcommand{\amp}{&}\) \(\definecolor{fillinmathshade}{gray}{0.9}\)The E1 Reaction
Just as the E2 reaction is analogous to the SN2 reaction, the SN1 reaction has a close analog called the E1 reaction (for elimination, unimolecular). The E1 reaction can be formulated as shown in Figure \(\PageIndex{1}\), with the elimination of HCl from 2-chloro-2-methylpropane.
E1 eliminations begin with the same unimolecular dissociation to give a carbocation that we saw in the SN1 reaction, but the dissociation is followed by loss of H+ from the adjacent carbon rather than by substitution. In fact, the E1 and SN1 reactions normally occur together whenever an alkyl halide is treated in a protic solvent with a nonbasic nucleophile. Thus, the best E1 substrates are also the best SN1 substrates, and mixtures of substitution and elimination products are usually obtained. For example, when 2-chloro-2-methylpropane is warmed to 65 °C in 80% aqueous ethanol, a 64 : 36 mixture of 2-methyl-2-propanol (SN1) and 2-methylpropene (E1) results.
Much evidence has been obtained in support of the E1 mechanism. For example, E1 reactions show first-order kinetics, consistent with a rate-limiting, unimolecular dissociation process. Furthermore, E1 reactions show no deuterium isotope effect because rupture of the C–H (or C–D) bond occurs after the rate-limiting step rather than during it. Thus, we can’t measure a rate difference between a deuterated and nondeuterated substrate.
A final piece of evidence involves the stereochemistry of elimination. Unlike the E2 reaction, where anti-periplanar geometry is required, there is no geometric requirement on the E1 reaction because the halide and the hydrogen are lost in separate steps. We might therefore expect to obtain the more stable (Zaitsev’s rule) product from E1 reaction, which is just what we find. To return to a familiar example, menthyl chloride loses HCl under E1 conditions in a polar solvent to give a mixture of alkenes in which the Zaitsev product, 3-menthene, predominates (Figure \(\PageIndex{2}\)).
Alkyl Halide Reactivity in E1 Reactions
Due to the fact that E1 reactions create a carbocation intermediate, the reactivity of alkyl halides toward E1 reactions mirrors that present in SN1 reactions.

As expected, tertiary carbocations are favored over secondary, primary, and methyl carbocations. This is due to the phenomenon of hyperconjugation, which essentially allows a nearby C-C or C-H bond to interact with the p orbital of the carbon to bring the electrons down to a lower energy state. Thus, this has a stabilizing effect on the molecule as a whole. In general, primary and methyl carbocations do not proceed through the E1 pathway for this reason, unless there is a means of carbocation rearrangement to move the positive charge to a nearby carbon that is more stable. Secondary and Tertiary carbons form more stable carbocations, thus E1 reactions occur quite rapidly at these atoms.

Secondary carbocations can be subject to the E2 reaction pathway, but this generally occurs in the presence of a good/strong base. Adding a weak base to the reaction disfavors E2, essentially pushing towards the E1 pathway. In many instances, solvolysis occurs rather than using a base to deprotonate. This means heat is added to the solution, and the solvent itself deprotonates a hydrogen. The medium can affect the pathway of the reaction as well. Polar protic solvents may be used to hinder nucleophiles, thus disfavoring E2/SN2 from occurring.
The Connection Between SN1 and E1 Reactions
The E1 and SN1 mechanisms both begin with the rate-determing step, the unimolecular removal of a leaving group to form a carbocation intermediate. Sharing the rate-determining step causes alkyl halides to produce both SN1 substitution and E1 elimination products whenever they are reacted with nonbasic nucleophiles in a protic solvent. For example, the hydrolysis of tert-butyl chloride in a solution of water and ethanol gives a mixture of 2-methyl-2-propanol (60%) and 2-methylpropene (40%) at a rate independent of the water concentration.

To produce the alcohol product, water attacks the carbocation as a nucleophile as part of an SN1 reaction. To produce the alkene product, water acts as a base and deprotonates an adjacent hydrogen as part of an E1 reaction. As expected, the mechanisms of the two reactions have similar characteristics. They both show first-order kinetics; neither is much influenced by a change in the nucleophile/base, and both are relatively non-stereospecific.

To summarize, when carbocation intermediates are formed, them react further by one or more of the following modes:
- The cation may bond to a nucleophile to give a substitution product.
- The cation may transfer an adjacent proton to a base, giving an alkene product.
- The cation may rearrange to a more stable carbocation, and then react by mode #1 or #2.
Comparing E1 and E2 Mechanisms
Three factors should be considered when determining whether an elimination reaction occurs via an E1 or E2 mechanism:
- The base: strong bases favor the E2 mechanism, whereas E1 mechanisms only require a weak base.
- The solvent: good ionizing solvents (polar protic) favor the E1 mechanism by stabilizing the carbocation intermediate.
- The alkyl halide: primary alkyl halides have the only structure useful in distinguishing between the E2 and E1 pathways. Since primary carbocations do not form, only the E2 mechanism is possible.
| Reaction Parameter | E2 | E1 |
| alkyl halide structure | tertiary > secondary > primary | tertiary > secondary >>>> primary |
| nucleophile | high concentration of a strong base | weak base |
| mechanism | 1-step | 2-step |
| rate-limiting step | bimolecular transition state | carbocation formation |
| rate law | rate = k[R-X][Base] | rate = k[R-X] |
| solvent | not important | polar protic |
The E1cB Reaction
The reaction is particularly common in substrates that have a poor leaving group, such as –OH, two carbons removed from a carbonyl group, as in HOC–CH–C═ O HOC –CH–C═O . The poor leaving group disfavors the alternative E1 and E2 possibilities, and the carbonyl group makes the adjacent hydrogen unusually acidic by resonance stabilization of the anion intermediate. We’ll look at this acidifying effect of a carbonyl group in CHEM 232.


E1cB Mechanism
In contrast to the E1 reaction, which involves a carbocation intermediate, the E1cB reaction takes place through a carbanion intermediate. Base-induced abstraction of a proton in a slow, rate-limiting step gives an anion, which expels a leaving group on the adjacent carbon.
Note: The double bond always forms in conjugation with the carbonyl.
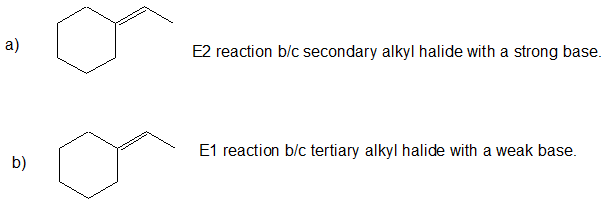
Predict the dominant elimination mechanism (E1 or E2) for each reaction below. Explain your reasoning.

- Answer
-
Specify the reaction conditions to favor the indicated elimination mechanism.

- Answer
-
a) strong base, such as hydroxide, an alkoxide, or equivalent
b) water or alcohol, or an equivalent weak base with heat
c) strong base, such as hydroxide, an alkoxide, or equivalent