
7.5: Installing RPi OS
- Page ID
- 469692

\( \newcommand{\vecs}[1]{\overset { \scriptstyle \rightharpoonup} {\mathbf{#1}} } \)
\( \newcommand{\vecd}[1]{\overset{-\!-\!\rightharpoonup}{\vphantom{a}\smash {#1}}} \)
\( \newcommand{\id}{\mathrm{id}}\) \( \newcommand{\Span}{\mathrm{span}}\)
( \newcommand{\kernel}{\mathrm{null}\,}\) \( \newcommand{\range}{\mathrm{range}\,}\)
\( \newcommand{\RealPart}{\mathrm{Re}}\) \( \newcommand{\ImaginaryPart}{\mathrm{Im}}\)
\( \newcommand{\Argument}{\mathrm{Arg}}\) \( \newcommand{\norm}[1]{\| #1 \|}\)
\( \newcommand{\inner}[2]{\langle #1, #2 \rangle}\)
\( \newcommand{\Span}{\mathrm{span}}\)
\( \newcommand{\id}{\mathrm{id}}\)
\( \newcommand{\Span}{\mathrm{span}}\)
\( \newcommand{\kernel}{\mathrm{null}\,}\)
\( \newcommand{\range}{\mathrm{range}\,}\)
\( \newcommand{\RealPart}{\mathrm{Re}}\)
\( \newcommand{\ImaginaryPart}{\mathrm{Im}}\)
\( \newcommand{\Argument}{\mathrm{Arg}}\)
\( \newcommand{\norm}[1]{\| #1 \|}\)
\( \newcommand{\inner}[2]{\langle #1, #2 \rangle}\)
\( \newcommand{\Span}{\mathrm{span}}\) \( \newcommand{\AA}{\unicode[.8,0]{x212B}}\)
\( \newcommand{\vectorA}[1]{\vec{#1}} % arrow\)
\( \newcommand{\vectorAt}[1]{\vec{\text{#1}}} % arrow\)
\( \newcommand{\vectorB}[1]{\overset { \scriptstyle \rightharpoonup} {\mathbf{#1}} } \)
\( \newcommand{\vectorC}[1]{\textbf{#1}} \)
\( \newcommand{\vectorD}[1]{\overrightarrow{#1}} \)
\( \newcommand{\vectorDt}[1]{\overrightarrow{\text{#1}}} \)
\( \newcommand{\vectE}[1]{\overset{-\!-\!\rightharpoonup}{\vphantom{a}\smash{\mathbf {#1}}}} \)
\( \newcommand{\vecs}[1]{\overset { \scriptstyle \rightharpoonup} {\mathbf{#1}} } \)
\( \newcommand{\vecd}[1]{\overset{-\!-\!\rightharpoonup}{\vphantom{a}\smash {#1}}} \)
\(\newcommand{\avec}{\mathbf a}\) \(\newcommand{\bvec}{\mathbf b}\) \(\newcommand{\cvec}{\mathbf c}\) \(\newcommand{\dvec}{\mathbf d}\) \(\newcommand{\dtil}{\widetilde{\mathbf d}}\) \(\newcommand{\evec}{\mathbf e}\) \(\newcommand{\fvec}{\mathbf f}\) \(\newcommand{\nvec}{\mathbf n}\) \(\newcommand{\pvec}{\mathbf p}\) \(\newcommand{\qvec}{\mathbf q}\) \(\newcommand{\svec}{\mathbf s}\) \(\newcommand{\tvec}{\mathbf t}\) \(\newcommand{\uvec}{\mathbf u}\) \(\newcommand{\vvec}{\mathbf v}\) \(\newcommand{\wvec}{\mathbf w}\) \(\newcommand{\xvec}{\mathbf x}\) \(\newcommand{\yvec}{\mathbf y}\) \(\newcommand{\zvec}{\mathbf z}\) \(\newcommand{\rvec}{\mathbf r}\) \(\newcommand{\mvec}{\mathbf m}\) \(\newcommand{\zerovec}{\mathbf 0}\) \(\newcommand{\onevec}{\mathbf 1}\) \(\newcommand{\real}{\mathbb R}\) \(\newcommand{\twovec}[2]{\left[\begin{array}{r}#1 \\ #2 \end{array}\right]}\) \(\newcommand{\ctwovec}[2]{\left[\begin{array}{c}#1 \\ #2 \end{array}\right]}\) \(\newcommand{\threevec}[3]{\left[\begin{array}{r}#1 \\ #2 \\ #3 \end{array}\right]}\) \(\newcommand{\cthreevec}[3]{\left[\begin{array}{c}#1 \\ #2 \\ #3 \end{array}\right]}\) \(\newcommand{\fourvec}[4]{\left[\begin{array}{r}#1 \\ #2 \\ #3 \\ #4 \end{array}\right]}\) \(\newcommand{\cfourvec}[4]{\left[\begin{array}{c}#1 \\ #2 \\ #3 \\ #4 \end{array}\right]}\) \(\newcommand{\fivevec}[5]{\left[\begin{array}{r}#1 \\ #2 \\ #3 \\ #4 \\ #5 \\ \end{array}\right]}\) \(\newcommand{\cfivevec}[5]{\left[\begin{array}{c}#1 \\ #2 \\ #3 \\ #4 \\ #5 \\ \end{array}\right]}\) \(\newcommand{\mattwo}[4]{\left[\begin{array}{rr}#1 \amp #2 \\ #3 \amp #4 \\ \end{array}\right]}\) \(\newcommand{\laspan}[1]{\text{Span}\{#1\}}\) \(\newcommand{\bcal}{\cal B}\) \(\newcommand{\ccal}{\cal C}\) \(\newcommand{\scal}{\cal S}\) \(\newcommand{\wcal}{\cal W}\) \(\newcommand{\ecal}{\cal E}\) \(\newcommand{\coords}[2]{\left\{#1\right\}_{#2}}\) \(\newcommand{\gray}[1]{\color{gray}{#1}}\) \(\newcommand{\lgray}[1]{\color{lightgray}{#1}}\) \(\newcommand{\rank}{\operatorname{rank}}\) \(\newcommand{\row}{\text{Row}}\) \(\newcommand{\col}{\text{Col}}\) \(\renewcommand{\row}{\text{Row}}\) \(\newcommand{\nul}{\text{Nul}}\) \(\newcommand{\var}{\text{Var}}\) \(\newcommand{\corr}{\text{corr}}\) \(\newcommand{\len}[1]{\left|#1\right|}\) \(\newcommand{\bbar}{\overline{\bvec}}\) \(\newcommand{\bhat}{\widehat{\bvec}}\) \(\newcommand{\bperp}{\bvec^\perp}\) \(\newcommand{\xhat}{\widehat{\xvec}}\) \(\newcommand{\vhat}{\widehat{\vvec}}\) \(\newcommand{\uhat}{\widehat{\uvec}}\) \(\newcommand{\what}{\widehat{\wvec}}\) \(\newcommand{\Sighat}{\widehat{\Sigma}}\) \(\newcommand{\lt}{<}\) \(\newcommand{\gt}{>}\) \(\newcommand{\amp}{&}\) \(\definecolor{fillinmathshade}{gray}{0.9}\)Installing RPi OS
Preparing your microSD Card
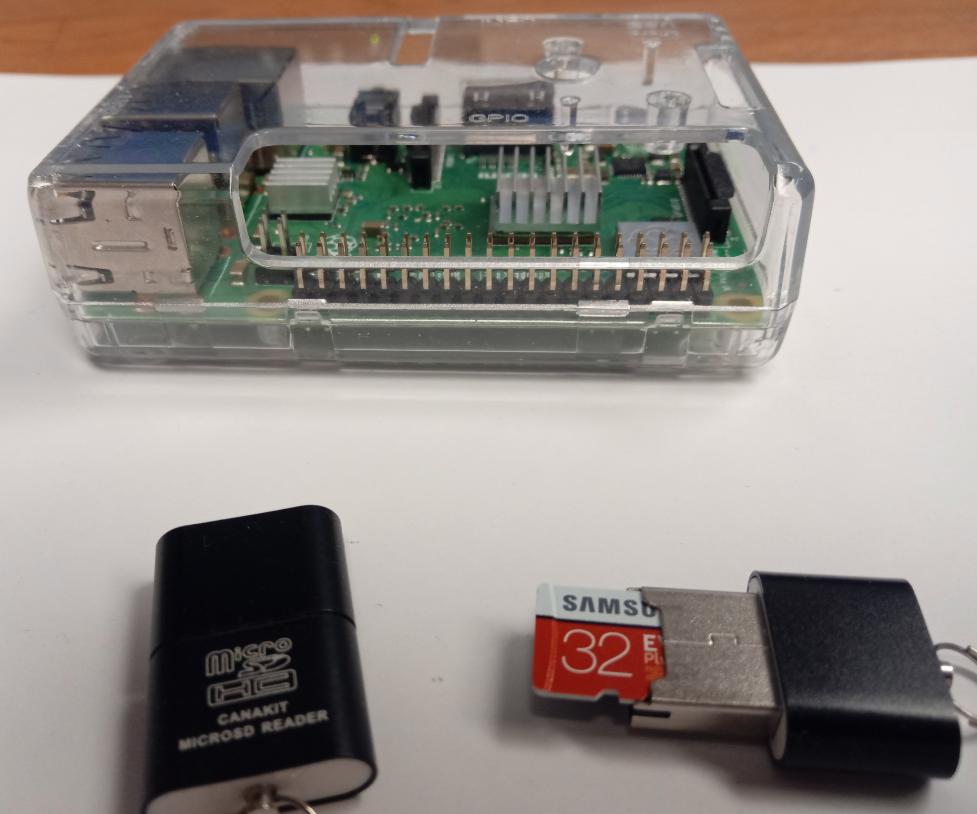
In Appendix A1.1 you installed all the software on your computer that you need for this task. Place a microSD card into a USB adapter sleeve and then place the USB into a USB port on the computer you set up in IOST module 1. Be sure you have no other external storage devices hooked up to your computer.
Format microSD Card
This step will show you how to use the SD Card Formatter to format the microSD card. This will clear all data on the card, and be sure you format the microSD card and not your hard drive!
1. From Start Menu, choose SD Card Formatter (you can click through the windows icon and scroll through the Apps to SD Association, or type in the search menu "sd" and the sd card formatter will autoappear
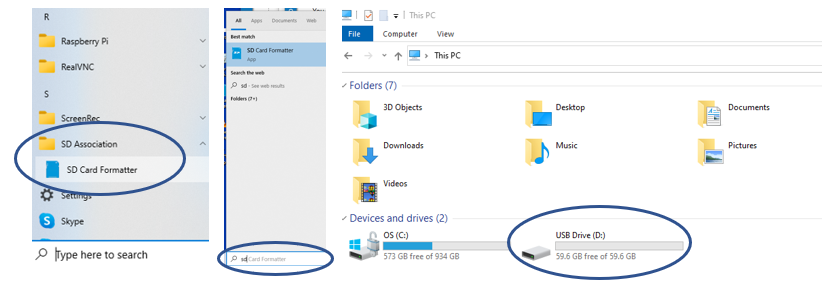 Figure \(\PageIndex{3}\): Two ways to activate SD Card Formatter from Windows Start Menu. Scrolling through the Apps (left image) or using Start menu Search option (middle image). Be sure you are formatting your USB drive with the micro SD card (right image) and not your hard drive!
2. Now that you have the SD Card Formatter open you can go and format your microSD card. Now be sure NOT TO FORMAT the C drive. Figure \(\PageIndex{4}\) shows screenshots of this process.
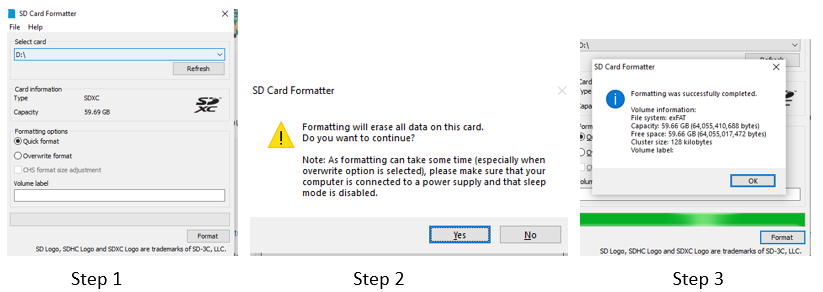 Figure \(\PageIndex{4}\): Screenshots of formatting the microSD card with SD Card Formatter. (1) Check to be sure which drive your microSD card is in and use quick format and make sure you are formatting the drive identified in step 1 (you do not want to format your computer's hard drive!). (2) The warning statement that formatting a drive will erase all data in the drive. (3) The formatting complete message, you are now ready to place an image of Raspbian on your micro SD card
Steps:
- Select Drive SD card is in and choose Quick format option
- Choose yes if you are in correct drive
- Choose OK when complete
Install RPi OS
There are multiple ways to install the RPi OS. The easiest is to use the Raspberry Pi Imager at https://www.raspberrypi.com/software/.
If you have not already installed Raspberry Pi Imager, follow these instructions. If you have, jump to step 4 and open the app. At the time of this writing the operating system is Debian 11 (Bullseye), which was released Oct. 30, 2021. As this is a new release there may be some issues with projects that use HATs (Hardware Attached on Top) and you may wish to use the Buster operating system. You can download both from this link, and then make an image on your personal computer that can be transferred to a micro-SD card. If you choose this later route, you will want to follow the instructions from the 2020 IOST class.
Step 1: Insert formatted micro SD card into USB reader and insert into a USB drive of your personal computer.
Step 2: Download Raspberry Pi Imager (figure \(\PageIndex{5}\).
Step 3: Click on the downloaded exe file (imager_1.7.1.exe in figure \(\PageIndex{6}\)
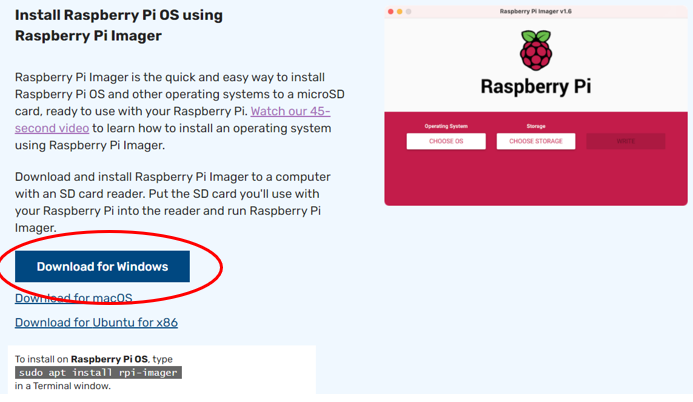 Figure \(\PageIndex{5}\): Download RPi OS Imager, here we are downloading onto a Windows PC. (Copyright; Belford CC 0.0)
After you download the imager you can install it
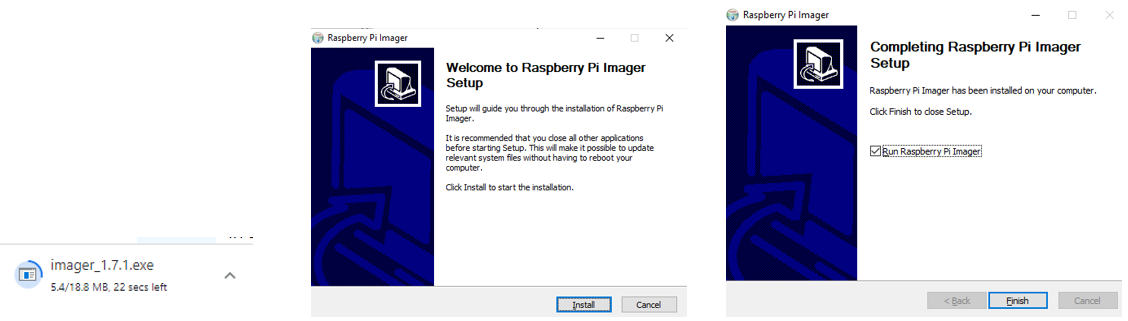 Figure \(\PageIndex{6}\): Installing Pi Imager. (Belford CC0.0)
Step 4: The Raspberry Pi Imager is now one of your apps and you can choose the operating system and storage device you wish to generate the image on
 Figure \(\PageIndex{7}\): Installing RPi OS on a a micro SD card with imager (Belford CC 0.0)
The RPi operating system will now be installed
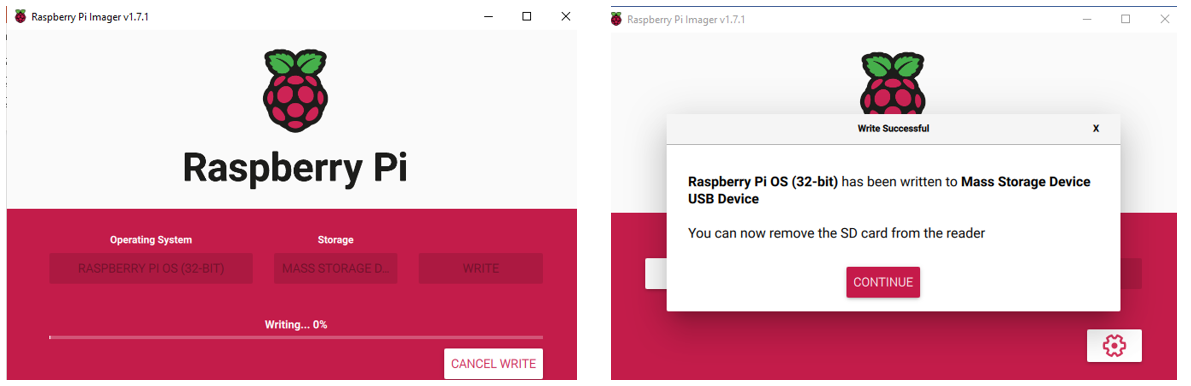 Figure \(\PageIndex{8}\): You are now ready to start your Pi. (Belford CC 0.0)