
3b.7: Headless Mode - Setting Up VNC Viewer
- Page ID
- 431697

\( \newcommand{\vecs}[1]{\overset { \scriptstyle \rightharpoonup} {\mathbf{#1}} } \)
\( \newcommand{\vecd}[1]{\overset{-\!-\!\rightharpoonup}{\vphantom{a}\smash {#1}}} \)
\( \newcommand{\id}{\mathrm{id}}\) \( \newcommand{\Span}{\mathrm{span}}\)
( \newcommand{\kernel}{\mathrm{null}\,}\) \( \newcommand{\range}{\mathrm{range}\,}\)
\( \newcommand{\RealPart}{\mathrm{Re}}\) \( \newcommand{\ImaginaryPart}{\mathrm{Im}}\)
\( \newcommand{\Argument}{\mathrm{Arg}}\) \( \newcommand{\norm}[1]{\| #1 \|}\)
\( \newcommand{\inner}[2]{\langle #1, #2 \rangle}\)
\( \newcommand{\Span}{\mathrm{span}}\)
\( \newcommand{\id}{\mathrm{id}}\)
\( \newcommand{\Span}{\mathrm{span}}\)
\( \newcommand{\kernel}{\mathrm{null}\,}\)
\( \newcommand{\range}{\mathrm{range}\,}\)
\( \newcommand{\RealPart}{\mathrm{Re}}\)
\( \newcommand{\ImaginaryPart}{\mathrm{Im}}\)
\( \newcommand{\Argument}{\mathrm{Arg}}\)
\( \newcommand{\norm}[1]{\| #1 \|}\)
\( \newcommand{\inner}[2]{\langle #1, #2 \rangle}\)
\( \newcommand{\Span}{\mathrm{span}}\) \( \newcommand{\AA}{\unicode[.8,0]{x212B}}\)
\( \newcommand{\vectorA}[1]{\vec{#1}} % arrow\)
\( \newcommand{\vectorAt}[1]{\vec{\text{#1}}} % arrow\)
\( \newcommand{\vectorB}[1]{\overset { \scriptstyle \rightharpoonup} {\mathbf{#1}} } \)
\( \newcommand{\vectorC}[1]{\textbf{#1}} \)
\( \newcommand{\vectorD}[1]{\overrightarrow{#1}} \)
\( \newcommand{\vectorDt}[1]{\overrightarrow{\text{#1}}} \)
\( \newcommand{\vectE}[1]{\overset{-\!-\!\rightharpoonup}{\vphantom{a}\smash{\mathbf {#1}}}} \)
\( \newcommand{\vecs}[1]{\overset { \scriptstyle \rightharpoonup} {\mathbf{#1}} } \)
\( \newcommand{\vecd}[1]{\overset{-\!-\!\rightharpoonup}{\vphantom{a}\smash {#1}}} \)
\(\newcommand{\avec}{\mathbf a}\) \(\newcommand{\bvec}{\mathbf b}\) \(\newcommand{\cvec}{\mathbf c}\) \(\newcommand{\dvec}{\mathbf d}\) \(\newcommand{\dtil}{\widetilde{\mathbf d}}\) \(\newcommand{\evec}{\mathbf e}\) \(\newcommand{\fvec}{\mathbf f}\) \(\newcommand{\nvec}{\mathbf n}\) \(\newcommand{\pvec}{\mathbf p}\) \(\newcommand{\qvec}{\mathbf q}\) \(\newcommand{\svec}{\mathbf s}\) \(\newcommand{\tvec}{\mathbf t}\) \(\newcommand{\uvec}{\mathbf u}\) \(\newcommand{\vvec}{\mathbf v}\) \(\newcommand{\wvec}{\mathbf w}\) \(\newcommand{\xvec}{\mathbf x}\) \(\newcommand{\yvec}{\mathbf y}\) \(\newcommand{\zvec}{\mathbf z}\) \(\newcommand{\rvec}{\mathbf r}\) \(\newcommand{\mvec}{\mathbf m}\) \(\newcommand{\zerovec}{\mathbf 0}\) \(\newcommand{\onevec}{\mathbf 1}\) \(\newcommand{\real}{\mathbb R}\) \(\newcommand{\twovec}[2]{\left[\begin{array}{r}#1 \\ #2 \end{array}\right]}\) \(\newcommand{\ctwovec}[2]{\left[\begin{array}{c}#1 \\ #2 \end{array}\right]}\) \(\newcommand{\threevec}[3]{\left[\begin{array}{r}#1 \\ #2 \\ #3 \end{array}\right]}\) \(\newcommand{\cthreevec}[3]{\left[\begin{array}{c}#1 \\ #2 \\ #3 \end{array}\right]}\) \(\newcommand{\fourvec}[4]{\left[\begin{array}{r}#1 \\ #2 \\ #3 \\ #4 \end{array}\right]}\) \(\newcommand{\cfourvec}[4]{\left[\begin{array}{c}#1 \\ #2 \\ #3 \\ #4 \end{array}\right]}\) \(\newcommand{\fivevec}[5]{\left[\begin{array}{r}#1 \\ #2 \\ #3 \\ #4 \\ #5 \\ \end{array}\right]}\) \(\newcommand{\cfivevec}[5]{\left[\begin{array}{c}#1 \\ #2 \\ #3 \\ #4 \\ #5 \\ \end{array}\right]}\) \(\newcommand{\mattwo}[4]{\left[\begin{array}{rr}#1 \amp #2 \\ #3 \amp #4 \\ \end{array}\right]}\) \(\newcommand{\laspan}[1]{\text{Span}\{#1\}}\) \(\newcommand{\bcal}{\cal B}\) \(\newcommand{\ccal}{\cal C}\) \(\newcommand{\scal}{\cal S}\) \(\newcommand{\wcal}{\cal W}\) \(\newcommand{\ecal}{\cal E}\) \(\newcommand{\coords}[2]{\left\{#1\right\}_{#2}}\) \(\newcommand{\gray}[1]{\color{gray}{#1}}\) \(\newcommand{\lgray}[1]{\color{lightgray}{#1}}\) \(\newcommand{\rank}{\operatorname{rank}}\) \(\newcommand{\row}{\text{Row}}\) \(\newcommand{\col}{\text{Col}}\) \(\renewcommand{\row}{\text{Row}}\) \(\newcommand{\nul}{\text{Nul}}\) \(\newcommand{\var}{\text{Var}}\) \(\newcommand{\corr}{\text{corr}}\) \(\newcommand{\len}[1]{\left|#1\right|}\) \(\newcommand{\bbar}{\overline{\bvec}}\) \(\newcommand{\bhat}{\widehat{\bvec}}\) \(\newcommand{\bperp}{\bvec^\perp}\) \(\newcommand{\xhat}{\widehat{\xvec}}\) \(\newcommand{\vhat}{\widehat{\vvec}}\) \(\newcommand{\uhat}{\widehat{\uvec}}\) \(\newcommand{\what}{\widehat{\wvec}}\) \(\newcommand{\Sighat}{\widehat{\Sigma}}\) \(\newcommand{\lt}{<}\) \(\newcommand{\gt}{>}\) \(\newcommand{\amp}{&}\) \(\definecolor{fillinmathshade}{gray}{0.9}\)Now that you have your Pi up and running you want to remotely access it (in Headless mode) through VNC viewer, which you installed on your laptop or desktop (see VNC Installation Instructions).
Activate VNC on Raspberry Pi
The easiest way is to click the Raspberry icon on the taskbar, choose preferenes/Raspberry Pi Configuration/Interfaces and toggle VNC to on (figure \(\PageIndex{1}\)
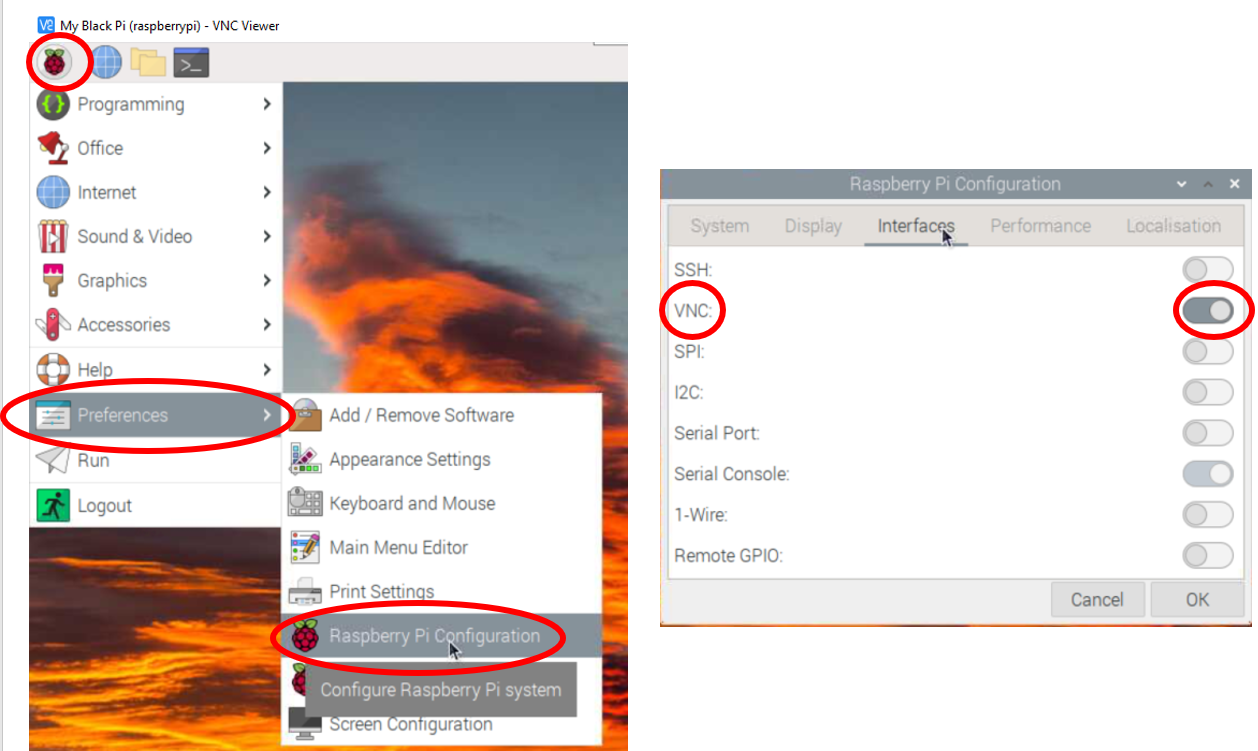 Figure \(\PageIndex{1}\): Screenshoot of procedures for activating VNC Viewer on Raspberry Pi. (Belford cc 0.0)
Obtain Pi IP address
Your desktop VNC viewer connects to the Pi over the internet through the Raspberry Pi's IP (Internet Protocol) address. This is a string of digits containing 4 sets of numbers separated by decimal points xxx.xx.xx.xx, and is like the web address for the Pi. These are assigned by your Internet Service Provider and may be static or dynamic. If it is static, it will never change, and you only have to do this once. If it is dynamic you will have to get the IP address every time it changes. Do deal with this we will set up a program that emails your IP address upon bootup.
 Figure \(\PageIndex{2}\): two ways to get Raspberry Pi IP address. (Copyright; author via source)
If you are at UALR you need to connect your Raspberry Pi to the IOT WiFi network, and this requires you to register it with IT Services (see instructions here). You can get your IP address by going to IT services and looking up your device
Set up Desktop VNC Connection
You can actually run multiple VNC connections at the same time. First you need to set up a connection, which you can do by right-clicking in a blank area of the viewer and choosing "new connection", or choosing file/new connection. This opens the panel if figure \(\PageIndex{3}\), you type in your IP address and give your connection a name
 Figure \(\PageIndex{3}\): Right click a blank area of VNC Viewer and create a new connection. After you give it an IP address and click OK, it will try and connect, and the first time will give you the sever not recognized screen. Continure, then put in your username and password to the Raspberry Pi, and you are good to go. If you click "Remember password", it will take you directly to the Pi desktop the next time. (Belford cc 0.0)
If you have an existing VNC connection and it does not work because the Raspberry Pi IP address changed, you can right click on it, and choose properties. That will open the panel in the left image of figure 3, and allow you to update the IP address.
You may wish to change your screen resolution (see section
File Transfer
One of the nice features of VNC is the ease with which you can transfer files between the pi and your PC or laptop. It is very important that you structure your directories (folders) on both your PC and the Pi so that you can keep your work organized. Therefore you should choose the destination folder with some fore thoughtl.
PC2Pi
To transfer from your personal computer (PC) to the the Pi you can use the collapsible menu at the top center of the Raspberry Pi desktop. You will need to navigate to the folder containing the file you want to upload to the Pi, and you can then place it on the Pi's desktop.
 Figure \(\PageIndex{4}\): Copy and Paste Caption here. (Copyright; author via source)
- Go to the collapsible menu and choose the "Transfer Files" options
- Choose Send "files.."
- Navigate to the folder on your PC having the file you want to upload and click on it
- Choose "Open"
The file will now be uploaded to your Raspberry Pi desktop.
Pi2PC
THe following steps allow you to transfer a file from your Raspberry Pi to your personal compter or laptop. You should set up a destination folder in your PC before you start sending files.
 Figure \(\PageIndex{1}\): Copy and Paste Caption here. (Copyright; author via source)
- Right Click on VNC icon
- Choose the "File Transfer" option
- Choose "Send Files"
- Navigate to the directory of the file you want to send
- Click OK
- Choose the destination directory on your PC
- Choose Send Files.
VNC Issues
Sometimes you lose the VNC Icon and can not transfer files. This is because you are running WayVNC server on the pi and not RealVNC Server. To fix this you must operate on Desktop mode as you will be disconnecting VNC. start by typing:
sudo raspi-config
this opens the configuration tool and choose:
- 6 Advanced Options
- A6 Wayland
- W1 X11
- finish and reboot
 Figure \(\PageIndex{1}\): Copy and Paste Caption here. (Copyright; author via source)
Once you reboot you need to restart VNC Viewer, which you can do from the configuration tool or from preferences. In the case of the configurationt tool choose
- 3. Interface Options
- I2 VNC
- Yes
- finish