
5.3: Procedures
- Page ID
- 374940
\( \newcommand{\vecs}[1]{\overset { \scriptstyle \rightharpoonup} {\mathbf{#1}} } \)
\( \newcommand{\vecd}[1]{\overset{-\!-\!\rightharpoonup}{\vphantom{a}\smash {#1}}} \)
\( \newcommand{\dsum}{\displaystyle\sum\limits} \)
\( \newcommand{\dint}{\displaystyle\int\limits} \)
\( \newcommand{\dlim}{\displaystyle\lim\limits} \)
\( \newcommand{\id}{\mathrm{id}}\) \( \newcommand{\Span}{\mathrm{span}}\)
( \newcommand{\kernel}{\mathrm{null}\,}\) \( \newcommand{\range}{\mathrm{range}\,}\)
\( \newcommand{\RealPart}{\mathrm{Re}}\) \( \newcommand{\ImaginaryPart}{\mathrm{Im}}\)
\( \newcommand{\Argument}{\mathrm{Arg}}\) \( \newcommand{\norm}[1]{\| #1 \|}\)
\( \newcommand{\inner}[2]{\langle #1, #2 \rangle}\)
\( \newcommand{\Span}{\mathrm{span}}\)
\( \newcommand{\id}{\mathrm{id}}\)
\( \newcommand{\Span}{\mathrm{span}}\)
\( \newcommand{\kernel}{\mathrm{null}\,}\)
\( \newcommand{\range}{\mathrm{range}\,}\)
\( \newcommand{\RealPart}{\mathrm{Re}}\)
\( \newcommand{\ImaginaryPart}{\mathrm{Im}}\)
\( \newcommand{\Argument}{\mathrm{Arg}}\)
\( \newcommand{\norm}[1]{\| #1 \|}\)
\( \newcommand{\inner}[2]{\langle #1, #2 \rangle}\)
\( \newcommand{\Span}{\mathrm{span}}\) \( \newcommand{\AA}{\unicode[.8,0]{x212B}}\)
\( \newcommand{\vectorA}[1]{\vec{#1}} % arrow\)
\( \newcommand{\vectorAt}[1]{\vec{\text{#1}}} % arrow\)
\( \newcommand{\vectorB}[1]{\overset { \scriptstyle \rightharpoonup} {\mathbf{#1}} } \)
\( \newcommand{\vectorC}[1]{\textbf{#1}} \)
\( \newcommand{\vectorD}[1]{\overrightarrow{#1}} \)
\( \newcommand{\vectorDt}[1]{\overrightarrow{\text{#1}}} \)
\( \newcommand{\vectE}[1]{\overset{-\!-\!\rightharpoonup}{\vphantom{a}\smash{\mathbf {#1}}}} \)
\( \newcommand{\vecs}[1]{\overset { \scriptstyle \rightharpoonup} {\mathbf{#1}} } \)
\(\newcommand{\longvect}{\overrightarrow}\)
\( \newcommand{\vecd}[1]{\overset{-\!-\!\rightharpoonup}{\vphantom{a}\smash {#1}}} \)
\(\newcommand{\avec}{\mathbf a}\) \(\newcommand{\bvec}{\mathbf b}\) \(\newcommand{\cvec}{\mathbf c}\) \(\newcommand{\dvec}{\mathbf d}\) \(\newcommand{\dtil}{\widetilde{\mathbf d}}\) \(\newcommand{\evec}{\mathbf e}\) \(\newcommand{\fvec}{\mathbf f}\) \(\newcommand{\nvec}{\mathbf n}\) \(\newcommand{\pvec}{\mathbf p}\) \(\newcommand{\qvec}{\mathbf q}\) \(\newcommand{\svec}{\mathbf s}\) \(\newcommand{\tvec}{\mathbf t}\) \(\newcommand{\uvec}{\mathbf u}\) \(\newcommand{\vvec}{\mathbf v}\) \(\newcommand{\wvec}{\mathbf w}\) \(\newcommand{\xvec}{\mathbf x}\) \(\newcommand{\yvec}{\mathbf y}\) \(\newcommand{\zvec}{\mathbf z}\) \(\newcommand{\rvec}{\mathbf r}\) \(\newcommand{\mvec}{\mathbf m}\) \(\newcommand{\zerovec}{\mathbf 0}\) \(\newcommand{\onevec}{\mathbf 1}\) \(\newcommand{\real}{\mathbb R}\) \(\newcommand{\twovec}[2]{\left[\begin{array}{r}#1 \\ #2 \end{array}\right]}\) \(\newcommand{\ctwovec}[2]{\left[\begin{array}{c}#1 \\ #2 \end{array}\right]}\) \(\newcommand{\threevec}[3]{\left[\begin{array}{r}#1 \\ #2 \\ #3 \end{array}\right]}\) \(\newcommand{\cthreevec}[3]{\left[\begin{array}{c}#1 \\ #2 \\ #3 \end{array}\right]}\) \(\newcommand{\fourvec}[4]{\left[\begin{array}{r}#1 \\ #2 \\ #3 \\ #4 \end{array}\right]}\) \(\newcommand{\cfourvec}[4]{\left[\begin{array}{c}#1 \\ #2 \\ #3 \\ #4 \end{array}\right]}\) \(\newcommand{\fivevec}[5]{\left[\begin{array}{r}#1 \\ #2 \\ #3 \\ #4 \\ #5 \\ \end{array}\right]}\) \(\newcommand{\cfivevec}[5]{\left[\begin{array}{c}#1 \\ #2 \\ #3 \\ #4 \\ #5 \\ \end{array}\right]}\) \(\newcommand{\mattwo}[4]{\left[\begin{array}{rr}#1 \amp #2 \\ #3 \amp #4 \\ \end{array}\right]}\) \(\newcommand{\laspan}[1]{\text{Span}\{#1\}}\) \(\newcommand{\bcal}{\cal B}\) \(\newcommand{\ccal}{\cal C}\) \(\newcommand{\scal}{\cal S}\) \(\newcommand{\wcal}{\cal W}\) \(\newcommand{\ecal}{\cal E}\) \(\newcommand{\coords}[2]{\left\{#1\right\}_{#2}}\) \(\newcommand{\gray}[1]{\color{gray}{#1}}\) \(\newcommand{\lgray}[1]{\color{lightgray}{#1}}\) \(\newcommand{\rank}{\operatorname{rank}}\) \(\newcommand{\row}{\text{Row}}\) \(\newcommand{\col}{\text{Col}}\) \(\renewcommand{\row}{\text{Row}}\) \(\newcommand{\nul}{\text{Nul}}\) \(\newcommand{\var}{\text{Var}}\) \(\newcommand{\corr}{\text{corr}}\) \(\newcommand{\len}[1]{\left|#1\right|}\) \(\newcommand{\bbar}{\overline{\bvec}}\) \(\newcommand{\bhat}{\widehat{\bvec}}\) \(\newcommand{\bperp}{\bvec^\perp}\) \(\newcommand{\xhat}{\widehat{\xvec}}\) \(\newcommand{\vhat}{\widehat{\vvec}}\) \(\newcommand{\uhat}{\widehat{\uvec}}\) \(\newcommand{\what}{\widehat{\wvec}}\) \(\newcommand{\Sighat}{\widehat{\Sigma}}\) \(\newcommand{\lt}{<}\) \(\newcommand{\gt}{>}\) \(\newcommand{\amp}{&}\) \(\definecolor{fillinmathshade}{gray}{0.9}\)Experimental Procedures
In this experiment you will mix a solution containing ferric iron with another containing iodide, and then measure the time it takes for the solution to turn blue, when you can conclude all the thiosulfate was consumed. Everyone should start with experiment 3 and show the instructor the results before proceeding. All groups should have roughly the same amount of time (it will depend on the temperature of the room). If a group has a radically different time they should bring this to the attention of the instructor and possibly repeat the experiment. All data needs to be uploaded to a Google Sheet after class as it is shared across the class. Note the data from experiment 3 is used in all three graphs.
The Reagents
 Figure \(\PageIndex{2}\): Reagents and flasks (Copyright; Liliane Poirot CC0)
|
Reagent 1
250 mL Erlenmeyer Flask |
Reagent 2 150 mL Beaker |
Conditions |
|||||||||
| Exp. # |
0.04M |
0.15M |
H2O |
Exp. # |
0.04M |
0.004M S2O3-2 |
Starch, (mL) |
H2O, (mL) |
Temp |
Time (sec) | |
| 1 | 20.00 | 20.00 | 10.00 |
1 |
10.00 |
10.00 |
5.00 |
25.00 | room | ||
| 2 | 15.00 | 20.00 | 15.00 |
2 |
10.00 |
10.00 |
5.00 |
25.00 | room | ||
| 3 | 10.00 | 20.00 | 20.00 |
3 |
10.00 |
10.00 |
5.00 |
25.00 |
room or variable |
||
| 4 | 10.00 | 20.00 | 20.00 |
4 |
15.00 |
10.00 |
5.00 |
20.00 | room | ||
| 5 | 10.00 | 20.00 | 20.00 |
5 |
20.00 |
10.00 |
5.00 |
15.00 | room | ||
| 6 | 10.00 | 20.00 | 20.00 | 6 |
10.00 |
10.00 |
5.00 |
25.00 | THOT | ||
| 7 | 10.00 | 20.00 | 20.00 | 7 |
10.00 |
10.00 |
5.00 |
25.00 | TCOLD | ||
Part 1: Room Temperature Kinetics
- Record room temperature on your data sheet
- Starting with Exp 3 go to the ferric iron dispensing burettes and pour solutions for reagent 1 into a 250 ml Erlenmeyer Flask, the total volume should be 50 mL.
- Remember Burettes are Labeled TD and read from top to bottom!
- Continuing with Exp 3 go to the iodide dispensing burettes and pour solutions for reagent 2 into a 150 ml beaker, the total volume should be 50 mL.
- Place the Erlenmeyer Flask on a white piece of paper
- Note the time and pour the contents of the beaker into the Erlenmeyer flask (you may want to use a stopwatch)
- Gently swirl the contents, then let the flask sit still and record on your data sheet the time it takes to turn blue.
- For the first trial (experiment 3) report your results to the instructor and proceed if your data is deemed acceptable.
- Repeat for experiments 1,2,4 & 5 and record the times in your data sheet (remember there are 60 seconds to a minute and so 1:20 is 80 seconds, not 120 seconds)
Part 2: Temperature Effects
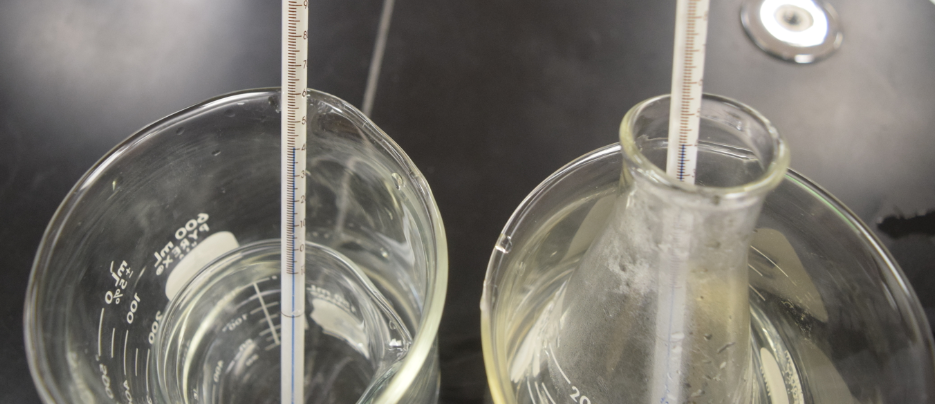 Figure \(\PageIndex{3}\): Iodine solution in left and ferric iron in the right in hot water bath where both solutuions are at same temperature (40 oC). (Copyright; Bob Belford CC0)
- Repeat steps 2 & 3 from part 1 for the reagents in Exp 3.
- Take two 600 mL beakers pour about 3/4 inch hot tap into the first and about 1.5 inches in the second. Add the 150 mL beaker with iodide solution to the shallower flask and the 250 mL Erlenmeyer flask to the deeper one.
- Place thermometers in both solutions and wait until they reach the same constant temperature, which needs to be around 10 degrees higher than room temperature (figure \(\PageIndex{3}\)). If needed, carefully replace the hot water in the bath (being sure not to get any into the reagent flasks)
- Do not heat above 52 oC.
- Remove the thermometer from the 150 mL beaker and carefully transfer the solution to the 250 mL Erelenmeyer Flask and record the time it takes to turn blue
- Record the time it takes to turn blue after the solutions are mixed.
- Record the temperature at the time you mixed the solutions and at the time it turned blue.
- Repeat the above procedures using a cold water bath instead of hot water bath.
- Pour cold water into one of the 600 mL beakers until it has about 2.5 inches deep and measure the temperature. You want it to be about 10 degrees colder than room temperature. If necessary add an ice cube (but make sure it all melts before proceeding)
- When you are happy with the temperature pour some of the water into the other 600 mL beaker so it is around 3/4 inch deep. Now proceed to add the 150 mL beaker to the shallow water bath and the 250 Erlenmeyer flask to the deeper, and repeat steps 3 and 4, just using a cold water bath instead of a hot one.
- NOTE: the chances of the temperature changing during the cold experiment is greater than the hot, as it takes longer.
 Figure \(\PageIndex{4}\): After the two solutions have reached the same constant temperature transfer the solution in the beaker to the Erlenmeyer flask. Start your stopwatch the moment you mix them, keep the flask in its water bath and record the temperature right after you mix them, and the moment it turns blue. In the ice bath it may change during the process and you will need to decide the best temperature to use. (Copyright; Bob Belford CC0)
Part 3: Upload data to class sheet
THIS SHOULD BE DONE DURING CLASS, and you can use the SCLB 263 computer lab if needed. If you can not do this during class you have up to four hours after class to complete the task or the instructor will upload your data and everyone in your group will lose 10 points.
- Identify a student who will upload your data to the class data sheet.
- Go to the class data sheet (link is in the Downloads & Forms).
- Choose the tab for your Lab Section
- Insert your data (figure \(\PageIndex{5}\))
 Figure \(\PageIndex{5}\): Copy and Paste Caption here. (Copyright; author via source)
- Email your lab partners that you have completed the task. This needs to be done within 4 hours of completion of the lab or the instructor will upload your data and everyone in your group will lose 10 points.
Tips for getting good data
- Place a piece of white paper under the Erlenmeyer Flask so you can clearly see blue.
- Have the same person pour from the beaker into the Erlenmeyer Flask and do so in a consistent manner.
- Have the same person "read the blue" for all experiments and do so at a consistent color.
- If possible use a stop watch to read the time.
- Gently swirl the flask for 5 seconds and then leave alone. Be consistent with all experiments. Although it would be nice to swirl all the time, it will be difficult to do so consistently, especially for the low temperature run that will take a long time.
- Assign one student to Reagent 1 and another to reagent 2. Do not stock pile the solutions, that is, do not collect reagents for multiple runs at once.
- Be careful reading burettes. Remember, they read from top to bottom, so the mark that is half way above the number 20 is 19.5, not 20.5
- For the non room temperature experiments you may want to record any temperature changes that occur during the course of the experiment.