

4.4: Molecular orbitals from d orbitals
- Page ID
- 488952

\( \newcommand{\vecs}[1]{\overset { \scriptstyle \rightharpoonup} {\mathbf{#1}} } \)
\( \newcommand{\vecd}[1]{\overset{-\!-\!\rightharpoonup}{\vphantom{a}\smash {#1}}} \)
\( \newcommand{\dsum}{\displaystyle\sum\limits} \)
\( \newcommand{\dint}{\displaystyle\int\limits} \)
\( \newcommand{\dlim}{\displaystyle\lim\limits} \)
\( \newcommand{\id}{\mathrm{id}}\) \( \newcommand{\Span}{\mathrm{span}}\)
( \newcommand{\kernel}{\mathrm{null}\,}\) \( \newcommand{\range}{\mathrm{range}\,}\)
\( \newcommand{\RealPart}{\mathrm{Re}}\) \( \newcommand{\ImaginaryPart}{\mathrm{Im}}\)
\( \newcommand{\Argument}{\mathrm{Arg}}\) \( \newcommand{\norm}[1]{\| #1 \|}\)
\( \newcommand{\inner}[2]{\langle #1, #2 \rangle}\)
\( \newcommand{\Span}{\mathrm{span}}\)
\( \newcommand{\id}{\mathrm{id}}\)
\( \newcommand{\Span}{\mathrm{span}}\)
\( \newcommand{\kernel}{\mathrm{null}\,}\)
\( \newcommand{\range}{\mathrm{range}\,}\)
\( \newcommand{\RealPart}{\mathrm{Re}}\)
\( \newcommand{\ImaginaryPart}{\mathrm{Im}}\)
\( \newcommand{\Argument}{\mathrm{Arg}}\)
\( \newcommand{\norm}[1]{\| #1 \|}\)
\( \newcommand{\inner}[2]{\langle #1, #2 \rangle}\)
\( \newcommand{\Span}{\mathrm{span}}\) \( \newcommand{\AA}{\unicode[.8,0]{x212B}}\)
\( \newcommand{\vectorA}[1]{\vec{#1}} % arrow\)
\( \newcommand{\vectorAt}[1]{\vec{\text{#1}}} % arrow\)
\( \newcommand{\vectorB}[1]{\overset { \scriptstyle \rightharpoonup} {\mathbf{#1}} } \)
\( \newcommand{\vectorC}[1]{\textbf{#1}} \)
\( \newcommand{\vectorD}[1]{\overrightarrow{#1}} \)
\( \newcommand{\vectorDt}[1]{\overrightarrow{\text{#1}}} \)
\( \newcommand{\vectE}[1]{\overset{-\!-\!\rightharpoonup}{\vphantom{a}\smash{\mathbf {#1}}}} \)
\( \newcommand{\vecs}[1]{\overset { \scriptstyle \rightharpoonup} {\mathbf{#1}} } \)
\(\newcommand{\longvect}{\overrightarrow}\)
\( \newcommand{\vecd}[1]{\overset{-\!-\!\rightharpoonup}{\vphantom{a}\smash {#1}}} \)
\(\newcommand{\ket}[1]{\left| #1 \right>}\)
\(\newcommand{\bra}[1]{\left< #1 \right|}\)
\(\newcommand{\braket}[2]{\left< #1 \vphantom{#2} \right| \left. #2 \vphantom{#1} \right>}\)
\(\newcommand{\braopket}[3]{\left< #1 \vphantom{#2}\vphantom{#3} \right| #2 \vphantom{#1}\vphantom{#3} \left| #3 \vphantom{#1}\vphantom{#2} \right>}\)
\(\newcommand{\qmvec}[1]{\mathbf{\vec{#1}}}\)
\(\newcommand{\op}[1]{\hat{\mathbf{#1}}}\)
\(\newcommand{\expect}[1]{\langle #1 \rangle}\)
\(\newcommand{\dfn}[1]{\emph{\textbf{#1}}}\)
In transition metals and other heavier elements, the \(d\) orbitals may combine with other orbitals of compatible symmetry (and energy) to form molecular orbitals. Generally, there are three types of bonding and antibonding interactions that may occur with \(d\) orbitals: sigma (\(\sigma\)), pi (\(\pi\)), and delta (\(\delta\)) bonds.
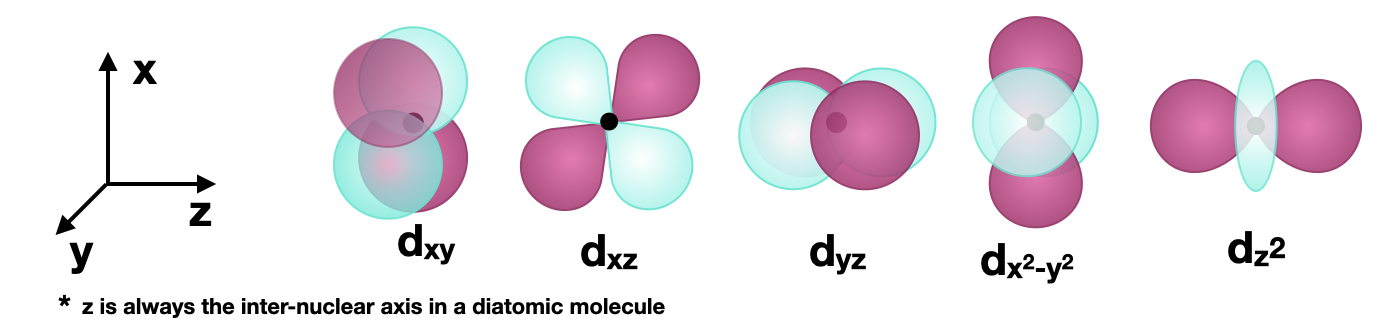 Figure \(\PageIndex{1}\): The five \(3d\) orbitals are shown. The orientation of the axes is consistent and the \(z\) axis is horizontal for convenience in drawing bonding along the \(z\) axis (see examples below). (CC-BY-SA; Kathryn Haas)
Sigma (\(\sigma\)) bonding with \(d\) orbitals
\(\sigma\) bonds are symmetric with respect to the inter-nuclear axis (in a diatomic molecule, this is the \(z\) axis). An example of a \(\sigma\) bond formed by \(d\) orbitals is that of two \(d_{z^2}\) orbitals (see Figure \(\PageIndex{2}\)). If a bonded atom is in a position other than on the \(z\) axis (in an octahedral geometry, for example), \(\sigma\) bonds can also form. For example, two \(d_{x^2-y^2}\) orbitals on atoms bonded along the \(x\) or \(y\) axes could also form a \(\sigma\) bond.
\(d\) orbitals can also form \(\sigma\) bonds with other types of orbitals with the appropriate symmetry. Examples of orbitals with appropriate symmetry are the \(s\) orbital and certain \(p\) orbitals on another atom, as shown below in Figure \(\PageIndex{2}\).
 Figure \(\PageIndex{2}\): Selected examples of \(\sigma\) bonds involving \(d\) orbitals along the \(z\) internuclear axis (shown as a bold horizontal line) between two atoms. (CC-BY-SA; Kathryn Haas)
Pi (\(\pi\)) bonding with \(d\) orbitals
\(\pi\) bonds are those with one node that is in-plane with the internuclear axis. A \(\pi\) bond can form between two \(d\) orbitals or between \(d\) orbitals and other types of orbitals with comparable symmetry. An example of a \(\pi\) bond between two \(d\) orbitals is that formed by two \(d_{xz}\) orbitals along the \(z\) axis (shown in Figure \(\PageIndex{3}\)). \(d\) orbitals can also form \(\pi\) bonds using \(p\) orbitals with compatible symmetry, as shown in Figure \(\PageIndex{3}\).

Delta (\(\delta\)) bonding with \(d\) orbitals
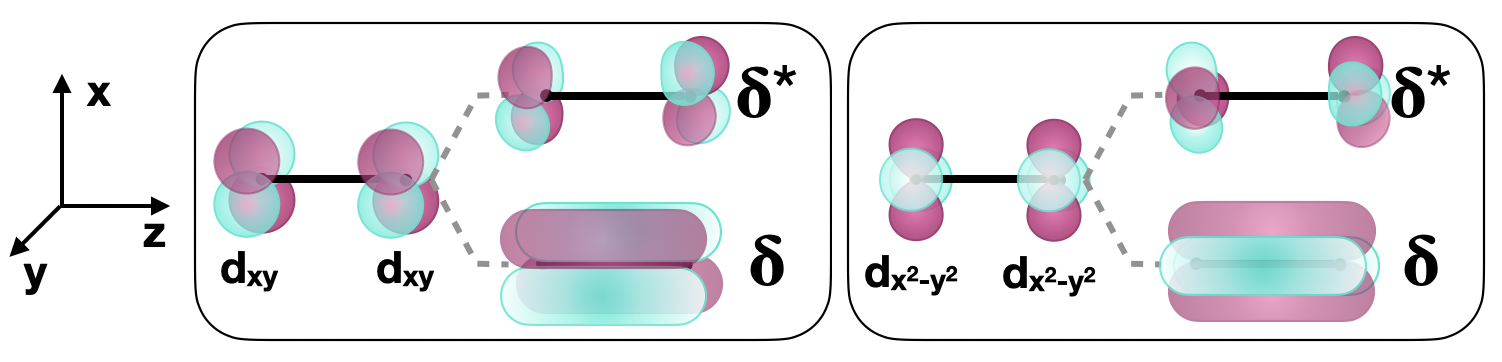
\(\delta \) bonds are those with two nodes that are in-plane with the internuclear axis. \(\delta\) bonds can form between two \(d\) orbitals with appropriate symmetry. For example, when two atoms bond along the \(z\) axis, the \(d_{xy}\) orbitals and the two \(d_{x^2-y^2}\) orbitals can form \(\delta\) bonds (Figure \(\PageIndex{4}\)).
Incompatible orbitals
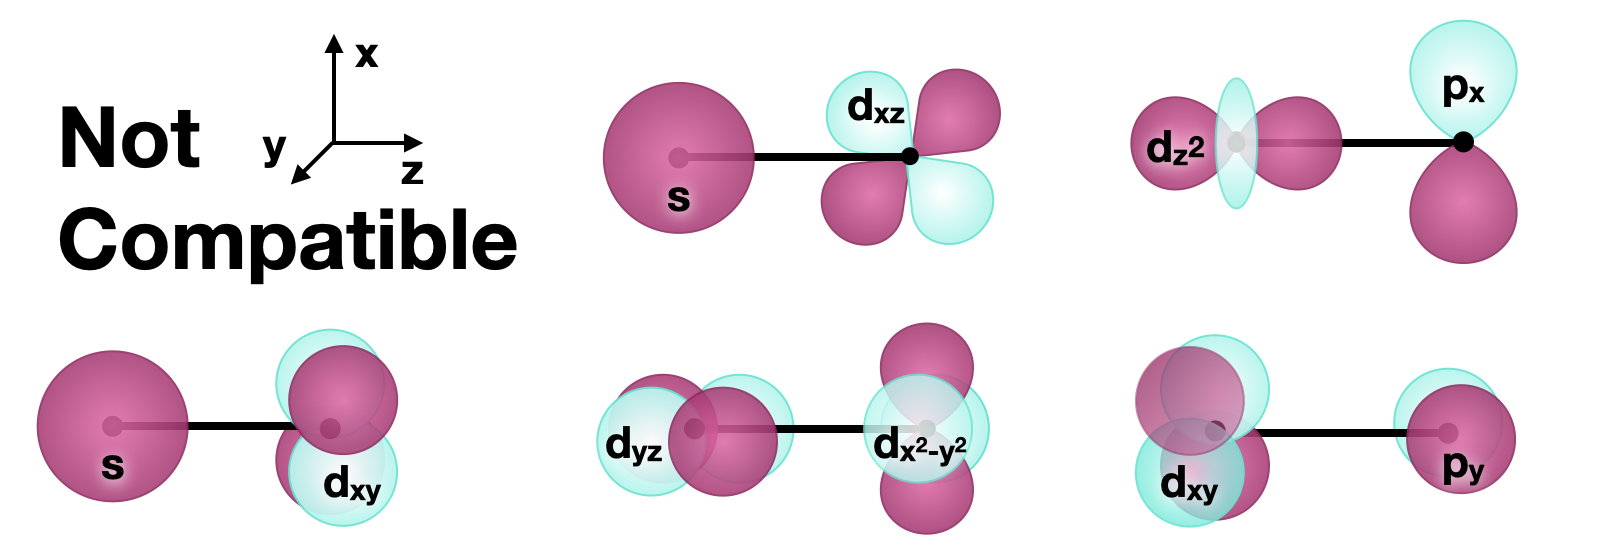
In the descriptions above, we focused on how bonds (and antibonds) can be formed with \(d\) orbitals. All bonding and non-bonding interactions require that orbitals have compatible symmetry to form productive interactions. It is worth mentioning that orbitals with symmetry that is incompatible with the \(d\) orbitals will not have bonding or antibonding interactions with \(d\) orbitals. The figure below shows several sets of orbitals that are incompatible for bonding.
Curated or created by Kathryn Haas