11.4: The Effect of the Metal Ion on d-Orbital Splitting
- Page ID
- 280533
\( \newcommand{\vecs}[1]{\overset { \scriptstyle \rightharpoonup} {\mathbf{#1}} } \)
\( \newcommand{\vecd}[1]{\overset{-\!-\!\rightharpoonup}{\vphantom{a}\smash {#1}}} \)
\( \newcommand{\id}{\mathrm{id}}\) \( \newcommand{\Span}{\mathrm{span}}\)
( \newcommand{\kernel}{\mathrm{null}\,}\) \( \newcommand{\range}{\mathrm{range}\,}\)
\( \newcommand{\RealPart}{\mathrm{Re}}\) \( \newcommand{\ImaginaryPart}{\mathrm{Im}}\)
\( \newcommand{\Argument}{\mathrm{Arg}}\) \( \newcommand{\norm}[1]{\| #1 \|}\)
\( \newcommand{\inner}[2]{\langle #1, #2 \rangle}\)
\( \newcommand{\Span}{\mathrm{span}}\)
\( \newcommand{\id}{\mathrm{id}}\)
\( \newcommand{\Span}{\mathrm{span}}\)
\( \newcommand{\kernel}{\mathrm{null}\,}\)
\( \newcommand{\range}{\mathrm{range}\,}\)
\( \newcommand{\RealPart}{\mathrm{Re}}\)
\( \newcommand{\ImaginaryPart}{\mathrm{Im}}\)
\( \newcommand{\Argument}{\mathrm{Arg}}\)
\( \newcommand{\norm}[1]{\| #1 \|}\)
\( \newcommand{\inner}[2]{\langle #1, #2 \rangle}\)
\( \newcommand{\Span}{\mathrm{span}}\) \( \newcommand{\AA}{\unicode[.8,0]{x212B}}\)
\( \newcommand{\vectorA}[1]{\vec{#1}} % arrow\)
\( \newcommand{\vectorAt}[1]{\vec{\text{#1}}} % arrow\)
\( \newcommand{\vectorB}[1]{\overset { \scriptstyle \rightharpoonup} {\mathbf{#1}} } \)
\( \newcommand{\vectorC}[1]{\textbf{#1}} \)
\( \newcommand{\vectorD}[1]{\overrightarrow{#1}} \)
\( \newcommand{\vectorDt}[1]{\overrightarrow{\text{#1}}} \)
\( \newcommand{\vectE}[1]{\overset{-\!-\!\rightharpoonup}{\vphantom{a}\smash{\mathbf {#1}}}} \)
\( \newcommand{\vecs}[1]{\overset { \scriptstyle \rightharpoonup} {\mathbf{#1}} } \)
\( \newcommand{\vecd}[1]{\overset{-\!-\!\rightharpoonup}{\vphantom{a}\smash {#1}}} \)
\(\newcommand{\avec}{\mathbf a}\) \(\newcommand{\bvec}{\mathbf b}\) \(\newcommand{\cvec}{\mathbf c}\) \(\newcommand{\dvec}{\mathbf d}\) \(\newcommand{\dtil}{\widetilde{\mathbf d}}\) \(\newcommand{\evec}{\mathbf e}\) \(\newcommand{\fvec}{\mathbf f}\) \(\newcommand{\nvec}{\mathbf n}\) \(\newcommand{\pvec}{\mathbf p}\) \(\newcommand{\qvec}{\mathbf q}\) \(\newcommand{\svec}{\mathbf s}\) \(\newcommand{\tvec}{\mathbf t}\) \(\newcommand{\uvec}{\mathbf u}\) \(\newcommand{\vvec}{\mathbf v}\) \(\newcommand{\wvec}{\mathbf w}\) \(\newcommand{\xvec}{\mathbf x}\) \(\newcommand{\yvec}{\mathbf y}\) \(\newcommand{\zvec}{\mathbf z}\) \(\newcommand{\rvec}{\mathbf r}\) \(\newcommand{\mvec}{\mathbf m}\) \(\newcommand{\zerovec}{\mathbf 0}\) \(\newcommand{\onevec}{\mathbf 1}\) \(\newcommand{\real}{\mathbb R}\) \(\newcommand{\twovec}[2]{\left[\begin{array}{r}#1 \\ #2 \end{array}\right]}\) \(\newcommand{\ctwovec}[2]{\left[\begin{array}{c}#1 \\ #2 \end{array}\right]}\) \(\newcommand{\threevec}[3]{\left[\begin{array}{r}#1 \\ #2 \\ #3 \end{array}\right]}\) \(\newcommand{\cthreevec}[3]{\left[\begin{array}{c}#1 \\ #2 \\ #3 \end{array}\right]}\) \(\newcommand{\fourvec}[4]{\left[\begin{array}{r}#1 \\ #2 \\ #3 \\ #4 \end{array}\right]}\) \(\newcommand{\cfourvec}[4]{\left[\begin{array}{c}#1 \\ #2 \\ #3 \\ #4 \end{array}\right]}\) \(\newcommand{\fivevec}[5]{\left[\begin{array}{r}#1 \\ #2 \\ #3 \\ #4 \\ #5 \\ \end{array}\right]}\) \(\newcommand{\cfivevec}[5]{\left[\begin{array}{c}#1 \\ #2 \\ #3 \\ #4 \\ #5 \\ \end{array}\right]}\) \(\newcommand{\mattwo}[4]{\left[\begin{array}{rr}#1 \amp #2 \\ #3 \amp #4 \\ \end{array}\right]}\) \(\newcommand{\laspan}[1]{\text{Span}\{#1\}}\) \(\newcommand{\bcal}{\cal B}\) \(\newcommand{\ccal}{\cal C}\) \(\newcommand{\scal}{\cal S}\) \(\newcommand{\wcal}{\cal W}\) \(\newcommand{\ecal}{\cal E}\) \(\newcommand{\coords}[2]{\left\{#1\right\}_{#2}}\) \(\newcommand{\gray}[1]{\color{gray}{#1}}\) \(\newcommand{\lgray}[1]{\color{lightgray}{#1}}\) \(\newcommand{\rank}{\operatorname{rank}}\) \(\newcommand{\row}{\text{Row}}\) \(\newcommand{\col}{\text{Col}}\) \(\renewcommand{\row}{\text{Row}}\) \(\newcommand{\nul}{\text{Nul}}\) \(\newcommand{\var}{\text{Var}}\) \(\newcommand{\corr}{\text{corr}}\) \(\newcommand{\len}[1]{\left|#1\right|}\) \(\newcommand{\bbar}{\overline{\bvec}}\) \(\newcommand{\bhat}{\widehat{\bvec}}\) \(\newcommand{\bperp}{\bvec^\perp}\) \(\newcommand{\xhat}{\widehat{\xvec}}\) \(\newcommand{\vhat}{\widehat{\vvec}}\) \(\newcommand{\uhat}{\widehat{\uvec}}\) \(\newcommand{\what}{\widehat{\wvec}}\) \(\newcommand{\Sighat}{\widehat{\Sigma}}\) \(\newcommand{\lt}{<}\) \(\newcommand{\gt}{>}\) \(\newcommand{\amp}{&}\) \(\definecolor{fillinmathshade}{gray}{0.9}\)
The Magnitude of \(\Delta_o\)
For octahedral complexes, the magnitude of Δo dictates whether a complex with four, five, six, or seven d electrons is high spin or low spin, which affects its magnetic properties, structure, and reactivity. Large values of Δo (i.e., Δo > P) yield a low-spin complex, whereas small values of Δo (i.e., Δo < P) produce a high-spin complex. As we noted, the magnitude of Δo depends on three factors: the charge on the metal ion, the principal quantum number of the metal (and thus its location in the periodic table), and the nature of the ligand. Values of Δo for some representative transition-metal complexes are given in Table \(\PageIndex{1}\).
| Octahedral Complexes | Δo (cm−1) | Octahedral Complexes | Δo (cm−1) | Tetrahedral Complexes | Δt (cm−1) |
|---|---|---|---|---|---|
| *Energies obtained by spectroscopic measurements are often given in units of wave numbers (cm−1); the wave number is the reciprocal of the wavelength of the corresponding electromagnetic radiation expressed in centimeters: 1 cm−1 = 11.96 J/mol. | |||||
| [Ti(H2O)6]3+ | 20,300 | [Fe(CN)6]4− | 32,800 | VCl4 | 9010 |
| [V(H2O)6]2+ | 12,600 | [Fe(CN)6]3− | 35,000 | [CoCl4]2− | 3300 |
| [V(H2O)6]3+ | 18,900 | [CoF6]3− | 13,000 | [CoBr4]2− | 2900 |
| [CrCl6]3− | 13,000 | [Co(H2O)6]2+ | 9300 | [CoI4]2− | 2700 |
| [Cr(H2O)6]2+ | 13,900 | [Co(H2O)6]3+ | 27,000 | ||
| [Cr(H2O)6]3+ | 17,400 | [Co(NH3)6]3+ | 22,900 | ||
| [Cr(NH3)6]3+ | 21,500 | [Co(CN)6]3− | 34,800 | ||
| [Cr(CN)6]3− | 26,600 | [Ni(H2O)6]2+ | 8500 | ||
| Cr(CO)6 | 34,150 | [Ni(NH3)6]2+ | 10,800 | ||
| [MnCl6]4− | 7500 | [RhCl6]3− | 20,400 | ||
| [Mn(H2O)6]2+ | 8500 | [Rh(H2O)6]3+ | 27,000 | ||
| [MnCl6]3− | 20,000 | [Rh(NH3)6]3+ | 34,000 | ||
| [Mn(H2O)6]3+ | 21,000 | [Rh(CN)6]3− | 45,500 | ||
| [Fe(H2O)6]2+ | 10,400 | [IrCl6]3− | 25,000 | ||
| [Fe(H2O)6]3+ | 14,300 | [Ir(NH3)6]3+ | 41,000 | ||
Source of data: Duward F. Shriver, Peter W. Atkins, and Cooper H. Langford, Inorganic Chemistry, 2nd ed. (New York: W. H. Freeman and Company, 1994).
Charge on the Metal Ion
Increasing the charge on a metal ion has two effects: the radius of the metal ion decreases, and negatively charged ligands are more strongly attracted to the metal. Both factors decrease the metal–ligand distance, which in turn causes the negatively charged ligands to interact more strongly with the d orbitals. Consequently, the magnitude of Δo increases as the charge on the metal ion increases. Typically, Δo for a tripositive ion is about 50% greater than for the dipositive ion of the same metal; for example, for [V(H2O)6]2+, Δo = 11,800 cm−1; for [V(H2O)6]3+, Δo = 17,850 cm−1.
Principal Quantum Number of the Metal
For a series of complexes of metals from the same group in the periodic table with the same charge and the same ligands, the magnitude of Δo increases with increasing principal quantum number: Δo (3d) < Δo (4d) < Δo (5d). The data for hexaammine complexes of the trivalent Group 9 metals illustrate this point:
The increase in Δo with increasing principal quantum number is due to the larger radius of valence orbitals down a column. In addition, repulsive ligand–ligand interactions are most important for smaller metal ions. Relatively speaking, this results in shorter M–L distances and stronger d orbital–ligand interactions.
Reasons for Low-spin vs. High-spin: The Effect of the Metal Ion
There are a few factors that determine the magnitude of the d orbital splitting and dictate whether or not an electron can occupy the higher energy set of orbitals instead of pairing up. These factors are based partly on ligand field strength, which is explored on the next page. They also depend on the charge on the metal ion and whether the metal is in the first, second, or third row of the transition metals.
The higher the charge on the metal, the greater the splitting between the d orbital energy levels. For example, Fe(II) is usually high spin. It has a smaller splitting between the lower and higher d orbital levels, so electrons can more easily go to the higher level rather than pair up un the lower level.
On the other hand, Fe(III) is usually low spin. It has a larger splitting between the d levels. In that case, it costs less energy for electrons to pair up in the lower level than to go up to the higher level.
- High-spin versus low-spin cases involve a trade-off between the d orbital splitting energy and the pairing energy.
- 2nd and 3rd row transition metals are usually low spin
- 1st row transition metals are often high spin
- However, 1st row transition metals and be low spin if they are very positive (usually 3+ or greater)
There is a lot going on in metal ions, but we'll take a simplified view of things. Thinking only about electrostatics, we can try to imagine what happens to those electrons when the charge on the metal ion changes.
First we need to know about Coulomb's law. Coulomb's law states that the force of attraction between the electron and the nucleus depends on only two factors: the amount of positive charge in the nucleus, and the distance between the nucleus and the electron.
The greater the charge on the nucleus, the greater the attraction between the electron and the nucleus.
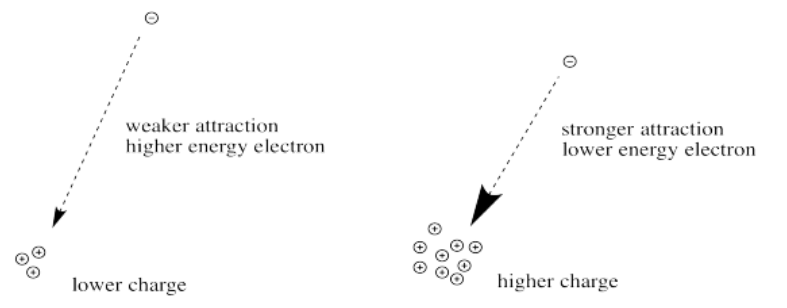
The farther an electron is from the nucleus, the weaker the attraction between the electron and the nucleus.
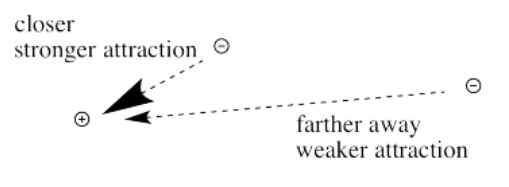
Coulomb's law can be used to evaluate the potential energy of the electron. It is one of the factors that determines how high or low those electronic energy levels are that we see in energy level diagrams for atoms, ions and molecules. The energy of the electron varies in a roughly similar way: the greater the charge on the nucleus, the lower the energy of the electron. Also, the closer the electron is to the nucleus, the lower its energy.
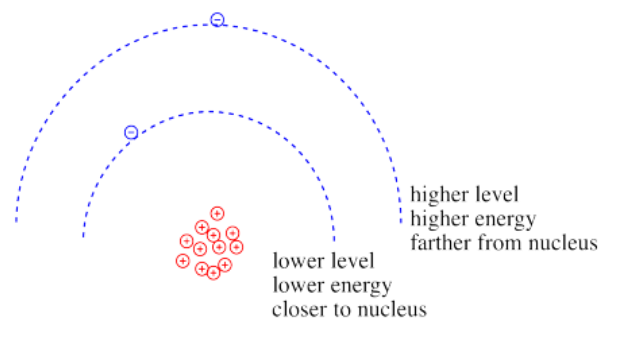
Roughly speaking, electrons at higher energy are farther from the nucleus. Electrons at lower energy are closer to the nucleus.
What happens if the charge increases? Maybe a lot more protons are added to the nucleus. Maybe some electrons are lost, so that to the remaining electrons it just feels like the charge of the nucleus has increased. Then the electrons should be more attracted to the nucleus. They get a little closer. Their potential energy drops.
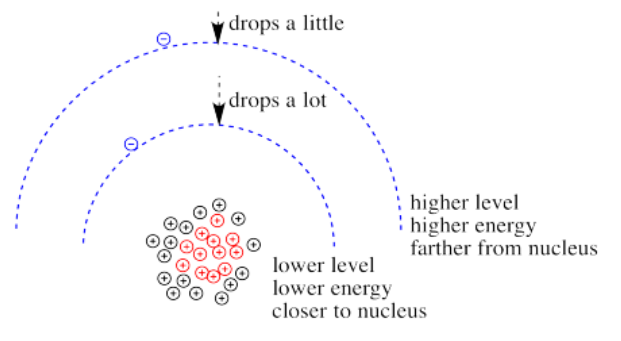
Of course, if one electron is closer to the nucleus already, it feels that increase in positive charge more strongly than an electron that is farther away. Consequently it drops further in energy than an electron that is further away.
If we translate that idea into a picture of the d orbital energy levels in an octahedral geometry, it looks like this:
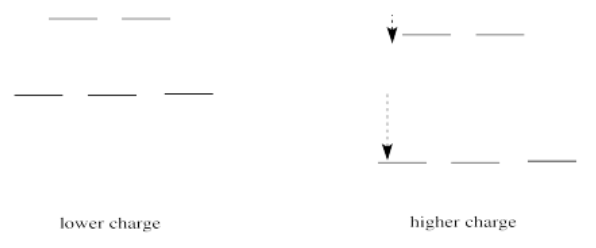
When the charge on the metal ion is increased, both the higher and the lower levels drop in energy. However, the lower level drops more. Thus, the gap between the levels gets wider.
Metals in the second and third row of the periodic table almost never form high-spin complexes. The d orbital energy splitting in these cases is larger than for first row metals. From a very simple point of view, these metals have many more protons in their nuclei than the first row transition metals, dropping that lower set of d electrons lower with respect to the higher set.
That isn't the whole picture for the second and third row transition metals, however. Remember, we are simplifying, and there are factors we won't go into. However, it is important to know that metal-ligand bond strengths are much greater in the second and third row than in the first. We'll look at the whole interaction diagram for an octahedral complex now, including contributions form metal s and p orbitals.
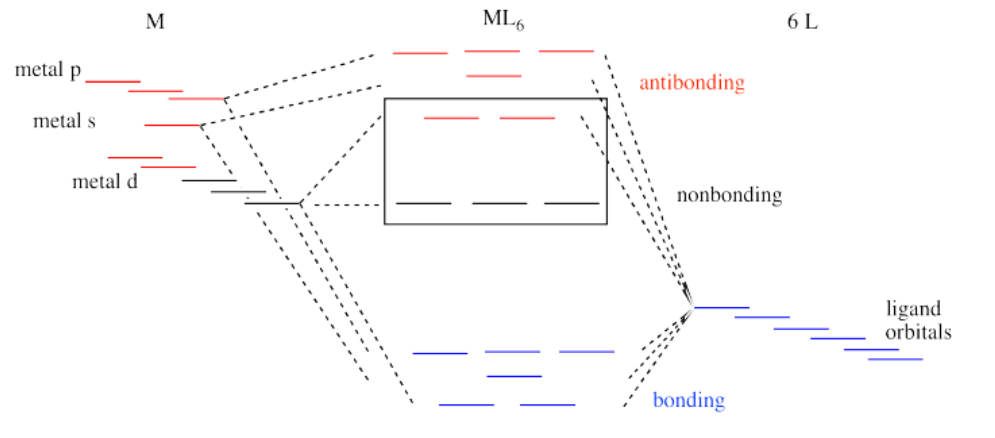
Like all ligand-metal interaction diagrams, the energy levels of the ligands by themselves are shown on one side. The metal's electronic energy levels are shown on the other side. The result of their interaction, a metal-ligand complex, is shown in the middle. The d orbital splitting diagram is shown in a box.
Suppose the diagram above is for a first row transition metal. The diagram for a second or third row metal is similar, but with stronger bonds.
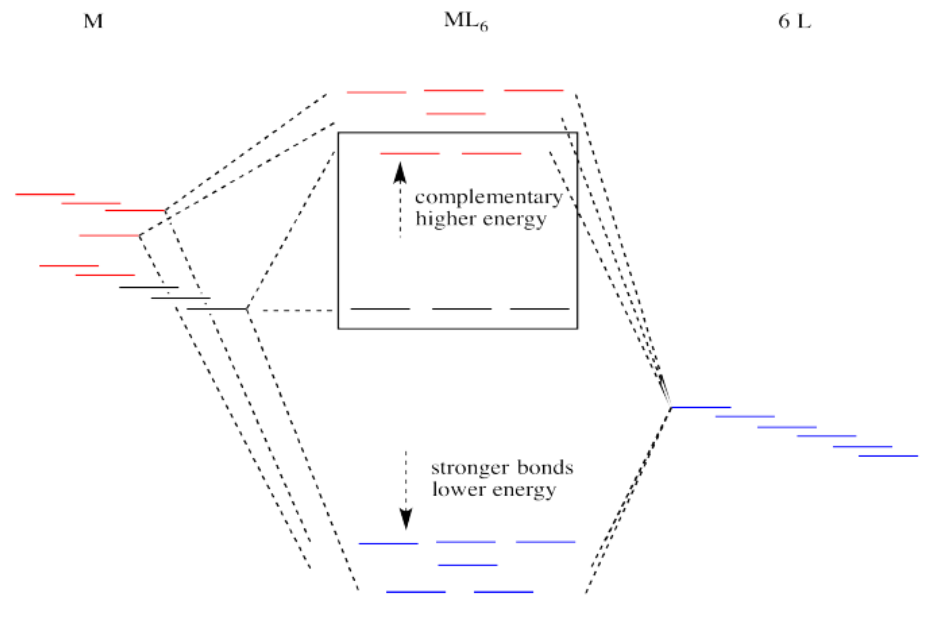
If the bonding interaction is stronger between the metal and ligand, then so is the antibonding interaction. The antibonding levels are bumped higher in energy as the bonding levels sink lower. Generally that's OK, because when the electrons are filled in, they will be found preferentially at the lower levels, not the higher ones. There will be a net lowering of electronic energy.
Why do second and third row transition metals form such strong bonds? Bond strengths are very complicated. In general, there is greater covalency between these metals and their ligands because of increased spatial and energetic overlap. Rather than go into those factors, we'll just think about all those extra protons in the nucleus that are attracting the ligand electrons more strongly.
There is one more important distinction that makes second and third row transition metals low spin. In addition, the pairing energy is lower in these metals because the orbitals are larger. There is more room for two electrons in one orbital, with less repulsion. As a result, electrons are much more likely to pair up than to occupy the next energy level.
- 2nd and 3rd row transition metals have stronger bonds, leading to a larger gap between d orbital levels
- 2nd and 3rd row transition metals have more diffuse orbitals, leading to a lower pairing energy
It is significant that most important transition metal ions in biology are from the first row of the transition block and are pretty labile. That fact plays an important role in the ease of formation and deconstruction of transition-metal containing proteins. In terms of formation, if the metal is more easily released by its previous ligands (either water or some compound that delivers the metal to the site of protein construction), it can form the necessary protein more quickly. However, even if a metal-containing enzyme plays a useful role, it should not be too stable, because we need to be able to regulate the level of protein concentration for optimum activity, or disassemble protein if it becomes damaged. Thus, it is important that the metal ion can be removed easily.
Metal ion properties that effect \(\Delta_o\)
- Position on the periodic table (period or shell number)
The splitting of the d-orbitals in any ligand field increases as shell number increases going down the periodic table. In general, with octahedral ligand fields, the \(3d\) metal ions can be either weak-field or strong-field depending on other factors. With octahedral complexes, the \(4d\) and larger metal ions are generally strong-field. - Oxidation state (charge of the metal ion)
As the metal oxidation state increases, the strength of the field also increases. The charge on a \(3d\) metal ion can contribute to whether it is weak-field or strong-field (and thus high-spin or low-spin for \(d^4-d^7\) metal ions). In octahedral \(3d\) metals, the +3 metal ions favor stronger-field (and sometimes low spin) complexes. The +2 metal ions in this series favor weaker-field (and usually high spin); but we cannot make a good prediction about this without knowing about the identity of the ligands.


