
14.3: Adding New Assignments
- Page ID
- 483786
\( \newcommand{\vecs}[1]{\overset { \scriptstyle \rightharpoonup} {\mathbf{#1}} } \)
\( \newcommand{\vecd}[1]{\overset{-\!-\!\rightharpoonup}{\vphantom{a}\smash {#1}}} \)
\( \newcommand{\id}{\mathrm{id}}\) \( \newcommand{\Span}{\mathrm{span}}\)
( \newcommand{\kernel}{\mathrm{null}\,}\) \( \newcommand{\range}{\mathrm{range}\,}\)
\( \newcommand{\RealPart}{\mathrm{Re}}\) \( \newcommand{\ImaginaryPart}{\mathrm{Im}}\)
\( \newcommand{\Argument}{\mathrm{Arg}}\) \( \newcommand{\norm}[1]{\| #1 \|}\)
\( \newcommand{\inner}[2]{\langle #1, #2 \rangle}\)
\( \newcommand{\Span}{\mathrm{span}}\)
\( \newcommand{\id}{\mathrm{id}}\)
\( \newcommand{\Span}{\mathrm{span}}\)
\( \newcommand{\kernel}{\mathrm{null}\,}\)
\( \newcommand{\range}{\mathrm{range}\,}\)
\( \newcommand{\RealPart}{\mathrm{Re}}\)
\( \newcommand{\ImaginaryPart}{\mathrm{Im}}\)
\( \newcommand{\Argument}{\mathrm{Arg}}\)
\( \newcommand{\norm}[1]{\| #1 \|}\)
\( \newcommand{\inner}[2]{\langle #1, #2 \rangle}\)
\( \newcommand{\Span}{\mathrm{span}}\) \( \newcommand{\AA}{\unicode[.8,0]{x212B}}\)
\( \newcommand{\vectorA}[1]{\vec{#1}} % arrow\)
\( \newcommand{\vectorAt}[1]{\vec{\text{#1}}} % arrow\)
\( \newcommand{\vectorB}[1]{\overset { \scriptstyle \rightharpoonup} {\mathbf{#1}} } \)
\( \newcommand{\vectorC}[1]{\textbf{#1}} \)
\( \newcommand{\vectorD}[1]{\overrightarrow{#1}} \)
\( \newcommand{\vectorDt}[1]{\overrightarrow{\text{#1}}} \)
\( \newcommand{\vectE}[1]{\overset{-\!-\!\rightharpoonup}{\vphantom{a}\smash{\mathbf {#1}}}} \)
\( \newcommand{\vecs}[1]{\overset { \scriptstyle \rightharpoonup} {\mathbf{#1}} } \)
\( \newcommand{\vecd}[1]{\overset{-\!-\!\rightharpoonup}{\vphantom{a}\smash {#1}}} \)
\(\newcommand{\avec}{\mathbf a}\) \(\newcommand{\bvec}{\mathbf b}\) \(\newcommand{\cvec}{\mathbf c}\) \(\newcommand{\dvec}{\mathbf d}\) \(\newcommand{\dtil}{\widetilde{\mathbf d}}\) \(\newcommand{\evec}{\mathbf e}\) \(\newcommand{\fvec}{\mathbf f}\) \(\newcommand{\nvec}{\mathbf n}\) \(\newcommand{\pvec}{\mathbf p}\) \(\newcommand{\qvec}{\mathbf q}\) \(\newcommand{\svec}{\mathbf s}\) \(\newcommand{\tvec}{\mathbf t}\) \(\newcommand{\uvec}{\mathbf u}\) \(\newcommand{\vvec}{\mathbf v}\) \(\newcommand{\wvec}{\mathbf w}\) \(\newcommand{\xvec}{\mathbf x}\) \(\newcommand{\yvec}{\mathbf y}\) \(\newcommand{\zvec}{\mathbf z}\) \(\newcommand{\rvec}{\mathbf r}\) \(\newcommand{\mvec}{\mathbf m}\) \(\newcommand{\zerovec}{\mathbf 0}\) \(\newcommand{\onevec}{\mathbf 1}\) \(\newcommand{\real}{\mathbb R}\) \(\newcommand{\twovec}[2]{\left[\begin{array}{r}#1 \\ #2 \end{array}\right]}\) \(\newcommand{\ctwovec}[2]{\left[\begin{array}{c}#1 \\ #2 \end{array}\right]}\) \(\newcommand{\threevec}[3]{\left[\begin{array}{r}#1 \\ #2 \\ #3 \end{array}\right]}\) \(\newcommand{\cthreevec}[3]{\left[\begin{array}{c}#1 \\ #2 \\ #3 \end{array}\right]}\) \(\newcommand{\fourvec}[4]{\left[\begin{array}{r}#1 \\ #2 \\ #3 \\ #4 \end{array}\right]}\) \(\newcommand{\cfourvec}[4]{\left[\begin{array}{c}#1 \\ #2 \\ #3 \\ #4 \end{array}\right]}\) \(\newcommand{\fivevec}[5]{\left[\begin{array}{r}#1 \\ #2 \\ #3 \\ #4 \\ #5 \\ \end{array}\right]}\) \(\newcommand{\cfivevec}[5]{\left[\begin{array}{c}#1 \\ #2 \\ #3 \\ #4 \\ #5 \\ \end{array}\right]}\) \(\newcommand{\mattwo}[4]{\left[\begin{array}{rr}#1 \amp #2 \\ #3 \amp #4 \\ \end{array}\right]}\) \(\newcommand{\laspan}[1]{\text{Span}\{#1\}}\) \(\newcommand{\bcal}{\cal B}\) \(\newcommand{\ccal}{\cal C}\) \(\newcommand{\scal}{\cal S}\) \(\newcommand{\wcal}{\cal W}\) \(\newcommand{\ecal}{\cal E}\) \(\newcommand{\coords}[2]{\left\{#1\right\}_{#2}}\) \(\newcommand{\gray}[1]{\color{gray}{#1}}\) \(\newcommand{\lgray}[1]{\color{lightgray}{#1}}\) \(\newcommand{\rank}{\operatorname{rank}}\) \(\newcommand{\row}{\text{Row}}\) \(\newcommand{\col}{\text{Col}}\) \(\renewcommand{\row}{\text{Row}}\) \(\newcommand{\nul}{\text{Nul}}\) \(\newcommand{\var}{\text{Var}}\) \(\newcommand{\corr}{\text{corr}}\) \(\newcommand{\len}[1]{\left|#1\right|}\) \(\newcommand{\bbar}{\overline{\bvec}}\) \(\newcommand{\bhat}{\widehat{\bvec}}\) \(\newcommand{\bperp}{\bvec^\perp}\) \(\newcommand{\xhat}{\widehat{\xvec}}\) \(\newcommand{\vhat}{\widehat{\vvec}}\) \(\newcommand{\uhat}{\widehat{\uvec}}\) \(\newcommand{\what}{\widehat{\wvec}}\) \(\newcommand{\Sighat}{\widehat{\Sigma}}\) \(\newcommand{\lt}{<}\) \(\newcommand{\gt}{>}\) \(\newcommand{\amp}{&}\) \(\definecolor{fillinmathshade}{gray}{0.9}\)Add New Assignment
Assignments in Adapt normally consist of one or more assessments (questions). You can learn how to add assessments here (coming soon). To create a new assignment:
- Log in to your instructors account and select the course that you want to add a new assignment to.
- Click “New Assignment”
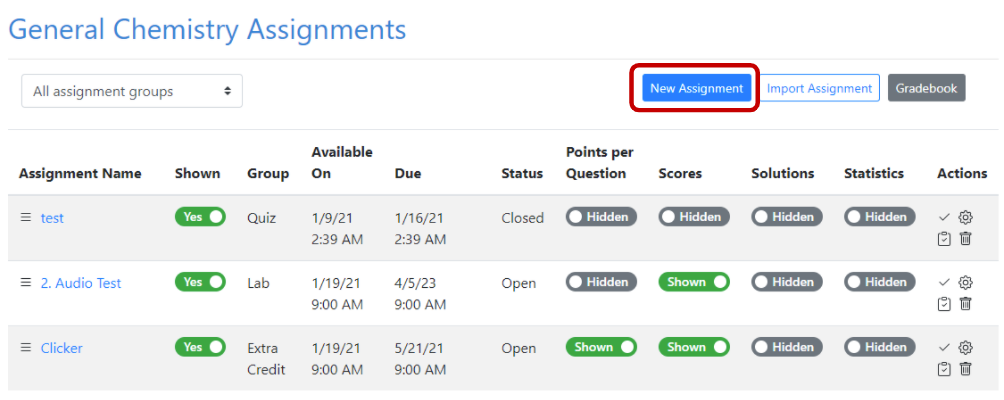
Figure \(\PageIndex{1}\): To add a new assignment click "New Assignment" button at the top - In the opened overlay window fill out assignment properties. Click “Submit” to save the assignment.
- Name - The name of the assignment that will be displayed for instructors and students
- Assignment group - You can choose an existing group or create a new group for this assignment.
Note: you can assign Group score weights in Course Properties → Assignment Group Weights
- Source
- Select “Internal” if you are using LibreTexts database or Query Library.
- Select “External” if you are planning on adding/importing scores from another source manually.
- Scoring Type
- Performance - students get credit for correct answers. Partial credit is possible with delayed grading.
- Completion - with Real Time Grading, students get full credit for completing the assessment regardless of whether the answer they provided is correct. Open-ended questions are graded manually. If the assignment has both types of questions (open-ended and auto-graded) students will get full credit for auto-graded assessments and the open-ended questions will require manual grading.
- Default Points/Question will be applied to all questions by default, but can be changed for each question manually later on.
- Assessment type
- Real Time - works best for auto-graded questions, students are provided with the feedback immediately after submitting their answer. Scores are also released at the time of submission.
- Delayed Graded Assessments: this type will require manual grading. Students won’t get their scores and feedback until the scores are released.
- Learning Tree Assessments: this type is only appropriate for learning trees.
- Clicker Assessments: this type is only appropriate for clicker questions.
- Default Open-ended Submission Type:
- Rich Text has additional formatting options compare to plain text
- Plain Text has no additional formatting options available
- File - lets students upload submissions as PDF, TXT, PNG, JPEG, JPG
- Audio - this type of submission allows students to record audio as their answer and submit it. Note: Audio feedback from graders is also available (see tutorial for grading).
- None - students won’t have any additional field for submission. Works well for auto-graded questions (H5P, WeBWorK, etc.)
- Late Policy
- Do not accept late - once the deadline has passed students cannot submit their answers.
- Accept but mark late - in this case the assignment will be marked late, but no points will automatically be deducted. You will need to set the final submission deadline before saving the settings.
- Accept late with a deduction - The most flexible way to apply credit deduction. You can set deduction percent and choose whether you want it deducted once or periodically (i.e. every 10 minutes, 2 hours, 1 day).
- Include in Final Score
- Include the assignment in computing a final weighted score - the score will be included in the final score calculation
- Do not include the assignment in computing a final weighted score - the score will not be included in the final score
- Instructions (Optional) - these instructions will be shown to students before they see the first question of the assignment.
- Randomization
- No - show all questions added to the assignment to students
- Yes - only show a specific number of questions out of all questions you’ve added to this assignment. You will need to indicate the number of randomized assessments. The bigger the pool of questions, the greater the chance that all students will get a different set of randomized questions.
- Notifications - if students opted-in to receive notifications they will be notified if you select “Yes”
- Assign to - select one or several students, specific section or all students enrolled in this course
- Available on - date when the assignment will be first available to students
- Due Date - Deadline for the assignment
- Final submission Deadline - If you select “Accept but mark late” or “Accept late with a deduction” you will be asked to provide this deadline after which the submissions will not be accepted anymore.
- Add Assign to - use this option to assign special deadlines for a specific student/section
Import assignments
- Log in to your instructors account and select the course that you want to add a new assignment to.
- Click "Import Assignment".
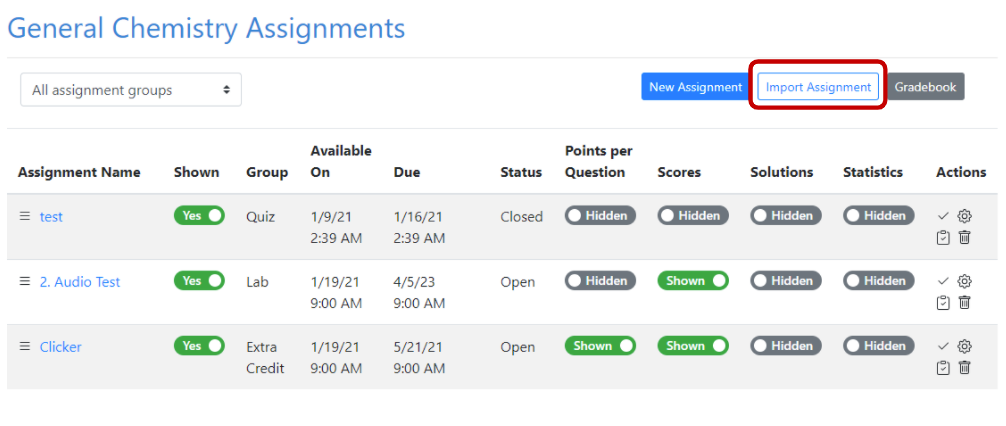
Figure \(\PageIndex{2}\): Click "Import Assignment" to clone properties or properties and questions from another assignment - You can choose to import Just the properties from another of your assignment (see the list above) and add different questions to it or import Properties and questions from one of your assignments.
- Click "Yes, Import Assignment" to complete the import.