
6.4: Extraction Procedure
- Page ID
- 535986
\( \newcommand{\vecs}[1]{\overset { \scriptstyle \rightharpoonup} {\mathbf{#1}} } \)
\( \newcommand{\vecd}[1]{\overset{-\!-\!\rightharpoonup}{\vphantom{a}\smash {#1}}} \)
\( \newcommand{\dsum}{\displaystyle\sum\limits} \)
\( \newcommand{\dint}{\displaystyle\int\limits} \)
\( \newcommand{\dlim}{\displaystyle\lim\limits} \)
\( \newcommand{\id}{\mathrm{id}}\) \( \newcommand{\Span}{\mathrm{span}}\)
( \newcommand{\kernel}{\mathrm{null}\,}\) \( \newcommand{\range}{\mathrm{range}\,}\)
\( \newcommand{\RealPart}{\mathrm{Re}}\) \( \newcommand{\ImaginaryPart}{\mathrm{Im}}\)
\( \newcommand{\Argument}{\mathrm{Arg}}\) \( \newcommand{\norm}[1]{\| #1 \|}\)
\( \newcommand{\inner}[2]{\langle #1, #2 \rangle}\)
\( \newcommand{\Span}{\mathrm{span}}\)
\( \newcommand{\id}{\mathrm{id}}\)
\( \newcommand{\Span}{\mathrm{span}}\)
\( \newcommand{\kernel}{\mathrm{null}\,}\)
\( \newcommand{\range}{\mathrm{range}\,}\)
\( \newcommand{\RealPart}{\mathrm{Re}}\)
\( \newcommand{\ImaginaryPart}{\mathrm{Im}}\)
\( \newcommand{\Argument}{\mathrm{Arg}}\)
\( \newcommand{\norm}[1]{\| #1 \|}\)
\( \newcommand{\inner}[2]{\langle #1, #2 \rangle}\)
\( \newcommand{\Span}{\mathrm{span}}\) \( \newcommand{\AA}{\unicode[.8,0]{x212B}}\)
\( \newcommand{\vectorA}[1]{\vec{#1}} % arrow\)
\( \newcommand{\vectorAt}[1]{\vec{\text{#1}}} % arrow\)
\( \newcommand{\vectorB}[1]{\overset { \scriptstyle \rightharpoonup} {\mathbf{#1}} } \)
\( \newcommand{\vectorC}[1]{\textbf{#1}} \)
\( \newcommand{\vectorD}[1]{\overrightarrow{#1}} \)
\( \newcommand{\vectorDt}[1]{\overrightarrow{\text{#1}}} \)
\( \newcommand{\vectE}[1]{\overset{-\!-\!\rightharpoonup}{\vphantom{a}\smash{\mathbf {#1}}}} \)
\( \newcommand{\vecs}[1]{\overset { \scriptstyle \rightharpoonup} {\mathbf{#1}} } \)
\(\newcommand{\longvect}{\overrightarrow}\)
\( \newcommand{\vecd}[1]{\overset{-\!-\!\rightharpoonup}{\vphantom{a}\smash {#1}}} \)
\(\newcommand{\avec}{\mathbf a}\) \(\newcommand{\bvec}{\mathbf b}\) \(\newcommand{\cvec}{\mathbf c}\) \(\newcommand{\dvec}{\mathbf d}\) \(\newcommand{\dtil}{\widetilde{\mathbf d}}\) \(\newcommand{\evec}{\mathbf e}\) \(\newcommand{\fvec}{\mathbf f}\) \(\newcommand{\nvec}{\mathbf n}\) \(\newcommand{\pvec}{\mathbf p}\) \(\newcommand{\qvec}{\mathbf q}\) \(\newcommand{\svec}{\mathbf s}\) \(\newcommand{\tvec}{\mathbf t}\) \(\newcommand{\uvec}{\mathbf u}\) \(\newcommand{\vvec}{\mathbf v}\) \(\newcommand{\wvec}{\mathbf w}\) \(\newcommand{\xvec}{\mathbf x}\) \(\newcommand{\yvec}{\mathbf y}\) \(\newcommand{\zvec}{\mathbf z}\) \(\newcommand{\rvec}{\mathbf r}\) \(\newcommand{\mvec}{\mathbf m}\) \(\newcommand{\zerovec}{\mathbf 0}\) \(\newcommand{\onevec}{\mathbf 1}\) \(\newcommand{\real}{\mathbb R}\) \(\newcommand{\twovec}[2]{\left[\begin{array}{r}#1 \\ #2 \end{array}\right]}\) \(\newcommand{\ctwovec}[2]{\left[\begin{array}{c}#1 \\ #2 \end{array}\right]}\) \(\newcommand{\threevec}[3]{\left[\begin{array}{r}#1 \\ #2 \\ #3 \end{array}\right]}\) \(\newcommand{\cthreevec}[3]{\left[\begin{array}{c}#1 \\ #2 \\ #3 \end{array}\right]}\) \(\newcommand{\fourvec}[4]{\left[\begin{array}{r}#1 \\ #2 \\ #3 \\ #4 \end{array}\right]}\) \(\newcommand{\cfourvec}[4]{\left[\begin{array}{c}#1 \\ #2 \\ #3 \\ #4 \end{array}\right]}\) \(\newcommand{\fivevec}[5]{\left[\begin{array}{r}#1 \\ #2 \\ #3 \\ #4 \\ #5 \\ \end{array}\right]}\) \(\newcommand{\cfivevec}[5]{\left[\begin{array}{c}#1 \\ #2 \\ #3 \\ #4 \\ #5 \\ \end{array}\right]}\) \(\newcommand{\mattwo}[4]{\left[\begin{array}{rr}#1 \amp #2 \\ #3 \amp #4 \\ \end{array}\right]}\) \(\newcommand{\laspan}[1]{\text{Span}\{#1\}}\) \(\newcommand{\bcal}{\cal B}\) \(\newcommand{\ccal}{\cal C}\) \(\newcommand{\scal}{\cal S}\) \(\newcommand{\wcal}{\cal W}\) \(\newcommand{\ecal}{\cal E}\) \(\newcommand{\coords}[2]{\left\{#1\right\}_{#2}}\) \(\newcommand{\gray}[1]{\color{gray}{#1}}\) \(\newcommand{\lgray}[1]{\color{lightgray}{#1}}\) \(\newcommand{\rank}{\operatorname{rank}}\) \(\newcommand{\row}{\text{Row}}\) \(\newcommand{\col}{\text{Col}}\) \(\renewcommand{\row}{\text{Row}}\) \(\newcommand{\nul}{\text{Nul}}\) \(\newcommand{\var}{\text{Var}}\) \(\newcommand{\corr}{\text{corr}}\) \(\newcommand{\len}[1]{\left|#1\right|}\) \(\newcommand{\bbar}{\overline{\bvec}}\) \(\newcommand{\bhat}{\widehat{\bvec}}\) \(\newcommand{\bperp}{\bvec^\perp}\) \(\newcommand{\xhat}{\widehat{\xvec}}\) \(\newcommand{\vhat}{\widehat{\vvec}}\) \(\newcommand{\uhat}{\widehat{\uvec}}\) \(\newcommand{\what}{\widehat{\wvec}}\) \(\newcommand{\Sighat}{\widehat{\Sigma}}\) \(\newcommand{\lt}{<}\) \(\newcommand{\gt}{>}\) \(\newcommand{\amp}{&}\) \(\definecolor{fillinmathshade}{gray}{0.9}\)Prepare the Setup
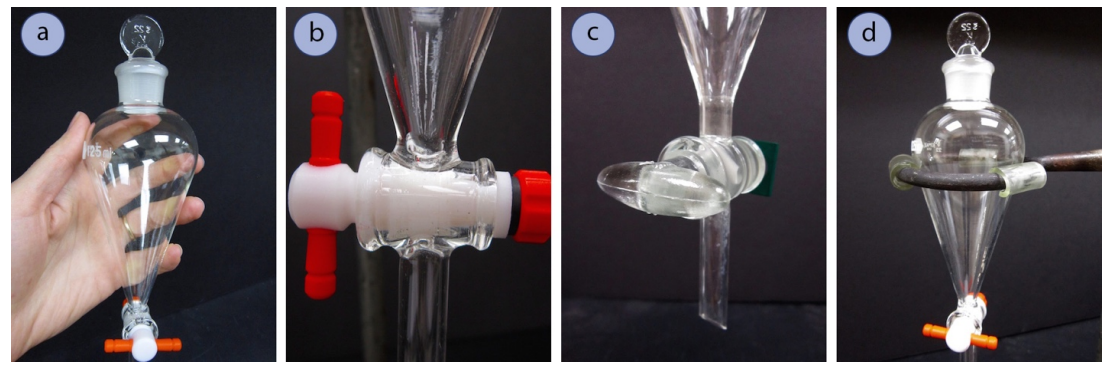
- Obtain a separatory funnel.
- A Teflon stopcock is typically used. If it was taken apart to dry, reassemble the stopcock, placing the parts in the appropriate order. Be sure that the Teflon stopcock is moderately tight so that it can still easily turn, but is not so loose that liquid can seep around the joint.
- Also obtain a stopper that fits well in the top joint of the funnel.
- Place the separatory funnel in a ring clamp attached to a ring stand or latticework.
Add the Solutions
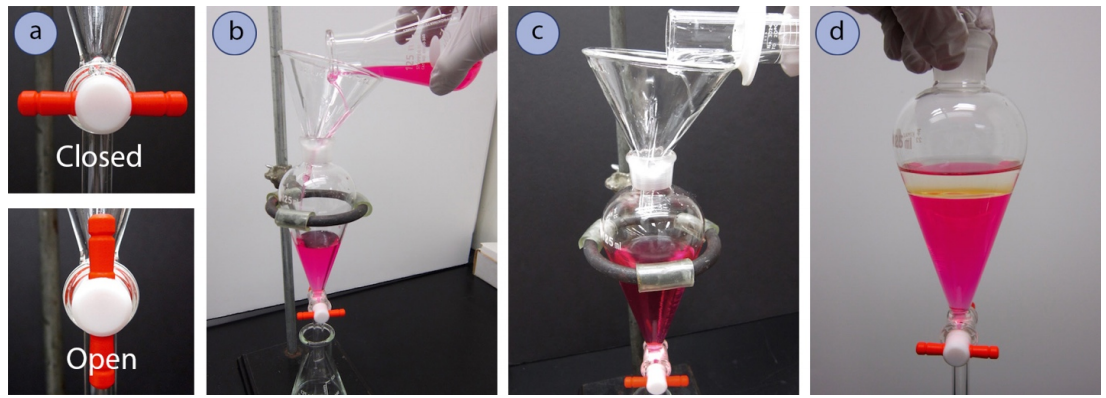
- Before pouring anything into a separatory funnel, be sure that the stopcock is in the "closed" position, where the stopcock is horizontal. As a fail-safe, always position an Erlenmeyer flask beneath the separatory funnel before pouring. This can catch liquid in case the stopcock is accidentally left open, or if the stopcock is loose and liquid leaks through unintentionally.
- Using a funnel, pour the liquid to be extracted into the separatory funnel. A separatory funnel should never be used with a hot or warm liquid.
- Pour a quantity of the extractive solvent into the separatory funnel, as indicated by the procedure. It is unnecessary to use precise quantities of solvent for extractions, and the volumes can be measured in a graduated cylinder. If a procedure calls for 20mL of solvent, it is acceptable if between 20-25mL is used.
Mix the Solutions
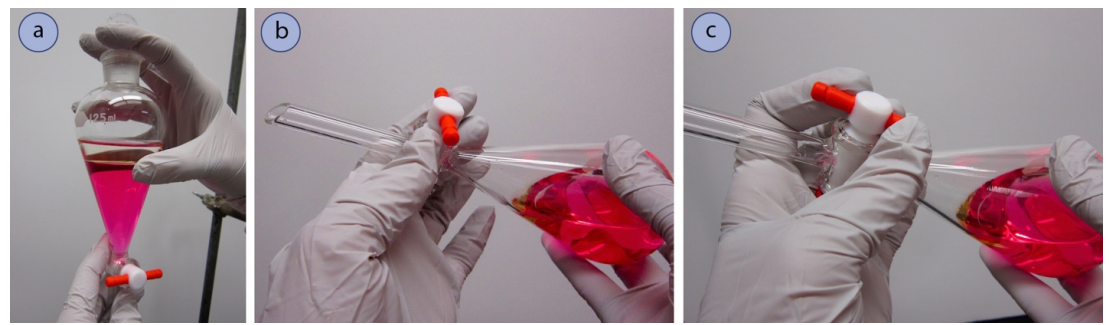
- Place the stopper on the funnel, and hold the funnel such that the fingers of one hand securely cover the stopper, while the other hand grips the bottom of the funnel.
- Gently invert the funnel, and swirl the mixture a little. Although it is not uncommon for some liquid to creep into the ground glass joint when inverted, it should be minimal.
- Pressure may build up inside the separatory funnel when solutions are mixed, so immediately after swirling, and with the funnel still inverted, "vent" the funnel by briefly opening the stopcock to allow for a release of pressure. With highly volatile solvents (like diethyl ether), a definite "swoosh" can be heard upon venting, and small amounts of liquid may even sputter out the stopcock. Safety note: Never point the stopcock toward someone as you vent, as it's possible some liquid may splatter onto him or her.
- Close the stopcock and mix the solutions a bit more vigorously, periodically stopping to vent the system.
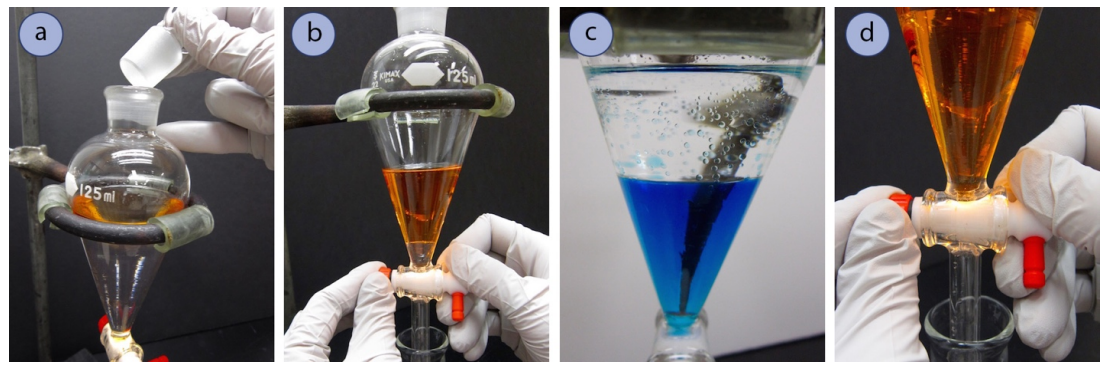
- Place the separatory funnel upright in the ring clamp to allow the layers to fully separate. The interface between the layers should settle rather quickly, often within 10 seconds or so. If the interface is clouded or not well defined (an emulsion has formed), see the next page.
Separate the Layers
- Liquid will not drain well from a separatory funnel if the stopper remains on, as air cannot enter the funnel to replace the displaced liquid. Before draining liquid from a separatory funnel, remove the stopper.
- Drain the majority of the bottom layer into a clean Erlenmeyer flask, positioning the ring clamp so that the tip of the separatory funnel is nestled in the Erlenmeyer flask to prevent splashing. Stop draining when the interface is within 1cm of the bottom of the stopcock.
- Gently swirl the funnel to dislodge any droplets clinging to the glass.
- Further drain the bottom layer, stopping when the interface just enters the stopcock chamber.
Notes:
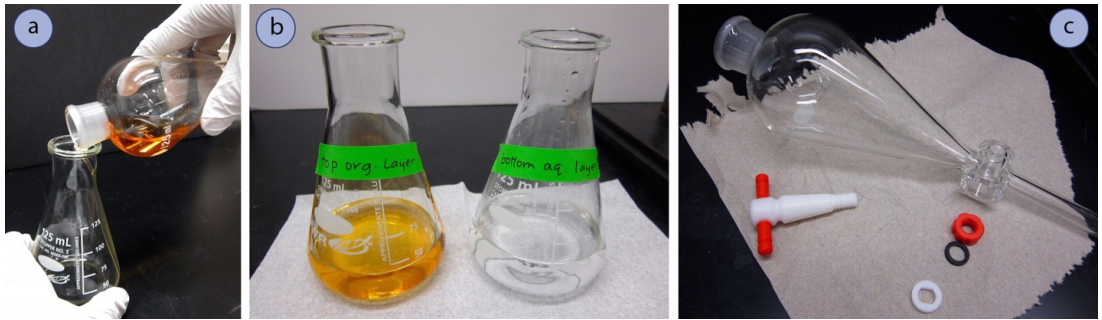
- It is proper technique to drain the bottom layer through the stopcock, and to pour out the top layer from the top of the funnel. This method minimizes re-mixing the solutions, as only the lower layer touches the stem of the funnel.
- Never throw away any liquids from an extraction until you are absolutely sure that you have the desired compound. Undesired layers can be properly disposed of when the desired compound is in your hands (e.g. after the rotary evaporator has removed the solvent). Mistakes made during extractions (e.g. carrying on with the wrong layer), can be solved as long as the solutions have not been placed in the waste container.
- To clean a separatory funnel, first rinse it with acetone into a waste container. Then wash the funnel with soap and water at your benchtop. Disassemble the Teflon stopcock to dry. Then reassemble and put back into your lab drawer.
Adapted from Step-by-step procedure for Extractions (Large Scale) by Lisa Nichols.