
5.6: TLC Procedure
- Page ID
- 536797
\( \newcommand{\vecs}[1]{\overset { \scriptstyle \rightharpoonup} {\mathbf{#1}} } \)
\( \newcommand{\vecd}[1]{\overset{-\!-\!\rightharpoonup}{\vphantom{a}\smash {#1}}} \)
\( \newcommand{\dsum}{\displaystyle\sum\limits} \)
\( \newcommand{\dint}{\displaystyle\int\limits} \)
\( \newcommand{\dlim}{\displaystyle\lim\limits} \)
\( \newcommand{\id}{\mathrm{id}}\) \( \newcommand{\Span}{\mathrm{span}}\)
( \newcommand{\kernel}{\mathrm{null}\,}\) \( \newcommand{\range}{\mathrm{range}\,}\)
\( \newcommand{\RealPart}{\mathrm{Re}}\) \( \newcommand{\ImaginaryPart}{\mathrm{Im}}\)
\( \newcommand{\Argument}{\mathrm{Arg}}\) \( \newcommand{\norm}[1]{\| #1 \|}\)
\( \newcommand{\inner}[2]{\langle #1, #2 \rangle}\)
\( \newcommand{\Span}{\mathrm{span}}\)
\( \newcommand{\id}{\mathrm{id}}\)
\( \newcommand{\Span}{\mathrm{span}}\)
\( \newcommand{\kernel}{\mathrm{null}\,}\)
\( \newcommand{\range}{\mathrm{range}\,}\)
\( \newcommand{\RealPart}{\mathrm{Re}}\)
\( \newcommand{\ImaginaryPart}{\mathrm{Im}}\)
\( \newcommand{\Argument}{\mathrm{Arg}}\)
\( \newcommand{\norm}[1]{\| #1 \|}\)
\( \newcommand{\inner}[2]{\langle #1, #2 \rangle}\)
\( \newcommand{\Span}{\mathrm{span}}\) \( \newcommand{\AA}{\unicode[.8,0]{x212B}}\)
\( \newcommand{\vectorA}[1]{\vec{#1}} % arrow\)
\( \newcommand{\vectorAt}[1]{\vec{\text{#1}}} % arrow\)
\( \newcommand{\vectorB}[1]{\overset { \scriptstyle \rightharpoonup} {\mathbf{#1}} } \)
\( \newcommand{\vectorC}[1]{\textbf{#1}} \)
\( \newcommand{\vectorD}[1]{\overrightarrow{#1}} \)
\( \newcommand{\vectorDt}[1]{\overrightarrow{\text{#1}}} \)
\( \newcommand{\vectE}[1]{\overset{-\!-\!\rightharpoonup}{\vphantom{a}\smash{\mathbf {#1}}}} \)
\( \newcommand{\vecs}[1]{\overset { \scriptstyle \rightharpoonup} {\mathbf{#1}} } \)
\(\newcommand{\longvect}{\overrightarrow}\)
\( \newcommand{\vecd}[1]{\overset{-\!-\!\rightharpoonup}{\vphantom{a}\smash {#1}}} \)
\(\newcommand{\avec}{\mathbf a}\) \(\newcommand{\bvec}{\mathbf b}\) \(\newcommand{\cvec}{\mathbf c}\) \(\newcommand{\dvec}{\mathbf d}\) \(\newcommand{\dtil}{\widetilde{\mathbf d}}\) \(\newcommand{\evec}{\mathbf e}\) \(\newcommand{\fvec}{\mathbf f}\) \(\newcommand{\nvec}{\mathbf n}\) \(\newcommand{\pvec}{\mathbf p}\) \(\newcommand{\qvec}{\mathbf q}\) \(\newcommand{\svec}{\mathbf s}\) \(\newcommand{\tvec}{\mathbf t}\) \(\newcommand{\uvec}{\mathbf u}\) \(\newcommand{\vvec}{\mathbf v}\) \(\newcommand{\wvec}{\mathbf w}\) \(\newcommand{\xvec}{\mathbf x}\) \(\newcommand{\yvec}{\mathbf y}\) \(\newcommand{\zvec}{\mathbf z}\) \(\newcommand{\rvec}{\mathbf r}\) \(\newcommand{\mvec}{\mathbf m}\) \(\newcommand{\zerovec}{\mathbf 0}\) \(\newcommand{\onevec}{\mathbf 1}\) \(\newcommand{\real}{\mathbb R}\) \(\newcommand{\twovec}[2]{\left[\begin{array}{r}#1 \\ #2 \end{array}\right]}\) \(\newcommand{\ctwovec}[2]{\left[\begin{array}{c}#1 \\ #2 \end{array}\right]}\) \(\newcommand{\threevec}[3]{\left[\begin{array}{r}#1 \\ #2 \\ #3 \end{array}\right]}\) \(\newcommand{\cthreevec}[3]{\left[\begin{array}{c}#1 \\ #2 \\ #3 \end{array}\right]}\) \(\newcommand{\fourvec}[4]{\left[\begin{array}{r}#1 \\ #2 \\ #3 \\ #4 \end{array}\right]}\) \(\newcommand{\cfourvec}[4]{\left[\begin{array}{c}#1 \\ #2 \\ #3 \\ #4 \end{array}\right]}\) \(\newcommand{\fivevec}[5]{\left[\begin{array}{r}#1 \\ #2 \\ #3 \\ #4 \\ #5 \\ \end{array}\right]}\) \(\newcommand{\cfivevec}[5]{\left[\begin{array}{c}#1 \\ #2 \\ #3 \\ #4 \\ #5 \\ \end{array}\right]}\) \(\newcommand{\mattwo}[4]{\left[\begin{array}{rr}#1 \amp #2 \\ #3 \amp #4 \\ \end{array}\right]}\) \(\newcommand{\laspan}[1]{\text{Span}\{#1\}}\) \(\newcommand{\bcal}{\cal B}\) \(\newcommand{\ccal}{\cal C}\) \(\newcommand{\scal}{\cal S}\) \(\newcommand{\wcal}{\cal W}\) \(\newcommand{\ecal}{\cal E}\) \(\newcommand{\coords}[2]{\left\{#1\right\}_{#2}}\) \(\newcommand{\gray}[1]{\color{gray}{#1}}\) \(\newcommand{\lgray}[1]{\color{lightgray}{#1}}\) \(\newcommand{\rank}{\operatorname{rank}}\) \(\newcommand{\row}{\text{Row}}\) \(\newcommand{\col}{\text{Col}}\) \(\renewcommand{\row}{\text{Row}}\) \(\newcommand{\nul}{\text{Nul}}\) \(\newcommand{\var}{\text{Var}}\) \(\newcommand{\corr}{\text{corr}}\) \(\newcommand{\len}[1]{\left|#1\right|}\) \(\newcommand{\bbar}{\overline{\bvec}}\) \(\newcommand{\bhat}{\widehat{\bvec}}\) \(\newcommand{\bperp}{\bvec^\perp}\) \(\newcommand{\xhat}{\widehat{\xvec}}\) \(\newcommand{\vhat}{\widehat{\vvec}}\) \(\newcommand{\uhat}{\widehat{\uvec}}\) \(\newcommand{\what}{\widehat{\wvec}}\) \(\newcommand{\Sighat}{\widehat{\Sigma}}\) \(\newcommand{\lt}{<}\) \(\newcommand{\gt}{>}\) \(\newcommand{\amp}{&}\) \(\definecolor{fillinmathshade}{gray}{0.9}\)Prepare the Samples, TLC Chamber, and Plate

- Dissolve a small amount of solid a small vial or test tube using acetone.
- Obtain a TLC chamber with lid. Cut a piece of filter paper so that when placed in the chamber, the filter paper fits inside the chamber and is flat on the bottom but not obscuring your view of the inside. The filter paper keeps the chamber saturated with vapors so when the eluent rises on the plate it doesn't easily evaporate..
- Add a portion of a prepared solvent for chromatography (5-10 mL for this type of TLC chamber). Close the lid and tilt the chamber to wet the filter paper.
- Obtain a TLC plate, touching the plate only on the back or edges, but not on the white surface. Use a rule to lightly draw a straight line with a pencil roughly 1 cm from the bottom. Do not use pen as the ink will separate along with your samples and the plate cannot be used.
.png?revision=1&size=bestfit&width=1111&height=393)
5. Label the areas with pencil where you plan to place the samples. The lanes should not be placed too close to the edge (keep at least 5mm away from each edge), as it is not unusual for solvent to travel slightly "fast" at the edge where capillary action of the solvent is greater. You should be able to place 3-5 spots on each plate. The lanes should also not be placed too close to one another, or the spots may overlap after elution. Spot broadening means that samples deposited right next to each other on the baseline of a TLC plate will probably bleed together during elution.
.png?revision=1&size=bestfit&width=660&height=382)
Spot the TLC plate with sample
- Obtain a capillary spotter (a very thin hollow piece of glass open at both ends). Place your spotter into the diluted sample you want to analyze to withdraw liquid into the spotter through capillary action.
- Keeping the spotter mostly vertical, make a practice "spot" on a paper towel or scrap piece of silica or alumina to familiarize yourself with how the liquid delivers from the spotter. The spots should be very small, around 2 mm in diameter. Deliver a very small spot of material on the pencil line of the appropriate lane using a quick "up and down" motion with your hand. Don't gouge the silica or alumina with the spotter.
- Dispose of the spotter in the broken glass container and use a new spotter for each sample.

Place the TLC plate in the chamber to "elute"
- Use forceps to delicately place the TLC plate into the chamber. Be sure that the plate touches the solvent perpendicular to the solvent, and not at an angle. This can cause the solvent to travel up the plate unevenly. The liquid level must be below the pencil line where the samples are spotted or the compounds will dissolve in the pool of eluent instead of traveling up the plate. Cap the chamber delicately and don't touch it again until the TLC is complete.
- Allow the TLC to develop. As liquid moves up the TLC plate it will appear transparent and wet. If the eluent is very polar (e.g. contains large amounts of ethanol or water), elution will take a relatively long time (can be 30-40 minutes). If the eluent is very nonpolar (e.g. contains large amounts of hexane or petroleum ether), elution will be relatively quick (can be 2-5 minutes for a 10 cm tall plate).
- It is best to let the TLC run to around 0.5cm from the top of the plate to get the best separation of spots and to minimize error in Rf calculations.
.png?revision=1&size=bestfit&width=1103&height=385)
Remove the TLC plate from the chamber
- Open the TLC chamber, and remove the TLC plate with forceps. Immediately mark the solvent line with a pencil to enable an Rf calculation, as the solvent often readily evaporates.
- If the compounds on the TLC plate are colored, the process is complete. If the compounds are colorless, they need to next be visualized. Visualization techniques are described on the next page.
TLC Troubleshooting
The spots are streaky or "blobby"
The components of a sample can appear as long streaks or "blobby" spots on a TLC plate if the samples are run at too high a concentration. The TLC plate can become overload and proper equilibration between stationary and mobile phases does not occur. Running TLC on concentrated samples gives inaccurate Rf values and may hide multiple spots. If streaking is seen on a TLC plate, the sample should be diluted and run again.
.png?revision=1&size=bestfit&width=886&height=370)
The spots ran unevenly
At times the solvent front may run unevenly on a TLC plate. This may occur if the plate was placed in the chamber at a slight tilt, if eluent splashed onto the plate during placement in the chamber, or if the chamber was jostled during elution. In cases where the front is dramatically different from one position to the other, the front should be measured for each lane of the plate (if calculating an Rf) instead of only once, or the plate should be remade and run again.
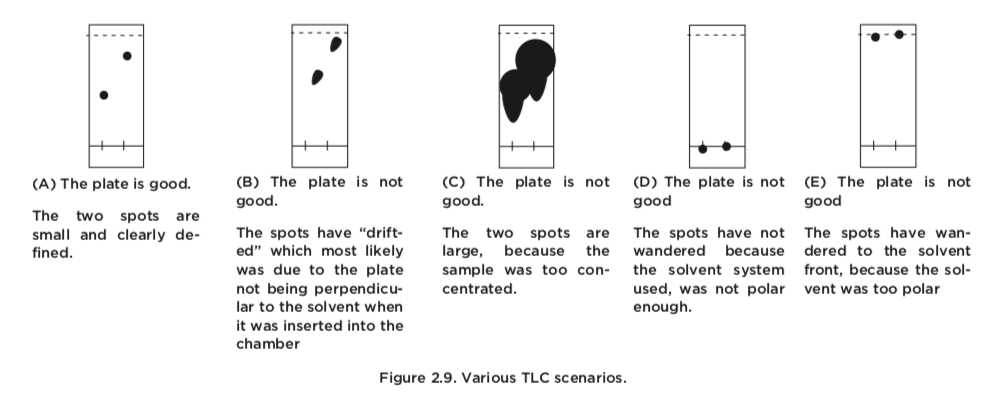
TLC analyses require a fair amount of care to get right. The most likely problems can be traced to the application and preparation of the TLC plate. Let us have a closer look at some TLC plates that are of inadequate quality and their causes.
Notebook Record of TLC
It is important to copy a TLC plate "to scale", meaning the dimensions should be the same in the notebook as they are in actuality. It is important to copy the TLC plate as accurately as possible, drawing the spots exactly as they appear, even if they are streaky or blobby. All spots seen in a lane should be recorded, even if they are faint. Good record keeping means to record all observations, even if the importance is unknown; a faint, unexpected spot may become relevant at a later time.
.png?revision=1&size=bestfit&width=1110&height=446)
Several other notations should be made along with the sketch of the TLC pate. The solvent system and identity of what was spotted in each lane must be recorded. For each spot, an Rf should be calculated along with notation of UV activity. If a spot changes appearance over time, as the orange spot in Figure 2.29b faded to light green over time, the initial appearance should be recorded.
Adapted from Step-by-Step Procedures for Thin Layer Chromatography by Lisa Nichols.