
4.3: Miller Indices (hkl)
- Page ID
- 364841

\( \newcommand{\vecs}[1]{\overset { \scriptstyle \rightharpoonup} {\mathbf{#1}} } \)
\( \newcommand{\vecd}[1]{\overset{-\!-\!\rightharpoonup}{\vphantom{a}\smash {#1}}} \)
\( \newcommand{\dsum}{\displaystyle\sum\limits} \)
\( \newcommand{\dint}{\displaystyle\int\limits} \)
\( \newcommand{\dlim}{\displaystyle\lim\limits} \)
\( \newcommand{\id}{\mathrm{id}}\) \( \newcommand{\Span}{\mathrm{span}}\)
( \newcommand{\kernel}{\mathrm{null}\,}\) \( \newcommand{\range}{\mathrm{range}\,}\)
\( \newcommand{\RealPart}{\mathrm{Re}}\) \( \newcommand{\ImaginaryPart}{\mathrm{Im}}\)
\( \newcommand{\Argument}{\mathrm{Arg}}\) \( \newcommand{\norm}[1]{\| #1 \|}\)
\( \newcommand{\inner}[2]{\langle #1, #2 \rangle}\)
\( \newcommand{\Span}{\mathrm{span}}\)
\( \newcommand{\id}{\mathrm{id}}\)
\( \newcommand{\Span}{\mathrm{span}}\)
\( \newcommand{\kernel}{\mathrm{null}\,}\)
\( \newcommand{\range}{\mathrm{range}\,}\)
\( \newcommand{\RealPart}{\mathrm{Re}}\)
\( \newcommand{\ImaginaryPart}{\mathrm{Im}}\)
\( \newcommand{\Argument}{\mathrm{Arg}}\)
\( \newcommand{\norm}[1]{\| #1 \|}\)
\( \newcommand{\inner}[2]{\langle #1, #2 \rangle}\)
\( \newcommand{\Span}{\mathrm{span}}\) \( \newcommand{\AA}{\unicode[.8,0]{x212B}}\)
\( \newcommand{\vectorA}[1]{\vec{#1}} % arrow\)
\( \newcommand{\vectorAt}[1]{\vec{\text{#1}}} % arrow\)
\( \newcommand{\vectorB}[1]{\overset { \scriptstyle \rightharpoonup} {\mathbf{#1}} } \)
\( \newcommand{\vectorC}[1]{\textbf{#1}} \)
\( \newcommand{\vectorD}[1]{\overrightarrow{#1}} \)
\( \newcommand{\vectorDt}[1]{\overrightarrow{\text{#1}}} \)
\( \newcommand{\vectE}[1]{\overset{-\!-\!\rightharpoonup}{\vphantom{a}\smash{\mathbf {#1}}}} \)
\( \newcommand{\vecs}[1]{\overset { \scriptstyle \rightharpoonup} {\mathbf{#1}} } \)
\(\newcommand{\longvect}{\overrightarrow}\)
\( \newcommand{\vecd}[1]{\overset{-\!-\!\rightharpoonup}{\vphantom{a}\smash {#1}}} \)
\(\newcommand{\avec}{\mathbf a}\) \(\newcommand{\bvec}{\mathbf b}\) \(\newcommand{\cvec}{\mathbf c}\) \(\newcommand{\dvec}{\mathbf d}\) \(\newcommand{\dtil}{\widetilde{\mathbf d}}\) \(\newcommand{\evec}{\mathbf e}\) \(\newcommand{\fvec}{\mathbf f}\) \(\newcommand{\nvec}{\mathbf n}\) \(\newcommand{\pvec}{\mathbf p}\) \(\newcommand{\qvec}{\mathbf q}\) \(\newcommand{\svec}{\mathbf s}\) \(\newcommand{\tvec}{\mathbf t}\) \(\newcommand{\uvec}{\mathbf u}\) \(\newcommand{\vvec}{\mathbf v}\) \(\newcommand{\wvec}{\mathbf w}\) \(\newcommand{\xvec}{\mathbf x}\) \(\newcommand{\yvec}{\mathbf y}\) \(\newcommand{\zvec}{\mathbf z}\) \(\newcommand{\rvec}{\mathbf r}\) \(\newcommand{\mvec}{\mathbf m}\) \(\newcommand{\zerovec}{\mathbf 0}\) \(\newcommand{\onevec}{\mathbf 1}\) \(\newcommand{\real}{\mathbb R}\) \(\newcommand{\twovec}[2]{\left[\begin{array}{r}#1 \\ #2 \end{array}\right]}\) \(\newcommand{\ctwovec}[2]{\left[\begin{array}{c}#1 \\ #2 \end{array}\right]}\) \(\newcommand{\threevec}[3]{\left[\begin{array}{r}#1 \\ #2 \\ #3 \end{array}\right]}\) \(\newcommand{\cthreevec}[3]{\left[\begin{array}{c}#1 \\ #2 \\ #3 \end{array}\right]}\) \(\newcommand{\fourvec}[4]{\left[\begin{array}{r}#1 \\ #2 \\ #3 \\ #4 \end{array}\right]}\) \(\newcommand{\cfourvec}[4]{\left[\begin{array}{c}#1 \\ #2 \\ #3 \\ #4 \end{array}\right]}\) \(\newcommand{\fivevec}[5]{\left[\begin{array}{r}#1 \\ #2 \\ #3 \\ #4 \\ #5 \\ \end{array}\right]}\) \(\newcommand{\cfivevec}[5]{\left[\begin{array}{c}#1 \\ #2 \\ #3 \\ #4 \\ #5 \\ \end{array}\right]}\) \(\newcommand{\mattwo}[4]{\left[\begin{array}{rr}#1 \amp #2 \\ #3 \amp #4 \\ \end{array}\right]}\) \(\newcommand{\laspan}[1]{\text{Span}\{#1\}}\) \(\newcommand{\bcal}{\cal B}\) \(\newcommand{\ccal}{\cal C}\) \(\newcommand{\scal}{\cal S}\) \(\newcommand{\wcal}{\cal W}\) \(\newcommand{\ecal}{\cal E}\) \(\newcommand{\coords}[2]{\left\{#1\right\}_{#2}}\) \(\newcommand{\gray}[1]{\color{gray}{#1}}\) \(\newcommand{\lgray}[1]{\color{lightgray}{#1}}\) \(\newcommand{\rank}{\operatorname{rank}}\) \(\newcommand{\row}{\text{Row}}\) \(\newcommand{\col}{\text{Col}}\) \(\renewcommand{\row}{\text{Row}}\) \(\newcommand{\nul}{\text{Nul}}\) \(\newcommand{\var}{\text{Var}}\) \(\newcommand{\corr}{\text{corr}}\) \(\newcommand{\len}[1]{\left|#1\right|}\) \(\newcommand{\bbar}{\overline{\bvec}}\) \(\newcommand{\bhat}{\widehat{\bvec}}\) \(\newcommand{\bperp}{\bvec^\perp}\) \(\newcommand{\xhat}{\widehat{\xvec}}\) \(\newcommand{\vhat}{\widehat{\vvec}}\) \(\newcommand{\uhat}{\widehat{\uvec}}\) \(\newcommand{\what}{\widehat{\wvec}}\) \(\newcommand{\Sighat}{\widehat{\Sigma}}\) \(\newcommand{\lt}{<}\) \(\newcommand{\gt}{>}\) \(\newcommand{\amp}{&}\) \(\definecolor{fillinmathshade}{gray}{0.9}\)Miller indices
The orientation of a surface or a crystal plane may be defined by considering how the plane (or indeed any parallel plane) intersects the main crystallographic axes of the solid. The application of a set of rules leads to the assignment of the Miller Indices (hkl), which are a set of numbers which quantify the intercepts and thus may be used to uniquely identify the plane or surface.
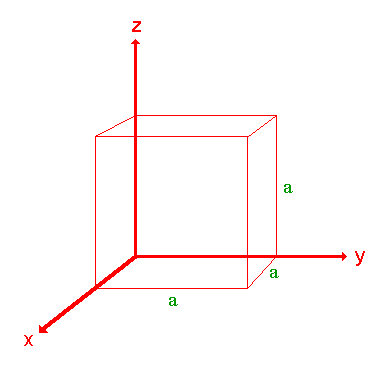
The following treatment of the procedure used to assign the Miller Indices is a simplified one and only a cubic crystal system (one having a cubic unit cell with dimensions a x a x a ) will be considered.
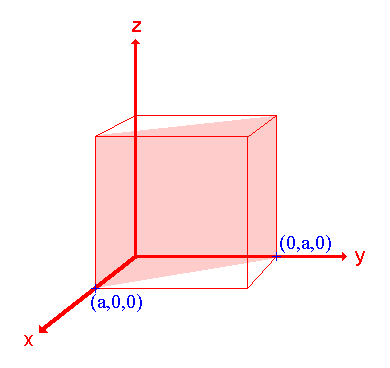
The procedure is most easily illustrated using an example so we will first consider the following surface/plane:
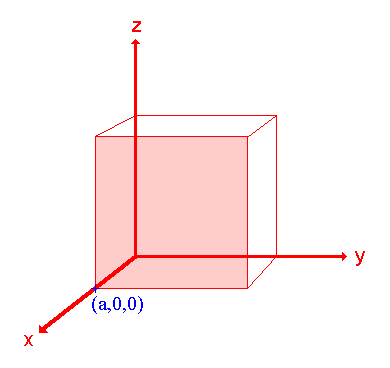
Step 1: Identify the intercepts on the x- , y- and z- axes.
In this case the intercept on the x-axis is at x = a ( at the point (a,0,0) ), but the surface is parallel to the y- and z-axes - strictly therefore there is no intercept on these two axes but we shall consider the intercept to be at infinity (∞) for the special case where the plane is parallel to an axis. The intercepts on the x- , y- and z-axes are thus a , ∞ , ∞.
Step 2: Specify the intercepts in fractional co-ordinates
Co-ordinates are converted to fractional co-ordinates by dividing by the respective cell-dimension - for example, a point (x,y,z) in a unit cell of dimensions a x b x c has fractional co-ordinates of (x/a , y/b , z/c). In the case of a cubic unit cell each co-ordinate will simply be divided by the cubic cell constant, a. This gives
Fractional Intercepts = a/a , ∞/a, ∞/a i.e. 1 , ∞ , ∞.
Step 3: Take the reciprocals of the fractional intercepts
This final manipulation generates the Miller Indices which (by convention) should then be specified without being separated by any commas or other symbols. The Miller Indices are also enclosed within standard brackets (….) when one is specifying a unique surface such as that being considered here.
The reciprocals of 1 and ∞ are 1 and 0 respectively, thus yielding Miller Indices (100).
So the surface/plane illustrated is the (100) plane of the cubic crystal.
Other Examples
1. The (110) surface
|
|
Assignment Intercepts: a , a , ∞ Fractional intercepts: 1 , 1 , ∞ Miller Indices: (110) |
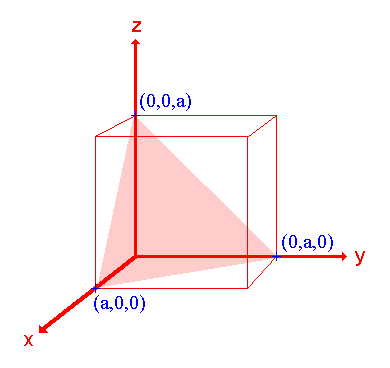
2. The (111) surface
|
|
Assignment Intercepts: a , a , a Fractional intercepts: 1 , 1 , 1 Miller Indices: (111) |
The (100), (110) and (111) surfaces considered above are the so-called low index surfaces of a cubic crystal system (the "low" refers to the Miller indices being small numbers - 0 or 1 in this case). These surfaces have a particular importance but there an infinite number of other planes that may be defined using Miller index notation. We shall just look at one more …
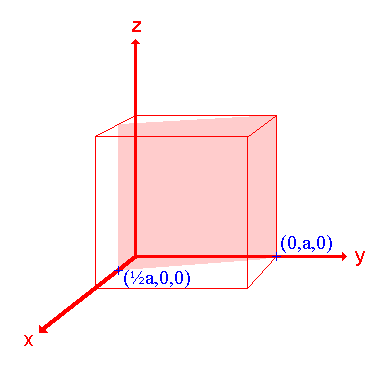
3. The (210) surface
|
|
Assignment Intercepts: ½ a , a , ∞ Fractional intercepts: ½ , 1 , ∞ Miller Indices: (210) |
Structure factor
The diffraction pattern appears as dots in patterns. The circles in the diffraction patterns with smaller radii correspond to smaller h, k, l values. In certain types of unit cells, not all the lattice planes will have their diffraction observed, which is usually called a systematic absence, because the diffracted beam may happen to be out of phase by 180° and the overall intensity is zero. Structure factor, Fhkl, can decide the systematic absences and intensities. Systematic absences arise when F=0, so no diffraction is observed. For example:
For a fcc crystal, Fhkl=f{1+eπi(h+l)+eπi(k+l)+eπi(h+k)}. When h, k, l are all odd or all even, F=4f. For the other situation, F=0 and thus diffraction intensity will also be zero. Structure factor is important in the structure determination step because it helps understand the Miller indices and intensities of diffraction peaks. The other common rules for reflection to be observed are as follows:
|
Lattice type |
Rule for reflection to be observed |
|---|---|
|
Primitive, P |
None |
|
Body centered, I |
hkl: h+k+l=2n |
|
Face centered, F |
hkl: h, k, l either all odd or all even |
|
Side centered, C |
hkl: h+k=2n |
|
Rhombohedral, R |
hkl: -h+k+l=3n or (h-k+l=3n) |
Further notes:
- in some instances the Miller indices are best multiplied or divided through by a common number in order to simplify them by, for example, removing a common factor. This operation of multiplication simply generates a parallel plane which is at a different distance from the origin of the particular unit cell being considered. e.g. (200) is transformed to (100) by dividing through by 2 .
- if any of the intercepts are at negative values on the axes then the negative sign will carry through into the Miller indices; in such cases the negative sign is actually denoted by overstriking the relevant number. e.g. (00-1) is instead denoted by (00\(\overline{1}\nonumber\))
- in the hcp crystal system there are four principal axes; this leads to four Miller Indices e.g. you may see articles referring to an hcp (0001) surface. It is worth noting, however, that the intercepts on the first three axes are necessarily related and not completely independent; consequently the values of the first three Miller indices are also linked by a simple mathematical relationship.
Contributors and Attributions
Roger Nix (Queen Mary, University of London)