5.5D: Step-by-Step Procedures for Steam Distillation
- Page ID
- 95725
\( \newcommand{\vecs}[1]{\overset { \scriptstyle \rightharpoonup} {\mathbf{#1}} } \)
\( \newcommand{\vecd}[1]{\overset{-\!-\!\rightharpoonup}{\vphantom{a}\smash {#1}}} \)
\( \newcommand{\id}{\mathrm{id}}\) \( \newcommand{\Span}{\mathrm{span}}\)
( \newcommand{\kernel}{\mathrm{null}\,}\) \( \newcommand{\range}{\mathrm{range}\,}\)
\( \newcommand{\RealPart}{\mathrm{Re}}\) \( \newcommand{\ImaginaryPart}{\mathrm{Im}}\)
\( \newcommand{\Argument}{\mathrm{Arg}}\) \( \newcommand{\norm}[1]{\| #1 \|}\)
\( \newcommand{\inner}[2]{\langle #1, #2 \rangle}\)
\( \newcommand{\Span}{\mathrm{span}}\)
\( \newcommand{\id}{\mathrm{id}}\)
\( \newcommand{\Span}{\mathrm{span}}\)
\( \newcommand{\kernel}{\mathrm{null}\,}\)
\( \newcommand{\range}{\mathrm{range}\,}\)
\( \newcommand{\RealPart}{\mathrm{Re}}\)
\( \newcommand{\ImaginaryPart}{\mathrm{Im}}\)
\( \newcommand{\Argument}{\mathrm{Arg}}\)
\( \newcommand{\norm}[1]{\| #1 \|}\)
\( \newcommand{\inner}[2]{\langle #1, #2 \rangle}\)
\( \newcommand{\Span}{\mathrm{span}}\) \( \newcommand{\AA}{\unicode[.8,0]{x212B}}\)
\( \newcommand{\vectorA}[1]{\vec{#1}} % arrow\)
\( \newcommand{\vectorAt}[1]{\vec{\text{#1}}} % arrow\)
\( \newcommand{\vectorB}[1]{\overset { \scriptstyle \rightharpoonup} {\mathbf{#1}} } \)
\( \newcommand{\vectorC}[1]{\textbf{#1}} \)
\( \newcommand{\vectorD}[1]{\overrightarrow{#1}} \)
\( \newcommand{\vectorDt}[1]{\overrightarrow{\text{#1}}} \)
\( \newcommand{\vectE}[1]{\overset{-\!-\!\rightharpoonup}{\vphantom{a}\smash{\mathbf {#1}}}} \)
\( \newcommand{\vecs}[1]{\overset { \scriptstyle \rightharpoonup} {\mathbf{#1}} } \)
\( \newcommand{\vecd}[1]{\overset{-\!-\!\rightharpoonup}{\vphantom{a}\smash {#1}}} \)
\(\newcommand{\avec}{\mathbf a}\) \(\newcommand{\bvec}{\mathbf b}\) \(\newcommand{\cvec}{\mathbf c}\) \(\newcommand{\dvec}{\mathbf d}\) \(\newcommand{\dtil}{\widetilde{\mathbf d}}\) \(\newcommand{\evec}{\mathbf e}\) \(\newcommand{\fvec}{\mathbf f}\) \(\newcommand{\nvec}{\mathbf n}\) \(\newcommand{\pvec}{\mathbf p}\) \(\newcommand{\qvec}{\mathbf q}\) \(\newcommand{\svec}{\mathbf s}\) \(\newcommand{\tvec}{\mathbf t}\) \(\newcommand{\uvec}{\mathbf u}\) \(\newcommand{\vvec}{\mathbf v}\) \(\newcommand{\wvec}{\mathbf w}\) \(\newcommand{\xvec}{\mathbf x}\) \(\newcommand{\yvec}{\mathbf y}\) \(\newcommand{\zvec}{\mathbf z}\) \(\newcommand{\rvec}{\mathbf r}\) \(\newcommand{\mvec}{\mathbf m}\) \(\newcommand{\zerovec}{\mathbf 0}\) \(\newcommand{\onevec}{\mathbf 1}\) \(\newcommand{\real}{\mathbb R}\) \(\newcommand{\twovec}[2]{\left[\begin{array}{r}#1 \\ #2 \end{array}\right]}\) \(\newcommand{\ctwovec}[2]{\left[\begin{array}{c}#1 \\ #2 \end{array}\right]}\) \(\newcommand{\threevec}[3]{\left[\begin{array}{r}#1 \\ #2 \\ #3 \end{array}\right]}\) \(\newcommand{\cthreevec}[3]{\left[\begin{array}{c}#1 \\ #2 \\ #3 \end{array}\right]}\) \(\newcommand{\fourvec}[4]{\left[\begin{array}{r}#1 \\ #2 \\ #3 \\ #4 \end{array}\right]}\) \(\newcommand{\cfourvec}[4]{\left[\begin{array}{c}#1 \\ #2 \\ #3 \\ #4 \end{array}\right]}\) \(\newcommand{\fivevec}[5]{\left[\begin{array}{r}#1 \\ #2 \\ #3 \\ #4 \\ #5 \\ \end{array}\right]}\) \(\newcommand{\cfivevec}[5]{\left[\begin{array}{c}#1 \\ #2 \\ #3 \\ #4 \\ #5 \\ \end{array}\right]}\) \(\newcommand{\mattwo}[4]{\left[\begin{array}{rr}#1 \amp #2 \\ #3 \amp #4 \\ \end{array}\right]}\) \(\newcommand{\laspan}[1]{\text{Span}\{#1\}}\) \(\newcommand{\bcal}{\cal B}\) \(\newcommand{\ccal}{\cal C}\) \(\newcommand{\scal}{\cal S}\) \(\newcommand{\wcal}{\cal W}\) \(\newcommand{\ecal}{\cal E}\) \(\newcommand{\coords}[2]{\left\{#1\right\}_{#2}}\) \(\newcommand{\gray}[1]{\color{gray}{#1}}\) \(\newcommand{\lgray}[1]{\color{lightgray}{#1}}\) \(\newcommand{\rank}{\operatorname{rank}}\) \(\newcommand{\row}{\text{Row}}\) \(\newcommand{\col}{\text{Col}}\) \(\renewcommand{\row}{\text{Row}}\) \(\newcommand{\nul}{\text{Nul}}\) \(\newcommand{\var}{\text{Var}}\) \(\newcommand{\corr}{\text{corr}}\) \(\newcommand{\len}[1]{\left|#1\right|}\) \(\newcommand{\bbar}{\overline{\bvec}}\) \(\newcommand{\bhat}{\widehat{\bvec}}\) \(\newcommand{\bperp}{\bvec^\perp}\) \(\newcommand{\xhat}{\widehat{\xvec}}\) \(\newcommand{\vhat}{\widehat{\vvec}}\) \(\newcommand{\uhat}{\widehat{\uvec}}\) \(\newcommand{\what}{\widehat{\wvec}}\) \(\newcommand{\Sighat}{\widehat{\Sigma}}\) \(\newcommand{\lt}{<}\) \(\newcommand{\gt}{>}\) \(\newcommand{\amp}{&}\) \(\definecolor{fillinmathshade}{gray}{0.9}\)Steam Distillation Procedure
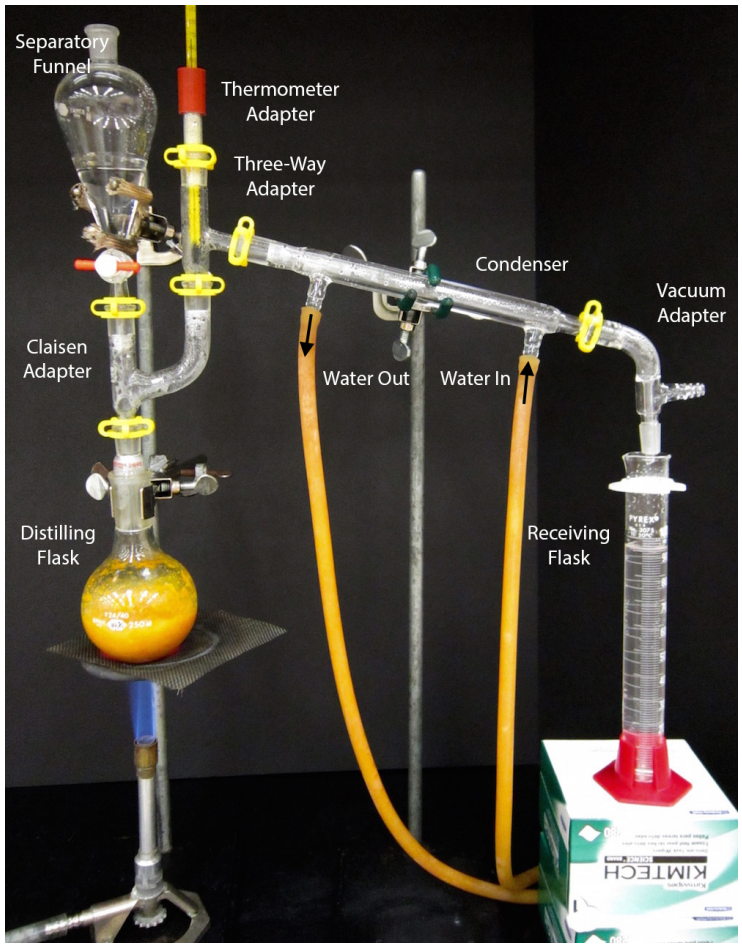
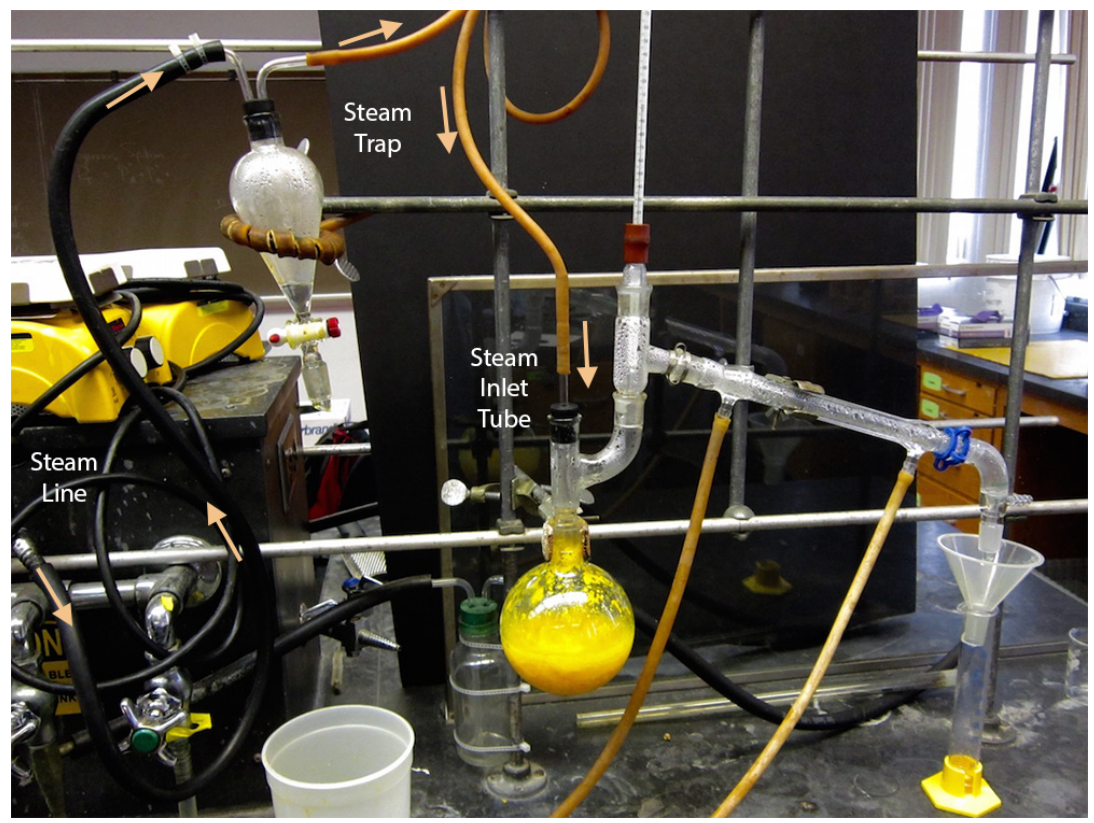
A steam distillation apparatus is shown in Figure 5.58 that uses boiling water in the distilling flask. An apparatus using a steam line is shown in Figure 5.59. It is assumed that readers have previously performed a simple distillation, so in this section are described differences between simple and steam distillations.
Prepare the Setup
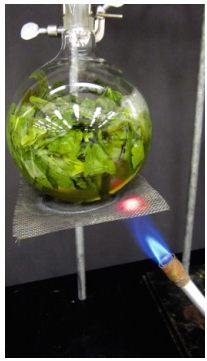
- Place the plant material to be extracted into a large round bottomed flask with a 24/40 joint (wide mouth), no more than half full. A large amount of material is often necessary as the bulk of plants is cellulose, not oil. Use of a 14/20 flask (more narrow mouth) would make it difficult to remove the plant materials after distillation.
- Use an extension clamp to secure the large flask to the ring stand or latticework. If desired, further secure the setup with a platform (e.g. ring clamp and wire mesh as in Figure 5.58).
- Add water to the distilling flask to just cover the plant material.
- Always use a Claisen adapter in the setup as plant materials commonly foam with heating and there is often a great amount of turbulence in the distilling flask (see splashing in the flask in Figure 5.59).
- Two variations of steam distillation are regularly used: one where steam is directly generated by heating water in the distilling flask with a Bunsen burner (Figure 5.58), and another where steam is indirectly generated by a steam line in the building (Figure 5.59).
Although burners are not commonly used with the distillation of organic compounds, they are relatively safe in steam distillations because: a) the majority of the vapor produced by the solution is typically water rather than organic compounds, so the vapor is not particularly flammable, b) The distillate may be somewhat flammable, but is a distance away from the heat source. - To the top of the Claisen adapter, connect one of the following, depending on the variation of distillation used:
- If water will be heated in the distilling flask along with a burner:
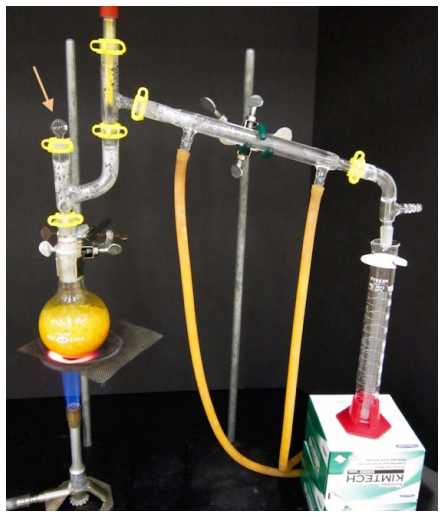
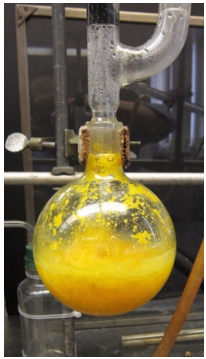
- Attach a stopper to close the system (indicated by the arrow in Figure 5.60) if the quantity of water will be sufficient for the distillation.
- Attach a \(125 \: \text{mL}\) separatory funnel (which must have a ground glass joint below the stopcock) if it is anticipated that water will need to be replenished during the distillation. Clamp and partially fill this separatory funnel with water (Figure 5.58).
- If a steam line will be used:
- Insert a steam inlet tube, and position it so the outlet is just raised above the bottom of the flask. Connect this tube to a separatory funnel trap attached to the steam line (Figure 5.59).
- If water will be heated in the distilling flask along with a burner:
- The receiving flask can be a graduated cylinder, Erlenmeyer flask, or round bottomed flask.
Begin Distilling
- Begin heating the flask:
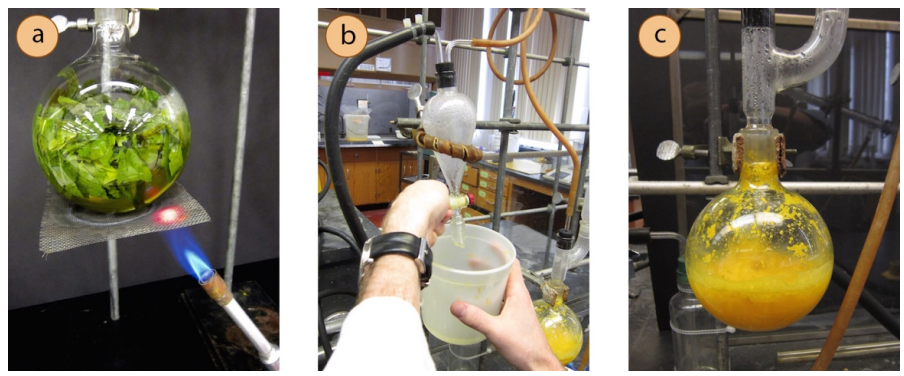
- If using a Bunsen burner, initially heat the flask at a rapid rate (it takes a lot of energy to boil water), but once the solution is boiling or foaming, turn down the burner and/or wave the burner in order to moderate the distillation rate (Figure 5.61a).
- If using a steam line, open the stopcock in the separatory funnel steam trap. Turn on the steam, and allow the water in the steam line to drain through the funnel and into a container (Figure 5.61b). Close the stopcock when it appears that most of what is coming out of the steam line is steam and not water. Adjust the steam rate so that the steam bubbles vigorously through the liquid in the distilling flask (Figure 5.61c).
- Collect distillate at a rate of 1 drop every second. The distillate will contain both water and oil, and may look one of two ways.
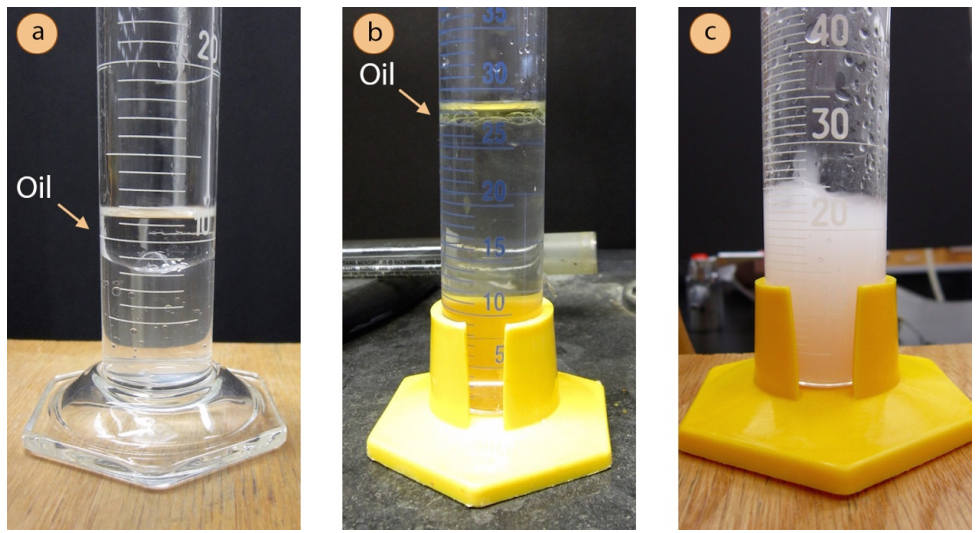
- A second layer may form, or the distillate may appear to have oily droplets clinging to the sides of the flask. This happens when the oil is very nonpolar (e.g. Figure 5.62a+b show the distillate of orange oil, which is almost entirely composed of hydrocarbons).
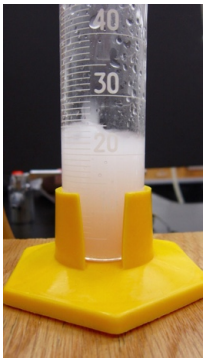
- The distillate may also appear cloudy or "milky" (Figure 5.62c shows the cloudy distillate of clove oil). A cloudy mixture forms when tiny insoluble particles are dispersed throughout the suspension. This tends to happen when the oil is water-insoluble but contains some polar functional groups (e.g. large compounds with a few alcohol or ether functional groups).
- If using a steam line, the steam rate will need to be reduced once the distillation begins.
- If not use a steam line, be sure to replenish the water in the distilling flask if the level gets too low (if the liquid in the distilling flask is getting thick). Heating a solution which is too concentrated can sometimes cause sugars in the plant material to caramelize, making cleanup difficult. To replenish water either:
- Temporarily open the stopper on the Claisen adapter and add water via wash bottle.
- If using a separatory funnel on the Claisen adapter, turn the stopcock to gradually pour in water. If water is drained too quickly so that it pools in the Claisen adapter, it will be difficult to drain into the distilling flask for the same reason that a separatory funnel doesn't drain with its stopper in place. Draining water from the separatory funnel slowly prevents this from happening.
Stop the Distillation
- If following a procedure, collect the recommended quantity of distillate. If the distillate is milky, the distillation can be ceased when the distillate dripping from the vacuum adapter clarifies, indicating that only water is condensing.
- If using a steam line, fully drain the liquid in the separatory funnel steam trap (and leave open) before turning off the steam. If water is in the funnel when the steam line is turned off, suction formed by the trap cooling faster than the distilling flask may pull liquid from the distilling flask into the steam trap (sometimes violently).
Isolate the Oil
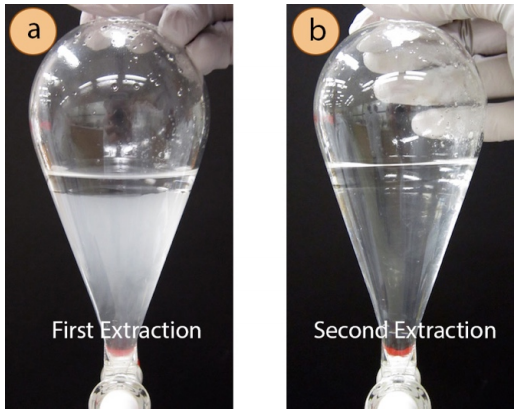
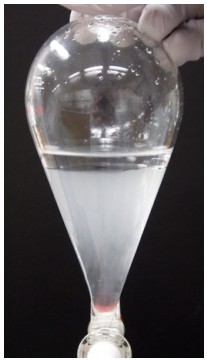
- If the oil separates from the distillate as in Figure 5.62a, it can be removed via pipette, dried with a drying agent (such as \(\ce{Na_2SO_4}\)) and analyzed directly. If milky as in Figure 5.62c, the oil must be extracted into an organic solvent, dried with a drying agent (such as \(\ce{MgSO_4}\)), and solvent removed with the rotary evaporator. Three extractions are typically necessary to fully extract the oil from a milky distillate into an organic solvent. In the extraction of the milky clove oil distillate from Figure 5.62c, notice how the aqueous layer (bottom) remains milky after the first extraction (Figure 5.63a). This milky appearance shows that the oil was not fully removed with one extraction. The aqueous layer clarifies with the second extraction (Figure 5.63b) demonstrating the importance of multiple extractions.
Steam Distillation Summary

 |
 |
 |
 |
|
Place large amount of plant material in a large round bottomed flask (no more than half full), and just cover with water. Always use a Claisen adapter, as there is often turbulence in the flask. |
Two variations are common:
|
Collect the distillate at a rate of 1 drop per second. The distillate may appear cloudy, or a second layer may form on the top. If milky, the distillation can be ceased when the distillate is clear. |
If a steam line was used, be sure to drain the liquid from the steam trap before turning off the steam, to prevent back suction. Separated oil can be pipetted (then dried with \(\ce{Na_2SO_4}\)), while milky distillates need to be extracted. |


