
1.3B: Transferring Methods - Liquids
- Page ID
- 93192

\( \newcommand{\vecs}[1]{\overset { \scriptstyle \rightharpoonup} {\mathbf{#1}} } \)
\( \newcommand{\vecd}[1]{\overset{-\!-\!\rightharpoonup}{\vphantom{a}\smash {#1}}} \)
\( \newcommand{\id}{\mathrm{id}}\) \( \newcommand{\Span}{\mathrm{span}}\)
( \newcommand{\kernel}{\mathrm{null}\,}\) \( \newcommand{\range}{\mathrm{range}\,}\)
\( \newcommand{\RealPart}{\mathrm{Re}}\) \( \newcommand{\ImaginaryPart}{\mathrm{Im}}\)
\( \newcommand{\Argument}{\mathrm{Arg}}\) \( \newcommand{\norm}[1]{\| #1 \|}\)
\( \newcommand{\inner}[2]{\langle #1, #2 \rangle}\)
\( \newcommand{\Span}{\mathrm{span}}\)
\( \newcommand{\id}{\mathrm{id}}\)
\( \newcommand{\Span}{\mathrm{span}}\)
\( \newcommand{\kernel}{\mathrm{null}\,}\)
\( \newcommand{\range}{\mathrm{range}\,}\)
\( \newcommand{\RealPart}{\mathrm{Re}}\)
\( \newcommand{\ImaginaryPart}{\mathrm{Im}}\)
\( \newcommand{\Argument}{\mathrm{Arg}}\)
\( \newcommand{\norm}[1]{\| #1 \|}\)
\( \newcommand{\inner}[2]{\langle #1, #2 \rangle}\)
\( \newcommand{\Span}{\mathrm{span}}\) \( \newcommand{\AA}{\unicode[.8,0]{x212B}}\)
\( \newcommand{\vectorA}[1]{\vec{#1}} % arrow\)
\( \newcommand{\vectorAt}[1]{\vec{\text{#1}}} % arrow\)
\( \newcommand{\vectorB}[1]{\overset { \scriptstyle \rightharpoonup} {\mathbf{#1}} } \)
\( \newcommand{\vectorC}[1]{\textbf{#1}} \)
\( \newcommand{\vectorD}[1]{\overrightarrow{#1}} \)
\( \newcommand{\vectorDt}[1]{\overrightarrow{\text{#1}}} \)
\( \newcommand{\vectE}[1]{\overset{-\!-\!\rightharpoonup}{\vphantom{a}\smash{\mathbf {#1}}}} \)
\( \newcommand{\vecs}[1]{\overset { \scriptstyle \rightharpoonup} {\mathbf{#1}} } \)
\( \newcommand{\vecd}[1]{\overset{-\!-\!\rightharpoonup}{\vphantom{a}\smash {#1}}} \)
\(\newcommand{\avec}{\mathbf a}\) \(\newcommand{\bvec}{\mathbf b}\) \(\newcommand{\cvec}{\mathbf c}\) \(\newcommand{\dvec}{\mathbf d}\) \(\newcommand{\dtil}{\widetilde{\mathbf d}}\) \(\newcommand{\evec}{\mathbf e}\) \(\newcommand{\fvec}{\mathbf f}\) \(\newcommand{\nvec}{\mathbf n}\) \(\newcommand{\pvec}{\mathbf p}\) \(\newcommand{\qvec}{\mathbf q}\) \(\newcommand{\svec}{\mathbf s}\) \(\newcommand{\tvec}{\mathbf t}\) \(\newcommand{\uvec}{\mathbf u}\) \(\newcommand{\vvec}{\mathbf v}\) \(\newcommand{\wvec}{\mathbf w}\) \(\newcommand{\xvec}{\mathbf x}\) \(\newcommand{\yvec}{\mathbf y}\) \(\newcommand{\zvec}{\mathbf z}\) \(\newcommand{\rvec}{\mathbf r}\) \(\newcommand{\mvec}{\mathbf m}\) \(\newcommand{\zerovec}{\mathbf 0}\) \(\newcommand{\onevec}{\mathbf 1}\) \(\newcommand{\real}{\mathbb R}\) \(\newcommand{\twovec}[2]{\left[\begin{array}{r}#1 \\ #2 \end{array}\right]}\) \(\newcommand{\ctwovec}[2]{\left[\begin{array}{c}#1 \\ #2 \end{array}\right]}\) \(\newcommand{\threevec}[3]{\left[\begin{array}{r}#1 \\ #2 \\ #3 \end{array}\right]}\) \(\newcommand{\cthreevec}[3]{\left[\begin{array}{c}#1 \\ #2 \\ #3 \end{array}\right]}\) \(\newcommand{\fourvec}[4]{\left[\begin{array}{r}#1 \\ #2 \\ #3 \\ #4 \end{array}\right]}\) \(\newcommand{\cfourvec}[4]{\left[\begin{array}{c}#1 \\ #2 \\ #3 \\ #4 \end{array}\right]}\) \(\newcommand{\fivevec}[5]{\left[\begin{array}{r}#1 \\ #2 \\ #3 \\ #4 \\ #5 \\ \end{array}\right]}\) \(\newcommand{\cfivevec}[5]{\left[\begin{array}{c}#1 \\ #2 \\ #3 \\ #4 \\ #5 \\ \end{array}\right]}\) \(\newcommand{\mattwo}[4]{\left[\begin{array}{rr}#1 \amp #2 \\ #3 \amp #4 \\ \end{array}\right]}\) \(\newcommand{\laspan}[1]{\text{Span}\{#1\}}\) \(\newcommand{\bcal}{\cal B}\) \(\newcommand{\ccal}{\cal C}\) \(\newcommand{\scal}{\cal S}\) \(\newcommand{\wcal}{\cal W}\) \(\newcommand{\ecal}{\cal E}\) \(\newcommand{\coords}[2]{\left\{#1\right\}_{#2}}\) \(\newcommand{\gray}[1]{\color{gray}{#1}}\) \(\newcommand{\lgray}[1]{\color{lightgray}{#1}}\) \(\newcommand{\rank}{\operatorname{rank}}\) \(\newcommand{\row}{\text{Row}}\) \(\newcommand{\col}{\text{Col}}\) \(\renewcommand{\row}{\text{Row}}\) \(\newcommand{\nul}{\text{Nul}}\) \(\newcommand{\var}{\text{Var}}\) \(\newcommand{\corr}{\text{corr}}\) \(\newcommand{\len}[1]{\left|#1\right|}\) \(\newcommand{\bbar}{\overline{\bvec}}\) \(\newcommand{\bhat}{\widehat{\bvec}}\) \(\newcommand{\bperp}{\bvec^\perp}\) \(\newcommand{\xhat}{\widehat{\xvec}}\) \(\newcommand{\vhat}{\widehat{\vvec}}\) \(\newcommand{\uhat}{\widehat{\uvec}}\) \(\newcommand{\what}{\widehat{\wvec}}\) \(\newcommand{\Sighat}{\widehat{\Sigma}}\) \(\newcommand{\lt}{<}\) \(\newcommand{\gt}{>}\) \(\newcommand{\amp}{&}\) \(\definecolor{fillinmathshade}{gray}{0.9}\)Pouring Liquids
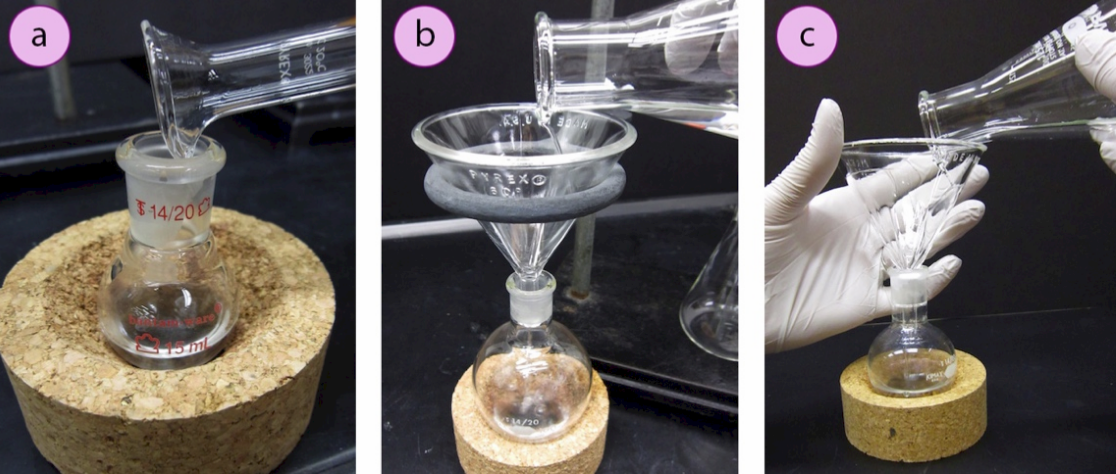
When transferring liquids with volumes greater than \(5 \: \text{mL}\), they can be poured directly into vessels. Graduated cylinders and beakers have an indentation in their mouth, so they can be poured controllably as long as the two pieces of glass touch one another (Figure 1.17a). If pouring from an Erlenmeyer flask, or transferring a liquid into a vessel containing a narrow mouth (e.g. a round bottomed flask), a funnel should be used. Funnels can be securely held with a ring clamp (Figure 1.17b), or held with one hand while pouring with the other (Figure 1.17c).
Comments Regarding Measurements
In order to determine a meaningful yield for a chemical reaction, it is important to have precise measurements on the limiting reactant. It is less important to be precise when manipulating a reagent that is in excess, especially if the reagent is in several times excess.
A portion of the liquid measured by a graduated cylinder always clings to the glassware after pouring, meaning that the true volume dispensed is never equivalent to the markings on the cylinder. Therefore, graduated cylinders can be used for dispensing solvents or liquids that are in excess, while more accurate methods (e.g. mass, calibrated pipettes or syringes) should be used when dispensing or measuring the limiting reactant. A graduated cylinder may be used to dispense a limiting reactant if a subsequent mass will be determined to find the precise quantity actually dispensed.
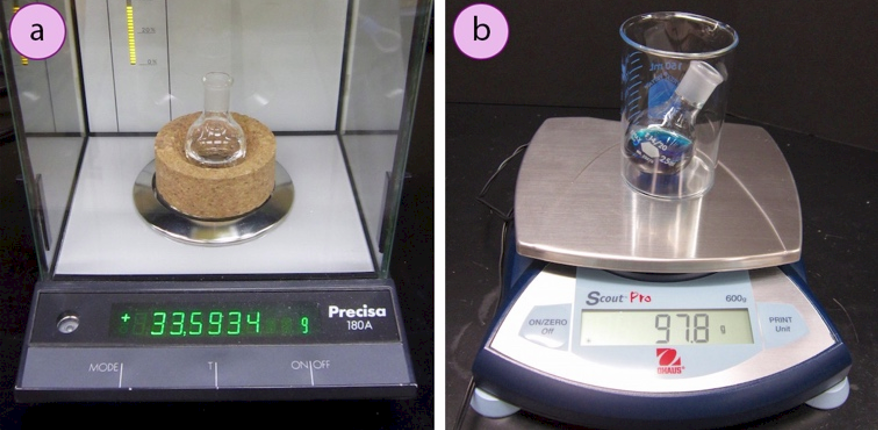
When determining the mass of a vessel on a balance, it's best to not include the mass of a cork ring (Figure 1.18a) or other support (e.g. the beaker in Figure 1.18b). A cork ring might get wet, have reagents spilled on it, or have pieces of cork fall out, leading to changes in mass that cannot be accounted for. Beakers used to support flasks can get mixed up, and every \(100\)-\(\text{mL}\) beaker does not have the same mass. It is also best to transport vessels containing chemicals to the balance in sealed containers, so as to minimize vapors and prevent possible spillage during transport.
Using Pasteur Pipettes
Pasteur pipettes (or pipets) are the most commonly used tool for transferring small volumes of liquids (< \(5 \: \text{mL}\)) from one container to another. They are considered disposable, although some institutions may clean and reuse them if they have a method for preventing the fragile tips from breaking.
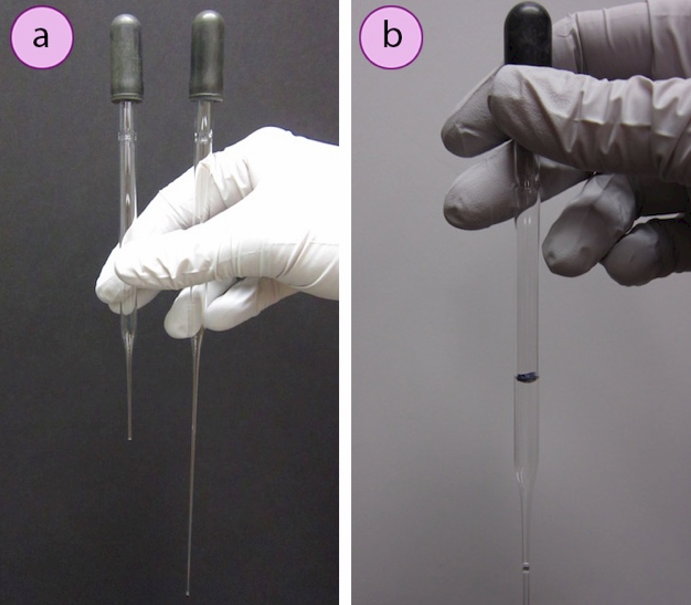
Pasteur pipettes come in two sizes (Figure 1.19a): short (5.75") and long (9"). Each can hold about \(1.5 \: \text{mL}\) of liquid, although the volume delivered is dependent on the size of the dropper bulb. The general guideline that "\(1 \: \text{mL}\) is equivalent to 20 drops" does not always hold for Pasteur pipettes, and may be inconsistent between different pipettes. The drop ratio for a certain pipette and solution can be determined by counting drops until \(1 \: \text{mL}\) is accumulated in a graduated cylinder. Alternatively, a pipette can be roughly calibrated by withdrawing \(1 \: \text{mL}\) of liquid from a graduated cylinder and marking the volume line with a permanent marker (Figure 1.19b).
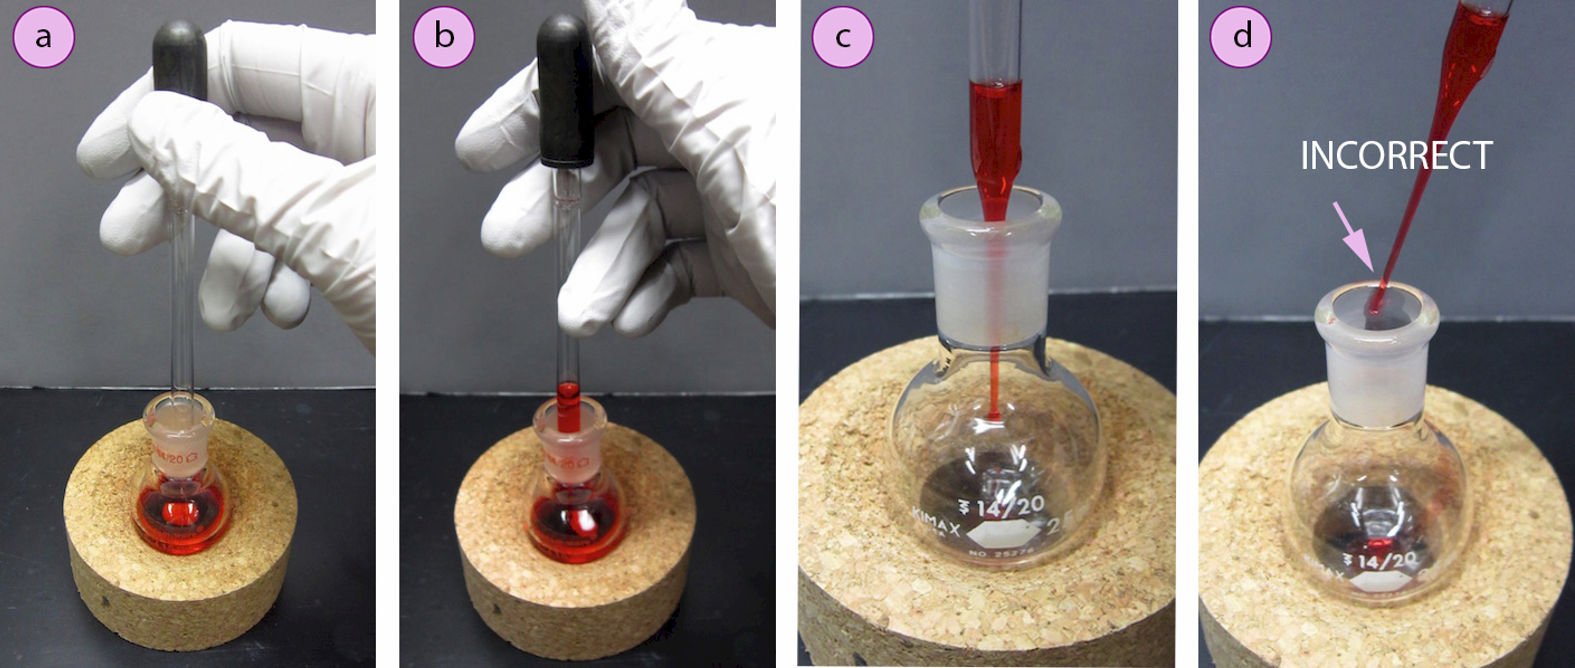
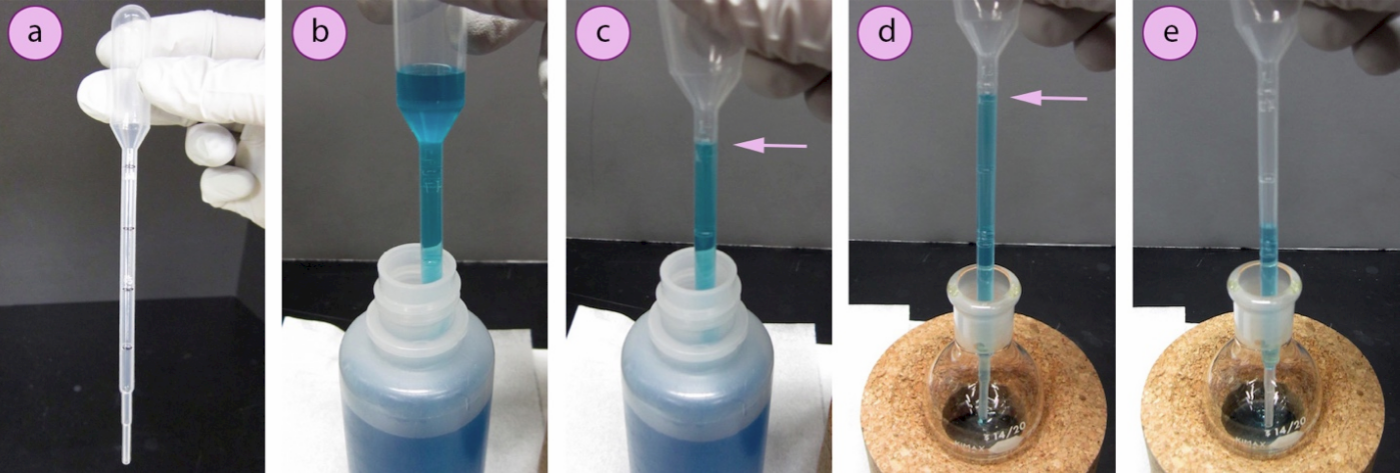
To use a pipette, attach a dropper bulb and place the pipette tip into a liquid. Squeeze then release the bulb to create suction, which will cause liquid to withdraw into the pipette (Figures 1.20 a+b). Keeping the pipette vertical, bring it to the flask where it is to be transferred, and position the pipette tip below the joint of the flask but not touching the sides before depressing the bulb to deliver the material to the flask (Figure 1.20c). The bulb can be squeezed a few times afterward to "blow out" residual liquid from the pipette.
If the receiving flask has a ground glass joint, the pipette tip should be below the joint while delivering so that liquid does not splash onto the joint, which sometimes causes pieces to freeze together when connected. If the pipette is to be reused (for example is the designated pipette for a reagent bottle), the pipette should be held so it does not touch the glassware, where it may become contaminated by other reagents in the flask (Figure 1.20d).
Using Calibrated Pipettes
Calibrated Plastic Pipettes
When some precision is needed in dispensing small volumes of liquid (\(1\)-\(2 \: \text{mL}\)), a graduated cylinder is not ideal as the pouring action results in a significant loss of material. Calibrated plastic pipettes have markings at \(0.25 \: \text{mL}\) increments for a \(1 \: \text{mL}\) pipette, and are economical ways to dispense relatively accurate volumes.
To use a calibrated plastic pipette, withdraw some of the liquid to be transferred into the bulb as usual (Figure 1.21b). Then squeeze the bulb just enough so that the liquid drains to the desired volume (Figure 1.21c), and maintain your position. While keeping the bulb depressed so the liquid still reads to the desired volume, quickly move the pipette to the transfer flask (Figure 1.21d), and depress the bulb further to deliver liquid to the flask (Figure 1.21e).
Calibrated Glass Pipettes
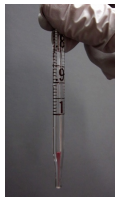
When a high level of precision is needed while dispensing liquids, calibrated glass pipettes (volumetric or graduated) can be used. Volumetric pipettes have a glass bulb at the top of their neck, and are capable of dispensing only one certain volume (for example, the top pipette in Figure 1.22 is a \(10.00 \: \text{mL}\) pipette). Graduated pipettes (Mohr pipettes) have markings that allow them to deliver many volumes. Both pipettes need to be connected to a pipette bulb to provide suction.

The volume markings on a graduated pipette indicate the delivered volume, which may seem a bit "backward" at first. For example, when a graduated pipette is held vertically, the highest marking is \(0.0 \: \text{mL}\), which indicates that no volume has been delivered when the pipette is still full. As liquid is drained into a vessel, the volume markings increase on the pipette, with the lowest marking often being the total capacity of the pipette (e.g. \(1.0 \: \text{mL}\) for a \(1.0 \: \text{mL}\) pipette).
Graduated pipettes can deliver any volume of liquid made possible by differences in the volume markings. For example, a \(1.0 \: \text{mL}\) pipette could be used to deliver \(0.4 \: \text{mL}\) of liquid by: a) Withdrawing liquid to the \(0.0 \: \text{mL}\) mark, then draining and delivering liquid to the \(0.4 \: \text{mL}\) mark, or b) Withdrawing liquid to the \(0.2 \: \text{mL}\) mark and draining and delivering liquid to the \(0.6 \: \text{mL}\) mark (or any combination where the difference in volumes is \(0.4 \: \text{mL}\)).
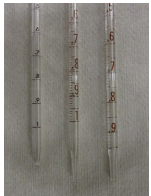
It is important to look carefully at the markings on a graduated pipette. Three different \(1 \: \text{mL}\) pipettes are shown in Figure 1.23a. The left-most pipette has markings every \(0.1 \: \text{mL}\), but no intermediary markings so is less precise than the other two pipettes in Figure 1.23a. The other two pipettes differ in the markings on the bottom. The lowest mark on the middle pipette is \(1 \: \text{mL}\), while the lowest mark on the right-most pipette is \(0.9 \: \text{mL}\). To deliver \(1.00 \: \text{mL}\) with the middle pipette, the liquid must be drained from the \(0.00 \: \text{mL}\) to the \(1.00 \: \text{mL}\) mark, and the final inch of liquid should be retained. To deliver \(1.00 \: \text{mL}\) with the right-most pipette, liquid must be drained from the \(0.00 \: \text{mL}\) mark completely out the tip, with the intent to deliver its total capacity.
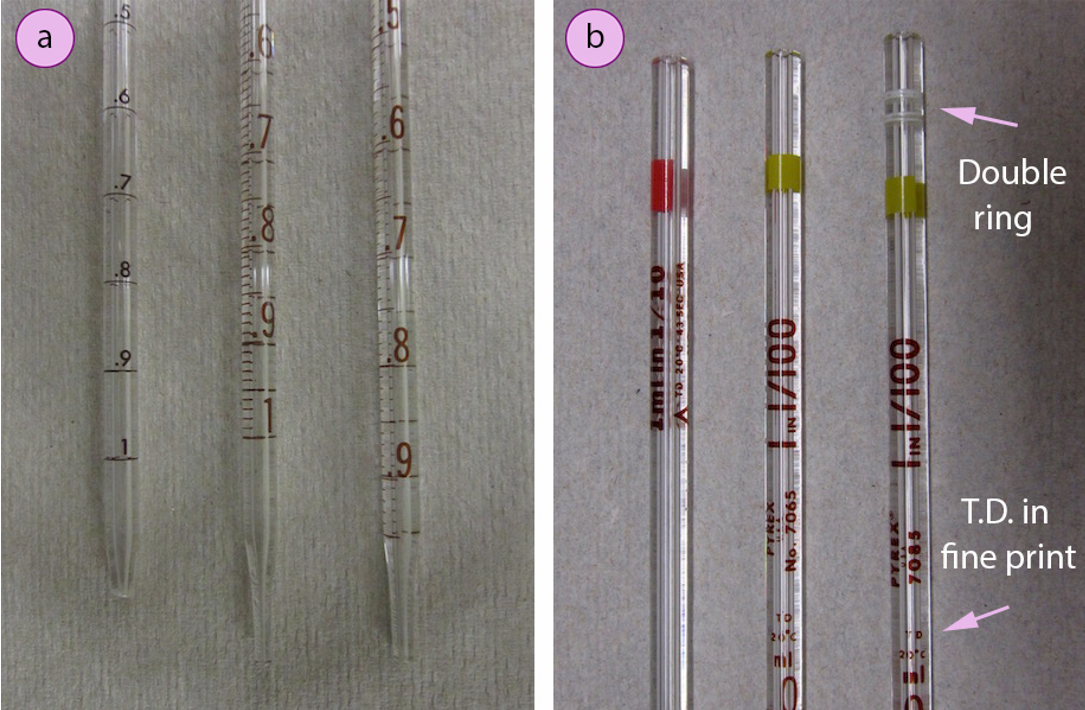
Pipettes are calibrated "to-deliver" (TD) or "to-contain" (TC) the marked volume. Pipettes are marked with T.C. or T.D. to differentiate between these two kinds, and to-deliver pipettes are also marked with a double ring near the top (Figure 1.23b). After draining a "to-deliver" pipette, the tip should be touched to the side of the flask to withdraw any clinging drops, and a small amount of residual liquid will remain in the tip. A "to-deliver" pipette is calibrated to deliver only the liquid that freely drains from the tip. However, after draining a "to-contain" pipette, the residual liquid in the tip should be "blown out" with pressure from a pipette bulb. "To-contain" pipettes may be useful for dispensing viscous liquids, where solvent can be used to wash out the entire contents.
In this section are described methods on how to use a calibrated glass pipette. These methods are for use with a clean and dry pipette. If residual liquid is in the tip of the pipette from water or from previous use with a different solution, a fresh pipette should be used.
Alternatively, if the reagent is not particularly expensive or reactive, the pipette can be "conditioned" with the reagent to remove residual liquid. To condition a pipette, rinse the pipette twice with a full volume of the reagent and collect the rinsing in a waste container. After two rinses, any residual liquid in the pipette will have been replaced by the reagent. When the reagent is then withdrawn into the pipette it will not be diluted or altered in any way.
To use a calibrated glass pipette:
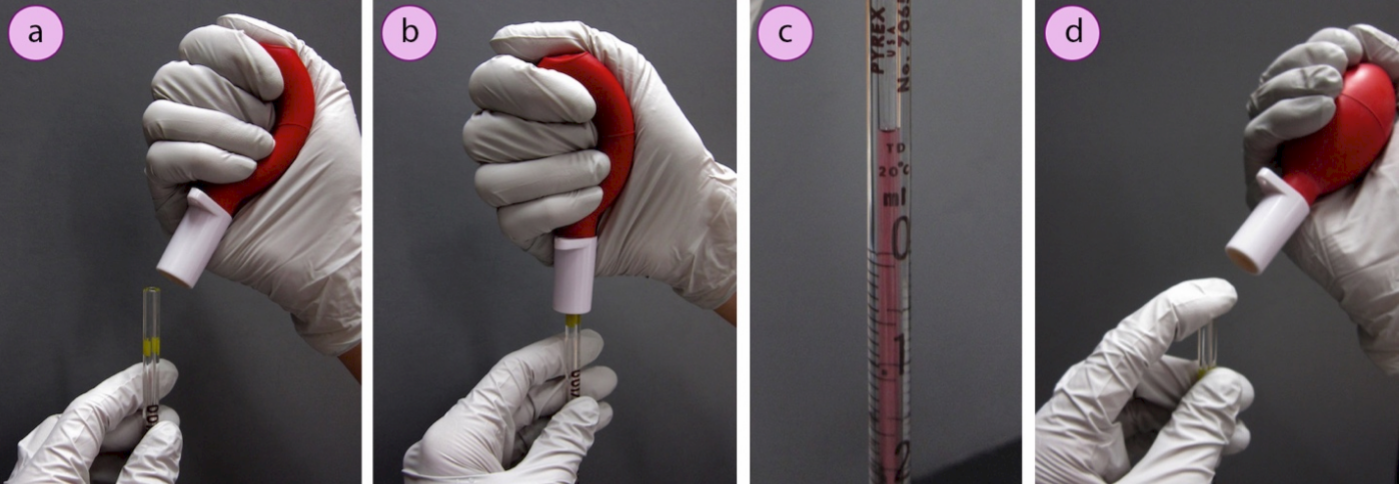
- Place the pipette tip in the reagent, squeeze the bulb and connect it to the top of the pipette (Figures 1.24 a+b).
- Partially release pressure on the bulb to create suction, but do not fully release your hand or you may create too great a vacuum, causing liquid to be violently withdrawn into the pipette bulb. Suction should be applied until the liquid rises to just past the desired mark (Figure 1.24c).
- Break the seal and remove the pipette bulb, then quickly place your finger atop the pipette to prevent the liquid from draining (Figure 1.24d).
- With a slight wiggling motion or slight release of pressure from your finger, allow tiny amounts of air to be let into the top of the pipette in order to slowly and controllably drain the liquid until the meniscus is at the desired volume (Figure 1.25a shows a volume of \(0.00 \: \text{mL}\)).
- Holding the top of the pipette tightly with your finger, bring the pipette to the flask where the liquid is to be delivered and again allow tiny amounts of air into the top of the pipette in order to slowly drain the liquid to the desired mark (Figure 1.25b; Figure 1.25c shows the delivered volume to be slightly below \(0.20 \: \text{mL}\)).
- Touch the pipette tip to the side of the container to dislodge any hanging drops and remove the pipette.
- If liquid was drained to the bottom of the pipette with a T.C. pipette, use pressure from a pipette bulb to blow out the residual drop. Do not blow out the residual drop when using a T.D. pipette.
- If a volumetric pipette is used, the liquid should be withdrawn with suction to the marked line above the glass bulb (indicated in Figure 1.25d). The liquid can be drained into the new container with your finger fully released from the top. When the liquid stops draining, the tip should be touched to the side of the flask to withdraw any clinging drops, but the residual drop should not be forced out (similar to a T.D. pipette).
.png?revision=1&size=bestfit&width=1106&height=466)
Calibrated Pipettes Summary
 |
 |
 |
 |
|
Place pipette tip in reagent bottle, squeeze pipette bulb, and connect to the pipette. Partially release your hand to create suction. Do not let go completely or liquid will withdraw forcibly and possibly into the bulb |
Apply suction until liquid is withdrawn to just past the desired mark. |
Remove the pipette bulb and place your finger atop the pipette. Allow tiny amounts of air to be let into the top of the pipette by wiggling your finger or a slight release of pressure. Drain the liquid to the desired mark. |
Tightly hold the pipette with your finger, bring it to the transfer flask and deliver the reagent to the desired mark. Touch the pipette to the side of the container to dislodge the drip at the end of the pipette. |
 |
If a pipette is drained to the tip,
|
 |
Note: If pipette is wet with a different solution before use, obtain a fresh one or "condition" the pipette with two rinses of the reagent. |
Table 1.4: Procedural summary for using calibrated pipettes.
Dispensing Highly Volatile Liquids
When attempting to dispense highly volatile liquids (e.g. diethyl ether) via pipette, it is very common that liquid drips out of the pipette even without pressure from the dropper bulb! This occurs as the liquid evaporates into the pipette's headspace, and the additional vapor causes the headspace pressure to exceed the atmospheric pressure.
To prevent a pipette from dripping, withdraw and expunge the liquid into the pipette several times. Once the headspace is saturated with solvent vapors, the pipette will no longer drip.
Pouring Hot Liquids
It may be difficult to manipulate a vessel of hot liquid with your bare hands. If pouring a hot liquid from a beaker, a silicone hot hand protector can be used (Figure 1.26a) or beaker tongs (Figures 1.26b+c).
.png?revision=1&size=bestfit&width=1038&height=343)
When pouring a hot liquid from an Erlenmeyer flask, hot hand protectors can also be used, but do not hold the awkward shape of the flask very securely. Pouring from hot Erlenmeyer flasks can be accomplished using a makeshift "paper towel holder". A long section of paper towel is folded several times in one direction to the thickness of approximately one inch (and secured with lab tape if desired, Figure 1.27a). This folded paper towel can be wrapped around the top of a beaker or Erlenmeyer flask and pinched to hold the flask (Figures 1.26d + 1.27b).
When pouring hot liquid from an Erlenmeyer flask, the paper towel holder should be narrow enough that the towel does not reach the top of the flask. If it does, liquid will wick toward the paper as it is poured, thus weakening the holder and also removing possibly valuable solution (Figure 1.27c). When the paper towel is a distance away from the top of the flask, liquid can be poured from the flask without absorbing the liquid (Figure 1.27d).
.png?revision=1&size=bestfit&width=1100&height=272)