2.4: Problem Set 4
- Page ID
- 221687
\( \newcommand{\vecs}[1]{\overset { \scriptstyle \rightharpoonup} {\mathbf{#1}} } \)
\( \newcommand{\vecd}[1]{\overset{-\!-\!\rightharpoonup}{\vphantom{a}\smash {#1}}} \)
\( \newcommand{\id}{\mathrm{id}}\) \( \newcommand{\Span}{\mathrm{span}}\)
( \newcommand{\kernel}{\mathrm{null}\,}\) \( \newcommand{\range}{\mathrm{range}\,}\)
\( \newcommand{\RealPart}{\mathrm{Re}}\) \( \newcommand{\ImaginaryPart}{\mathrm{Im}}\)
\( \newcommand{\Argument}{\mathrm{Arg}}\) \( \newcommand{\norm}[1]{\| #1 \|}\)
\( \newcommand{\inner}[2]{\langle #1, #2 \rangle}\)
\( \newcommand{\Span}{\mathrm{span}}\)
\( \newcommand{\id}{\mathrm{id}}\)
\( \newcommand{\Span}{\mathrm{span}}\)
\( \newcommand{\kernel}{\mathrm{null}\,}\)
\( \newcommand{\range}{\mathrm{range}\,}\)
\( \newcommand{\RealPart}{\mathrm{Re}}\)
\( \newcommand{\ImaginaryPart}{\mathrm{Im}}\)
\( \newcommand{\Argument}{\mathrm{Arg}}\)
\( \newcommand{\norm}[1]{\| #1 \|}\)
\( \newcommand{\inner}[2]{\langle #1, #2 \rangle}\)
\( \newcommand{\Span}{\mathrm{span}}\) \( \newcommand{\AA}{\unicode[.8,0]{x212B}}\)
\( \newcommand{\vectorA}[1]{\vec{#1}} % arrow\)
\( \newcommand{\vectorAt}[1]{\vec{\text{#1}}} % arrow\)
\( \newcommand{\vectorB}[1]{\overset { \scriptstyle \rightharpoonup} {\mathbf{#1}} } \)
\( \newcommand{\vectorC}[1]{\textbf{#1}} \)
\( \newcommand{\vectorD}[1]{\overrightarrow{#1}} \)
\( \newcommand{\vectorDt}[1]{\overrightarrow{\text{#1}}} \)
\( \newcommand{\vectE}[1]{\overset{-\!-\!\rightharpoonup}{\vphantom{a}\smash{\mathbf {#1}}}} \)
\( \newcommand{\vecs}[1]{\overset { \scriptstyle \rightharpoonup} {\mathbf{#1}} } \)
\( \newcommand{\vecd}[1]{\overset{-\!-\!\rightharpoonup}{\vphantom{a}\smash {#1}}} \)
\(\newcommand{\avec}{\mathbf a}\) \(\newcommand{\bvec}{\mathbf b}\) \(\newcommand{\cvec}{\mathbf c}\) \(\newcommand{\dvec}{\mathbf d}\) \(\newcommand{\dtil}{\widetilde{\mathbf d}}\) \(\newcommand{\evec}{\mathbf e}\) \(\newcommand{\fvec}{\mathbf f}\) \(\newcommand{\nvec}{\mathbf n}\) \(\newcommand{\pvec}{\mathbf p}\) \(\newcommand{\qvec}{\mathbf q}\) \(\newcommand{\svec}{\mathbf s}\) \(\newcommand{\tvec}{\mathbf t}\) \(\newcommand{\uvec}{\mathbf u}\) \(\newcommand{\vvec}{\mathbf v}\) \(\newcommand{\wvec}{\mathbf w}\) \(\newcommand{\xvec}{\mathbf x}\) \(\newcommand{\yvec}{\mathbf y}\) \(\newcommand{\zvec}{\mathbf z}\) \(\newcommand{\rvec}{\mathbf r}\) \(\newcommand{\mvec}{\mathbf m}\) \(\newcommand{\zerovec}{\mathbf 0}\) \(\newcommand{\onevec}{\mathbf 1}\) \(\newcommand{\real}{\mathbb R}\) \(\newcommand{\twovec}[2]{\left[\begin{array}{r}#1 \\ #2 \end{array}\right]}\) \(\newcommand{\ctwovec}[2]{\left[\begin{array}{c}#1 \\ #2 \end{array}\right]}\) \(\newcommand{\threevec}[3]{\left[\begin{array}{r}#1 \\ #2 \\ #3 \end{array}\right]}\) \(\newcommand{\cthreevec}[3]{\left[\begin{array}{c}#1 \\ #2 \\ #3 \end{array}\right]}\) \(\newcommand{\fourvec}[4]{\left[\begin{array}{r}#1 \\ #2 \\ #3 \\ #4 \end{array}\right]}\) \(\newcommand{\cfourvec}[4]{\left[\begin{array}{c}#1 \\ #2 \\ #3 \\ #4 \end{array}\right]}\) \(\newcommand{\fivevec}[5]{\left[\begin{array}{r}#1 \\ #2 \\ #3 \\ #4 \\ #5 \\ \end{array}\right]}\) \(\newcommand{\cfivevec}[5]{\left[\begin{array}{c}#1 \\ #2 \\ #3 \\ #4 \\ #5 \\ \end{array}\right]}\) \(\newcommand{\mattwo}[4]{\left[\begin{array}{rr}#1 \amp #2 \\ #3 \amp #4 \\ \end{array}\right]}\) \(\newcommand{\laspan}[1]{\text{Span}\{#1\}}\) \(\newcommand{\bcal}{\cal B}\) \(\newcommand{\ccal}{\cal C}\) \(\newcommand{\scal}{\cal S}\) \(\newcommand{\wcal}{\cal W}\) \(\newcommand{\ecal}{\cal E}\) \(\newcommand{\coords}[2]{\left\{#1\right\}_{#2}}\) \(\newcommand{\gray}[1]{\color{gray}{#1}}\) \(\newcommand{\lgray}[1]{\color{lightgray}{#1}}\) \(\newcommand{\rank}{\operatorname{rank}}\) \(\newcommand{\row}{\text{Row}}\) \(\newcommand{\col}{\text{Col}}\) \(\renewcommand{\row}{\text{Row}}\) \(\newcommand{\nul}{\text{Nul}}\) \(\newcommand{\var}{\text{Var}}\) \(\newcommand{\corr}{\text{corr}}\) \(\newcommand{\len}[1]{\left|#1\right|}\) \(\newcommand{\bbar}{\overline{\bvec}}\) \(\newcommand{\bhat}{\widehat{\bvec}}\) \(\newcommand{\bperp}{\bvec^\perp}\) \(\newcommand{\xhat}{\widehat{\xvec}}\) \(\newcommand{\vhat}{\widehat{\vvec}}\) \(\newcommand{\uhat}{\widehat{\uvec}}\) \(\newcommand{\what}{\widehat{\wvec}}\) \(\newcommand{\Sighat}{\widehat{\Sigma}}\) \(\newcommand{\lt}{<}\) \(\newcommand{\gt}{>}\) \(\newcommand{\amp}{&}\) \(\definecolor{fillinmathshade}{gray}{0.9}\)1. The raising and lowering operators are:
\[
\begin{array}{l}
\mathrm{L}_t \Psi\left(\mathrm{L}, \mathrm{M}_{\mathrm{L}}, \mathrm{S}, \mathrm{M}\right)=\hbar\left[\left(\mathrm{L} \pm \mathrm{M}_{\mathrm{L}}+1\right)\left(\mathrm{L} \mp \mathrm{M}_{\mathrm{L}}\right)\right]^{1 / 2} \Psi\left(\mathrm{L}, \mathrm{M}_{\mathrm{L}} \pm 1, \mathrm{~S}, \mathrm{M}_{\mathrm{S}}\right) \\
\mathrm{S}_{ \pm} \Psi\left(\mathrm{L}, \mathrm{M}_{\mathrm{L}}, \mathrm{S}, \mathrm{M}\right)=\hbar\left[\left(\mathrm{S} \pm \mathrm{M}_{\mathrm{S}}+1\right)\left(\mathrm{S} \mp \mathrm{M}_{\mathrm{S}}\right)\right]^{1 / 2} \Psi\left(\mathrm{L}, \mathrm{M}_{\mathrm{L}}, \mathrm{S}, \mathrm{M}_{\mathrm{S}} \pm 1\right) \\
\mathrm{L}_t \Phi\left(\mathrm{m}_{\boldsymbol{l}_1}, \mathrm{~m}_{\mathrm{s}_1} ; \ldots \mathrm{m}_{\boldsymbol{l}_{\mathrm{N}}}, \mathrm{m}_{\mathrm{s}_{\mathrm{N}}}\right)=\hbar \sum_{\mathrm{i}=1}^{\mathrm{N}}\left[\left(\boldsymbol{\zeta}_1 \pm \mathrm{m}_{\boldsymbol{\xi}}+1\right)\left(\boldsymbol{\zeta}_1 \mp \mathrm{m}_{\boldsymbol{\ell}}\right)\right]^{1 / 2} \Phi\left(\mathrm{m}_{\boldsymbol{l}_1}, \mathrm{~m}_{\mathrm{s}_1} ; \ldots \mathrm{m}_{\boldsymbol{\xi}_1} \pm 1, \mathrm{~m}_{\mathrm{s}_{\mathrm{i}}} ; \ldots \mathrm{m}_{\boldsymbol{\zeta}_{\mathrm{N}}}, \mathrm{m}_{\mathrm{s}_{\mathrm{N}}}\right) \\
\mathrm{S}_{ \pm} \Phi\left(\mathrm{m}_{\boldsymbol{f}_1}, \mathrm{~m}_{\mathrm{s}_1} ; \ldots \mathrm{m}_{\boldsymbol{k}}, \mathrm{m}_{\mathrm{s}_{\mathrm{N}}}\right)=\hbar \sum_{i=1}^{\mathrm{N}}\left[\left(\frac{3}{2} \pm \mathrm{m}_{\mathrm{s}}\right)\left(\frac{1}{2} \mp \mathrm{m}_{\mathrm{s}_{\mathrm{i}}}\right)\right]^{1 / 6} \Phi\left(\mathrm{m}_{\boldsymbol{f}_1}, \mathrm{~m}_{\mathrm{s}_1} ; \ldots \mathrm{m}_{\boldsymbol{l}}, \mathrm{m}_{\mathrm{s}_{\mathrm{i}}} \pm 1 ; \ldots \mathrm{m}_{\boldsymbol{f}_{\mathrm{N}}}, \mathrm{m}_{\mathrm{s}_{\mathrm{N}}}\right) \\
\end{array}
\notag \]
(a) For the p 2 configuration, we found that Ψ(L = 1, ML = 1, S = 1, MS = 1) for the 3P state was defined by a unique configuration (1+, 0+). Similarily, Ψ(L = 1, ML = 0, S = 1, MS = 1) of the 3P state is defined by the unique configuration, (1+, -1+). Using the angular momentum operator on Ψ(L = 1, ML = 1, S = 1, MS = 1) = (1+, 0+), show that you obtain the result, Ψ(L = 1, ML = 0, S = 1, MS = 1) = (1+, -1+).
(b) The states encompassed by Ψ(L, ML = 0, S, MS = 0) are defined by three configurations, (0+, 0+), (1+, -1-), (1-, -1+). . Beginning with your result for Ψ(L = 1, ML = 0, S = 1, MS = 1) of the 3P state, determine the linear combination that defines Ψ(L = 1, ML = 0, S = 1, MS = 0).
2. LIESST (Light Induced Electronic Spin State Trapping) is a method of changing the electronic spin state of a compound by means of irradiation with light. The overall effect is represented schematically with regard to configurations as follows,

The low spin state is slightly more stable than the high spin state by only a few cm–1. Thus, the complex will exhibit low spin behavior only at very low temperatures (< 10 K). Excitation produces excited states corresponding to the low spin complex. From these low spin excited states, intersystem crossing (isc) occurs to produce the high spin complex. At low temperatures the high spin complex is trapped indefinitely owing to an Arrenhius barrier of ~800 cm–1. Upon warming the barrier is surmounted and the complex converts back to the low spin state. This overall process has been called the Light-Induced Excited Spin State Trapping (LIESST).
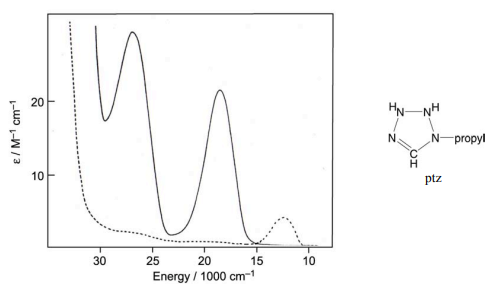
A compound displaying LIESST is [Fe(ptz)6](BF4)2. Shown below are the absorption spectra responsible for the effect.

(a) The solid line is the low temperature spectrum of the low spin complex. The energies of the transitions are 18,400 and 26,650 cm–1 , respectively. Using the appropriate TS diagram (from ant standard text), assign the two transitions.
(b) Upon irradiation, the dashed spectrum is produced. This is the absorption spectrum for the high spin complex, which features only a single band at 12,250 cm–1 . Assign this transition. Using the B value obtained from part a, determine Dq for the high spin system.
(c) On the basis of the Tanabe-Sugano diagram, explain the LIESST effect.
3. The spectroscopy and photochemistry of Cr(III) has spanned four decades of spectroscopic and photochemical research. The spectroscopy of Cr(III) in the solid state is the underpinning for the invention in the 1960’s of the first solid state laser, the ruby laser. The photochemistry of these complexes continues to be pursued by a number of research programs around the world. Consider the following.
(a) Ruby is a gemstone composed of Cr(III) embedded in the octahedral oxide environment of Al2O3. The electronic spectrum of the octahedral Cr(III) exhibits three spin-allowed (strong = s) transitions and a number of so called ‘ruby’ lines, spin-forbidden (quartet-doublet) transitions (weak = w), which are extremely narrow and 10–3 times weaker than d-d transitions.
(i) The absorption bands in the electronic spectrum of Cr3+ /Al2O3 system are 14430(w), 18000(s), 21000(w), 24600(s) and 39000(s) cm–1 . Use a d3 Tanabe-Sugano diagram to assign the transitions and calculate Dq.
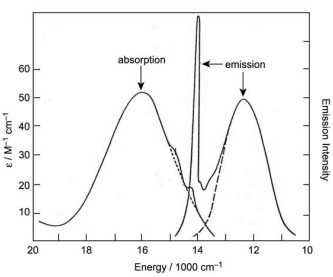
(ii) The absorption and emission spectra of the lowest energy transitions of Cr(III) are given below. On the basis of your above work, assign the emission and absorption bands to the appropriate transitions. Why is the one transition broad and the other sharp? Why are the absorption and emission maxima of the sharp transition nearly overlapped whereas the absorption and emission maxima of the broad transition so far removed from each other?

(b) Trans-Cr(NH3)4(DMF)Cl2+ cation is a high spin chromium(III) complex. The spectroscopy of this complex is intriguing because it is one of the few systems in which three different simultaneous photoreactions have been fully characterized. A complete scheme of the photoreactions is given below:

Because Cr(III) is in a C4v environment, the octahedral Tanabe-Sugano diagram is invalid. In this case, spectroscopic assignments are achieved by using a descent in symmetry method, where the splitting of the t2g and eg manifolds are analyzed in the desired symmetry field as follows:
(i) The wavelengths (nm) and the extinction coefficients (M–1 cm–1) of the complex are 555 (20), 468 (18) and 384 (42). Assign the quartet transitions and give the state symmetries of the excited states by qualitatively considering the splitting of the d-orbital manifold. For determining the states of the (e)2 electronic configuration, you will need the equations given in the lecture notes and reproduced here:
\begin{aligned}
&\chi^{+}=1 / 2\left\{[\chi(\mathrm{R})]^{2}+\chi\left(\mathrm{R}^{2}\right)\right\} \\
&\chi^{-}=1 / 2\left\{[\chi(\mathrm{R})]^{2}-\chi\left(\mathrm{R}^{2}\right)\right\}
\end{aligned}
(ii) The photochemistry originates from specific ligand field states (i.e. the products come from different excited states). By using the MO diagram and the assignments you have made, explain the observed photochemistry.
(iii) Why is DMF substituted more easily than chlorine?


